編輯:Android開發教程
我們使用LinearLayout和TableLayout可以滿足開發應用程序界面基本的要求 。但是有時候實現界面的時候不夠靈活,我們還可以使用另外一種控件 RelativeLayout。RelativeLayout是一種相對布局的控件,這個容器內部的子元 素們可以使用彼此之間的相對位置或者和容器間的相對位置來進行定位,類似於 網頁設計中的CSS。在指定控件的位置時,我們需要指定這個控件與其它控件之 間的相對位置關系,比如說與另一個控件的左邊對齊,右對齊,位於另一個控件 的上方,下方等等。一個控件可以指定與多個其它控件的相對位置。這樣,我們 就可以在設計位置靈活多變的界面時就會更加的方便。
Android RelativeLayout 屬性
// 相對於給定ID控件

android:layout_above 將該控件的底部置於給定ID的控件之上;

android:layout_below 將該控件的底部置於給定ID的控件之下;

android:layout_toLeftOf 將該控件的右邊緣與給定ID的控件左邊緣對 齊;

android:layout_toRightOf 將該控件的左邊緣與給定ID的控件右邊緣對 齊;

android:layout_alignBaseline 將該控件的baseline與給定ID的baseline對 齊;

android:layout_alignTop 將該控件的頂部邊緣與給定ID的頂部邊緣對 齊;

android:layout_alignBottom 將該控件的底部邊緣與給定ID的底部邊緣對 齊;

android:layout_alignLeft 將該控件的左邊緣與給定ID的左邊緣對齊;

android:layout_alignRight 將該控件的右邊緣與給定ID的右邊緣對齊;

// 相對於父組件

android:layout_alignParentTop 如果為true,將該控件的頂部與其父控件的 頂部對齊;

android:layout_alignParentBottom 如果為true,將該控件的底部與其父控件 的底部對齊;

android:layout_alignParentLeft 如果為true,將該控件的左部與其父控件的 左部對齊;

android:layout_alignParentRight 如果為true,將該控件的右部與其父控件 的右部對齊;

// 居中

android:layout_centerHorizontal 如果為true,將該控件的置於水平居 中;

android:layout_centerVertical 如果為true,將該控件的置於垂直居中;

android:layout_centerInParent 如果為true,將該控件的置於父控件的中 央;

// 指定移動像素,值為px

android:layout_marginTop 上偏移的值;

android:layout_marginBottom 下偏移的值;

android:layout_marginLeft    左偏移的值;

android:layout_marginRight   右偏移的值;
示例:
01.<?xml version="1.0" encoding="utf-8"?>
02.<RelativeLayout xmlns:android="http://schemas.android.com/apk/res/android"
03.    android:layout_width="fill_parent"
04.    android:layout_height="fill_parent"
05.    android:padding="10px"
06.    >
07.    <TextView
08.    android:id="@+id/textView"
09.    android:text="TextView"
10.    android:layout_width="fill_parent"
11.    android:layout_height="wrap_content"
12.    />
13.    <!--沒有對textView的位置做設置,默認為RelativeLayout容器的左上角  -->
14.    <EditText
15.    android:id="@+id/editText"
16.    android:layout_width="fill_parent"
17.    android:layout_height="wrap_content"
18.    android:layout_below="@id/textView"
19.    android:background="@android:drawable/editbox_background"
20.    />
21.    <!--editText控件位於textView控件的下面-->
22.    <Button
23.    android:id="@+id/buttonSure"
24.    android:text="確定"
25.    android:layout_width="wrap_content"
26.    android:layout_height="wrap_content"
27.    android:layout_below="@id/editText"
28.    android:layout_alignParentRight="true"
29.    android:layout_marginLeft="10px"
30.    />
31.    <!--buttonSure控件在editText控件的下面,並且於父容器的位置關系為右對齊。  android:layout_marginLeft="10px"
32.                    設置buttonSure控件的左外邊距為10像素,即此控件的左邊與其他控件相距10像素的距離-->
33.    <Button
34.    android:id="@+id/buttonCancel"
35.    android:text="取消"
36.    android:layout_width="wrap_content"
37.    android:layout_height="wrap_content"
38.    android:layout_toLeftOf="@id/buttonSure"
39.    android:layout_alignTop="@id/buttonSure"
40.    />
41.    <!--buttonCancel為相對於buttonSure的位置確定。buttonCancel控件的右邊緣與buttonSure控件的左邊緣對齊,
42.                    頂部邊緣與buttonSure控件的 頂部邊緣對齊-->
43.</RelativeLayout>
 Android事件分發機制完全解析,帶你從源碼的角度徹底理解(下)
記得在前面的文章中,我帶大家一起從源碼的角度分析了Android中View的事件分發機制,相信閱讀過的 朋友對View的事件分發已經有比較深刻的理解了。還未閱讀過的朋友,
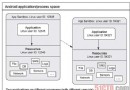
 Android的Activity和Task
Task的概念A task is a stack of activities. Task 就是一個棧,這個棧裡面存放了 很多 Activity ,它遵循著後進先出的原則。
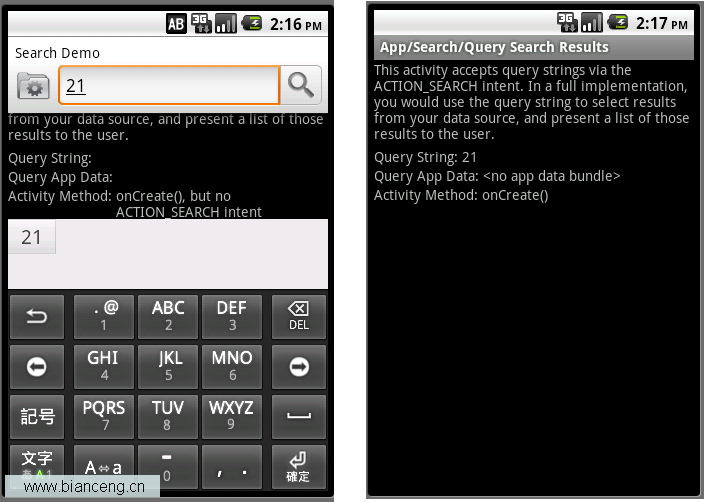 Android ApiDemos示例解析(37):App->Search->Query Search Results
這個例子單獨運行時(從Launcher啟動),這時接受到的Intent不含ACTION_SEARCH,和一個普通的Activity沒有什麼兩樣。在例(36)時,它是作為查
 Android技巧:Unable to execute dex: Multiple dex files define解決方法
唔,之前已經想過今後不動android,沒想到還是因為比賽的原因重操舊業。android有很多問題是由於eclipse的不完善造成的,比如今天遇到的這個問題 Unable