編輯:Android開發教程
最近項目中需要用到ListView下拉刷新的功能,一開始想圖省事,在網上直接找一個現成的,可是嘗試了 網上多個版本的下拉刷新之後發現效果都不怎麼理想。有些是因為功能不完整或有Bug,有些是因為使用起來 太復雜,十全十美的還真沒找到。因此我也是放棄了在網上找現成代碼的想法,自己花功夫編寫了一種非常 簡單的下拉刷新實現方案,現在拿出來和大家分享一下。相信在閱讀完本篇文章之後,大家都可以在自己的 項目中一分鐘引入下拉刷新功能。
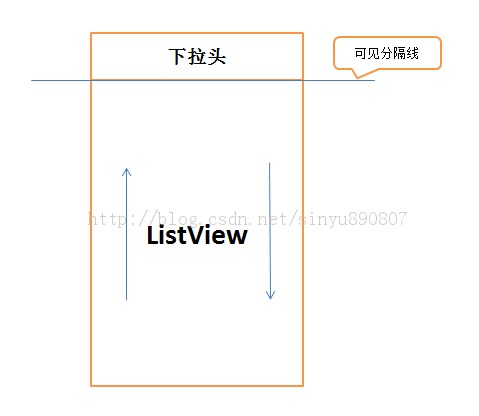
首先講一下實現原理。這裡我們將采取的方案是使用組合View的方 式,先自定義一個布局繼承自LinearLayout,然後在這個布局中加入下拉頭和ListView這兩個子元素,並讓 這兩個子元素縱向排列。初始化的時候,讓下拉頭向上偏移出屏幕,這樣我們看到的就只有ListView了。然 後對ListView的touch事件進行監聽,如果當前ListView已經滾動到頂部並且手指還在向下拉的話,那就將下 拉頭顯示出來,松手後進行刷新操作,並將下拉頭隱藏。原理示意圖如下:
那我們現在就來動 手實現一下,新建一個項目起名叫PullToRefreshTest,先在項目中定義一個下拉頭的布局文件 pull_to_refresh.xml,代碼如下所示:
<RelativeLayout

xmlns:android="http://schemas.android.com/apk/res/android"
    xmlns:tools="http://schemas.android.com/tools"
    android:id="@+id/pull_to_refresh_head"
    android:layout_width="fill_parent"
    android:layout_height="60dip" >

    <LinearLayout
        android:layout_width="200dip"
        android:layout_height="60dip"
        android:layout_centerInParent="true"
        android:orientation="horizontal" >

        <RelativeLayout
            android:layout_width="0dip"
            android:layout_height="60dip"
            android:layout_weight="3"
            >
            <ImageView
                android:id="@+id/arrow"
                android:layout_width="wrap_content"
                android:layout_height="wrap_content"
                android:layout_centerInParent="true"
                android:src="@drawable/arrow"
                />
            <ProgressBar
                android:id="@+id/progress_bar"
                android:layout_width="30dip"
                android:layout_height="30dip"
                android:layout_centerInParent="true"
                android:visibility="gone"
                />
        </RelativeLayout>

        <LinearLayout
            android:layout_width="0dip"
            android:layout_height="60dip"
            android:layout_weight="12"
            android:orientation="vertical" >

            <TextView
                android:id="@+id/description"
                android:layout_width="fill_parent"
                android:layout_height="0dip"
                android:layout_weight="1"
                android:gravity="center_horizontal|bottom"
                android:text="@string/pull_to_refresh" />

            <TextView
                android:id="@+id/updated_at"
                android:layout_width="fill_parent"
                android:layout_height="0dip"
                android:layout_weight="1"
                android:gravity="center_horizontal|top"
                android:text="@string/updated_at" />
        </LinearLayout>
    </LinearLayout>

</RelativeLayout>
查看本欄目更多精彩內容:http://www.bianceng.cn/OS/extra/
 Android中如何實現Socket大文件斷點上傳
什麼是Socket?所謂Socket通常也稱作“套接字”,用於描述IP地址和端口,是一個通信連的句柄,應用程序通常通過“套接字&rdq
 Android開發入門(十)基本控件 10.3 ProgressBar
當執行某些正在處理的任務時,ProgressBar提供了一個可視化的反饋。例如,你在從web服務器下載數據 ,然後需要更新下載的狀態。在這種情況下,ProgressBar
 Android多線程研究(2)定時器
先來看一段代碼:public static void main(String[] args) { new Timer().schedule(new TimerT
 Android測試教程(3):測試項目
Android的編譯和測試工具需要測試項目組織符合預訂的結構:分別為Test case 類,Test case 包以及測試項目。JUnit 為Android的測試的基礎,