編輯:關於Android編程
整個項目的主要思想和步驟是:
1.個性化安裝圖標的定制。
2.進入程序,播放背景音樂。
3.進行拼圖游戲。
4.游戲過關後進入下一個界面,有兩個按鈕,點擊即可實現給指定號碼撥號功能。
由於源碼我注釋得也比較清楚了,直接上源碼給大家看吧~
第一個界面的實現代碼,Main.java
[java]
<span style="font-size:14px;">/**
* @file Main.java
* @brief 整個程序的功能:實現一個手機拼圖程序,並且帶有自動撥號功能
*
* 整個項目的主要思想和步驟是:
* 1.個性化安裝圖標的定制。
* 2.進入程序,播放背景音樂。
* 3.進行拼圖游戲。
* 4.游戲過關後進入下一個界面,有兩個按鈕,點擊即可實現給指定號碼撥號功能。
* Blog: http://blog.csdn.net/jjzhoujun2010
*
* @author zhoujun
* @version V1.0.00
* @date 2012/09/12
*/
package com.example.zhangbeta2;
import android.app.Activity;
import android.content.Intent;
import android.os.Bundle;
import android.view.Gravity;
import android.view.Menu;
import android.view.View;
import android.view.View.OnClickListener;
import android.widget.Button;
import android.widget.ImageView;
import android.widget.LinearLayout;
import android.widget.Toast;
/**
* @brief 實現一個手機拼圖程序,並且帶有自動撥號功能
* */
public class Main extends Activity {
private Intent mIntent = new Intent("com.angel.Android.MUSIC");
Button mButtonNext = null;
Button mButtonExit = null;
@Override
public void onCreate(Bundle savedInstanceState) {
super.onCreate(savedInstanceState);
setContentView(R.layout.main);
startService(mIntent); //開啟背景音樂
mButtonNext = (Button)findViewById(R.id.buttonNext);
mButtonNext.setOnClickListener(new NextButtonListener());
mButtonExit = (Button)findViewById(R.id.buttonExit);
mButtonExit.setOnClickListener(new ExitButtonListener());
}
/**
* @brief 本類功能:設置下一步按鈕監聽器,點擊按鈕跳轉到相應拼圖游戲的Activity中
*/
class NextButtonListener implements OnClickListener{
@Override
public void onClick(View v) {
// TODO Auto-generated method stub
// 點擊相應按鈕,跳轉到拼圖界面activity
Intent intent = new Intent();
intent.setClass(Main.this, SePintu.class);
startActivity(intent);
}
}
/**
* @brief 本類功能:設置退出按鈕監聽器,點擊按鈕彈出Toast,關閉背景音樂,並且退出整個程序
*/
class ExitButtonListener implements OnClickListener{
private Toast toast;
@Override
public void onClick(View v) {
// TODO Auto-generated method stub
toast = Toast.makeText(getApplicationContext(), "無論如何,都希望你快樂幸福", Toast.LENGTH_LONG);
toast.setGravity(Gravity.CENTER, 0, 0);
LinearLayout toastView = (LinearLayout)toast.getView();
ImageView imageCodeProject = new ImageView(getApplicationContext());
imageCodeProject.setImageResource(R.drawable.pic3);
toastView.addView(imageCodeProject, 0);
toast.show();
finish();
stopService(mIntent); //關閉背景音樂
// android.os.Process.killProcess(android.os.Process.myPid());
}
}
@Override
public boolean onCreateOptionsMenu(Menu menu) {
getMenuInflater().inflate(R.menu.main, menu);
return true;
}
}
</span>
跳轉到第二個界面的實現代碼,SePintu.java
[java]
<span style="font-size:14px;">/**
* @file SePintu.java
* @brief 顯示拼圖游戲界面,此圖片是被打亂了的拼圖
* @author zhoujun
* @version V1.0.00
* @date 2012/09/12
* Blog: http://blog.csdn.net/jjzhoujun2010
*/
package com.example.zhangbeta2;
import android.app.Activity;
import android.app.AlertDialog;
import android.app.AlertDialog.Builder;
import android.content.DialogInterface;
import android.content.Intent;
import android.graphics.Bitmap;
import android.graphics.BitmapFactory;
import android.graphics.Matrix;
import android.graphics.drawable.BitmapDrawable;
import android.os.Bundle;
import android.view.Gravity;
import android.view.View;
import android.view.View.OnClickListener;
import android.view.WindowManager;
import android.widget.ImageView;
import android.widget.ImageView.ScaleType;
import android.widget.Button;
import android.widget.LinearLayout;
/**
* @brief 顯示拼圖游戲界面,此圖片是被打亂了的拼圖
* */
public class SePintu extends Activity{
private int mLevelNow = 4;
private ImageView mImages[][]; //存放小圖片的數組
private Bitmap mBitmap; //資源圖片
private int mImageWidth = 0, mImageHeight = 0; //slot的寬高
private int mImageNum[]; //圖片的順序
private int mX = 0, mY = 0; //圖片的起始位置
private int mClickNum = 0; //點擊參數
private int mWindowWidth = 0, mWindowHeight = 0; //屏幕參數
@Override
public void onCreate(Bundle savedInstanceState){
super.onCreate(savedInstanceState);
// pic1 = (ImageView)findViewById(R.id.pic1);
mBitmap = BitmapFactory.decodeResource(getResources(), R.drawable.pic1);
System.out.println("width = " + mBitmap.getWidth() + "height = " + mBitmap.getHeight());
//屏幕參數
WindowManager w = this.getWindowManager();
mWindowHeight = w.getDefaultDisplay().getHeight();
mWindowWidth = w.getDefaultDisplay().getWidth();
System.out.println("wWidth = " + mWindowWidth + "wHeight = " + mWindowHeight);
setImage();
}
/**
* @brief 將一副圖片分割成幾個小部分打亂
*/
public void setImage() {
mImageWidth = mBitmap.getWidth() / mLevelNow; //切割圖片,每一小塊的寬度
mImageHeight = mBitmap.getHeight() / mLevelNow;
mImageNum = new int[mLevelNow * mLevelNow];
System.out.println("mIWidth = " + mImageWidth + "mImageHeight = " + mImageHeight);
erraLen(mLevelNow * mLevelNow); //隨機組合切碎的小圖片
readyImage();
setLayout(); //布局隨機組合後的圖片
}
/**
* @brief 在當前的Activity中顯示打亂後的拼圖以及相應按鈕
* */
private void setLayout() {
PictureLayout lay = new PictureLayout(this, mImages); //利用帶參數的構造函數來布局小圖片
lay.setOrientation(LinearLayout.VERTICAL);
lay.setGravity(Gravity.CENTER_HORIZONTAL);
setContentView(lay); //顯示lay布局,SePintu的Activity
Button methodButton = new Button(this);
methodButton.setText(R.string.method_btn_label);
methodButton.setOnClickListener(new MethodBtnClick()); //添加監聽器
Button showSourceImageBtn = new Button(this);
showSourceImageBtn.setText(R.string.show_source_image_btn_label);
showSourceImageBtn.setOnClickListener(new SourceBtnClick());
LinearLayout linear = new LinearLayout(this);
//注意,對於LinearLayout布局來說,設置橫向還是縱向是必須的!否則就看不到效果了。
linear.setOrientation(LinearLayout.HORIZONTAL);
//此處相當於布局文件中的Android:gravity屬性
linear.setGravity(Gravity.CENTER_HORIZONTAL);
methodButton.setWidth(200);
showSourceImageBtn.setWidth(200);
linear.addView(methodButton); //通過addView將兩按鈕添加到布局中
linear.addView(showSourceImageBtn);
lay.addView(linear); //把linear當作子child添加到lay布局中
}
/**
* @brief 點擊“游戲說明”按鈕,跳轉到相應的Activity中
* */
class MethodBtnClick implements OnClickListener{
@Override
public void onClick(View v) {
// TODO Auto-generated method stub
Intent intent = new Intent();
intent.setClass(SePintu.this, Method.class);
startActivity(intent); //跳轉Activity
}
}
/**
* @brief 點擊“查看原圖”按鈕,顯示出未打亂的原圖
* */
class SourceBtnClick implements OnClickListener{
@Override
public void onClick(View v) {
// TODO Auto-generated method stub
Intent intent = new Intent(SePintu.this, SourceImageAty.class);
startActivity(intent); //跳轉Activity
}
}
/**
* @brief 把一個有序數組通過隨機取數打亂
* @param lenght 數組大小,隨機數的范圍
*/
public void erraLen(int lenght) {
int errInt[] = new int[lenght];
for (int i = 0; i < lenght; i++) {
errInt[i] = i;
}
int len = lenght;// 設置隨機數的范圍
for (int i = 0; i < lenght; i++) {
int index = (int) Math.floor((Math.random() * len));
mImageNum[i] = errInt[index];
for (int j = index; j < errInt.length - 1; j++) {
// 把選中的數之後的數一次向前移一位,因為index選中的數已經存放在相應的mImageNum裡面了,
errInt[j] = errInt[j + 1];
}
len--;// 隨機數的范圍減一
}
}
/**
* @brief 准備圖片 把一張圖片截成幾張小的通過打亂的數組來取cache裡的圖片放到View裡面就成打亂二維數組
*/
private void readyImage() {
Matrix matrix = new Matrix();
mImages = new ImageView[mLevelNow][mLevelNow];
// 設置縮放比例
// float scaleW = ((float) mBitmap.getWidth()) / mBitmap.getWidth();
// float scaleH = ((float) mBitmap.getHeight()) / mBitmap.getHeight();
float scaleW = ((float) mBitmap.getWidth()) / (mWindowWidth + 180);
float scaleH = ((float) mBitmap.getHeight()) / (mWindowHeight + 180);
System.out.println("scaleW = " + scaleW +" scaleH" + scaleH);
float scale = scaleW > scaleH ? 1 / scaleW : 1 / scaleH; //scale是縮放比例,取最小比例的進行縮放
System.out.println("scale = " + scale);
matrix.postScale(scale, scale);
Bitmap bitss[][] = new Bitmap[mLevelNow][mLevelNow];
ImageView[][] cache = new ImageView[mLevelNow][mLevelNow];
int cont = 1;
for (int i = 0; i < mLevelNow; i++) {
for (int j = 0; j < mLevelNow; j++) {
int mX = i * mImageWidth;
int mY = j * mImageHeight;
// 第一個是要在那個圖片上截取 mX,y是要在這個圖的那個位置截取
// mImageWidth,mImageHeight是截取的長和寬, matrix是縮放比例
Bitmap mapi = Bitmap.createBitmap(mBitmap, mX, mY, mImageWidth,
mImageHeight, matrix, true);
bitss[i][j] = mapi;
ImageView img = new ImageView(this);
BitmapDrawable draw = new BitmapDrawable(bitss[i][j]);
img.setImageDrawable(draw);
img.setId(cont);
img.setScaleType(ScaleType.FIT_XY);
img.setOnClickListener(OnClickImageView1);
cache[i][j] = img; //cache存放著整張圖切割後的小圖片
cont++;
}
}
for (int i = 0; i < mImageNum.length; i++) {
int mX = mImageNum[i] / mLevelNow; //確定第幾行
int mY = mImageNum[i] % mLevelNow; //確定第幾列
int x1 = i / mLevelNow;
int y1 = i % mLevelNow;
mImages[x1][y1] = cache[mX][mY]; //將cache裡面的小圖片隨機放入mImages數組裡面
}
}
/**
* @brief 監聽點擊操作,以便判斷是否需要互相交換小圖片
* */
private android.view.View.OnClickListener OnClickImageView1 = new ImageView.OnClickListener() {
@Override
public void onClick(View v) {
if (mClickNum == 0) {// 即需要交換的第一個圖片
for (int i = 0; i < mImages.length; i++) {
boolean f = false;
for (int j = 0; j < mImages[i].length; j++) {
ImageView imgg = mImages[i][j];
if (imgg == v) { //所點擊的剛好是指定的小圖片區域
mX = i;
mY = j;
mClickNum++; //點擊了一次
f = true;
break;
}
}
if (f) {
break;
}
}
} else {// 即需要交換的第二個圖片
for (int i = 0; i < mImages.length; i++) {
for (int j = 0; j < mImages[i].length; j++) {
ImageView imgg = mImages[i][j];
if (imgg == v) {
if (mClickNum == 1) {
changePosition(i, j, mX, mY);
mX = 0;
mY = 0;
mClickNum = 0;
}
}
}
}
}
}
};
/**
* @brief 判斷是否需要互相交換小圖片
* @param x1 第一張圖片左上角x坐標的值
* @param y1 第一張圖片左上角y坐標的值
* @param x2 第二張圖片左上角x坐標的值
* @param y2 第二張圖片左上角y坐標的值
* */
private void changePosition(int x1, int y1, int x2, int y2) {
// 判斷寬和高差的絕對值是否是1,如果是1的話交換兩張圖片,不是1的話提示用戶
if (Math.abs(x1 - x2) + Math.abs(y1 - y2) != 1) {
System.out.println("not link....");
Builder bul = new AlertDialog.Builder(this); //彈出相應對話框
bul.setTitle(R.string.dialog);
bul.setMessage(R.string.cannot_change);
bul.setPositiveButton(R.string.yes, new DialogInterface.OnClickListener() {
@Override
public void onClick(DialogInterface dialog, int which) {
}
}).show();
} else { //相鄰,兩張圖片進行交換
System.out.println("link....");
String str = "";
ImageView bitF = null;
bitF = mImages[x1][y1];
mImages[x1][y1] = mImages[x2][y2];
mImages[x2][y2] = bitF;
for (int i = 0; i < mImages.length; i++) {
for (int j = 0; j < mImages[i].length; j++) {
ImageView img = mImages[i][j];
//得到ImageView的父控件
LinearLayout pa = (LinearLayout) img.getParent();
// 再移除ImageView使其父控件沒有,移除父控件,重新用setLayout()進行布局
pa.removeView(img);
}
}
setLayout(); //將進行變換操作的圖片顯示出來
for (int i = 0; i < mImages.length; i++) {
for (int j = 0; j < mImages[i].length; j++) {
str += mImages[i][j].getId(); //取對應小圖片的ID,相當於R.id.mImages[i][j]
}
}
//根據具體切割次數mLevelNow,判斷最後一次變換是否已經拼好
switch (mLevelNow) {
case 2:
if (str.equals("1324")) {
// “1324”的意思是,將圖片2*2地切割,有四塊,標號先豎著,然後再橫著來1234,根據getId取值互相比較
this.success();
}
break;
case 3:
if (str.equals("147258369")) {
this.success();
}
break;
case 4:
if (str.equals("15913261014371115481216")) {
this.success();
}
break;
case 5:
if (str.equals("16111621271217223813182349141924510152025")) {
this.success();
}
break;
}
}
}
/**
* @brief 完成拼圖後,提示成功完成對話框,點擊按鈕進入下一個Activity界面
*/
public void success() {
Builder bul = new AlertDialog.Builder(this);
bul.setTitle(R.string.dialog);
bul.setMessage(R.string.congratulation);
bul.setPositiveButton(R.string.next_Label, new DialogInterface.OnClickListener() {
@Override
public void onClick(DialogInterface dialog, int which) {
Intent intent = new Intent(SePintu.this, TheEnd.class);
SePintu.this.startActivity(intent); //點擊確定後跳轉到下一個Activity
}
});
bul.show();
System.out.println("success");
}
}</span>
通過構造函數,進行畫圖布局,PictureLayout.java
[java]
<span style="font-size:14px;">/**
* @file PictureLayout.java
* @brief 重新布置打亂後的拼圖
* @author zhoujun
* @version V1.0.00
* @date 2012/09/12
* Blog: http://blog.csdn.net/jjzhoujun2010
*/
package com.example.zhangbeta2;
import android.content.Context;
import android.widget.ImageView;
import android.widget.LinearLayout;
/**
* brief 重新布置打亂後的拼圖
* */
public class PictureLayout extends LinearLayout{
public PictureLayout(Context context, ImageView[][] images) {
super(context);
setLayout(context, images);
setBackgroundColor(0xffff7777); //為了和照片邊緣區分開,我添加了背景顏色
}
/**
* @brief 重新布置打亂後的拼圖
* @param view 當前被拆分打亂的照片
* */
private void setLayout(Context context, ImageView[][] view) {
LinearLayout linralayout = new LinearLayout(context);
linralayout.setOrientation(LinearLayout.VERTICAL);
linralayout.setPadding(0, 0, 0, 0);
for (int i = 0; i < view.length; i++) {
LinearLayout liner = new LinearLayout(context);
liner.setOrientation(LinearLayout.HORIZONTAL);
int leng = view[i].length;
for (int j = 0; j < leng; j++) {
ImageView img = (ImageView) view[i][j];
liner.addView(img);
}
linralayout.addView(liner);
liner = null;
}
this.addView(linralayout);
}
}</span>
游戲原圖顯示,SourceImageAct.java
[java]
<span style="font-size:14px;">/**
* @file SourceImageAty.java
* @brief 顯示未打亂的原圖
* @author zhoujun
* @version V1.0.00
* @date 2012/09/12
* Blog: http://blog.csdn.net/jjzhoujun2010
*/
package com.example.zhangbeta2;
import android.app.Activity;
import android.graphics.Bitmap;
import android.graphics.BitmapFactory;
import android.os.Bundle;
import android.view.View;
import android.view.View.OnClickListener;
import android.widget.ImageView;
/**
* @brief 顯示未打亂的原圖
* */
public class SourceImageAty extends Activity{
private ImageView mPic1;
@Override
protected void onCreate(Bundle savedInstanceState) {
super.onCreate(savedInstanceState);
setContentView(R.layout.source);
mPic1 = (ImageView)findViewById(R.id.pic1);
Bitmap bitmap1 = BitmapFactory.decodeResource(getResources(), R.drawable.pic1);
mPic1.setImageBitmap(bitmap1);
mPic1.setOnClickListener(new OnClickListener(){
@Override
public void onClick(View v) {
// TODO Auto-generated method stub
finish(); //點擊屏幕圖片即退出當前Activity
}
});
}
}
</span>
游戲方法Activity, Method.java
[java]
<span style="font-size:14px;">/**
* @file Method.java
* @brief 實現拼圖游戲裡面“游戲說明”的Activity
* @author zhoujun
* @version V1.0.00
* @date 2012/09/12
* Blog: http://blog.csdn.net/jjzhoujun2010
*/
package com.example.zhangbeta2;
import android.app.Activity;
import android.os.Bundle;
import android.view.View;
import android.view.View.OnClickListener;
import android.widget.Button;
/**
* @brief 實現點擊拼圖游戲裡面“游戲說明”按鈕後跳轉後的Activity
* */
public class Method extends Activity{
Button mBackBtn = null;
@Override
public void onCreate(Bundle savedInstanceState){
super.onCreate(savedInstanceState);
setContentView(R.layout.method);
mBackBtn = (Button)findViewById(R.id.backBtn);
mBackBtn.setOnClickListener(new backOnClickListener());
}
/**
* @brief 本類功能:設置返回按鈕監聽器,點擊按鈕銷毀當前Activity,返回拼圖游戲Activity
*/
class backOnClickListener implements OnClickListener{
@Override
public void onClick(View v) {
// TODO Auto-generated method stub
finish();
}
}
}</span>
最後界面,TheEnd.java
[java]
<span style="font-size:14px;">/**
* @file TheEnd.java
* @brief 最後的顯示界面,包含兩個來實現自動播放功能的按鈕
* @author zhoujun
* @version V1.0.00
* @date 2012/09/12
* Blog: http://blog.csdn.net/jjzhoujun2010
*/
package com.example.zhangbeta2;
import android.app.Activity;
import android.content.Intent;
import android.net.Uri;
import android.os.Bundle;
import android.view.View;
import android.view.View.OnClickListener;
import android.widget.Button;
/**
* @brief 最後的顯示界面,包含兩個來實現自動播放功能的按鈕
*/
public class TheEnd extends Activity{
private Intent mIntentMusic = new Intent("com.angel.Android.MUSIC");
@Override
public void onCreate(Bundle savedInstanceState){
super.onCreate(savedInstanceState);
setContentView(R.layout.end);
setCompenent();
}
/**
* @brief 設置按鈕,點擊相應按鈕,自動給指定號碼進行撥號
* */
private void setCompenent(){
Button callExitBtn = (Button)findViewById(R.id.call_exit);
callExitBtn.setOnClickListener(new OnClickListener(){
@Override
public void onClick(View v) {
// TODO Auto-generated method stub
Intent intent = new Intent(
Intent.ACTION_CALL, Uri.parse("tel:10086")); //自動撥號,由於隱私,改成10086.。。
stopService(mIntentMusic);
startActivity(intent);
}
});
Button exitCallBtn = (Button)findViewById(R.id.exit_call);
exitCallBtn.setOnClickListener(new OnClickListener(){
@Override
public void onClick(View v) {
// TODO Auto-generated method stub
Intent intent = new Intent(
Intent.ACTION_CALL, Uri.parse("tel:10086"));
stopService(mIntentMusic);
startActivity(intent);
}
});
}
}</span>
背景音樂實現,MusicServer.java
[java]
<span style="font-size:14px;">/**
* @file MusicServer.java
* @brief 開啟一個Server,用來自動播放背景音樂
* @author zhoujun
* @version V1.0.00
* @date 2012/09/12
* Blog: http://blog.csdn.net/jjzhoujun2010
*/
package com.example.zhangbeta2;
import android.app.Service;
import android.content.Intent;
import android.media.MediaPlayer;
import android.os.IBinder;
/**
* @brief 繼承一個服務,用來播放背景音樂
* */
public class MusicServer extends Service {
private MediaPlayer mMediaPlayer;
/**
* @brief 綁定對應的intent
* @return null
*/
@Override
public IBinder onBind(Intent intent) {
// TODO Auto-generated method stub
return null;
}
/**
* @brief 根據intent,打開背景音樂
*/
@Override
public void onStart(Intent intent,int startId){
super.onStart(intent, startId);
if(mMediaPlayer==null){
// R.raw.happy是資源文件,MP3格式的,存放在res資源下raw文件夾裡,沒有的話新建個
mMediaPlayer = MediaPlayer.create(this, R.raw.happy);
mMediaPlayer.setLooping(true);
mMediaPlayer.start();
}
}
/**
* @brief 關閉背景音樂
*/
@Override
public void onDestroy() {
// TODO Auto-generated method stub
super.onDestroy();
mMediaPlayer.stop();
}
}</span>
JAVA文件就這些,剩下就是xml文件了。
main.xml文件如下
[html]
<span style="font-size:14px;"><LinearLayout xmlns:android="http://schemas.android.com/apk/res/android"
xmlns:tools="http://schemas.android.com/tools"
android:layout_width="fill_parent"
android:layout_height="fill_parent"
android:orientation="vertical"
android:background="@drawable/background">
<TextView
android:layout_width="fill_parent"
android:layout_height="wrap_content"
android:background="#abcdef"
android:text="@string/hello_world"
tools:context=".Main" />
<LinearLayout
android:orientation="horizontal"
android:layout_width="fill_parent"
android:layout_height="fill_parent"
>
<Button
android:id="@+id/buttonNext"
android:layout_width="wrap_content"
android:layout_height="wrap_content"
android:layout_weight="1"
android:text="@string/next"
/>
<Button
android:id="@+id/buttonExit"
android:layout_width="wrap_content"
android:layout_height="wrap_content"
android:layout_weight="1"
android:text="@string/exit"
/>
</LinearLayout>
</LinearLayout>
</span>
method.xml文件如下
[html]
<span style="font-size:14px;"><?xml version="1.0" encoding="utf-8"?>
<LinearLayout xmlns:android="http://schemas.android.com/apk/res/android"
android:layout_width="match_parent"
android:layout_height="match_parent"
android:orientation="vertical" >
<TextView
android:layout_width="wrap_content"
android:layout_height="wrap_content"
android:text="@string/method_detail"/>
<Button
android:id="@+id/backBtn"
android:layout_width="fill_parent"
android:layout_height="wrap_content"
android:text="@string/back_label"/>
</LinearLayout></span>
source.xml文件如下
[html]
<span style="font-size:14px;"><?xml version="1.0" encoding="utf-8"?>
<LinearLayout xmlns:android="http://schemas.android.com/apk/res/android"
android:layout_width="fill_parent"
android:layout_height="fill_parent"
android:orientation="vertical"
android:background="#ffff7777">
<ImageView
android:id="@+id/pic1"
android:layout_width="fill_parent"
android:layout_height="fill_parent">
</ImageView>
</LinearLayout></span>
end.xml文件如下
[html]
<span style="font-size:14px;"><LinearLayout xmlns:android="http://schemas.android.com/apk/res/android"
xmlns:tools="http://schemas.android.com/tools"
android:layout_width="fill_parent"
android:layout_height="fill_parent"
android:orientation="vertical"
>
<LinearLayout
android:layout_width="fill_parent"
android:layout_height="wrap_content"
android:layout_gravity="center_horizontal"
android:background="@drawable/cake_bak">
</LinearLayout>
<LinearLayout
android:layout_width="fill_parent"
android:layout_height="wrap_content"
android:orientation="horizontal">
<Button
android:id="@+id/call_exit"
android:layout_width="wrap_content"
android:layout_height="wrap_content"
android:layout_weight="1"
android:text="@string/call_exit"/>
<Button
android:id="@+id/exit_call"
android:layout_width="wrap_content"
android:layout_height="wrap_content"
android:layout_weight="1"
android:text="@string/exit_call"/>
</LinearLayout>
</LinearLayout>
</span>
AndroidManifest.xml文件如下
[html]
<span style="font-size:14px;"><manifest xmlns:android="http://schemas.android.com/apk/res/android"
package="com.example.zhangbeta2"
android:versionCode="1"
android:versionName="1.0" >
<uses-sdk
android:minSdkVersion="8"
android:targetSdkVersion="15" />
<application
android:icon="@drawable/ic_launcher"
android:label="@string/app_name"
android:theme="@style/AppTheme" >
<activity
android:name=".Main"
android:label="@string/title_activity_main"
>
<intent-filter>
<action android:name="android.intent.action.MAIN" />
<category android:name="android.intent.category.LAUNCHER" />
</intent-filter>
</activity>
<activity
android:name=".SePintu"
android:label="@string/label_pintu1"/>
<activity
android:name=".Method"
android:label="@string/method_label"/>
<activity
android:name=".TheEnd"
android:label="@string/label_theEnd"/>
<activity
android:name=".SourceImageAty"
android:label="@string/source_back_label"/>
<service android:name=".MusicServer">
<intent-filter>
<action android:name="com.angel.Android.MUSIC"/>
<category android:name="android.intent.category.default" />
</intent-filter>
</service>
</application>
<uses-permission android:name="android.permission.CALL_PHONE"></uses-permission>
</manifest></span>
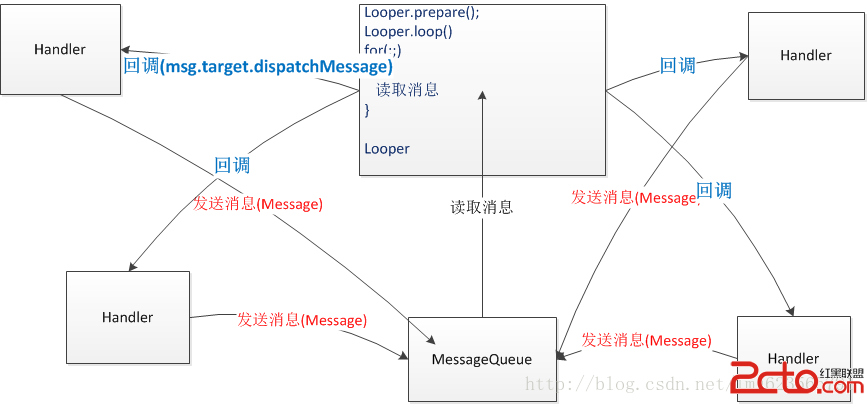 Android 異步消息處理機制 讓你深入理解 Looper、Handler、Message三者關系
轉載請標明出處:http://blog.csdn.net/lmj623565791/article/details/38377229 ,本文出自【張鴻洋的博客】很多人面試
 andorid自定義ViewPager之——子ViewPager滑到邊緣後直接滑動父ViewPager
最近的項目中,有一個需求要用ViewPager中嵌套ViewPager去實現整個效果,沒做任何處理做出來後,只能不停的滑動子ViewPager,父ViewPager就無法
 Android Wear - Design Principles for Android Wear(設計原則)
Focus on not stopping the user and all else will follow(專注於不打算用戶並讓一切後續跟
 自定義布局實現側滑菜單2
我們在上一節已經說了側滑菜單的實現原理,並且實現了單側菜單,這一節我們就完善項目,實現雙向側滑菜單。原理我們都說了,不明白的看上節,好了,直接上代碼/** * 這個類和S