編輯:關於Android編程
1.Activity源代碼:
package com.example.crema;
import java.io.ByteArrayOutputStream;
import java.io.File;
import java.text.SimpleDateFormat;
import java.util.Date;
import android.net.Uri;
import android.os.Bundle;
import android.os.Environment;
import android.provider.MediaStore;
import android.app.Activity;
import android.content.Intent;
import android.graphics.Bitmap;
import android.util.Log;
import android.view.Menu;
import android.view.View;
import android.view.View.OnClickListener;
import android.widget.Button;
import android.widget.ImageView;
import android.widget.TextView;
public class CramaActivity extends Activity {
private Button creama=null;
private ImageView img=null;
private TextView text=null;
private File tempFile = new File(Environment.getExternalStorageDirectory(),
getPhotoFileName());
private static final int PHOTO_REQUEST_TAKEPHOTO = 1;// 拍照
private static final int PHOTO_REQUEST_GALLERY = 2;// 從相冊中選擇
private static final int PHOTO_REQUEST_CUT = 3;// 結果
@Override
public void onCreate(Bundle savedInstanceState) {
super.onCreate(savedInstanceState);
setContentView(R.layout.activity_crama);
init();
Log.i("TAG-->", ""+Environment.getExternalStorageDirectory());
}
private void init() {
// TODO Auto-generated method stub
creama=(Button) findViewById(R.id.btn_creama);
img=(ImageView) findViewById(R.id.img_creama);
creama.setOnClickListener(listener);
text=(TextView) findViewById(R.id.text);
}
protected void onActivityResult(int requestCode, int resultCode, Intent data) {
switch (requestCode) {
case PHOTO_REQUEST_TAKEPHOTO:// 當選擇拍照時調用
startPhotoZoom(Uri.fromFile(tempFile));
break;
case PHOTO_REQUEST_GALLERY:// 當選擇從本地獲取圖片時
// 做非空判斷,當我們覺得不滿意想重新剪裁的時候便不會報異常,下同
if (data != null)
startPhotoZoom(data.getData());
break;
case PHOTO_REQUEST_CUT:// 返回的結果
if (data != null)
// setPicToView(data);
sentPicToNext(data);
break;
}
super.onActivityResult(requestCode, resultCode, data);
}
private OnClickListener listener=new OnClickListener(){
@Override
public void onClick(View arg0) {
// TODO Auto-generated method stub
Intent cameraintent = new Intent(MediaStore.ACTION_IMAGE_CAPTURE);
// 指定調用相機拍照後照片的儲存路徑
cameraintent.putExtra(MediaStore.EXTRA_OUTPUT,
Uri.fromFile(tempFile));
startActivityForResult(cameraintent, PHOTO_REQUEST_TAKEPHOTO);
}};
@Override
public boolean onCreateOptionsMenu(Menu menu) {
getMenuInflater().inflate(R.menu.activity_crama, menu);
return true;
}
private void startPhotoZoom(Uri uri) {
Intent intent = new Intent("com.android.camera.action.CROP");
intent.setDataAndType(uri, "image/*");
// crop為true是設置在開啟的intent中設置顯示的view可以剪裁
intent.putExtra("crop", "true");
// aspectX aspectY 是寬高的比例
intent.putExtra("aspectX", 1);
intent.putExtra("aspectY", 1);
// outputX,outputY 是剪裁圖片的寬高
intent.putExtra("outputX", 300);
intent.putExtra("outputY", 300);
intent.putExtra("return-data", true);
intent.putExtra("noFaceDetection", true);
startActivityForResult(intent, PHOTO_REQUEST_CUT);
}
// 將進行剪裁後的圖片傳遞到下一個界面上
private void sentPicToNext(Intent picdata) {
Bundle bundle = picdata.getExtras();
if (bundle != null) {
Bitmap photo = bundle.getParcelable("data");
if (photo==null) {
img.setImageResource(R.drawable.get_user_photo);
}else {
img.setImageBitmap(photo);
// 設置文本內容為 圖片絕對路徑和名字
text.setText(tempFile.getAbsolutePath());
}
ByteArrayOutputStream baos = null;
try {
baos = new ByteArrayOutputStream();
photo.compress(Bitmap.CompressFormat.JPEG, 100, baos);
byte[] photodata = baos.toByteArray();
System.out.println(photodata.toString());
// Intent intent = new Intent();
// intent.setClass(RegisterActivity.this, ShowActivity.class);
// intent.putExtra("photo", photodata);
// startActivity(intent);
// finish();
} catch (Exception e) {
e.getStackTrace();
} finally {
if (baos != null) {
try {
baos.close();
} catch (Exception e) {
e.printStackTrace();
}
}
}
}
}
// 使用系統當前日期加以調整作為照片的名稱
private String getPhotoFileName() {
Date date = new Date(System.currentTimeMillis());
SimpleDateFormat dateFormat = new SimpleDateFormat(
"'IMG'_yyyyMMdd_HHmmss");
return dateFormat.format(date) + ".jpg";
}
}
2.xml布局文件代碼:
<RelativeLayout xmlns:android="http://schemas.android.com/apk/res/android"
xmlns:tools="http://schemas.android.com/tools"
android:layout_width="match_parent"
android:layout_height="match_parent" >
<Button
android:id="@+id/btn_creama"
android:layout_width="wrap_content"
android:layout_height="wrap_content"
android:layout_centerHorizontal="true"
android:text="@string/hello_world"
tools:context=".CramaActivity" />
<ImageView
android:id="@+id/img_creama"
android:layout_width="150dip"
android:layout_height="150dip"
android:layout_margin="15dip"
android:layout_centerHorizontal="true"
android:layout_below="@+id/btn_creama"
android:scaleType="fitXY"
android:background="@drawable/bg_img_coner"
/>
<TextView
android:id="@+id/text"
android:layout_width="fill_parent"
android:layout_height="wrap_content"
android:layout_below="@+id/img_creama"
android:textSize="16sp"
android:background="#22000000"
/>
</RelativeLayout>
 Android--Activity生命周期
熟悉javaEE的朋友們都了解servlet技術,我們想要實現一個自己的servlet,需要繼承相應的基類,重寫它的方法,這些方法會在合適的時間被servlet容器調用。
 Android實現果凍滑動效果的控件
前言在微信是的處理方法是讓用戶滑動,但最終還是回滾到最初的地方,這樣的效果很生動(畢竟成功還是取決於細節)。那麼在安卓我們要怎麼弄呢。下面為大家介紹一下JellyScro
 Android手機端小米推送Demo解析和實現方法
最近這幾個月都是在准備找工作和找工作中,付出了很多,總算是有點收獲,所以都沒有怎麼整理筆記。到了最近才有空把自己的筆記整理一下發上來,分享一下我的學習經驗。推送由於最近項
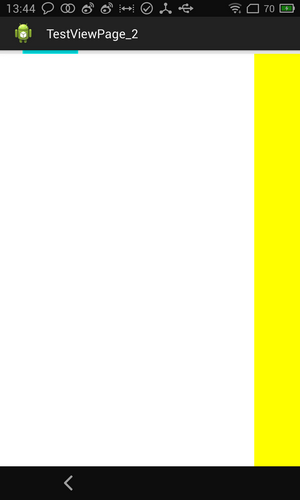 Android中ViewPager實現滑動指示條及與Fragment的配合
自主實現滑動指示條先上效果圖:1、XML布局布局代碼如下:<LinearLayout xmlns:android=http://schemas.android.co