編輯:關於Android編程
Android布局
當你看到android手機上的展現出漂亮的頁面的時候,你就會想這是怎麼做出來。其實這也不難。在每一個頁面絕對會有一個相對應的布局。下面我就給大家介紹下在android開發中用到的最多的3個布局—線性布局,表格布局,相對布局。
1:線性布局(LinearLayout)
其實布局都會有2種實現方式,一種是用布局管理器xml文件,另外一種則是用代碼生成。
<?xml version="1.0" encoding="utf-8"?>
<LinearLayout xmlns:android="http://schemas.android.com/apk/res/android"
android:orientation="vertical"
android:layout_width="fill_parent"
android:layout_height="fill_parent"
>
<TextView
android:layout_width="fill_parent"
android:layout_height="wrap_content"
android:text="@string/hello"à這裡是要在string.xml文件定義的
/>
<Button android:id="@+id/testButton4"
android:layout_width="fill_parent"
android:layout_height="wrap_content"
android:text="@string/myRalativeLayoutButton3"/>
</LinearLayout>
以上代碼線性布局的垂直布局,控制線性布局的水平與垂直是用線性的一個orientation來控制的,這樣就可以達到你想要展現方式。
第二種代碼生成,其實在開發中會大量的采用上面的這樣的方式,但是用代碼生成的,也要掌握,因為當你展現出來的控件是不確定的,當某一個按鍵才展現的話,這樣用代碼生成的話,就方便很多。
publicclass myLinearLayout extends Activity{
privatebooleanflag=true;
protectedvoid onCreate(Bundle savedInstanceState) {
super.onCreate(savedInstanceState);
final LinearLayout layout=new LinearLayout(this);
LinearLayout.LayoutParams layoutParams=new LinearLayout.LayoutParams(ViewGroup.LayoutParams.FILL_PARENT,ViewGroup.LayoutParams.FILL_PARENT);
layout.setOrientation(LinearLayout.VERTICAL);
LinearLayout.LayoutParams textParams=new LinearLayout.LayoutParams(ViewGroup.LayoutParams.FILL_PARENT,ViewGroup.LayoutParams.WRAP_CONTENT);
TextView tv=new TextView(this);
tv.setLayoutParams(textParams);
tv.setText(R.string.myLinearLayoutText);
tv.setTextSize(20);
layout.addView(tv);
LinearLayout.LayoutParams buttonParams=new LinearLayout.LayoutParams(ViewGroup.LayoutParams.FILL_PARENT,ViewGroup.LayoutParams.WRAP_CONTENT);
Button button =new Button(this);
button.setLayoutParams(buttonParams);
button.setText(R.string.myLinearLayoutButton1);
layout.addView(button,buttonParams);
LinearLayout.LayoutParams radioGroupParams=new LinearLayout.LayoutParams(ViewGroup.LayoutParams.FILL_PARENT,ViewGroup.LayoutParams.WRAP_CONTENT);
final RadioGroup radioGroup=new RadioGroup(myLinearLayout.this);
radioGroup.setLayoutParams(radioGroupParams);
LinearLayout.LayoutParams radioButton1Parms=new LinearLayout.LayoutParams(ViewGroup.LayoutParams.FILL_PARENT,ViewGroup.LayoutParams.WRAP_CONTENT);
final RadioButton radioButton1=new RadioButton(myLinearLayout.this);
radioButton1.setId(1);
radioButton1.setLayoutParams(radioButton1Parms);
radioButton1.setText(R.string.maleText);
radioButton1.setChecked(true);
radioGroup.addView(radioButton1);
LinearLayout.LayoutParams radioButton2Params=new LinearLayout.LayoutParams(ViewGroup.LayoutParams.FILL_PARENT,ViewGroup.LayoutParams.WRAP_CONTENT);
final RadioButton radioButton2=new RadioButton(myLinearLayout.this);
radioButton2.setId(2);
radioButton2.setLayoutParams(radioButton2Params);
radioButton2.setText(R.string.famaleText);
radioGroup.addView(radioButton2);
layout.addView(radioGroup);
radioGroup.setVisibility(View.GONE);
super.setContentView(layout,layoutParams);
button.setOnClickListener(new View.OnClickListener(){
publicvoid onClick(View v) {
if(flag){
radioGroup.setVisibility(View.VISIBLE);
flag=false;
}else{
radioGroup.setVisibility(View.GONE);
flag=true;
}
radioGroup.setOnCheckedChangeListener(new RadioGroup.OnCheckedChangeListener(){
publicvoid onCheckedChanged(RadioGroup group, int checkedId) {
if(checkedId==1){
radioButton2.setChecked(true);
}else{
radioButton1.setChecked(true);
}
}
});
}
});
}
}
在以上的代碼中在一個頁面出現了一個 TextView ,一個button,在就是用button控制展現的一個單選框(單選框的展現和隱藏)。
其中GONE,VISIBLE 分別用來隱藏和展現。
2:表格布局(TableLayout)
當你打開你的android手機的時候,展現在你面前的就是一個表格布局,下面也是用2種的方式展現出table布局
<?xml version="1.0" encoding="utf-8"?>
<TableLayout xmlns:android="http://schemas.android.com/apk/res/android"
android:layout_width="fill_parent" android:layout_height="fill_parent"
android:orientation="vertical"
android:id="@+id/myTableLayoutId"
android:shrinkColumns="3"
android:background="@drawable/psu">
<View android:layout_height="2px"
android:background="#FF909090" />
<TableRow>
<TextView android:layout_column="0"
android:gravity="center_vertical"
android:padding="8px"
android:text="ID"/>
<TextView android:layout_column="1"
android:gravity="center_vertical"
android:padding="8px"
android:text="name"/>
<TextView android:layout_column="2"
android:gravity="center_vertical"
android:padding="8px"
android:text="email"/>
<TextView android:layout_column="3"
android:padding="8px"
android:gravity="center_vertical"
android:text="address"/>
</TableRow>
</TableLayout>
在table布局中往往你遇到,一行展現出來的東西會有一部分不能顯示出來,在android中它會用shrinkColumns它會用這個來控制第幾行來換行。其實table布局和javaweb中的table很相似,在table中要有TableRow 這個就相當於table中的tr。你可以控制每一個TableRow內容的的居中,居左,居右等等。
這個是使用android:gravity。
代碼的實現部分,
publicclass myTableLayoutTwo extends Activity {
private Map<String, String> mapTitle = new HashMap<String, String>();
private List<Map<String, String>> listData = new ArrayList<Map<String, String>>();
protectedvoid onCreate(Bundle savedInstanceState) {
super.onCreate(savedInstanceState);
// 組裝數據表頭
this.mapTitle.put("id", "編號");
this.mapTitle.put("name", "姓名");
this.mapTitle.put("cj", "成績");
// 組裝數據內容
for (int i = 0; i < 3; i++) {
Map<String, String> map = new HashMap<String, String>();
map.put("id", String.valueOf(i));
map.put("name", "bruce" + i);
map.put("cj", String.valueOf(i));
this.listData.add(map);
}
TableLayout layout = new TableLayout(this);
TableLayout.LayoutParams tableLayout = new TableLayout.LayoutParams(
ViewGroup.LayoutParams.FILL_PARENT,
ViewGroup.LayoutParams.FILL_PARENT);
layout.setBackgroundResource(R.drawable.psu);
TableRow tableRowTitle=new TableRow(this);
for(int i=0;i<this.mapTitle.size();i++){
String key="";
switch (i) {
case 0:
key="id";
break;
case 1:
key="name";
break;
case 2:
key="cj";
break;
default:
break;
}
TextView textViewTitle=new TextView(this);
textViewTitle.setText(this.mapTitle.get(key));
tableRowTitle.addView(textViewTitle);
}
layout.addView(tableRowTitle);
System.out.println("33333333");
int k=1;
for(int i=0;i<this.listData.size();i++){
k++;
Map<String,String> map=this.listData.get(i);
TableRow tableRow=new TableRow(this);
for(int j=0;j<map.size();j++){
String key="";
switch (j) {
case 0:
key="id";
break;
case 1:
key="name";
break;
case 2:
key="cj";
break;
default:
break;
}
TextView textViewContent=new TextView(this);
textViewContent.setText(map.get(key));
tableRow.addView(textViewContent,j);
}
layout.addView(tableRow);
}
super.setContentView(layout,tableLayout);
}
}
在用代碼實現tablelayout的時候特別要注意,tableRow.addView(textViewContent,j);裡面的內容確實是在一行中,比如動態加載數據的時候。這樣就會遇到這樣的就問題,上面的例子就是用j來控制的。來表示是一行的內容。
3:相對布局(RelativeLayout)
顧名思義相對布局就要有一個參照物,這樣你才能相對它來布局你的主鍵
<?xml version="1.0" encoding="utf-8"?>
<RelativeLayout
xmlns:android="http://schemas.android.com/apk/res/android"
android:id="@+id/myRelativeLayoutId"
android:layout_width="wrap_content"
android:layout_height="wrap_content">
<ImageView android:id="@+id/imga"
android:layout_width="wrap_content"
android:layout_height="wrap_content"
android:src="@drawable/android_mldn_01"/>
<ImageView android:id="@+id/imgb"
android:layout_height="wrap_content"
android:layout_width="wrap_content"
android:src="@drawable/android_mldn_02"
android:layout_toRightOf="@id/imga"/>
</RelativeLayout>
以上是2張圖片的相對布局是把id為imgb的放在imga的右邊,在上面的布局中是用toRightOf來控制的。
publicclass myRelativeLayout extends Activity {
private RelativeLayout myRelativeLayout;
protectedvoid onCreate(Bundle savedInstanceState) {
super.onCreate(savedInstanceState);
super.setContentView(R.layout.myralativelayout);
this.myRelativeLayout = (RelativeLayout) super
.findViewById(R.id.myRelativeLayoutId);
RelativeLayout.LayoutParams relativeLayoutParams = new RelativeLayout.LayoutParams(
ViewGroup.LayoutParams.FILL_PARENT,
ViewGroup.LayoutParams.WRAP_CONTENT);
relativeLayoutParams.addRule(RelativeLayout.RIGHT_OF, R.id.imga);
relativeLayoutParams.addRule(RelativeLayout.BELOW, R.id.myT1);
Button button=new Button(this);
button.setText("代碼生成的button");?????不要這樣寫
this.myRelativeLayout.addView(button,relativeLayoutParams);
}
}
注意在上面的代碼中有一些不合理的地方,就是在手機應用避免出現硬編碼,就是button.setText("代碼生成的button");最好是在string.xml文件中定義文字,這樣你好統一的去改這些說明文字。可以寫成button.setText(R.string.maleText)
當在學習android的時候你要注意一些性能上的問題,因為手機的內存有限,cpu沒有那麼的強大,在運行起來要達到快速,這樣就會要求我們在開發中選擇布局是用代碼生成,還是用xml生成,這樣就要看具體的應用方式。本人建議你用xml文件生成。
在開發中大部分用的就是上面的三種布局,在加上布局的嵌套就會達到你想要的效果
 Android編程之Fragment使用動畫造成Unknown animation name: objectAnimator異常
在為Fragment做切換動畫,啟動後遇到了一個異常: Caused by: java.lang.RuntimeException: Unknown animation
 [android]Android中圖形圖片及處理相關Api的小總結
開發應用中圖片的使用是必不可少的,Android系統提供了豐富的圖片支持功能。我們除了可以使Drawable資源庫,還可以使用Bitmap、Picture類去創建圖片,也
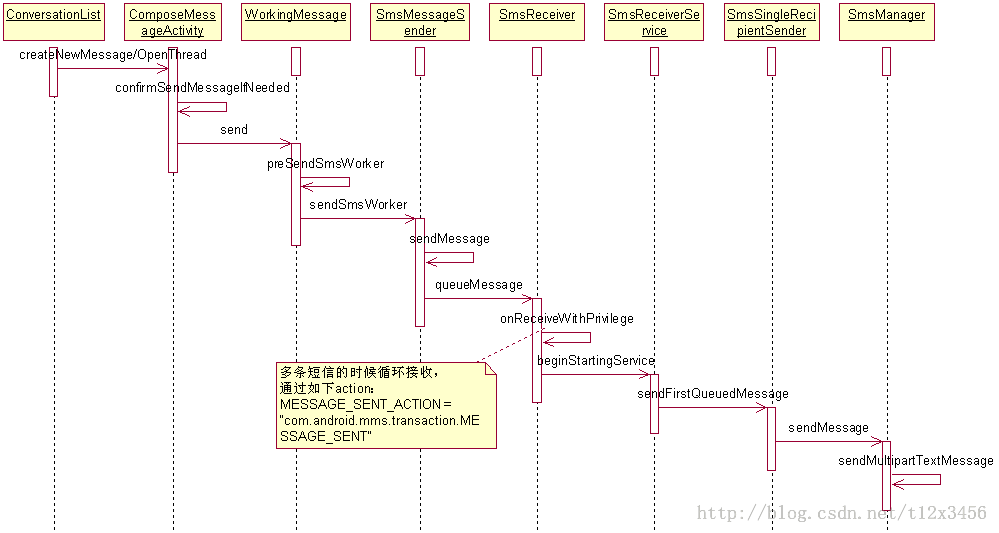 Android開發中使用mms模塊收發單卡和雙卡短信的教程
一.信息發送:com.android.mms.data.WorkingMessage.java 類 send()函數: public void send() {
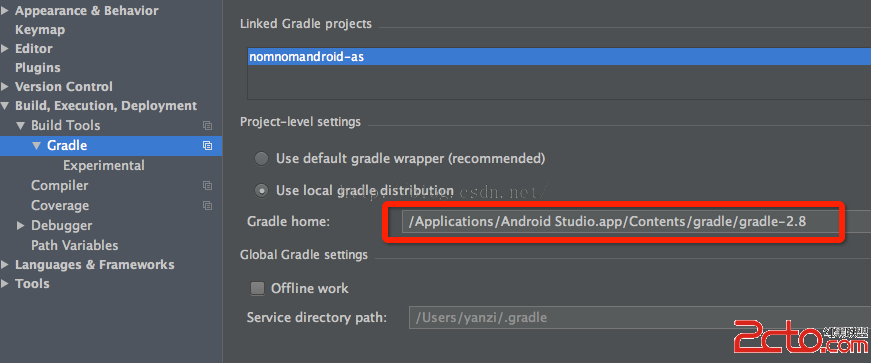 AndroidStudio 1.4升級到1.5後,peer not authenticated錯誤
解決方法:找到項目最外層的build.gradle文件,將其中的:dependencies {classpath 'com.android.tools.build