編輯:關於Android編程
在消息的獲取上是選擇輪詢還是推送得根據實際的業務需要來技術選型,例如對消息實時性比較高的需求,比如微博新通知或新聞等那就最好是用推送了。但如果只是一般的消息檢測比如更新檢查,可能是半個小時或一個小時一次,那用輪詢也是一個不錯的選擇,因為不需要額外搭建推送服務器,不用額外配置推送服務。另外推送現在一般以維持長連接的方式實現,在手機客戶端也會耗費一定的電量。今天就介紹一個在Android上實現輪詢機制的方法——使用AlarmManager
AlarmManager在Android中主要用來定時處理一個事件或是定期處理一個事件,比如鬧鐘應用就是使用AlarmManager來實現的,我們今天要使用AlarmManager的定期執行功能來實現輪詢的功能。對於定期執行任務也可以用Timer和TimerTask來實現,也可以開一個Service在Thread裡面以while循環來實現。但最好的方案還是選用AlarmManager,這裡涉及一個Android系統鎖的機制,即系統在檢測到一段時間沒有活躍以後,會關閉一些不必要的服務來減少資源和電量消耗。使用Timer和Service來實現的話很可能出現的情況就是屏幕熄滅後一段時間,服務就被停止了,當然輪詢也就被停止了。這個大家可以實驗一下,之前我寫過一篇文章也介紹了一種保持後台喚醒的機制《使用WakeLock使Android應用程序保持後台喚醒》,感興趣的可以看看。那麼接下來就開始使用AlarmManager+Service+Thread來實現我們的輪詢服務吧!
一、新建輪詢工具類PollingUtils.java
public class PollingUtils {

	//開啟輪詢服務
	public static void startPollingService(Context context, int seconds, Class<?> cls,String action) {
		//獲取AlarmManager系統服務
		AlarmManager manager = (AlarmManager) context
				.getSystemService(Context.ALARM_SERVICE);

		//包裝需要執行Service的Intent
		Intent intent = new Intent(context, cls);
		intent.setAction(action);
		PendingIntent pendingIntent = PendingIntent.getService(context, 0,
				intent, PendingIntent.FLAG_UPDATE_CURRENT);

		//觸發服務的起始時間
		long triggerAtTime = SystemClock.elapsedRealtime();

		//使用AlarmManger的setRepeating方法設置定期執行的時間間隔(seconds秒)和需要執行的Service
		manager.setRepeating(AlarmManager.ELAPSED_REALTIME, triggerAtTime,
				seconds * 1000, pendingIntent);
	}

	//停止輪詢服務
	public static void stopPollingService(Context context, Class<?> cls,String action) {
		AlarmManager manager = (AlarmManager) context
				.getSystemService(Context.ALARM_SERVICE);
		Intent intent = new Intent(context, cls);
		intent.setAction(action);
		PendingIntent pendingIntent = PendingIntent.getService(context, 0,
				intent, PendingIntent.FLAG_UPDATE_CURRENT);
		//取消正在執行的服務
		manager.cancel(pendingIntent);
	}
}
public class PollingService extends Service {

	public static final String ACTION = "com.ryantang.service.PollingService";

	private Notification mNotification;
	private NotificationManager mManager;

	@Override
	public IBinder onBind(Intent intent) {
		return null;
	}

	@Override
	public void onCreate() {
		initNotifiManager();
	}

	@Override
	public void onStart(Intent intent, int startId) {
		new PollingThread().start();
	}

	//初始化通知欄配置
	private void initNotifiManager() {
		mManager = (NotificationManager) getSystemService(NOTIFICATION_SERVICE);
		int icon = R.drawable.ic_launcher;
		mNotification = new Notification();
		mNotification.icon = icon;
		mNotification.tickerText = "New Message";
		mNotification.defaults |= Notification.DEFAULT_SOUND;
		mNotification.flags = Notification.FLAG_AUTO_CANCEL;
	}

	//彈出Notification
	private void showNotification() {
		mNotification.when = System.currentTimeMillis();
		//Navigator to the new activity when click the notification title
		Intent i = new Intent(this, MessageActivity.class);
		PendingIntent pendingIntent = PendingIntent.getActivity(this, 0, i,
				Intent.FLAG_ACTIVITY_NEW_TASK);
		mNotification.setLatestEventInfo(this,
				getResources().getString(R.string.app_name), "You have new message!", pendingIntent);
		mManager.notify(0, mNotification);
	}

	/**
	 * Polling thread
	 * 模擬向Server輪詢的異步線程
	 * @Author Ryan
	 * @Create 2013-7-13 上午10:18:34
	 */
	int count = 0;
	class PollingThread extends Thread {
		@Override
		public void run() {
			System.out.println("Polling...");
			count ++;
			//當計數能被5整除時彈出通知
			if (count % 5 == 0) {
				showNotification();
				System.out.println("New message!");
			}
		}
	}

	@Override
	public void onDestroy() {
		super.onDestroy();
		System.out.println("Service:onDestroy");
	}

}
public class MainActivity extends Activity {

	@Override
	protected void onCreate(Bundle savedInstanceState) {
		super.onCreate(savedInstanceState);
		setContentView(R.layout.activity_main);
		//Start polling service
		System.out.println("Start polling service...");
		PollingUtils.startPollingService(this, 5, PollingService.class, PollingService.ACTION);
	}

	@Override
	protected void onDestroy() {
		super.onDestroy();
		//Stop polling service
		System.out.println("Stop polling service...");
		PollingUtils.stopPollingService(this, PollingService.class, PollingService.ACTION);
	}

}
 Android AlertDialog對話框自定義風格的另類實現
一、引子 學過Android的同學都知道,對話框的重要程度非常高,任何一款 app幾乎都離不開對話框,值得慶幸的是,對話框的運用在Android中還是相對比較容易的。雖然
 Android仿人人網滑動側邊欄效果
很多應用為了節省空間而又使界面能夠充足的顯示信息,大多數應用都采用了側邊欄的方式,如下圖: 來說說它
 自定義控件三部曲之繪圖篇(十九)——LinearGradient與閃動文字效果
博主這段時間工作實在是太忙了,全天無尿點……博客一直沒更新,實在對不住大家……這篇就給大家講setShader的另
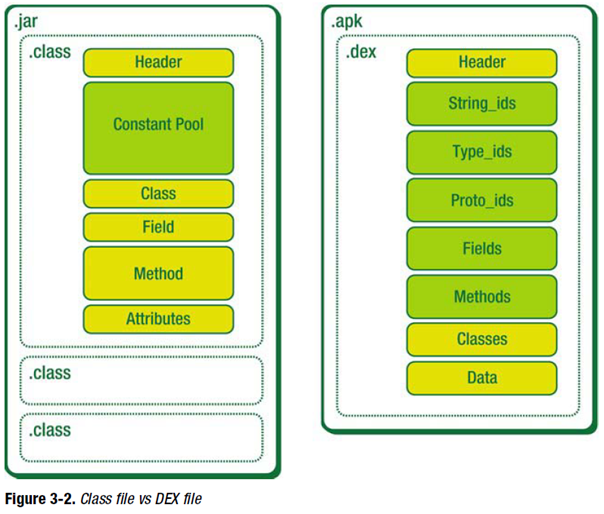 Dex文件格式詳解
什麼是dex文件他是Android系統的可執行文件,包含應用程序的全部操作指令以及運行時數據。由於dalvik是一種針對嵌入式設備而特殊設計的java虛擬機,所以dex文