Activity狀態保存應用及Activity的主題皮膚學習
1.Activity狀態的保存.
Activity生命周期函數事項介紹。
生命周期中的函數 函數的詳細描述 是否能殺死進程程序 下個執行的函數方法
1.onCreate() 當activity被創建時調用。這是做一般的靜態初始化的地方,比如創建界面, 否 onStart()
把數據綁定到列表,等等之類。這個方法會被傳入一個 Bundle對像,它包含了
activity的上一次(關閉時)的狀態(如果這個狀態可以得到)。
此方法後面永遠跟著onStart()。
2.onReStart() 在停止後被調用,但不是停止後馬上調用,而是在再次開始前調用, 否 onStart()
也就是在再次調用onStart()之前立即調用。
3.onStart() 當activity變成可見後立即調用它。如果activity成為最上層, 否 onResume()或onStop()
則調用onResume(),如果完全被摭蓋,就調用onStop()。
4.onResume() 當activity處於最上層時,立即調用此方法。 否 onPause()
此時activity獲得輸入焦點。後面跟著onPause()。
5.onPause() 當另一個activity要進入Pause狀態時調用此方法。這個方法一般是 是 onResume()或onStop()
用來提交那些發生改變的永久化的數據們,停止動畫和其它消耗CPU的玩意們。
這些工作必須以最快的速度完成,因為在這個方法返回之前,
另一個activity就不能進入resume狀態。當它又回到最上層時,後面跟著onResume(),
當它被完全摭蓋時,後面跟著onStop()。
6.onStop() 當activity被完全摭蓋時被調用。當activity要銷毀時或被其它activity完全 是 onRestart()或onDestory()
摭蓋時都會發生。如果這個activity又回到最上層,則後面跟著onRestart(),
如果它逝去了,則跟著onDestroy()。
7.onDestory() 在activity銷毀之前被調用。這是activity能收到的最後一個調用。 是 進程關閉程序完全銷毀
調用的原因可能是別人在這個activity上調用了finish(),也可能是系統為了更多的
內存空間而把它所在的進程處死了。在這個方法中,
可以調用isFinishing()來判斷自己屬於哪一種死法。
如果我們在進行操作這時 有其他的動作要執行,這時程序就會處於 onStop()狀態,由於設備的內存資源消耗的太大,Android操作系統就會殺死一些進程,
來釋放資源,這時我們就要在殺死之前保存上次操作時的數據和狀態。
注意:要保存數據要覆蓋 : protected void onSaveInstanceState(Bundle outState) 在此方法中進行運行程序狀態和數據的保存。
直接上顯示源碼
前台布局源碼:
復制代碼
<LinearLayout xmlns:android="http://schemas.android.com/apk/res/android"
xmlns:tools="http://schemas.android.com/tools"
android:layout_width="fill_parent"
android:orientation="vertical"
android:layout_height="fill_parent"
tools:context=".MainActivity" >
<LinearLayout
android:layout_width="fill_parent"
android:layout_height="wrap_content"
android:orientation="horizontal">
<TextView android:layout_width="wrap_content"
android:layout_height="wrap_content"
android:text="用戶名:"/>
<EditText android:id="@+id/txt_account"
android:layout_width="fill_parent"
android:layout_height="wrap_content"/>
</LinearLayout>
<LinearLayout android:layout_width="fill_parent"
android:layout_height="wrap_content"
android:orientation="horizontal">
<TextView android:layout_width="wrap_content"
android:layout_height="wrap_content"
android:text="密 碼:"/>
<EditText android:id="@+id/txt_password"
android:layout_width="fill_parent"
android:layout_height="wrap_content"
android:inputType="textPassword"/>
</LinearLayout>
<LinearLayout android:layout_width="fill_parent"
android:layout_height="wrap_content"
android:orientation="horizontal">
<Button android:id="@+id/btn_login"
android:layout_width="wrap_content"
android:layout_height="wrap_content"
android:text="登陸"/>
<Button android:id="@+id/btn_exit"
android:layout_width="wrap_content"
android:layout_height="wrap_content"
android:text="退出"/>
</LinearLayout>
</LinearLayout>
復制代碼
後台源碼:
復制代碼
public class MainActivity extends Activity
{
private final static String TAG="MainActivity";
private final static String CONFIG="Account";
private EditText txt_account=null;
@Override
protected void onCreate(Bundle savedInstanceState)
{
super.onCreate(savedInstanceState);
setContentView(R.layout.activity_main);
Log.i(TAG, "MainActivity==onCreate");
txt_account=(EditText)findViewById(R.id.txt_account);
//判斷獲取保存的數據
if(null!=savedInstanceState && savedInstanceState.containsKey(CONFIG))
{
String account=savedInstanceState.getString(CONFIG);
txt_account.setText(account);
}
Button btn_login=(Button)findViewById(R.id.btn_login);
btn_login.setOnClickListener(listener);
Button btn_exit=(Button)findViewById(R.id.btn_exit);
btn_exit.setOnClickListener(listener);
}
//保存狀態覆蓋此方法
@Override
protected void onSaveInstanceState(Bundle outState)
{
super.onSaveInstanceState(outState);
Log.i(TAG, "MainActivity==onSaveInstanceState");
//保存數據
outState.putString(CONFIG,txt_account.getText().toString());
}
private OnClickListener listener=new OnClickListener()
{
@Override
public void onClick(View view)
{
Button btn=(Button)view;
switch (btn.getId())
{
case R.id.btn_login:
{
Intent intent=new Intent(MainActivity.this,SecondActivity.class);
MainActivity.this.startActivity(intent);
}
break;
case R.id.btn_exit:
finish();
break;
default:
break;
}
}
};
@Override
protected void onStart()
{
// TODO Auto-generated method stub
super.onStart();
Log.i(TAG, "MainActivity==onStart");
}
@Override
protected void onRestart()
{
// TODO Auto-generated method stub
super.onRestart();
Log.i(TAG, "MainActivity==onRestart");
}
@Override
protected void onResume()
{
// TODO Auto-generated method stub
super.onResume();
Log.i(TAG, "MainActivity==onResume");
}
@Override
protected void onPause()
{
// TODO Auto-generated method stub
super.onPause();
Log.i(TAG, "MainActivity==onPause");
}
@Override
protected void onStop()
{
// TODO Auto-generated method stub
super.onStop();
Log.i(TAG, "MainActivity==onStop");
}
@Override
protected void onDestroy()
{
// TODO Auto-generated method stub
super.onDestroy();
Log.i(TAG, "MainActivity==onDestroy");
}
@Override
public boolean onCreateOptionsMenu(Menu menu)
{
// Inflate the menu; this adds items to the action bar if it is present.
getMenuInflater().inflate(R.menu.activity_main, menu);
return true;
}
}
復制代碼
效果圖:
運行LogCat日志信息。此時我們點擊登錄到第二個Activity時 。就會調用 onSaveInstanceState()方法進行保存。
:
由於本人用模擬器無法演示:程序在OnStop()時被Android系統殺死。如果在後台被系統殺死前,就會調用onSaveInstanceState()方法進行保存。
如果此時在啟動應用程序 在onCreare()方法中 判斷 Bundle 的值 ,取出臨時保存的程序的運行狀態就數據。
2.Activity的主題設置。
android:theme
1. android:theme="@android:style/Theme.Dialog"
2. android:theme="@android:style/Theme.NoTitleBar"
3. android:theme="@android:style/Theme.NoTitleBar.Fullscreen"
4. android:theme="Theme.Light" android:theme="Theme.Light.NoTitleBar"
5. android:theme="Theme.Light.NoTitleBar.Fullscreen"
6. android:theme="Theme.Black" android:theme="Theme.Black.NoTitleBar"
7. android:theme="Theme.Black.NoTitleBar.Fullscreen"
8.android:theme="Theme.Wallpaper"
9.android:theme="Theme.Wallpaper.NoTitleBar"
10. android:theme="Theme.Wallpaper.NoTitleBar.Fullscreen"
11.android:theme="Translucent"
12. android:theme="Theme.Translucent.NoTitleBar"
13.android:theme="Theme.Translucent.NoTitleBar.Fullscreen"
14.android:theme="Theme.Panel" android:theme="Theme.Light.Panel"
簡單對主題進行截圖介紹:我們對SecondActivity 運行主題Theme
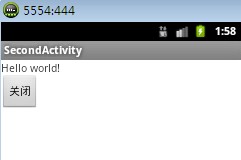
SencondActivity前台布局
復制代碼
<LinearLayout xmlns:android="http://schemas.android.com/apk/res/android"
xmlns:tools="http://schemas.android.com/tools"
android:layout_width="match_parent"
android:layout_height="match_parent"
android:orientation="vertical"
tools:context=".SecondActivity" >
<TextView
android:layout_width="wrap_content"
android:layout_height="wrap_content"
android:text="@string/hello_world" />
<Button android:id="@+id/btn_close"
android:layout_width="wrap_content"
android:layout_height="wrap_content"
android:text="關閉"/>
</LinearLayout>
復制代碼
後台源碼
復制代碼
public class SecondActivity extends Activity
{
@Override
protected void onCreate(Bundle savedInstanceState)
{
super.onCreate(savedInstanceState);
setContentView(R.layout.activity_second);
Button btn_close=(Button)findViewById(R.id.btn_close);
btn_close.setOnClickListener(new OnClickListener(){
@Override
public void onClick(View v)
{
finish();
}});
}
@Override
public boolean onCreateOptionsMenu(Menu menu)
{
// Inflate the menu; this adds items to the action bar if it is present.
getMenuInflater().inflate(R.menu.activity_second, menu);
return true;
}
}
復制代碼
沒有應用Theme主題是 截圖
在配置文件中添加主題:
<activity
android:name="com.example.activitysavestatedemo.SecondActivity"
android:label="@string/title_activity_second"
android:theme="@android:style/Theme.Dialog" >
</activity>
1.android:theme="@android:style/Theme.Dialog" 效果截圖: 彈出一個模式對話框,此時只能操作對話框。
 Andrdoid中對應用程序的行為攔截實現方式之----從底層C進行攔截
 安卓 .9.png圖片寫聊天對話框的 詳細教程
 AndroidEventBus ( 事件總線 ) 的設計與實現
 Android手機同時使用Wi-Fi和數據流量