編輯:關於Android編程
我們這裡的代碼沒有播放。但是有封裝和詳解,如下:
package com.ppmeet;

import java.io.File;
import java.io.FileInputStream;
import java.io.FileNotFoundException;
import java.io.FileOutputStream;
import java.io.IOException;
import android.app.Activity;
import android.graphics.PixelFormat;
import android.media.AudioFormat;
import android.media.AudioRecord;
import android.media.MediaRecorder;
import android.os.Bundle;
import android.view.View;
import android.view.View.OnClickListener;
import android.view.Window;
import android.view.WindowManager;
import android.widget.Button;

/**
 * class name:TestAudioRecord

 * class description:用AudioRecord來進行錄音

 * PS:

 *
 * @version 1.00 2011/09/21
 * @author CODYY)peijiangping
 */
public class TestAudioRecord extends Activity {
	// 音頻獲取源
	private int audioSource = MediaRecorder.AudioSource.MIC;
	// 設置音頻采樣率,44100是目前的標准,但是某些設備仍然支持22050,16000,11025
	private static int sampleRateInHz = 44100;
	// 設置音頻的錄制的聲道CHANNEL_IN_STEREO為雙聲道,CHANNEL_CONFIGURATION_MONO為單聲道
	private static int channelConfig = AudioFormat.CHANNEL_IN_STEREO;
	// 音頻數據格式:PCM 16位每個樣本。保證設備支持。PCM 8位每個樣本。不一定能得到設備支持。
	private static int audioFormat = AudioFormat.ENCODING_PCM_16BIT;
	// 緩沖區字節大小
	private int bufferSizeInBytes = 0;
	private Button Start;
	private Button Stop;
	private AudioRecord audioRecord;
	private boolean isRecord = false;// 設置正在錄制的狀態
	//AudioName裸音頻數據文件
	private static final String AudioName = /sdcard/love.raw;
	//NewAudioName可播放的音頻文件
	private static final String NewAudioName = /sdcard/new.wav;

	public void onCreate(Bundle savedInstanceState) {
		super.onCreate(savedInstanceState);
		getWindow().setFormat(PixelFormat.TRANSLUCENT);// 讓界面橫屏
		requestWindowFeature(Window.FEATURE_NO_TITLE);// 去掉界面標題
		getWindow().setFlags(WindowManager.LayoutParams.FLAG_FULLSCREEN,
				WindowManager.LayoutParams.FLAG_FULLSCREEN);
		// 重新設置界面大小
		setContentView(R.layout.main);
		init();
	}

	private void init() {
		Start = (Button) this.findViewById(R.id.start);
		Stop = (Button) this.findViewById(R.id.stop);
		Start.setOnClickListener(new TestAudioListener());
		Stop.setOnClickListener(new TestAudioListener());
		creatAudioRecord();
	}

	private void creatAudioRecord() {
		// 獲得緩沖區字節大小
		bufferSizeInBytes = AudioRecord.getMinBufferSize(sampleRateInHz,
				channelConfig, audioFormat);
		// 創建AudioRecord對象
		audioRecord = new AudioRecord(audioSource, sampleRateInHz,
				channelConfig, audioFormat, bufferSizeInBytes);
	}

	class TestAudioListener implements OnClickListener {

		@Override
		public void onClick(View v) {
			if (v == Start) {
				startRecord();
			}
			if (v == Stop) {
				stopRecord();
			}

		}

	}

	private void startRecord() {
		audioRecord.startRecording();
		// 讓錄制狀態為true
		isRecord = true;
		// 開啟音頻文件寫入線程
		new Thread(new AudioRecordThread()).start();
	}

	private void stopRecord() {
		close();
	}

	private void close() {
		if (audioRecord != null) {
			System.out.println(stopRecord);
			isRecord = false;//停止文件寫入
			audioRecord.stop();
			audioRecord.release();//釋放資源
			audioRecord = null;
		}
	}

	class AudioRecordThread implements Runnable {
		@Override
		public void run() {
			writeDateTOFile();//往文件中寫入裸數據
			copyWaveFile(AudioName, NewAudioName);//給裸數據加上頭文件
		}
	}

	/**
	 * 這裡將數據寫入文件,但是並不能播放,因為AudioRecord獲得的音頻是原始的裸音頻,
	 * 如果需要播放就必須加入一些格式或者編碼的頭信息。但是這樣的好處就是你可以對音頻的 裸數據進行處理,比如你要做一個愛說話的TOM
	 * 貓在這裡就進行音頻的處理,然後重新封裝 所以說這樣得到的音頻比較容易做一些音頻的處理。
	 */
	private void writeDateTOFile() {
		// new一個byte數組用來存一些字節數據,大小為緩沖區大小
		byte[] audiodata = new byte[bufferSizeInBytes];
		FileOutputStream fos = null;
		int readsize = 0;
		try {
			File file = new File(AudioName);
			if (file.exists()) {
				file.delete();
			}
			fos = new FileOutputStream(file);// 建立一個可存取字節的文件
		} catch (Exception e) {
			e.printStackTrace();
		}
		while (isRecord == true) {
			readsize = audioRecord.read(audiodata, 0, bufferSizeInBytes);
			if (AudioRecord.ERROR_INVALID_OPERATION != readsize) {
				try {
					fos.write(audiodata);
				} catch (IOException e) {
					e.printStackTrace();
				}
			}
		}
		try {
			fos.close();// 關閉寫入流
		} catch (IOException e) {
			e.printStackTrace();
		}
	}

	// 這裡得到可播放的音頻文件
	private void copyWaveFile(String inFilename, String outFilename) {
		FileInputStream in = null;
		FileOutputStream out = null;
		long totalAudioLen = 0;
		long totalDataLen = totalAudioLen + 36;
		long longSampleRate = sampleRateInHz;
		int channels = 2;
		long byteRate = 16 * sampleRateInHz * channels / 8;
		byte[] data = new byte[bufferSizeInBytes];
		try {
			in = new FileInputStream(inFilename);
			out = new FileOutputStream(outFilename);
			totalAudioLen = in.getChannel().size();
			totalDataLen = totalAudioLen + 36;
			WriteWaveFileHeader(out, totalAudioLen, totalDataLen,
					longSampleRate, channels, byteRate);
			while (in.read(data) != -1) {
				out.write(data);
			}
			in.close();
			out.close();
		} catch (FileNotFoundException e) {
			e.printStackTrace();
		} catch (IOException e) {
			e.printStackTrace();
		}
	}

	/**
	 * 這裡提供一個頭信息。插入這些信息就可以得到可以播放的文件。
	 * 為我為啥插入這44個字節,這個還真沒深入研究,不過你隨便打開一個wav
	 * 音頻的文件,可以發現前面的頭文件可以說基本一樣哦。每種格式的文件都有
	 * 自己特有的頭文件。
	 */
	private void WriteWaveFileHeader(FileOutputStream out, long totalAudioLen,
			long totalDataLen, long longSampleRate, int channels, long byteRate)
			throws IOException {
		byte[] header = new byte[44];
		header[0] = 'R'; // RIFF/WAVE header
		header[1] = 'I';
		header[2] = 'F';
		header[3] = 'F';
		header[4] = (byte) (totalDataLen & 0xff);
		header[5] = (byte) ((totalDataLen >> 8) & 0xff);
		header[6] = (byte) ((totalDataLen >> 16) & 0xff);
		header[7] = (byte) ((totalDataLen >> 24) & 0xff);
		header[8] = 'W';
		header[9] = 'A';
		header[10] = 'V';
		header[11] = 'E';
		header[12] = 'f'; // 'fmt ' chunk
		header[13] = 'm';
		header[14] = 't';
		header[15] = ' ';
		header[16] = 16; // 4 bytes: size of 'fmt ' chunk
		header[17] = 0;
		header[18] = 0;
		header[19] = 0;
		header[20] = 1; // format = 1
		header[21] = 0;
		header[22] = (byte) channels;
		header[23] = 0;
		header[24] = (byte) (longSampleRate & 0xff);
		header[25] = (byte) ((longSampleRate >> 8) & 0xff);
		header[26] = (byte) ((longSampleRate >> 16) & 0xff);
		header[27] = (byte) ((longSampleRate >> 24) & 0xff);
		header[28] = (byte) (byteRate & 0xff);
		header[29] = (byte) ((byteRate >> 8) & 0xff);
		header[30] = (byte) ((byteRate >> 16) & 0xff);
		header[31] = (byte) ((byteRate >> 24) & 0xff);
		header[32] = (byte) (2 * 16 / 8); // block align
		header[33] = 0;
		header[34] = 16; // bits per sample
		header[35] = 0;
		header[36] = 'd';
		header[37] = 'a';
		header[38] = 't';
		header[39] = 'a';
		header[40] = (byte) (totalAudioLen & 0xff);
		header[41] = (byte) ((totalAudioLen >> 8) & 0xff);
		header[42] = (byte) ((totalAudioLen >> 16) & 0xff);
		header[43] = (byte) ((totalAudioLen >> 24) & 0xff);
		out.write(header, 0, 44);
	}

	@Override
	protected void onDestroy() {
		close();
		super.onDestroy();
	}
}
 android6.0源碼分析之Camera API2.0下的Capture流程分析
android6.0源碼分析之Camera API2.0下的Capture流程分析 前面對Camera2的初始化以及預覽的相關流程進行了詳細分析,本文將會對Ca
 Android屬性動畫與自定義View——實現vivo x6更新系統的動畫效果
晚上好,現在是凌晨兩點半,然後我還在寫代碼。電腦裡播放著《凌晨兩點半》,晚上寫代碼,腦子更清醒,思路更清晰。今天聊聊屬性動畫和自定義View搭配使用,前面都講到自定義Vi
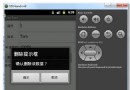 android 彈出提示框的使用(圖文實例)
復制代碼 代碼如下://刪除全部else if(id==R.id.btnDelet){new AlertDialog.Builder(this).setTitle(刪除提
 Android優化查詢加載大數量的本地相冊圖片
一、概述講解優化查詢相冊圖片之前,我們先來看下PM提出的需求,PM的需求很簡單,就是要做一個類似微信的本地相冊圖片查詢控件,主要包含兩個兩部分: 進入圖片選擇頁面就要顯