編輯:關於Android編程
public int getResourceId(String name) {
    try {
        // 根據資源的ID的變量名獲得Field的對象,使用反射機制來實現的
        Field field = R.drawable.class.getField(name);
        // 取得並返回資源的id的字段(靜態變量)的值,使用反射機制
        return Integer.parseInt(field.get(null).toString());
    } catch (Exception e) {
        // TODO: handle exception
    }
    return 0;
}
String html = "圖像1·textView2: ·注意需要創建Activity1.java圖像2
圖像3
"; html += "圖像4
圖像5
"; CharSequence charSequence = Html.fromHtml(html, new ImageGetter() { @Override public Drawable getDrawable(String source) { // TODO Auto-generated method stub // 獲得系統資源的信息,比如圖片信息 Drawable drawable = getResources().getDrawable( getResourceId(source)); // 第三個圖片文件按照50%的比例進行壓縮 if (source.equals("/uploadfile/Collfiles/20140222/20140222090743174.")) { drawable.setBounds(0, 0, drawable.getIntrinsicWidth() / 2, drawable.getIntrinsicHeight() / 2); } else { drawable.setBounds(0, 0, drawable.getIntrinsicWidth(), drawable.getIntrinsicHeight()); } return drawable; } }, null); textView.setText(charSequence); //Sets the movement method (arrow key handler) to be used for this TextView. This can be null to disallow using the arrow keys to move the cursor or scroll the view. textView.setMovementMethod(LinkMovementMethod.getInstance());
public void onCreate(Bundle savedInstanceState) {
    super.onCreate(savedInstanceState);
    setContentView(R.layout.main);
    TextView textView = (TextView) this.findViewById(R.id.textview);
    String text1 = "顯示Activity1";
    // 主要是用來拆分字符串
    SpannableString spannableString = new SpannableString(text1);
    spannableString.setSpan(new ClickableSpan() {
        @Override
        public void onClick(View widget) {
            // TODO Auto-generated method stub
            Intent intent = new Intent(Main.this, Activity1.class);
            startActivity(intent);
        }
    }, 0, text1.length(), Spanned.SPAN_EXCLUSIVE_EXCLUSIVE);
    textView.setText(spannableString);
    textView.setMovementMethod(LinkMovementMethod.getInstance());
}
·textView3:
跑馬燈效果
// Boolean that controls whether a view can take focus while in touch mode.
android:focusableInTouchMode="true"
// If set, causes words that are longer than the view is wide to be ellipsized instead of broken in the middle.
android:ellipsize="marquee"
// The number of times to repeat the marquee animation.
android:marqueeRepeatLimit="marquee_forever"
String html = "美國科學家羅伯特J。勒夫科維茲(Robert J. Lefkowitz)";
CharSequence charSequence = Html.fromHtml(html);
textView1.setText(charSequence);
textView1.setMovementMethod(LinkMovementMethod.getInstance());
·EditText1: ·實現表情輸入
try {
    Field field = R.drawable.class.getDeclaredField("face"
            + randomId);
    int resourceId = Integer.parseInt(field.get(null)
            .toString());
    // 在android中要顯示圖片信息,必須使用Bitmap位圖的對象來裝載
    Bitmap bitmap = BitmapFactory.decodeResource(
            getResources(), resourceId);
    ImageSpan imageSpan = new ImageSpan(Main.this, bitmap);
    SpannableString spannableString = new SpannableString(
            "face");
    spannableString.setSpan(imageSpan, 0, 4,
            Spannable.SPAN_EXCLUSIVE_EXCLUSIVE);
    editText.append(spannableString);
} catch (Exception e) {
    // TODO: handle exception
}
·EditText2:
·輸入特定字符:
//If set, specifies that this TextView has a numeric input method and that these specific characters are the ones that it will accept.
android:digits="0123456789"
android:digits="qwertyuiopasdfghjklzxcvbnm"
//The type of data being placed in a text field, used to help an input method decide how to let the user enter text.
android:inputType="number|textCapCharacters"
·AutoCompleteTextView/MultiAutoCompleteTextView:
auto = (AutoCompleteTextView) this.findViewById(R.id.autotext);
String[] autoStrings = new String[] { "聯合國", "聯合國安理會", "聯合國五個常任理事國",
        "Google", "Google Map" };
// 第二個參數表示適配器的下拉風格
ArrayAdapter adapter = new ArrayAdapter(Main.this,
        android.R.layout.simple_dropdown_item_1line, autoStrings);
auto.setAdapter(adapter);

mul = (MultiAutoCompleteTextView) this.findViewById(R.id.mul);
mul.setAdapter(adapter);
mul.setTokenizer(new MultiAutoCompleteTextView.CommaTokenizer());// 完成對選項的拆分的功能,以逗號進行拆分
·RadioButton:
·單選按鈕的使用:
int len = group.getChildCount();// 獲得單選按鈕組的選項個數
String msgString = "";
for (int i = 0; i < len; i++) {
    RadioButton radioButton = (RadioButton) group.getChildAt(i);
    if (radioButton.isChecked()) {
        msgString = radioButton.getText().toString();
        break;
    }
}
Toast.makeText(Main.this, msgString, 1).show();
·ToggleButton:
開關按鈕:實現布局內橫向和縱向的排列
ToggleButton toggle=(ToggleButton)findViewById(R.id.toggleButton1);
final LinearLayout layout=(LinearLayout)findViewById(R.id.lLayout);
toggle.setOnCheckedChangeListener(new OnCheckedChangeListener() {
    @Override
    public void onCheckedChanged(CompoundButton arg0, boolean arg1) {
        if(arg1){
            //設置垂直布局
            layout.setOrientation(1);
        }else{
            //設置水平布局
            layout.setOrientation(0);
        }
    }
});
·CheckBox:略
·
·SeekBar 拖動條
需要實現接口:
OnSeekBarChangeListener
android:max="100"
android:progress="30"
android:secondaryProgress="60"//第二位置進度
seekBar1.setOnSeekBarChangeListener(this);
seekBar2.setOnSeekBarChangeListener(this);
// 當滑動滑竿的時候會觸發的事件
@Override
public void onProgressChanged(SeekBar seekBar, int progress,
        boolean fromUser) {
    // TODO Auto-generated method stub
    if (seekBar.getId() == R.id.seekbar1) {
        textView1.setText("seekbar1的當前位置是:" + progress);
    } else {
        textView2.setText("seekbar2的當前位置是:" + progress);
    }
}
// 表示從哪裡開始拖動
@Override
public void onStartTrackingTouch(SeekBar seekBar) {
    // TODO Auto-generated method stub
    if (seekBar.getId() == R.id.seekbar1) {
        textView1.setText("seekbar1開始拖動");
    } else {
        textView1.setText("seekbar2開始拖動");
    }
}
// 表示從哪裡結束拖動
@Override
public void onStopTrackingTouch(SeekBar seekBar) {
    // TODO Auto-generated method stub
    if (seekBar.getId() == R.id.seekbar1) {
        textView1.setText("seekbar1停止拖動");
    } else {
        textView1.setText("seekbar2停止拖動");
    }
}
·ImageView1:
//Controls how the image should be resized or moved to match the size of this ImageView.
android:scaleType="center"
//Sets a drawable as the content of this ImageView.
android:src="@drawable/background"
// 設置第一個圖片的比例大小
// 表示寬度:200高度是100
imageView.setLayoutParams(new LinearLayout.LayoutParams(200, 100));
·ImageView2:實現圖片的裁剪和顯示功能:
package com.android.myimageview;
import android.R.integer;
import android.app.Activity;
import android.content.Intent;
import android.graphics.Bitmap;
import android.graphics.BitmapFactory;
import android.net.Uri;
import android.os.Bundle;
import android.view.View;
import android.view.View.OnClickListener;
import android.widget.Button;
import android.widget.ImageView;
public class Main extends Activity implements OnClickListener {
    /** Called when the activity is first created. */
    private Button selectImageBtn;
    private Button cutImageBtn;
    private ImageView imageView;
    // 聲明兩個靜態的整型變量,主要是用於意圖的返回的標志
    private static final int IMAGE_SELECT = 1;// 選擇圖片
    private static final int IMAGE_CUT = 2;// 裁剪圖片
    @Override
    public void onCreate(Bundle savedInstanceState) {
        super.onCreate(savedInstanceState);
        setContentView(R.layout.main);
        selectImageBtn = (Button) this.findViewById(R.id.selectImageBtn);
        cutImageBtn = (Button) this.findViewById(R.id.cutImageBtn);
        imageView = (ImageView) this.findViewById(R.id.imageview);
        selectImageBtn.setOnClickListener(this);
        cutImageBtn.setOnClickListener(this);
        // imageView.setImageBitmap(bm);
    }
    @Override
    protected void onActivityResult(int requestCode, int resultCode, Intent data) {
        // TODO Auto-generated method stub
        super.onActivityResult(requestCode, resultCode, data);
        if (resultCode == RESULT_OK) {
            // 處理圖片按照手機的屏幕大小顯示
            if (requestCode == IMAGE_SELECT) {
                Uri uri = data.getData();// 獲得圖片的路徑
                int dw = getWindowManager().getDefaultDisplay().getWidth();// 獲得屏幕的寬度
                int dh = getWindowManager().getDefaultDisplay().getHeight() / 2;
                try {
                    // 實現對圖片的裁剪的類,是一個匿名內部類
                    BitmapFactory.Options factory = new BitmapFactory.Options();
                    factory.inJustDecodeBounds = true;// 如果設置為true,允許查詢圖片不是按照像素分配給內存
                    Bitmap bmp = BitmapFactory.decodeStream(
                            getContentResolver().openInputStream(uri), null,
                            factory);
                    // 對圖片的寬度和高度對應手機的屏幕進行匹配
                    int hRatio = (int) Math
                            .ceil(factory.outHeight / (float) dh);
                    // 如果大於1 表示圖片的高度大於手機屏幕的高度
                    int wRatio = (int) Math.ceil(factory.outWidth / (float) dw);
                    // 如果大於1 表示圖片的寬度大於手機屏幕的寬度
                    // 縮放到1/radio的尺寸和1/radio^2像素
                    if (hRatio > 1 || wRatio > 1) {
                        if (hRatio > wRatio) {
                            factory.inSampleSize = hRatio;
                        } else {
                            factory.inSampleSize = wRatio;
                        }
                    }
                    // 對
                    factory.inJustDecodeBounds = false;
                    // 使用BitmapFactory對圖片進行適屏的操作,
                    bmp = BitmapFactory.decodeStream(getContentResolver()
                            .openInputStream(uri), null, factory);
                    imageView.setImageBitmap(bmp);
                } catch (Exception e) {
                    // TODO: handle exception
                }
                // 表示裁剪圖片
            } else if (requestCode == IMAGE_CUT) {
                Bitmap bitmap = data.getParcelableExtra("data");
                imageView.setImageBitmap(bitmap);
            }
        }
    }
    @Override
    public void onClick(View v) {
        // TODO Auto-generated method stub
        switch (v.getId()) {
        case R.id.selectImageBtn:
            // 如何提取手機的圖片的,並且進行選擇圖片的功能
            Intent intent = new Intent(
                    Intent.ACTION_PICK,
                    android.provider.MediaStore.Images.Media.EXTERNAL_CONTENT_URI);// 打開手機的圖片庫
            startActivityForResult(intent, IMAGE_SELECT);
            break;

        case R.id.cutImageBtn:
            Intent intent2 = getImageClipIntent();
            startActivityForResult(intent2, IMAGE_CUT);
            break;
        }
    }
    private Intent getImageClipIntent() {
        // TODO Auto-generated method stub
        Intent intent = new Intent(Intent.ACTION_GET_CONTENT, null);
        // 實現對圖片的裁剪,必須要設置圖片的屬性和大小
        intent.setType("image/*");// 獲取任意的圖片類型
        intent.putExtra("crop", "true");// 滑動選中圖片區域
        intent.putExtra("aspectX", 1);// 表示剪切框的比例1:1的效果
        intent.putExtra("aspectY", 1);
        intent.putExtra("outputX", 80);// 指定輸出圖片的大小
        intent.putExtra("outputY", 80);
        intent.putExtra("return-data", true);
        return intent;
    }
}
·ImageView2:從網絡上獲取ImageView顯示在本地
·1.編寫HttpUtils.java類
package com.android.myhttp;
import java.io.ByteArrayOutputStream;
import java.io.IOException;
import java.io.InputStream;
import java.net.HttpURLConnection;
import java.net.URL;
public class HttpUtils {
    private final static String URL_PATH = "http://192.168.0.102:8080/myhttp/koala.jpg";// 訪問網路圖片的路徑
    public HttpUtils() {
        // TODO Auto-generated constructor stub
    }
    /**
     * 從網絡中獲取圖片信息,以流的形式返回
     *
     * @return
     */
    public static InputStream getImageViewInputStream() throws IOException {
        InputStream inputStream = null;

        URL url = new URL(URL_PATH);
        if (url != null) {
            HttpURLConnection httpURLConnection = (HttpURLConnection) url
                    .openConnection();
            httpURLConnection.setConnectTimeout(3000);// 設置連接超時的時間
            httpURLConnection.setRequestMethod("GET");
            httpURLConnection.setDoInput(true);
            int response_code = httpURLConnection.getResponseCode();
            if (response_code == 200) {
                inputStream = httpURLConnection.getInputStream();
            }
        }
        return inputStream;
    }
    /**
     * 從網絡中獲取圖片信息,以字節數組的形式返回
     *
     * @return
     */
    public static byte[] getImageViewArray() {
        byte[] data = null;
        InputStream inputStream = null;
        // 不需要關閉的輸出流,直接寫入到內存中
        ByteArrayOutputStream outputStream = new ByteArrayOutputStream();

        try {
            URL url = new URL(URL_PATH);
            if (url != null) {
                HttpURLConnection httpURLConnection = (HttpURLConnection) url
                        .openConnection();
                httpURLConnection.setConnectTimeout(3000);// 設置連接超時的時間
                httpURLConnection.setRequestMethod("GET");// 請求方法
                httpURLConnection.setDoInput(true);// 打開輸入流
                int response_code = httpURLConnection.getResponseCode();
                int len = 0;
                byte[] b_data = new byte[1024];

                if (response_code == 200) {
                    inputStream = httpURLConnection.getInputStream();
                    while ((len = inputStream.read(b_data)) != -1) {
                        outputStream.write(b_data, 0, len);
                    }
                    data = outputStream.toByteArray();
                }
            }
        } catch (Exception e) {
            // TODO: handle exception
        } finally {
            if (inputStream != null) {
                try {
                    inputStream.close();
                } catch (IOException e) {
                    // TODO Auto-generated catch block
                    e.printStackTrace();
                }
            }
        }
        return data;
    }
}
·2.Main.java
package com.android.myhttp;
import java.io.IOException;
import java.io.InputStream;
import android.app.Activity;
import android.graphics.Bitmap;
import android.graphics.BitmapFactory;
import android.os.Bundle;
import android.view.View;
import android.widget.Button;
import android.widget.CursorAdapter;
import android.widget.ImageView;
public class Main extends Activity {
    /** Called when the activity is first created. */
    private Button button;
    private ImageView imageView;
    @Override
    public void onCreate(Bundle savedInstanceState) {
        super.onCreate(savedInstanceState);
        setContentView(R.layout.main);
        button = (Button) this.findViewById(R.id.button);
        imageView = (ImageView) this.findViewById(R.id.imageview);
        button.setOnClickListener(new View.OnClickListener() {
            @Override
            public void onClick(View v) {
                // TODO Auto-generated method stub
                // try {
                // InputStream inputStream = HttpUtils
                // .getImageViewInputStream();
                // Bitmap bitmap = BitmapFactory.decodeStream(inputStream);
                // imageView.setImageBitmap(bitmap);
                // } catch (IOException e) {
                // // TODO: handle exception
                // }
                byte[] data = HttpUtils.getImageViewArray();
                Bitmap bitmap = BitmapFactory.decodeByteArray(data, 0,
                        data.length);
                imageView.setImageBitmap(bitmap);
            }
        });
    }
}
·DatePicker和TimePicker
datePicker.init(2001, 1, 25, this);// 初始化日期
timePicker.setIs24HourView(true);// 顯示時間是否是按照24小時制
timePicker.setOnTimeChangedListener(this);// 注冊事件
// 時間控件的觸發
public void onTimeChanged(TimePicker view, int hourOfDay, int minute) {
    // TODO Auto-generated method stub
    Toast.makeText(Main.this,
            "hourOfDay:" + hourOfDay + "minute:" + minute, 1).show();
}
// 日期控件的觸發
public void onDateChanged(DatePicker view, int year, int monthOfYear,
        int dayOfMonth) {
    // TODO Auto-generated method stub
    Calendar calendar = Calendar.getInstance();
    calendar.set(datePicker.getYear(), datePicker.getMonth(),
            datePicker.getDayOfMonth(), timePicker.getCurrentHour(),
            timePicker.getCurrentMinute());
    SimpleDateFormat format = new SimpleDateFormat("yyyy年MM月dd日    HH:mm");
    textView.setText(format.format(calendar.getTime()));
}
·
·
·
·
·點此進入下篇:
·Android 學習(三)下: UI 控件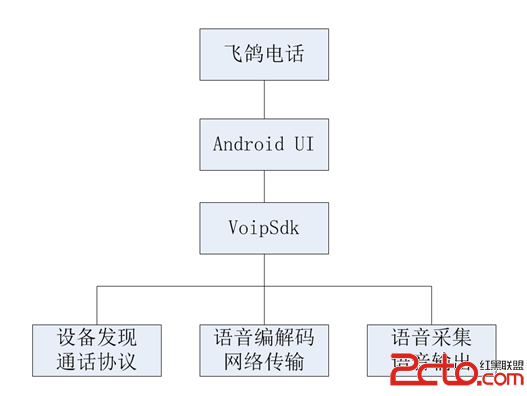 PigeonCall:一款Android VoIP網絡電話App架構的介紹
1.概述 PigeonCall,中文名“飛鴿電話”,是一款Android平台的VoIP網絡電話應用,但只工作於局域網,支持給任意局域網內
 Android資源圖片讀取機制
在新建一個Android項目時,在res目錄下會自動生成幾個drawable文件夾,drawable-ldpi,drawable-mdpi,drawable-hdpi,一
 Android TextView設置不同的顏色字體
這裡記錄一個比較方便的方式來解決Textview設置不同顏色的字體的方法。可能第一反應是布局的嵌套,這個方法肯定可以啊,但是肯定不推薦啊,布局要盡量減少布局的嵌套,其次,
 unity3d發布apk在android虛擬機中運行的詳細步驟(unity3d導出android apk)
unity3d發布apk在android虛擬機中運行的詳細步驟(unity3d導出android apk),總的流程分為以下6個步驟:1、安裝java_jdk2、配置ja
 Android Application Thread CPU GC Operatiing and OOM Question 0603-隨手筆記
在之前app寫完測試的時候,跑完整個老化階段包括數據收發都沒問題,鍵入