編輯:關於Android編程
本文原博客:http://hubingforever.blog.163.com/blog/static/171040579201372915716149/
在Android源碼的system\extras(比如Android4.0\system\extras)下新建一個目錄,比如su_robin目錄
在su_robin目錄下包含以三個文件: su.h文件
#ifndef SU_h #define SU_h 1
#ifdef LOG_TAG#undef LOG_TAG#endif#define LOG_TAG "robin"
#define REQUESTOR "com.noshufou.android.su"#define REQUESTOR_DATA_PATH "/data/data/" REQUESTOR#define REQUESTOR_CACHE_PATH "/dev/" REQUESTOR
#define REQUESTOR_DATABASES_PATH REQUESTOR_DATA_PATH "/databases"#define REQUESTOR_DATABASE_PATH REQUESTOR_DATABASES_PATH "/permissions.sqlite"
/* intent actions */#define ACTION_REQUEST REQUESTOR ".REQUEST"#define ACTION_RESULT  REQUESTOR ".RESULT"
#define DEFAULT_SHELL "/system/bin/sh"
#ifdef SU_LEGACY_BUILD#define VERSION_EXTRA	"l"#else#define VERSION_EXTRA	""#endif
#define VERSION "3.1.1" VERSION_EXTRA#define VERSION_CODE 17
#define DATABASE_VERSION 6#define PROTO_VERSION 0
struct su_initiator {    pid_t pid;    unsigned uid;    char bin[PATH_MAX];    char args[4096];};
struct su_request {    unsigned uid;    int login;    int keepenv;    char *shell;    char *command;    char **argv;    int argc;    int optind;};
struct su_context {    struct su_initiator from;    struct su_request to;    mode_t umask;};
enum {    DB_INTERACTIVE,    DB_DENY,    DB_ALLOW};#endif
注意,這裡的很多東西是多余。
su.c文件
#includeAndroid.mk文件#include #include #include #include #include #include #include #include #include #include #include #include #include #include #include #include #include #include #include #include "su.h" int main(int argc, char *argv[]){ LOGI("hello !robin-su begin %d !",getuid()); printf("hello !robin-su begin"); int uid=0; int gid=0; if(setgid(gid) || setuid(uid)) { LOGI("robin su: permission denied\n"); fprintf(stderr,"su: permission denied\n"); return 1; } char command[1024]; LOGI("hello !robin-su end %d !",getuid()); printf("hello !robin-su end"); /* Default exec shell. */ execlp("/system/bin/sh", "sh", NULL); fprintf(stderr, "su: exec failed\n"); return 1;}
LOCAL_PATH := $(call my-dir)include $(CLEAR_VARS)
LOCAL_MODULE := surLOCAL_SRC_FILES := su.c
LOCAL_STATIC_LIBRARIES := \    liblog \    libc \
LOCAL_MODULE_PATH := $(TARGET_OUT_OPTIONAL_EXECUTABLES)LOCAL_MODULE_TAGS := eng debugLOCAL_FORCE_STATIC_EXECUTABLE := true
include $(BUILD_EXECUTABLE)
編譯Android源碼,生成rom 如果你還不知道如何編譯Android源碼,請參照 http://source.android.com/source/building-running.html 在out\target\product\generic\system\xbin目錄下找到生成的可執行文件sur,就是我們自己制作的su文件 通過adb push命令將其推送到手機上的system\xbin目錄, 通過執行系統原來自己帶的su切換到root用戶,對手機上sur文件執行chmod 6777 sur命令。 使文件屬性變為rwsrwsrwx,如下所示 rwsrwsrwx root root 58960 2013-08-29 11:31 sur 然後你可以通過執行系統原來自己帶的sur切換到root用戶 關於chmod 6777 sur命令請參考《chmod命令基本篇》和請參考《chmod命令高級篇( SetUID與SetGID標識位)》 關於setuid請參考《setuid()與setgid()的使用 》 結束!
 android4.4 webview chromium實現硬件渲染的chromium內核結構
這裡只關注與原生chromium不同的幾個類。 一.DrawGLFunctor android4.4 webview chromium的硬件渲染是android ui系統
 Android N 的新特性
2016年5月19日,谷歌在美國加州的山景城舉辦了GoogleI/O開發者大會中發布。在系統界面上谷歌或許已經貧乏,這也是手機整體大環境所致,因此谷歌也只好轉向修補方面,
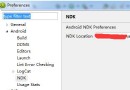 Android NDK 開發(筆記一)
接引:Android NDK r7以上集成了cywin,在開發NDK時不用那麼麻煩的在去下載與配置cywin.Android NDK 開發步驟:Eclipse 首先配置N
 詳解android使用ItemDecoration 懸浮導航欄效果
開始逐漸領略到ItemDecoration的美~今天讓我 使用 ItemDecoration 來完成 可推動的懸浮導航欄的效果,最終實現的效果如下圖:具體實現步驟如下:根