有好幾周沒寫東西了,一方面是因為前幾個周末都有些事情,另外也是因為沒能找到好的寫作方向,或者說有些話題
值得分享、寫作,可是自己積累還不夠,沒辦法只好悶頭繼續研究了。這段時間一邊在寫代碼,一邊也在想Android中
究竟是如何將R.layout.xxx_view.xml這樣的布局文件加載到Android系統的view層次結構中的(即我們常說的view樹)。
這期間一方面自己研究了下源碼,另一方面也在網上搜索了下相關文章,發現了2篇很不錯的同主題文章,推薦給大家:
http://blog.csdn.net/qinjuning/article/details/7226787 & http://blog.csdn.net/bigconvience/article/details/28626631。
我們在開發中接觸的最早的應該算是Activity.setContentView(int resourceId)方法了,我們知道在Activity的onCreate方法
中調用此方法可以把我們提供的根布局文件加載到activity中並顯示出來。很自然地我們就從它開始說起吧,廢話不多說上代碼:
復制代碼
/**
* Set the activity content from a layout resource. The resource will be
* inflated, adding all top-level views to the activity.
*
* @param layoutResID Resource ID to be inflated.
*
* @see #setContentView(android.view.View)
* @see #setContentView(android.view.View, android.view.ViewGroup.LayoutParams)
*/
public void setContentView(int layoutResID) { // 實際上其內部都是delegate給了getWindow()方法
getWindow().setContentView(layoutResID);
initActionBar();
}
/**
* Set the activity content to an explicit view. This view is placed
* directly into the activity's view hierarchy. It can itself be a complex
* view hierarchy. When calling this method, the layout parameters of the
* specified view are ignored. Both the width and the height of the view are
* set by default to {@link ViewGroup.LayoutParams#MATCH_PARENT}. To use
* your own layout parameters, invoke
* {@link #setContentView(android.view.View, android.view.ViewGroup.LayoutParams)}
* instead.
*
* @param view The desired content to display.
*
* @see #setContentView(int)
* @see #setContentView(android.view.View, android.view.ViewGroup.LayoutParams)
*/
public void setContentView(View view) {
getWindow().setContentView(view);
initActionBar();
}
/**
* Set the activity content to an explicit view. This view is placed
* directly into the activity's view hierarchy. It can itself be a complex
* view hierarchy.
*
* @param view The desired content to display.
* @param params Layout parameters for the view.
*
* @see #setContentView(android.view.View)
* @see #setContentView(int)
*/
public void setContentView(View view, ViewGroup.LayoutParams params) {
getWindow().setContentView(view, params);
initActionBar();
}
/**
* Add an additional content view to the activity. Added after any existing
* ones in the activity -- existing views are NOT removed.
*
* @param view The desired content to display.
* @param params Layout parameters for the view.
*/
public void addContentView(View view, ViewGroup.LayoutParams params) {
getWindow().addContentView(view, params);
initActionBar();
}
復制代碼
我們可以看到setContentView方法內部都delegate給了getWindow()方法,這裡順便也把addContentView提及了下,setXXX有
替換的意思,addXXX則是往後面在加一個,即以前的還在。緊接著我們看下Activity裡的window是咋來的吧,代碼如下:
復制代碼
private Window mWindow; // Activity的一個字段
/**
* Retrieve the current {@link android.view.Window} for the activity.
* This can be used to directly access parts of the Window API that
* are not available through Activity/Screen.
*
* @return Window The current window, or null if the activity is not
* visual.
*/
public Window getWindow() {
return mWindow;
}
final void attach(Context context, ActivityThread aThread, Instrumentation instr, IBinder token,
Application application, Intent intent, ActivityInfo info, CharSequence title,
Activity parent, String id, NonConfigurationInstances lastNonConfigurationInstances,
Configuration config) {
attach(context, aThread, instr, token, 0, application, intent, info, title, parent, id,
lastNonConfigurationInstances, config);
}
final void attach(Context context, ActivityThread aThread,
Instrumentation instr, IBinder token, int ident,
Application application, Intent intent, ActivityInfo info,
CharSequence title, Activity parent, String id,
NonConfigurationInstances lastNonConfigurationInstances,
Configuration config) {
attachBaseContext(context);
mFragments.attachActivity(this, mContainer, null);
mWindow = PolicyManager.makeNewWindow(this); // 注意這行代碼,這裡實際上創建了一個PhoneWindow的實例
mWindow.setCallback(this); // window對象裡的Callback接口的實現是Activity
mWindow.getLayoutInflater().setPrivateFactory(this);
if (info.softInputMode != WindowManager.LayoutParams.SOFT_INPUT_STATE_UNSPECIFIED) {
mWindow.setSoftInputMode(info.softInputMode);
}
if (info.uiOptions != 0) {
mWindow.setUiOptions(info.uiOptions);
}
mUiThread = Thread.currentThread();
mMainThread = aThread;
mInstrumentation = instr;
mToken = token;
mIdent = ident;
mApplication = application;
mIntent = intent;
mComponent = intent.getComponent();
mActivityInfo = info;
mTitle = title;
mParent = parent;
mEmbeddedID = id;
mLastNonConfigurationInstances = lastNonConfigurationInstances;
mWindow.setWindowManager(
(WindowManager)context.getSystemService(Context.WINDOW_SERVICE),
mToken, mComponent.flattenToString(),
(info.flags & ActivityInfo.FLAG_HARDWARE_ACCELERATED) != 0);
if (mParent != null) {
mWindow.setContainer(mParent.getWindow());
}
mWindowManager = mWindow.getWindowManager();
mCurrentConfig = config;
}
復制代碼
這裡我們順便解釋下Window、Activity、View的區別和聯系:
首先Window是個抽象類,封裝了頂層Window樣式和行為的策略類,它的實例被用作頂層view加到window manager裡面,它提供了
標准的UI策略,如背景、標題欄、默認的key處理邏輯等等。在Android系統中有一個唯一的實現PhoneWindow,當我們需要window的
時候就會有一個PhoneWindow的實例被new出來。每個Activity都有一個與之關聯的window對象,Activity在其上繪制其UI。
Window對象裡又有一個mDecor對象,它是window裡的頂層view(也就是說view的層次結構從它開始,它是view樹的根)。
更多的解釋可以參考這個問題: http://stackoverflow.com/questions/9451755/what-is-an-android-window 。
接著我們看看上面代碼裡具體給mWindow對象賦值的代碼,先來看看com.android.internal.policy.PolicyManager類:
復制代碼
public final class PolicyManager {
private static final String POLICY_IMPL_CLASS_NAME =
"com.android.internal.policy.impl.Policy";
private static final IPolicy sPolicy;
static {
// Pull in the actual implementation of the policy at run-time
try {
Class policyClass = Class.forName(POLICY_IMPL_CLASS_NAME); // 加載class文件
sPolicy = (IPolicy)policyClass.newInstance(); // 根據Class對象,創建個實例
} catch (ClassNotFoundException ex) {
throw new RuntimeException(
POLICY_IMPL_CLASS_NAME + " could not be loaded", ex);
} catch (InstantiationException ex) {
throw new RuntimeException(
POLICY_IMPL_CLASS_NAME + " could not be instantiated", ex);
} catch (IllegalAccessException ex) {
throw new RuntimeException(
POLICY_IMPL_CLASS_NAME + " could not be instantiated", ex);
}
}
// Cannot instantiate this class
private PolicyManager() {}
// The static methods to spawn new policy-specific objects
public static Window makeNewWindow(Context context) {
return sPolicy.makeNewWindow(context);
}
public static LayoutInflater makeNewLayoutInflater(Context context) {
return sPolicy.makeNewLayoutInflater(context);
}
public static WindowManagerPolicy makeNewWindowManager() {
return sPolicy.makeNewWindowManager();
}
public static FallbackEventHandler makeNewFallbackEventHandler(Context context) {
return sPolicy.makeNewFallbackEventHandler(context);
}
}
復制代碼
接著我們看下sPolicy的具體實現類,com.android.internal.policy.impl.Policy.java文件:
復制代碼
public class Policy implements IPolicy {
private static final String TAG = "PhonePolicy";
private static final String[] preload_classes = {
"com.android.internal.policy.impl.PhoneLayoutInflater",
"com.android.internal.policy.impl.PhoneWindow",
"com.android.internal.policy.impl.PhoneWindow$1",
"com.android.internal.policy.impl.PhoneWindow$DialogMenuCallback",
"com.android.internal.policy.impl.PhoneWindow$DecorView",
"com.android.internal.policy.impl.PhoneWindow$PanelFeatureState",
"com.android.internal.policy.impl.PhoneWindow$PanelFeatureState$SavedState",
};
static {
// For performance reasons, preload some policy specific classes when
// the policy gets loaded.
for (String s : preload_classes) {
try {
Class.forName(s); // 預加載這些類的class文件,以便後面new他們的對象
} catch (ClassNotFoundException ex) {
Log.e(TAG, "Could not preload class for phone policy: " + s);
}
}
}
public Window makeNewWindow(Context context) {
return new PhoneWindow(context); // 至此我們看到了Android系統裡真正且唯一的Window類型,PhoneWindow
}
public LayoutInflater makeNewLayoutInflater(Context context) {
return new PhoneLayoutInflater(context); // LayoutInflater接口的實際實現者,以後我們的代碼裡出現的類似
} // (LayoutInflater) context.getSystemService(Context.LAYOUT_INFLATER_SERVICE)
// 這樣的代碼,返回的都是此對象。
public WindowManagerPolicy makeNewWindowManager() {
return new PhoneWindowManager();
}
public FallbackEventHandler makeNewFallbackEventHandler(Context context) {
return new PhoneFallbackEventHandler(context);
}
}
復制代碼
至此我們看清楚了Activity中的mWindow對象實際上是PhoneWindow的實例。搞清楚了window對象咋來的,接下來我們可以
分析其setContentView方法了,代碼如下:
復制代碼
// This is the top-level view of the window, containing the window decor.
private DecorView mDecor; // window中的頂層view
// This is the view in which the window contents are placed. It is either
// mDecor itself, or a child of mDecor where the contents go.
private ViewGroup mContentParent; // Android為我們提供的window布局文件中id=@android:id/content的view
// 後面我們會看幾個典型的window布局文件
private LayoutInflater mLayoutInflater;
public PhoneWindow(Context context) {
super(context);
mLayoutInflater = LayoutInflater.from(context); // 我們在上文中提到的通過context.getSystemService實現
}
@Override
public void setContentView(int layoutResID) {
if (mContentParent == null) { // 第一次調用的時候執行
installDecor();
} else { // 可以看出setContentView支持多次調用,只是相當於把之前的view層次結構扔掉,從頭再來而已
mContentParent.removeAllViews();
}
mLayoutInflater.inflate(layoutResID, mContentParent); // 將我們dev提供的頂層layout文件加到mContentParent裡面
final Callback cb = getCallback();
if (cb != null && !isDestroyed()) {
cb.onContentChanged(); // 調用回調函數,一般是Activity或Dialog
}
}
@Override
public void setContentView(View view) { // 默認的LayoutParams是MATCH_PARENT,當然你也可以指定
setContentView(view, new ViewGroup.LayoutParams(MATCH_PARENT, MATCH_PARENT));
}
@Override
public void setContentView(View view, ViewGroup.LayoutParams params) {
if (mContentParent == null) {
installDecor();
} else {
mContentParent.removeAllViews();
}
mContentParent.addView(view, params);
final Callback cb = getCallback();
if (cb != null && !isDestroyed()) {
cb.onContentChanged();
}
}
@Override
public void addContentView(View view, ViewGroup.LayoutParams params) {
if (mContentParent == null) {
installDecor();
} // 注意相比setContentView來說,少了mContentParent.removeAllViews()調用,
// 所以效果就是之前的view層次結構還在,只是新增了一個view
mContentParent.addView(view, params);
final Callback cb = getCallback();
if (cb != null && !isDestroyed()) {
cb.onContentChanged();
}
}
復制代碼
接著我們看看installDecor相關的實現:
復制代碼
private void installDecor() {
if (mDecor == null) {
mDecor = generateDecor(); // new一個DecorView(一種特殊的FrameLayout)
mDecor.setDescendantFocusability(ViewGroup.FOCUS_AFTER_DESCENDANTS);
mDecor.setIsRootNamespace(true);
if (!mInvalidatePanelMenuPosted && mInvalidatePanelMenuFeatures != 0) {
mDecor.postOnAnimation(mInvalidatePanelMenuRunnable);
}
}
if (mContentParent == null) {
mContentParent = generateLayout(mDecor); // 初始化mContentParent
// Set up decor part of UI to ignore fitsSystemWindows if appropriate.
mDecor.makeOptionalFitsSystemWindows();
mTitleView = (TextView)findViewById(com.android.internal.R.id.title);
if (mTitleView != null) {
mTitleView.setLayoutDirection(mDecor.getLayoutDirection());
if ((getLocalFeatures() & (1 << FEATURE_NO_TITLE)) != 0) {
View titleContainer = findViewById(com.android.internal.R.id.title_container);
if (titleContainer != null) {
titleContainer.setVisibility(View.GONE);
} else {
mTitleView.setVisibility(View.GONE);
}
if (mContentParent instanceof FrameLayout) {
((FrameLayout)mContentParent).setForeground(null);
}
} else {
mTitleView.setText(mTitle);
}
} else {
mActionBar = (ActionBarView) findViewById(com.android.internal.R.id.action_bar);
if (mActionBar != null) {
mActionBar.setWindowCallback(getCallback());
if (mActionBar.getTitle() == null) {
mActionBar.setWindowTitle(mTitle);
}
final int localFeatures = getLocalFeatures();
if ((localFeatures & (1 << FEATURE_PROGRESS)) != 0) {
mActionBar.initProgress();
}
if ((localFeatures & (1 << FEATURE_INDETERMINATE_PROGRESS)) != 0) {
mActionBar.initIndeterminateProgress();
}
final ActionBarOverlayLayout abol = (ActionBarOverlayLayout) findViewById(
com.android.internal.R.id.action_bar_overlay_layout);
if (abol != null) {
abol.setOverlayMode(
(localFeatures & (1 << FEATURE_ACTION_BAR_OVERLAY)) != 0);
}
boolean splitActionBar = false;
final boolean splitWhenNarrow =
(mUiOptions & ActivityInfo.UIOPTION_SPLIT_ACTION_BAR_WHEN_NARROW) != 0;
if (splitWhenNarrow) {
splitActionBar = getContext().getResources().getBoolean(
com.android.internal.R.bool.split_action_bar_is_narrow);
} else {
splitActionBar = getWindowStyle().getBoolean(
com.android.internal.R.styleable.Window_windowSplitActionBar, false);
}
final ActionBarContainer splitView = (ActionBarContainer) findViewById(
com.android.internal.R.id.split_action_bar);
if (splitView != null) {
mActionBar.setSplitView(splitView);
mActionBar.setSplitActionBar(splitActionBar);
mActionBar.setSplitWhenNarrow(splitWhenNarrow);
final ActionBarContextView cab = (ActionBarContextView) findViewById(
com.android.internal.R.id.action_context_bar);
cab.setSplitView(splitView);
cab.setSplitActionBar(splitActionBar);
cab.setSplitWhenNarrow(splitWhenNarrow);
} else if (splitActionBar) {
Log.e(TAG, "Requested split action bar with " +
"incompatible window decor! Ignoring request.");
}
if ((mResourcesSetFlags & FLAG_RESOURCE_SET_ICON) != 0 ||
(mIconRes != 0 && !mActionBar.hasIcon())) {
mActionBar.setIcon(mIconRes);
} else if ((mResourcesSetFlags & FLAG_RESOURCE_SET_ICON) == 0 &&
mIconRes == 0 && !mActionBar.hasIcon()) {
mActionBar.setIcon(
getContext().getPackageManager().getDefaultActivityIcon());
mResourcesSetFlags |= FLAG_RESOURCE_SET_ICON_FALLBACK;
}
if ((mResourcesSetFlags & FLAG_RESOURCE_SET_LOGO) != 0 ||
(mLogoRes != 0 && !mActionBar.hasLogo())) {
mActionBar.setLogo(mLogoRes);
}
// Post the panel invalidate for later; avoid application onCreateOptionsMenu
// being called in the middle of onCreate or similar.
mDecor.post(new Runnable() {
public void run() {
// Invalidate if the panel menu hasn't been created before this.
PanelFeatureState st = getPanelState(FEATURE_OPTIONS_PANEL, false);
if (!isDestroyed() && (st == null || st.menu == null)) {
invalidatePanelMenu(FEATURE_ACTION_BAR);
}
}
});
}
}
}
}
protected DecorView generateDecor() { // 我會在合適的時候專門分析下DecorView
return new DecorView(getContext(), -1);
}
protected ViewGroup generateLayout(DecorView decor) {
// Apply data from current theme.
TypedArray a = getWindowStyle();
if (false) {
System.out.println("From style:");
String s = "Attrs:";
for (int i = 0; i < com.android.internal.R.styleable.Window.length; i++) {
s = s + " " + Integer.toHexString(com.android.internal.R.styleable.Window[i]) + "="
+ a.getString(i);
}
System.out.println(s);
}
// 接下來的一大堆代碼都是從window的theme中獲取屬性值,然後調用相應的requestFeature或setFlags方法
mIsFloating = a.getBoolean(com.android.internal.R.styleable.Window_windowIsFloating, false);
int flagsToUpdate = (FLAG_LAYOUT_IN_SCREEN|FLAG_LAYOUT_INSET_DECOR)
& (~getForcedWindowFlags());
if (mIsFloating) { // 比如這裡,如果是floating的(如dialog),則設置layout為WRAP_CONTENT,即非全屏
setLayout(WRAP_CONTENT, WRAP_CONTENT);
setFlags(0, flagsToUpdate);
} else {
setFlags(FLAG_LAYOUT_IN_SCREEN|FLAG_LAYOUT_INSET_DECOR, flagsToUpdate);
}
if (a.getBoolean(com.android.internal.R.styleable.Window_windowNoTitle, false)) {
requestFeature(FEATURE_NO_TITLE);
} else if (a.getBoolean(com.android.internal.R.styleable.Window_windowActionBar, false)) {
// Don't allow an action bar if there is no title.
requestFeature(FEATURE_ACTION_BAR);
}
if (a.getBoolean(com.android.internal.R.styleable.Window_windowActionBarOverlay, false)) {
requestFeature(FEATURE_ACTION_BAR_OVERLAY);
}
if (a.getBoolean(com.android.internal.R.styleable.Window_windowActionModeOverlay, false)) {
requestFeature(FEATURE_ACTION_MODE_OVERLAY);
}
if (a.getBoolean(com.android.internal.R.styleable.Window_windowFullscreen, false)) {
setFlags(FLAG_FULLSCREEN, FLAG_FULLSCREEN & (~getForcedWindowFlags()));
}
if (a.getBoolean(com.android.internal.R.styleable.Window_windowTranslucentStatus,
false)) {
setFlags(FLAG_TRANSLUCENT_STATUS, FLAG_TRANSLUCENT_STATUS
& (~getForcedWindowFlags()));
}
if (a.getBoolean(com.android.internal.R.styleable.Window_windowTranslucentNavigation,
false)) {
setFlags(FLAG_TRANSLUCENT_NAVIGATION, FLAG_TRANSLUCENT_NAVIGATION
& (~getForcedWindowFlags()));
}
if (a.getBoolean(com.android.internal.R.styleable.Window_windowOverscan, false)) {
setFlags(FLAG_LAYOUT_IN_OVERSCAN, FLAG_LAYOUT_IN_OVERSCAN&(~getForcedWindowFlags()));
}
if (a.getBoolean(com.android.internal.R.styleable.Window_windowShowWallpaper, false)) {
setFlags(FLAG_SHOW_WALLPAPER, FLAG_SHOW_WALLPAPER&(~getForcedWindowFlags()));
}
if (a.getBoolean(com.android.internal.R.styleable.Window_windowEnableSplitTouch,
getContext().getApplicationInfo().targetSdkVersion
>= android.os.Build.VERSION_CODES.HONEYCOMB)) {
setFlags(FLAG_SPLIT_TOUCH, FLAG_SPLIT_TOUCH&(~getForcedWindowFlags()));
}
a.getValue(com.android.internal.R.styleable.Window_windowMinWidthMajor, mMinWidthMajor);
a.getValue(com.android.internal.R.styleable.Window_windowMinWidthMinor, mMinWidthMinor);
if (a.hasValue(com.android.internal.R.styleable.Window_windowFixedWidthMajor)) {
if (mFixedWidthMajor == null) mFixedWidthMajor = new TypedValue();
a.getValue(com.android.internal.R.styleable.Window_windowFixedWidthMajor,
mFixedWidthMajor);
}
if (a.hasValue(com.android.internal.R.styleable.Window_windowFixedWidthMinor)) {
if (mFixedWidthMinor == null) mFixedWidthMinor = new TypedValue();
a.getValue(com.android.internal.R.styleable.Window_windowFixedWidthMinor,
mFixedWidthMinor);
}
if (a.hasValue(com.android.internal.R.styleable.Window_windowFixedHeightMajor)) {
if (mFixedHeightMajor == null) mFixedHeightMajor = new TypedValue();
a.getValue(com.android.internal.R.styleable.Window_windowFixedHeightMajor,
mFixedHeightMajor);
}
if (a.hasValue(com.android.internal.R.styleable.Window_windowFixedHeightMinor)) {
if (mFixedHeightMinor == null) mFixedHeightMinor = new TypedValue();
a.getValue(com.android.internal.R.styleable.Window_windowFixedHeightMinor,
mFixedHeightMinor);
}
final Context context = getContext();
final int targetSdk = context.getApplicationInfo().targetSdkVersion;
final boolean targetPreHoneycomb = targetSdk < android.os.Build.VERSION_CODES.HONEYCOMB;
final boolean targetPreIcs = targetSdk < android.os.Build.VERSION_CODES.ICE_CREAM_SANDWICH;
final boolean targetHcNeedsOptions = context.getResources().getBoolean(
com.android.internal.R.bool.target_honeycomb_needs_options_menu);
final boolean noActionBar = !hasFeature(FEATURE_ACTION_BAR) || hasFeature(FEATURE_NO_TITLE);
if (targetPreHoneycomb || (targetPreIcs && targetHcNeedsOptions && noActionBar)) {
addFlags(WindowManager.LayoutParams.FLAG_NEEDS_MENU_KEY);
} else {
clearFlags(WindowManager.LayoutParams.FLAG_NEEDS_MENU_KEY);
}
if (mAlwaysReadCloseOnTouchAttr || getContext().getApplicationInfo().targetSdkVersion
>= android.os.Build.VERSION_CODES.HONEYCOMB) {
if (a.getBoolean(
com.android.internal.R.styleable.Window_windowCloseOnTouchOutside,
false)) {
setCloseOnTouchOutsideIfNotSet(true);
}
}
WindowManager.LayoutParams params = getAttributes();
if (!hasSoftInputMode()) {
params.softInputMode = a.getInt(
com.android.internal.R.styleable.Window_windowSoftInputMode,
params.softInputMode);
}
if (a.getBoolean(com.android.internal.R.styleable.Window_backgroundDimEnabled,
mIsFloating)) {
/* All dialogs should have the window dimmed */
if ((getForcedWindowFlags()&WindowManager.LayoutParams.FLAG_DIM_BEHIND) == 0) {
params.flags |= WindowManager.LayoutParams.FLAG_DIM_BEHIND;
}
if (!haveDimAmount()) {
params.dimAmount = a.getFloat(
android.R.styleable.Window_backgroundDimAmount, 0.5f);
}
}
if (params.windowAnimations == 0) {
params.windowAnimations = a.getResourceId(
com.android.internal.R.styleable.Window_windowAnimationStyle, 0);
}
// The rest are only done if this window is not embedded; otherwise,
// the values are inherited from our container.
if (getContainer() == null) {
if (mBackgroundDrawable == null) {
if (mBackgroundResource == 0) {
mBackgroundResource = a.getResourceId(
com.android.internal.R.styleable.Window_windowBackground, 0);
}
if (mFrameResource == 0) {
mFrameResource = a.getResourceId(com.android.internal.R.styleable.Window_windowFrame, 0);
}
if (false) {
System.out.println("Background: "
+ Integer.toHexString(mBackgroundResource) + " Frame: "
+ Integer.toHexString(mFrameResource));
}
}
mTextColor = a.getColor(com.android.internal.R.styleable.Window_textColor, 0xFF000000);
}
// Inflate the window decor.
// 接下來就是根據設定好的features(即窗口風格屬性)選擇對應的xml文件
int layoutResource;
int features = getLocalFeatures();
// System.out.println("Features: 0x" + Integer.toHexString(features));
if ((features & ((1 << FEATURE_LEFT_ICON) | (1 << FEATURE_RIGHT_ICON))) != 0) {
if (mIsFloating) {
TypedValue res = new TypedValue();
getContext().getTheme().resolveAttribute(
com.android.internal.R.attr.dialogTitleIconsDecorLayout, res, true);
layoutResource = res.resourceId;
} else {
layoutResource = com.android.internal.R.layout.screen_title_icons;
}
// XXX Remove this once action bar supports these features.
removeFeature(FEATURE_ACTION_BAR);
// System.out.println("Title Icons!");
} else if ((features & ((1 << FEATURE_PROGRESS) | (1 << FEATURE_INDETERMINATE_PROGRESS))) != 0
&& (features & (1 << FEATURE_ACTION_BAR)) == 0) {
// Special case for a window with only a progress bar (and title).
// XXX Need to have a no-title version of embedded windows.
layoutResource = com.android.internal.R.layout.screen_progress;
// System.out.println("Progress!");
} else if ((features & (1 << FEATURE_CUSTOM_TITLE)) != 0) {
// Special case for a window with a custom title.
// If the window is floating, we need a dialog layout
if (mIsFloating) {
TypedValue res = new TypedValue();
getContext().getTheme().resolveAttribute(
com.android.internal.R.attr.dialogCustomTitleDecorLayout, res, true);
layoutResource = res.resourceId;
} else {
layoutResource = com.android.internal.R.layout.screen_custom_title;
}
// XXX Remove this once action bar supports these features.
removeFeature(FEATURE_ACTION_BAR);
} else if ((features & (1 << FEATURE_NO_TITLE)) == 0) {
// If no other features and not embedded, only need a title.
// If the window is floating, we need a dialog layout
if (mIsFloating) {
TypedValue res = new TypedValue();
getContext().getTheme().resolveAttribute(
com.android.internal.R.attr.dialogTitleDecorLayout, res, true);
layoutResource = res.resourceId;
} else if ((features & (1 << FEATURE_ACTION_BAR)) != 0) {
layoutResource = com.android.internal.R.layout.screen_action_bar;
} else {
layoutResource = com.android.internal.R.layout.screen_title;
}
// System.out.println("Title!");
} else if ((features & (1 << FEATURE_ACTION_MODE_OVERLAY)) != 0) {
layoutResource = com.android.internal.R.layout.screen_simple_overlay_action_mode;
} else {
// Embedded, so no decoration is needed.
layoutResource = com.android.internal.R.layout.screen_simple;
// System.out.println("Simple!");
}
mDecor.startChanging(); // 回調點,表示開始。。。
View in = mLayoutInflater.inflate(layoutResource, null); // 將選定的layout文件inflate成view
decor.addView(in, new ViewGroup.LayoutParams(MATCH_PARENT, MATCH_PARENT)); // 將其添加到decor中
ViewGroup contentParent = (ViewGroup)findViewById(ID_ANDROID_CONTENT); // 找到系統layout文件中為我們客戶端布局預留
if (contentParent == null) { // 的placeholder,我們的Activity布局將從這裡開始。
throw new RuntimeException("Window couldn't find content container view");
}
if ((features & (1 << FEATURE_INDETERMINATE_PROGRESS)) != 0) {
ProgressBar progress = getCircularProgressBar(false);
if (progress != null) {
progress.setIndeterminate(true);
}
}
// Remaining setup -- of background and title -- that only applies
// to top-level windows.
if (getContainer() == null) {
Drawable drawable = mBackgroundDrawable;
if (mBackgroundResource != 0) {
drawable = getContext().getResources().getDrawable(mBackgroundResource);
}
mDecor.setWindowBackground(drawable);
drawable = null;
if (mFrameResource != 0) {
drawable = getContext().getResources().getDrawable(mFrameResource);
}
mDecor.setWindowFrame(drawable);
// System.out.println("Text=" + Integer.toHexString(mTextColor) +
// " Sel=" + Integer.toHexString(mTextSelectedColor) +
// " Title=" + Integer.toHexString(mTitleColor));
if (mTitleColor == 0) {
mTitleColor = mTextColor;
}
if (mTitle != null) {
setTitle(mTitle);
}
setTitleColor(mTitleColor);
}
mDecor.finishChanging(); // 回調點,表示結束了。。。
return contentParent; // 返回客戶端(Activity)布局的parent view
}
復制代碼
mContentParent被正確初始化後,在setContentView中通過mLayoutInflater.inflate(layoutResID, mContentParent);
這樣的代碼就可以將Activity的布局文件加到整個view層次結構中,這樣我們的layout xml就和系統的聯系起來了。
下面我們看幾個前面說到的系統提供的布局文件,針對某個特定的feature屬性,代碼如下:
復制代碼
<!-- screen_title.xml -->
<LinearLayout xmlns:android="http://schemas.android.com/apk/res/android"
android:orientation="vertical"
android:fitsSystemWindows="true">
<!-- Popout bar for action modes -->
<ViewStub android:id="@+id/action_mode_bar_stub"
android:inflatedId="@+id/action_mode_bar"
android:layout="@layout/action_mode_bar"
android:layout_width="match_parent"
android:layout_height="wrap_content" />
<FrameLayout
android:layout_width="match_parent"
android:layout_height="?android:attr/windowTitleSize"
style="?android:attr/windowTitleBackgroundStyle">
<TextView android:id="@android:id/title"
style="?android:attr/windowTitleStyle"
android:background="@null"
android:fadingEdge="horizontal"
android:gravity="center_vertical"
android:layout_width="match_parent"
android:layout_height="match_parent" />
</FrameLayout>
<FrameLayout android:id="@android:id/content" // 注意這裡的共同點,這就是給客戶端程序預留的placeholder,mContentParent view
android:layout_width="match_parent"
android:layout_height="0dip"
android:layout_weight="1"
android:foregroundGravity="fill_horizontal|top"
android:foreground="?android:attr/windowContentOverlay" />
</LinearLayout>
<!-- screen_simple.xml -->
<LinearLayout xmlns:android="http://schemas.android.com/apk/res/android"
android:layout_width="match_parent"
android:layout_height="match_parent"
android:fitsSystemWindows="true"
android:orientation="vertical">
<ViewStub android:id="@+id/action_mode_bar_stub"
android:inflatedId="@+id/action_mode_bar"
android:layout="@layout/action_mode_bar"
android:layout_width="match_parent"
android:layout_height="wrap_content" />
<FrameLayout
android:id="@android:id/content" // 共同點,id都是android:id/content
android:layout_width="match_parent"
android:layout_height="match_parent"
android:foregroundInsidePadding="false"
android:foregroundGravity="fill_horizontal|top"
android:foreground="?android:attr/windowContentOverlay" />
</LinearLayout>
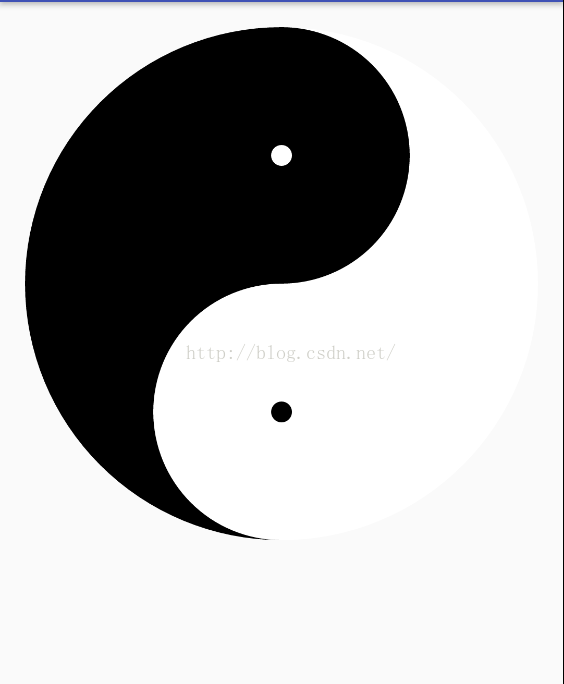 Android 繪制太極圖實例詳解
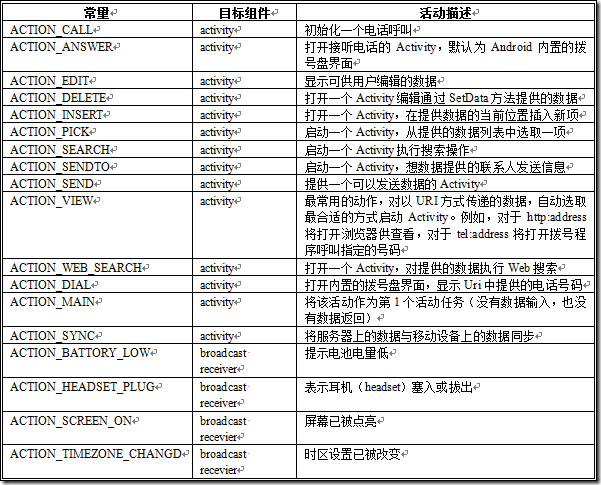 Android利用Intent啟動和關閉Activity
 Android 6.0 Runtime permission
 (Android review)handler的基本使用