編輯:關於Android編程
Android基於Linux2.6+內核,我們看一張圖,以對Android系統的架構有個感性的認識。
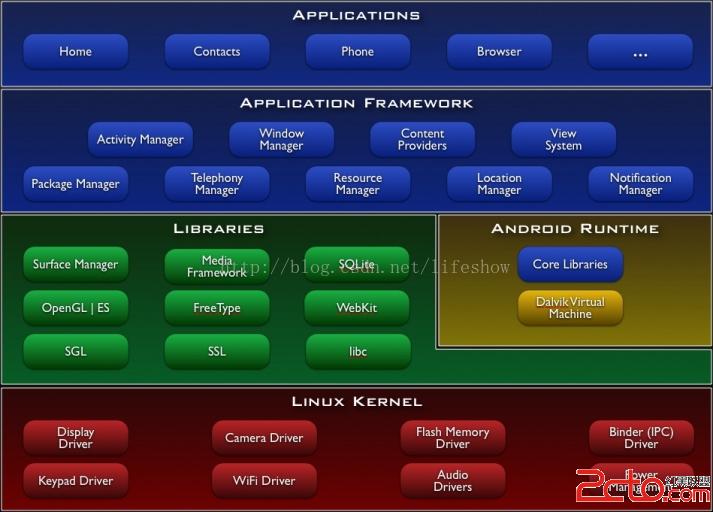
我們從Kernel層簡單說明:
1、Kernel層:基於Linux2.6+內核,同時做了一些嵌入式環境做了一些針對性的優化調整。
2、Libraries層:包括Bionic C庫,以及HAL(硬件驅動接口抽象)等API。
3、Android Runtime(ART)層:包含核心應用庫和Dalvik虛擬機。
4、Application FramewZ喎?/kf/ware/vc/" target="_blank" class="keylink">vcmuy46O6tL9KQVZBtcRBUEm/8rzco6yw/MCoQWN0aXZpdHkgTWFuYWdlcrrNV2luZG93cyBNYW5hZ2VytcihozwvcD4KPHA+ICAgIDWhokFwcGxpY2F0aW9usuOjurnLw/vLvNLlo6zTptPDsuOjrMjn1KTXsLXEtee7sKGitszQxaOs087Pt0FQULXIoaM8L3A+CjxwPiAgICA8L3A+CjxwPiAgICDPwsPmo6zO0sPHytfPyL+0z8LSu7j2teTQzbXEQW5kcm9pZM+1zbNBUFC9+LPM07PP8aO6PC9wPgo8cD7D/MHu0NDK5MjrUFOjrLLpv7S1scewvfizzMHQse2jujwvcD4KPHA+PGltZyBzcmM9"/uploadfile/Collfiles/20140716/2014071608491840.png" alt="\">
我們看看紅圈標注的進程,其中10002為PID,137為父進程ID。

可以看到進程號137的進程即為神秘的“zygote”進程,而zygote的父進程為init進程。init進程為Android一切進程的祖先進程,而zygote則為APP應用的祖先進程。
至此,我們對Android的應用啟動的初始過程有了一個大致的認識,下面,我們結合AOSP(Android Open Source Project)來做更深入的分析。
Android開源代碼庫:點擊打開鏈接
首先我們從app_main.cpp開始(點擊打開鏈接),這個就是/system/bin/app_process的C++源碼,也就是所有APP的父進程。我們直接對照源碼進程閱讀,我添加了注釋:
int main(int argc, char* const argv[])
{
    if (prctl(PR_SET_NO_NEW_PRIVS, 1, 0, 0, 0) < 0) {
        // Older kernels don't understand PR_SET_NO_NEW_PRIVS and return
        // EINVAL. Don't die on such kernels.
        if (errno != EINVAL) {
            LOG_ALWAYS_FATAL("PR_SET_NO_NEW_PRIVS failed: %s", strerror(errno));
            return 12;
        }
    }

    AppRuntime runtime(argv[0], computeArgBlockSize(argc, argv));
    // Process command line arguments
    // ignore argv[0]
    argc--;
    argv++;

    // Everything up to '--' or first non '-' arg goes to the vm.
    //
    // The first argument after the VM args is the "parent dir", which
    // is currently unused.
    //
    // After the parent dir, we expect one or more the following internal
    // arguments :
    //
    // --zygote : Start in zygote mode
    // --start-system-server : Start the system server.
    // --application : Start in application (stand alone, non zygote) mode.
    // --nice-name : The nice name for this process.
    //
    // For non zygote starts, these arguments will be followed by
    // the main class name. All remaining arguments are passed to
    // the main method of this class.
    //
    // For zygote starts, all remaining arguments are passed to the zygote.
    // main function.


    int i = runtime.addVmArguments(argc, argv);

    // Parse runtime arguments.  Stop at first unrecognized option.
    bool zygote = false;
    bool startSystemServer = false;
    bool application = false;
    const char* niceName = NULL;
    String8 className;

    ++i;  // Skip unused "parent dir" argument.
    while (i < argc) {
        const char* arg = argv[i++];
		/*******************
		啟動參數包含--zygote
		niceName即進程名,在ARM32下,ZYGOTE_NICE_NAME = zygote(ARM64則為zygote64)
		*******************/
        if (strcmp(arg, "--zygote") == 0) {
            zygote = true;
            niceName = ZYGOTE_NICE_NAME;
        }
        /*******************
		啟動參數包含--start-system-server
		置startSystemServer為true,以同時啟動system-server
		*******************/
		else if (strcmp(arg, "--start-system-server") == 0) {
            startSystemServer = true;
        }
        /*******************
		啟動參數包含--application
		置application為true,傳遞參數給dalvik
		*******************/
		else if (strcmp(arg, "--application") == 0) {
            application = true;
        } else if (strncmp(arg, "--nice-name=", 12) == 0) {
            niceName = arg + 12;
        } else if (strncmp(arg, "--", 2) != 0) {
            className.setTo(arg);
            break;
        } else {
            --i;
            break;
        }
    }

    Vector args;
    if (!className.isEmpty()) {
        // We're not in zygote mode, the only argument we need to pass
        // to RuntimeInit is the application argument.
        //
        // The Remainder of args get passed to startup class main(). Make
        // copies of them before we overwrite them with the process name.
		/*******************
		非Zygote模式處理
		*******************/
        args.add(application ? String8("application") : String8("tool"));
        runtime.setClassNameAndArgs(className, argc - i, argv + i);
    } else {
        // We're in zygote mode.
		/*******************
		Zygote模式啟動處理
		*******************/
        maybeCreateDalvikCache();

        if (startSystemServer) {
            args.add(String8("start-system-server"));
        }

        char prop[PROP_VALUE_MAX];
        if (property_get(ABI_LIST_PROPERTY, prop, NULL) == 0) {
            LOG_ALWAYS_FATAL("app_process: Unable to determine ABI list from property %s.",
                ABI_LIST_PROPERTY);
            return 11;
        }

        String8 abiFlag("--abi-list=");
        abiFlag.append(prop);
        args.add(abiFlag);

        // In zygote mode, pass all remaining arguments to the zygote
        // main() method.
        for (; i < argc; ++i) {
            args.add(String8(argv[i]));
        }
    }

    if (niceName && *niceName) {
        runtime.setArgv0(niceName);
        set_process_name(niceName);
    }

    if (zygote) {
	    /*******************
		Zygote Init,Dalvik啟動
	    *******************/
        runtime.start("com.android.internal.os.ZygoteInit", args);
    } else if (className) {
        runtime.start("com.android.internal.os.RuntimeInit", args);
    } else {
        fprintf(stderr, "Error: no class name or --zygote supplied.\n");
        app_usage();
        LOG_ALWAYS_FATAL("app_process: no class name or --zygote supplied.");
        return 10;
    }
} 
其作用就是初始化zygote進程。
zygote啟動過程可以大致描述如下:執行app_process,並修改進程名為zygote,同時根據傳入的start-system-server參數,啟動system-server服務,同時初始化dalvik虛擬機。我們看看AndroidRuntime這個類的源碼(點擊打開鏈接),其中start函數的作用有兩個,一是啟動dalvik VM,一是執行com.android.internal.os.ZygoteInit的main函數,並傳遞相關參數,實現zygote初始化工作。
我們再看看com.android.internal.os.ZygoteInit這個JAVA類的源碼(點擊打開鏈接),看看究竟都做了什麼。
public static void main(String argv[]) {
        try {
            // Start profiling the zygote initialization.
            SamplingProfilerIntegration.start();

            boolean startSystemServer = false;
            String socketName = "zygote";
            String abiList = null;
            for (int i = 1; i < argv.length; i++) {
                if ("start-system-server".equals(argv[i])) {
				/*准備啟動system_server*/
                    startSystemServer = true;
                } else if (argv[i].startsWith(ABI_LIST_ARG)) {
                    abiList = argv[i].substring(ABI_LIST_ARG.length());
                } else if (argv[i].startsWith(SOCKET_NAME_ARG)) {
				/*Zygote監聽的socketname,默認為/dev/socket/zygote   */
                    socketName = argv[i].substring(SOCKET_NAME_ARG.length());
                } else {
                    throw new RuntimeException("Unknown command line argument: " + argv[i]);
                }
            }

            if (abiList == null) {
                throw new RuntimeException("No ABI list supplied.");
            }

			/**注冊socket*/
            registerZygoteSocket(socketName);
            EventLog.writeEvent(LOG_BOOT_PROGRESS_PRELOAD_START,
                SystemClock.uptimeMillis());
            preload();
            EventLog.writeEvent(LOG_BOOT_PROGRESS_PRELOAD_END,
                SystemClock.uptimeMillis());

            // Finish profiling the zygote initialization.
            SamplingProfilerIntegration.writeZygoteSnapshot();

            // Do an initial gc to clean up after startup
            gc();

            // Disable tracing so that forked processes do not inherit stale tracing tags from
            // Zygote.
            Trace.setTracingEnabled(false);

            if (startSystemServer) {
                startSystemServer(abiList, socketName);
            }

            Log.i(TAG, "Accepting command socket connections");
            runSelectLoop(abiList);

            closeServerSocket();
        } catch (MethodAndArgsCaller caller) {
            caller.run();
        } catch (RuntimeException ex) {
            Log.e(TAG, "Zygote died with exception", ex);
            closeServerSocket();
            throw ex;
        }
    }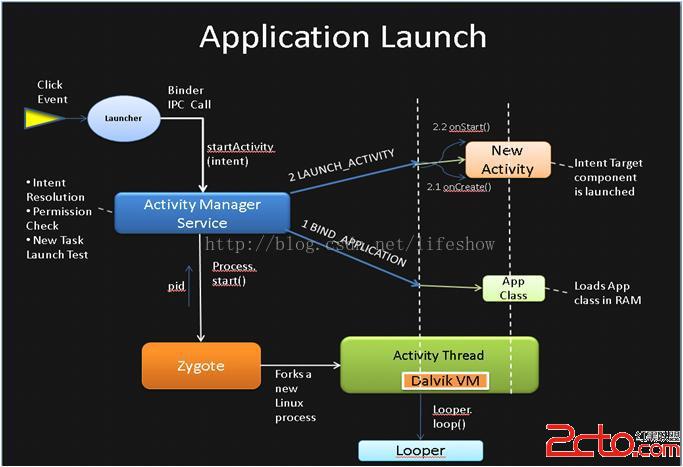
1、Launcher(Android的“發射進程”,你能看到的桌面,應用列表等都是Launcher的內容)進程監聽到應用啟動事件,如你點擊了APP圖標;
2、通過Binder(Android跨進程通信框架IPC),跨進程通知Activity Manager服務來啟動Activity。ActivityManager調用Zygote.forkAndSpecialize來fork一個新的APP子進程並返回PID,然後調用APP的啟動Activity的OnStart和OnCreate方法,完成啟動!
我們看看Fork這個函數(點擊打開鏈接):Fork的作用是“克隆”一個和當前進程結構一致的全新子進程(當然,並不是完整的照搬)!這是Android的一個聰明的做法,依據Linux的COW(Copy On Write)理論,新生成的進程會“共享”父進程的所有庫鏈接信息,同時會加載自己應有特定的一些LIB,例如Bionic libc庫是所有APP共享的,由於它是只讀的,因此所有的APP共享一份“物理存儲”的LIBC庫,而不是每個APP一份拷貝。
我們看看Zygote進程的內存maps片段:
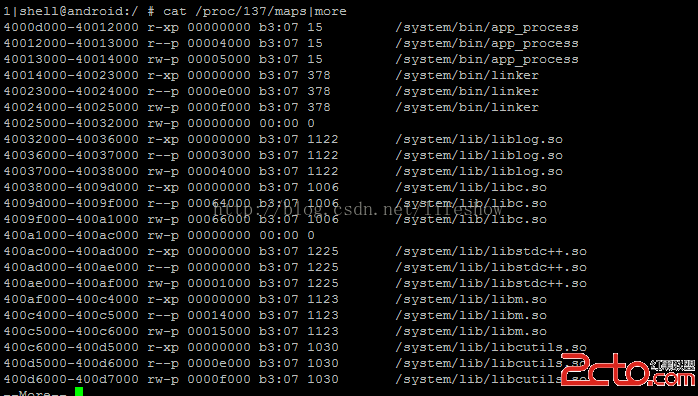
/system/lib下面的這些C庫被所有APP進程共享,雖然在不同的APP進程中可能位於不同的虛擬地址,但“共享”一份物理存儲!其他的APP啟動後的內存映像都是從這個zygote完整“拷貝”過來的!
轉載請注明出處:生活秀
Enjoy IT!
 Android中的Low Memory Killer
在現有的技術條件下,內存永遠都是一個吃緊的資源,不用說是PC上會出現內存不足的可能,更不必說在移動設備上了。一旦出現內存不足就會導致系統卡頓,影響用戶體驗。而
 Android Volley框架完全解析
2013年Google I/O大會上推出了一個新的網絡通信框架——Volley。Volley可是說是把AsyncHttpClient和Univer
 Android實現短信加密功能(發送加密短信、解密本地短信)
短信加密此類功能由於新手學習的需求量較小,所以在網上很少有一些簡單的demo供新手參考。小編做到此處也是花了比較多的時間自我構思,具體的過程也是不過多描述了,講一下dem
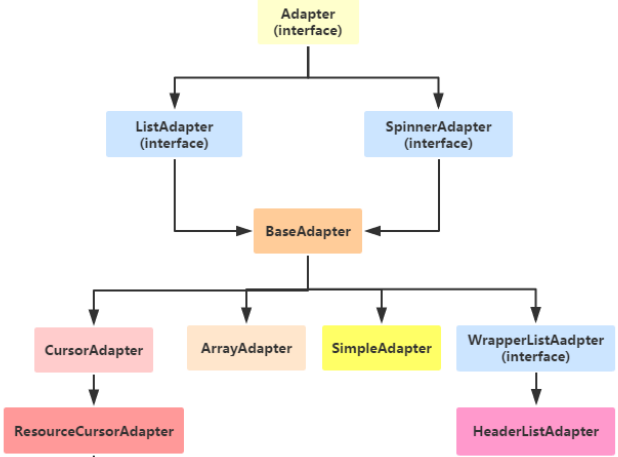 Adapter類型控件之Adapter(數據適配器)
(一)概述Adapter是作為連接數據跟View之間橋梁的,你可以創建一個View來使用Adapter來對數據直接進行填充;(二)Adapter(適配器)的使用先來看看他