編輯:關於Android編程
本篇文章主要是帶大家從源碼的角度上面去解讀這個強大的圖片加載框架,自己很久沒有寫文章了,感覺生疏了許多,距離上一篇文章三個月多了,確實是自己平常忙,換了工作很多東西都要去看去理解,然後加上自己也懶了,沒有以前那麼有激情了,我感覺這節奏不對,我要繼續保持以前的激情,正所謂好記性不如爛筆頭,有時候自己也會去翻看下之前寫的東西,我覺得知識寫下來比在腦海中留存的更久,今天就給大家來讀一讀這個框架的源碼,我感覺這個圖片加載框架確實寫的很不錯,讀完代碼自己也學到了很多。我希望大家可以先去看下Android 開源框架Universal-Image-Loader完全解析(一)--- 基本介紹及使用, Android 開源框架Universal-Image-Loader完全解析(二)--- 圖片緩存策略詳解 ,我希望大家可以堅持看完,看完了對你絕對是有收獲的。
ImageView mImageView = (ImageView) findViewById(R.id.image);
        String imageUrl = https://lh6.googleusercontent.com/-55osAWw3x0Q/URquUtcFr5I/AAAAAAAAAbs/rWlj1RUKrYI/s1024/A%252520Photographer.jpg;

        //顯示圖片的配置
        DisplayImageOptions options = new DisplayImageOptions.Builder()
                .showImageOnLoading(R.drawable.ic_stub)
                .showImageOnFail(R.drawable.ic_error)
                .cacheInMemory(true)
                .cacheOnDisk(true)
                .bitmapConfig(Bitmap.Config.RGB_565)
                .build();

        ImageLoader.getInstance().displayImage(imageUrl, mImageView, options);
大部分的時候我們都是使用上面的代碼去加載圖片,我們先看下
public void displayImage(String uri, ImageView imageView, DisplayImageOptions options) {
		displayImage(uri, new ImageViewAware(imageView), options, null, null);
	}
從上面的代碼中,我們可以看出,它會將ImageView轉換成ImageViewAware, ImageViewAware主要是做什麼的呢?該類主要是將ImageView進行一個包裝,將ImageView的強引用變成弱引用,當內存不足的時候,可以更好的回收ImageView對象,還有就是獲取ImageView的寬度和高度。這使得我們可以根據ImageView的寬高去對圖片進行一個裁剪,減少內存的使用。
接下來看具體的displayImage方法啦,由於這個方法代碼量蠻多的,所以這裡我分開來讀
checkConfiguration();
		if (imageAware == null) {
			throw new IllegalArgumentException(ERROR_WRONG_ARGUMENTS);
		}
		if (listener == null) {
			listener = emptyListener;
		}
		if (options == null) {
			options = configuration.defaultDisplayImageOptions;
		}

		if (TextUtils.isEmpty(uri)) {
			engine.cancelDisplayTaskFor(imageAware);
			listener.onLoadingStarted(uri, imageAware.getWrappedView());
			if (options.shouldShowImageForEmptyUri()) {
				imageAware.setImageDrawable(options.getImageForEmptyUri(configuration.resources));
			} else {
				imageAware.setImageDrawable(null);
			}
			listener.onLoadingComplete(uri, imageAware.getWrappedView(), null);
			return;
		}
第1行代碼是檢查ImageLoaderConfiguration是否初始化,這個初始化是在Application中進行的
12-21行主要是針對url為空的時候做的處理,第13行代碼中,ImageLoaderEngine中存在一個HashMap,用來記錄正在加載的任務,加載圖片的時候會將ImageView的id和圖片的url加上尺寸加入到HashMap中,加載完成之後會將其移除,然後將DisplayImageOptions的imageResForEmptyUri的圖片設置給ImageView,最後回調給ImageLoadingListener接口告訴它這次任務完成了。
	ImageSize targetSize = ImageSizeUtils.defineTargetSizeForView(imageAware, configuration.getMaxImageSize());
		String memoryCacheKey = MemoryCacheUtils.generateKey(uri, targetSize);
		engine.prepareDisplayTaskFor(imageAware, memoryCacheKey);

		listener.onLoadingStarted(uri, imageAware.getWrappedView());

		Bitmap bmp = configuration.memoryCache.get(memoryCacheKey);
		if (bmp != null && !bmp.isRecycled()) {
			L.d(LOG_LOAD_IMAGE_FROM_MEMORY_CACHE, memoryCacheKey);

			if (options.shouldPostProcess()) {
				ImageLoadingInfo imageLoadingInfo = new ImageLoadingInfo(uri, imageAware, targetSize, memoryCacheKey,
						options, listener, progressListener, engine.getLockForUri(uri));
				ProcessAndDisplayImageTask displayTask = new ProcessAndDisplayImageTask(engine, bmp, imageLoadingInfo,
						defineHandler(options));
				if (options.isSyncLoading()) {
					displayTask.run();
				} else {
					engine.submit(displayTask);
				}
			} else {
				options.getDisplayer().display(bmp, imageAware, LoadedFrom.MEMORY_CACHE);
				listener.onLoadingComplete(uri, imageAware.getWrappedView(), bmp);
			}
		}
第1行主要是將ImageView的寬高封裝成ImageSize對象,如果獲取ImageView的寬高為0,就會使用手機屏幕的寬高作為ImageView的寬高,我們在使用ListView,GridView去加載圖片的時候,第一頁獲取寬度是0,所以第一頁使用的手機的屏幕寬高,後面的獲取的都是控件本身的大小了
第7行從內存緩存中獲取Bitmap對象,我們可以再ImageLoaderConfiguration中配置內存緩存邏輯,默認使用的是LruMemoryCache,這個類我在前面的文章中講過
第11行中有一個判斷,我們如果在DisplayImageOptions中設置了postProcessor就進入true邏輯,不過默認postProcessor是為null的,BitmapProcessor接口主要是對Bitmap進行處理,這個框架並沒有給出相對應的實現,如果我們有自己的需求的時候可以自己實現BitmapProcessor接口(比如將圖片設置成圓形的)
第22 -23行是將Bitmap設置到ImageView上面,這裡我們可以在DisplayImageOptions中配置顯示需求displayer,默認使用的是SimpleBitmapDisplayer,直接將Bitmap設置到ImageView上面,我們可以配置其他的顯示邏輯, 他這裡提供了FadeInBitmapDisplayer(透明度從0-1)RoundedBitmapDisplayer(4個角是圓弧)等, 然後回調到ImageLoadingListener接口
if (options.shouldShowImageOnLoading()) {
				imageAware.setImageDrawable(options.getImageOnLoading(configuration.resources));
			} else if (options.isResetViewBeforeLoading()) {
				imageAware.setImageDrawable(null);
			}

			ImageLoadingInfo imageLoadingInfo = new ImageLoadingInfo(uri, imageAware, targetSize, memoryCacheKey,
					options, listener, progressListener, engine.getLockForUri(uri));
			LoadAndDisplayImageTask displayTask = new LoadAndDisplayImageTask(engine, imageLoadingInfo,
					defineHandler(options));
			if (options.isSyncLoading()) {
				displayTask.run();
			} else {
				engine.submit(displayTask);
			}
這段代碼主要是Bitmap不在內存緩存,從文件中或者網絡裡面獲取bitmap對象,實例化一個LoadAndDisplayImageTask對象,LoadAndDisplayImageTask實現了Runnable,如果配置了isSyncLoading為true, 直接執行LoadAndDisplayImageTask的run方法,表示同步,默認是false,將LoadAndDisplayImageTask提交給線程池對象
接下來我們就看LoadAndDisplayImageTask的run(), 這個類還是蠻復雜的,我們還是一段一段的分析
if (waitIfPaused()) return;
if (delayIfNeed()) return;
如果waitIfPaused(), delayIfNeed()返回true的話,直接從run()方法中返回了,不執行下面的邏輯, 接下來我們先看看waitIfPaused()
	private boolean waitIfPaused() {
		AtomicBoolean pause = engine.getPause();
		if (pause.get()) {
			synchronized (engine.getPauseLock()) {
				if (pause.get()) {
					L.d(LOG_WAITING_FOR_RESUME, memoryCacheKey);
					try {
						engine.getPauseLock().wait();
					} catch (InterruptedException e) {
						L.e(LOG_TASK_INTERRUPTED, memoryCacheKey);
						return true;
					}
					L.d(LOG_RESUME_AFTER_PAUSE, memoryCacheKey);
				}
			}
		}
		return isTaskNotActual();
	}
這個方法是干嘛用呢,主要是我們在使用ListView,GridView去加載圖片的時候,有時候為了滑動更加的流暢,我們會選擇手指在滑動或者猛地一滑動的時候不去加載圖片,所以才提出了這麼一個方法,那麼要怎麼用呢? 這裡用到了PauseOnScrollListener這個類,使用很簡單ListView.setOnScrollListener(new PauseOnScrollListener(pauseOnScroll, pauseOnFling )), pauseOnScroll控制我們緩慢滑動ListView,GridView是否停止加載圖片,pauseOnFling 控制猛的滑動ListView,GridView是否停止加載圖片
除此之外,這個方法的返回值由isTaskNotActual()決定,我們接著看看isTaskNotActual()的源碼
private boolean isTaskNotActual() {
		return isViewCollected() || isViewReused();
	}
isViewCollected()是判斷我們ImageView是否被垃圾回收器回收了,如果回收了,LoadAndDisplayImageTask方法的run()就直接返回了,isViewReused()判斷該ImageView是否被重用,被重用run()方法也直接返回,為什麼要用isViewReused()方法呢?主要是ListView,GridView我們會復用item對象,假如我們先去加載ListView,GridView第一頁的圖片的時候,第一頁圖片還沒有全部加載完我們就快速的滾動,isViewReused()方法就會避免這些不可見的item去加載圖片,而直接加載當前界面的圖片
ReentrantLock loadFromUriLock = imageLoadingInfo.loadFromUriLock;
		L.d(LOG_START_DISPLAY_IMAGE_TASK, memoryCacheKey);
		if (loadFromUriLock.isLocked()) {
			L.d(LOG_WAITING_FOR_IMAGE_LOADED, memoryCacheKey);
		}

		loadFromUriLock.lock();
		Bitmap bmp;
		try {
			checkTaskNotActual();

			bmp = configuration.memoryCache.get(memoryCacheKey);
			if (bmp == null || bmp.isRecycled()) {
				bmp = tryLoadBitmap();
				if (bmp == null) return; // listener callback already was fired

				checkTaskNotActual();
				checkTaskInterrupted();

				if (options.shouldPreProcess()) {
					L.d(LOG_PREPROCESS_IMAGE, memoryCacheKey);
					bmp = options.getPreProcessor().process(bmp);
					if (bmp == null) {
						L.e(ERROR_PRE_PROCESSOR_NULL, memoryCacheKey);
					}
				}

				if (bmp != null && options.isCacheInMemory()) {
					L.d(LOG_CACHE_IMAGE_IN_MEMORY, memoryCacheKey);
					configuration.memoryCache.put(memoryCacheKey, bmp);
				}
			} else {
				loadedFrom = LoadedFrom.MEMORY_CACHE;
				L.d(LOG_GET_IMAGE_FROM_MEMORY_CACHE_AFTER_WAITING, memoryCacheKey);
			}

			if (bmp != null && options.shouldPostProcess()) {
				L.d(LOG_POSTPROCESS_IMAGE, memoryCacheKey);
				bmp = options.getPostProcessor().process(bmp);
				if (bmp == null) {
					L.e(ERROR_POST_PROCESSOR_NULL, memoryCacheKey);
				}
			}
			checkTaskNotActual();
			checkTaskInterrupted();
		} catch (TaskCancelledException e) {
			fireCancelEvent();
			return;
		} finally {
			loadFromUriLock.unlock();
		}
第1行代碼有一個loadFromUriLock,這個是一個鎖,獲取鎖的方法在ImageLoaderEngine類的getLockForUri()方法中
ReentrantLock getLockForUri(String uri) {
		ReentrantLock lock = uriLocks.get(uri);
		if (lock == null) {
			lock = new ReentrantLock();
			uriLocks.put(uri, lock);
		}
		return lock;
	}
從上面可以看出,這個鎖對象與圖片的url是相互對應的,為什麼要這麼做?也行你還有點不理解,不知道大家有沒有考慮過一個場景,假如在一個ListView中,某個item正在獲取圖片的過程中,而此時我們將這個item滾出界面之後又將其滾進來,滾進來之後如果沒有加鎖,該item又會去加載一次圖片,假設在很短的時間內滾動很頻繁,那麼就會出現多次去網絡上面請求圖片,所以這裡根據圖片的Url去對應一個ReentrantLock對象,讓具有相同Url的請求就會在第7行等待,等到這次圖片加載完成之後,ReentrantLock就被釋放,剛剛那些相同Url的請求就會繼續執行第7行下面的代碼
來到第12行,它們會先從內存緩存中獲取一遍,如果內存緩存中沒有在去執行下面的邏輯,所以ReentrantLock的作用就是避免這種情況下重復的去從網絡上面請求圖片。
第14行的方法tryLoadBitmap(),這個方法確實也有點長,我先告訴大家,這裡面的邏輯是先從文件緩存中獲取有沒有Bitmap對象,如果沒有在去從網絡中獲取,然後將bitmap保存在文件系統中,我們還是具體分析下
File imageFile = configuration.diskCache.get(uri);
			if (imageFile != null && imageFile.exists()) {
				L.d(LOG_LOAD_IMAGE_FROM_DISK_CACHE, memoryCacheKey);
				loadedFrom = LoadedFrom.DISC_CACHE;

				checkTaskNotActual();
				bitmap = decodeImage(Scheme.FILE.wrap(imageFile.getAbsolutePath()));
			}
先判斷文件緩存中有沒有該文件,如果有的話,直接去調用decodeImage()方法去解碼圖片,該方法裡面調用BaseImageDecoder類的decode()方法,根據ImageView的寬高,ScaleType去裁剪圖片,具體的代碼我就不介紹了,大家自己去看看,我們接下往下看tryLoadBitmap()方法
	if (bitmap == null || bitmap.getWidth() <= 0 || bitmap.getHeight() <= 0) {
				L.d(LOG_LOAD_IMAGE_FROM_NETWORK, memoryCacheKey);
				loadedFrom = LoadedFrom.NETWORK;

				String imageUriForDecoding = uri;
				if (options.isCacheOnDisk() && tryCacheImageOnDisk()) {
					imageFile = configuration.diskCache.get(uri);
					if (imageFile != null) {
						imageUriForDecoding = Scheme.FILE.wrap(imageFile.getAbsolutePath());
					}
				}

				checkTaskNotActual();
				bitmap = decodeImage(imageUriForDecoding);

				if (bitmap == null || bitmap.getWidth() <= 0 || bitmap.getHeight() <= 0) {
					fireFailEvent(FailType.DECODING_ERROR, null);
				}
			}
第1行表示從文件緩存中獲取的Bitmap為null,或者寬高為0,就去網絡上面獲取Bitmap,來到第6行代碼是否配置了DisplayImageOptions的isCacheOnDisk,表示是否需要將Bitmap對象保存在文件系統中,一般我們需要配置為true, 默認是false這個要注意下,然後就是執行tryCacheImageOnDisk()方法,去服務器上面拉取圖片並保存在本地文件中
	private Bitmap decodeImage(String imageUri) throws IOException {
		ViewScaleType viewScaleType = imageAware.getScaleType();
		ImageDecodingInfo decodingInfo = new ImageDecodingInfo(memoryCacheKey, imageUri, uri, targetSize, viewScaleType,
				getDownloader(), options);
		return decoder.decode(decodingInfo);
	}

	/** @return true - if image was downloaded successfully; false - otherwise */
	private boolean tryCacheImageOnDisk() throws TaskCancelledException {
		L.d(LOG_CACHE_IMAGE_ON_DISK, memoryCacheKey);

		boolean loaded;
		try {
			loaded = downloadImage();
			if (loaded) {
				int width = configuration.maxImageWidthForDiskCache;
				int height = configuration.maxImageHeightForDiskCache;

				if (width > 0 || height > 0) {
					L.d(LOG_RESIZE_CACHED_IMAGE_FILE, memoryCacheKey);
					resizeAndSaveImage(width, height); // TODO : process boolean result
				}
			}
		} catch (IOException e) {
			L.e(e);
			loaded = false;
		}
		return loaded;
	}

	private boolean downloadImage() throws IOException {
		InputStream is = getDownloader().getStream(uri, options.getExtraForDownloader());
		return configuration.diskCache.save(uri, is, this);
	}
第6行的downloadImage()方法是負責下載圖片,並將其保持到文件緩存中,將下載保存Bitmap的進度回調到IoUtils.CopyListener接口的onBytesCopied(int current, int total)方法中,所以我們可以設置ImageLoadingProgressListener接口來獲取圖片下載保存的進度,這裡保存在文件系統中的圖片是原圖
第16-17行,獲取ImageLoaderConfiguration是否設置保存在文件系統中的圖片大小,如果設置了maxImageWidthForDiskCache和maxImageHeightForDiskCache,會調用resizeAndSaveImage()方法對圖片進行裁剪然後在替換之前的原圖,保存裁剪後的圖片到文件系統的,之前有同學問過我說這個框架保存在文件系統的圖片都是原圖,怎麼才能保存縮略圖,只要在Application中實例化ImageLoaderConfiguration的時候設置maxImageWidthForDiskCache和maxImageHeightForDiskCache就行了
if (bmp == null) return; // listener callback already was fired

				checkTaskNotActual();
				checkTaskInterrupted();

				if (options.shouldPreProcess()) {
					L.d(LOG_PREPROCESS_IMAGE, memoryCacheKey);
					bmp = options.getPreProcessor().process(bmp);
					if (bmp == null) {
						L.e(ERROR_PRE_PROCESSOR_NULL, memoryCacheKey);
					}
				}

				if (bmp != null && options.isCacheInMemory()) {
					L.d(LOG_CACHE_IMAGE_IN_MEMORY, memoryCacheKey);
					configuration.memoryCache.put(memoryCacheKey, bmp);
				}
接下來這裡就簡單了,6-12行是否要對Bitmap進行處理,這個需要自行實現,14-17就是將圖片保存到內存緩存中去
DisplayBitmapTask displayBitmapTask = new DisplayBitmapTask(bmp, imageLoadingInfo, engine, loadedFrom);
		runTask(displayBitmapTask, syncLoading, handler, engine);
最後這兩行代碼就是一個顯示任務,直接看DisplayBitmapTask類的run()方法
@Override
	public void run() {
		if (imageAware.isCollected()) {
			L.d(LOG_TASK_CANCELLED_IMAGEAWARE_COLLECTED, memoryCacheKey);
			listener.onLoadingCancelled(imageUri, imageAware.getWrappedView());
		} else if (isViewWasReused()) {
			L.d(LOG_TASK_CANCELLED_IMAGEAWARE_REUSED, memoryCacheKey);
			listener.onLoadingCancelled(imageUri, imageAware.getWrappedView());
		} else {
			L.d(LOG_DISPLAY_IMAGE_IN_IMAGEAWARE, loadedFrom, memoryCacheKey);
			displayer.display(bitmap, imageAware, loadedFrom);
			engine.cancelDisplayTaskFor(imageAware);
			listener.onLoadingComplete(imageUri, imageAware.getWrappedView(), bitmap);
		}
	}
假如ImageView被回收了或者被重用了,回調給ImageLoadingListener接口,否則就調用BitmapDisplayer去顯示Bitmap
文章寫到這裡就已經寫完了,不知道大家對這個開源框架有沒有進一步的理解,這個開源框架設計也很靈活,用了很多的設計模式,比如建造者模式,裝飾模式,代理模式,策略模式等等,這樣方便我們去擴展,實現我們想要的功能,今天的講解就到這了,有對這個框架不明白的地方可以在下面留言,我會盡量為大家解答的。
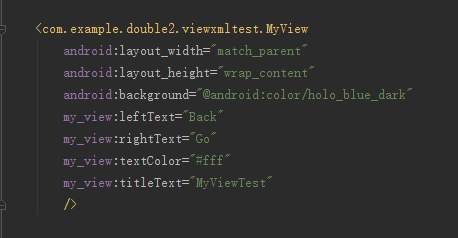 給自定義View添加xml屬性
筆者之前已經寫過了一些自定義View的文章,在此對其也就不從頭說起了,如有興趣的讀者可以看一下筆者的前兩篇文章。筆者之前的文章中僅僅介紹了如何使用自定義View以及為什麼
 Android實現炫酷的網絡直播彈幕功能
現在網絡直播越來越火,網絡主播也逐漸成為一種新興職業,對於網絡直播,彈幕功能是必須要有的,如下圖:首先來分析一下,這個彈幕功能是怎麼實現的,首先在最下面肯定是一個游戲界面
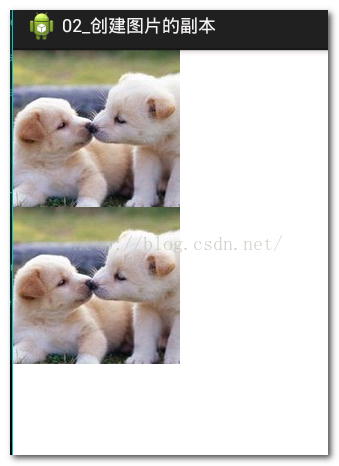 Android簡易實戰教程--第二十九話《創建圖片副本》
承接第二十八話加載大圖片,本篇介紹如何創建一個圖片的副本。安卓中加載的原圖是無法對其修改的,因為默認權限是只讀的。但是通過創建副本,就可以對其做一些修改,繪制等了。首先創
 ListView上拉加載和下拉刷新多種實現方式
該篇為ListView下拉刷新和上拉加載實現的各種方法大合集。可能在具體的細節邏輯上處理不太到位,但基本上完成邏輯的實現。細節方面,個人可以根據自己的需求進行完善。該博客