編輯:關於Android編程
本文主要講述如何動態給UI界面添加布局和控件,在編程的時候很多時候需要動態顯示一些內容,在動態添加View的時候,主要使用addView方法。
1. addView方法簡介
在Android 中,可以利用排版View的 addView 函數,將動態產生的View 物件加入到排版View 中。
例子如下:
界面代碼:
Activity代碼:
public class helloWorld extends Activity {

   public void onCreate(Bundle savedInstanceState) {
      super.onCreate(savedInstanceState);
      setContentView( R.layout.main );

      // 取得LinearLayout 物件
      LinearLayout ll = (LinearLayout)findViewById(R.id.viewObj);

      // 將TextView 加入到LinearLayout 中
      TextView tv = new TextView(this);
      tv.setText(Hello World);
      ll. addView ( tv );

      // 將Button 1 加入到LinearLayout 中
      Button b1 = new Button(this);
      b1.setText(取消);
      ll. addView ( b1 );

      // 將Button 2 加入到LinearLayout 中
      Button b2 = new Button(this);
      b2.setText(確定);
      ll. addView ( b2 );

      // 從LinearLayout 中移除Button 1
      ll. removeView ( b1 );
   }
}
上述代碼的位置,是垂直順序排列的因為界面代碼Linerlayout的orientation設置的是vertical的,但是為了美觀,需要設置添加的View的位置和樣式。在添加View的時候分為兩類來介紹,一種是布局(例如:Linearlayout等),一種是控件(例如:Button,TextView等等。)
2. 動態添加布局(包括樣式和位置)
下面的例子將介紹如何動態添加布局,基本內容和上面的代碼一致,主要注重如何控制添加的布局的位置。在控制布局的位置的時候使用LayoutParam類來實現。
例子:
界面代碼和上面的界面代碼類似,就不在重復介紹。
Activity類部分代碼:
RelativeLayout rl = new RelativeLayout(this);
//設置RelativeLayout布局的寬高
RelativeLayout.LayoutParams relLayoutParams=new RelativeLayout.LayoutParams(LayoutParams.WRAP_CONTENT,LayoutParams.WRAP_CONTENT);
this.addView(rl, relLayoutParams);
3. 動態添加控件
動態添加控件和添加布局很相似,下述代碼主要注重看控制控件的位置,下面的代碼和第二項添加布局的補充,在新添加的布局裡面再添加控件。
界面代碼同樣不在重復。
Activity類部分代碼:
RelativeLayout rl = new RelativeLayout(this);
//設置RelativeLayout布局的寬高
RelativeLayout.LayoutParams relLayoutParams=new RelativeLayout.LayoutParams(LayoutParams.WRAP_CONTENT,LayoutParams.WRAP_CONTENT);

TextView temp = new TextView(this);
temp .setId(1);
temp.setText(“圖片”);
rl.addView(temp);

TextView tv = new TextView(this);
tv.setText(“文字”);
tv.setId(2);
LayoutParams param1 = new LayoutParams(LayoutParams.WRAP_CONTENT,LayoutParams.WRAP_CONTENT);
param1.addRule(RelativeLayout.BELOW, 1);//此控件在id為1的控件的下邊
rl.addView(tv,param1);


Button update = new Button(this);
update.setText(Button);
LayoutParams param2 = new LayoutParams(LayoutParams.WRAP_CONTENT,LayoutParams.WRAP_CONTENT);
param2.addRule(RelativeLayout.RIGHT_OF, 1);//此控件在id為1的控件的右邊
rl.addView(update,param2);

this.addView(rl, relLayoutParams);
注意:控制位置和樣式的時候,布局和控件使用的方法是一樣的。
 Android4.4-Launcher源碼分析系列之WorkSpace及屏幕滑動
一.WorkSpace是什麼前面已經介紹了一個WorkSpace包含了多個CellLayout,再回憶下之前畫過的圖WorkSpace是一個ViewGroup,它的布局如
 android對象關系映射框架ormlite學習
總感覺用原始的SQLLiteHelper操作數據庫有點麻煩,上網找了些android數據庫orm框架,對比了一下,現在使用ormlite的人貌似挺多的,在網
 利用阿裡大於平台進行發送手機驗證碼
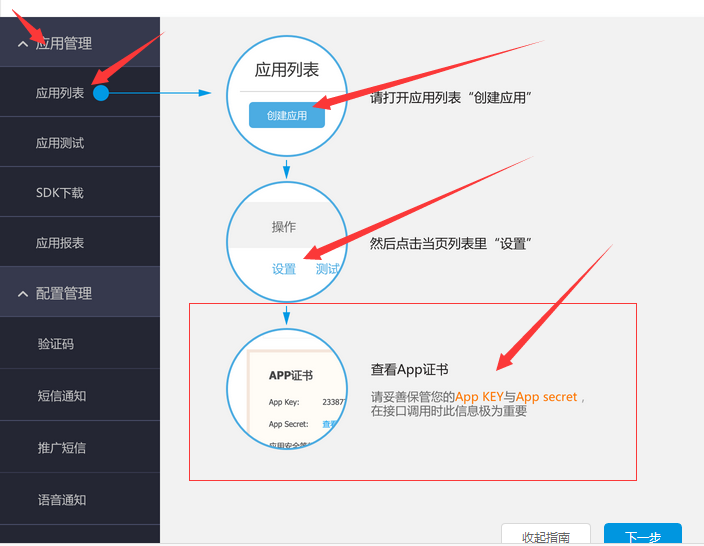
短信驗證(注冊或改密碼等)首先去登錄阿裡大於: http://www.alidayu.com/沒有號的就注冊一個!用淘寶就可以登錄了,相信一般人都是不需要注冊的。阿裡大於
 Android編程之ProgressBar圓形進度條顏色設置方法
本文實例講述了Android ProgressBar圓形進度條顏色設置方法。分享給大家供大家參考,具體如下:你是不是還在為設置進度條的顏色而煩惱呢……別著急,且看如下如何