有兩種方式聲明layout:
1.在xml文件中聲明UI組件。
2.在運行時,實例化布局元素。我們可以以編碼的方式創建View或ViewGroup對象,操縱它們的屬性。
下面用一個小例子來學習怎樣以編碼的方式添加layout:
復制代碼
1 import android.app.Activity;
2 import android.graphics.Color;
3 import android.os.Bundle;
4 import android.view.ViewGroup;
5 import android.widget.Button;
6 import android.widget.LinearLayout;
7 import android.widget.TextView;
8
9 public class MainActivity extends Activity {
10
11 private LinearLayout linearLayout;
12 private TextView textView;
13 private Button button;
14 public static final int VERTICAL = 1;
15 public static final int MATCH_PARENT = -1;
16 public static final int WRAP_CONTENT = -2;
17 @Override
18 protected void onCreate(Bundle savedInstanceState) {
19 super.onCreate(savedInstanceState);
20
21 //以編碼的方式添加layout
22
23 linearLayout = new LinearLayout(this);
24 linearLayout.setOrientation(VERTICAL); //設置LinearLayout方向,0是水平,1是垂直。默認是水平。
25 //設置布局參數,-1是MATCH_PARENT,-2是WRAP_CONTENT
26 //ViewGroup.LayoutParams(int width, int height)
27 linearLayout.setLayoutParams(new ViewGroup.LayoutParams(MATCH_PARENT,MATCH_PARENT));
28
29 textView = new TextView(this);
30 textView.setText("ThisIsATextView");
31 textView.setBackgroundColor(Color.RED);
32 textView.setLayoutParams(new ViewGroup.LayoutParams(MATCH_PARENT,WRAP_CONTENT));
33
34 button = new Button(this);
35 button.setText("ThisIsAButton");
36 button.setBackgroundColor(Color.GREEN);
37 button.setLayoutParams(new ViewGroup.LayoutParams(MATCH_PARENT,WRAP_CONTENT));
38
39 linearLayout.addView(button);
40 linearLayout.addView(textView);
41 //布局寫好後,不要忘記添加到Activity中
42 setContentView(linearLayout);
43
44
45 }
46 }
復制代碼
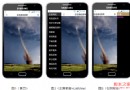
運行效果圖:
每個layout文件必須包含一個確定的根元素,這個根元素它必須是View或ViewGroup的對象。
那View類和ViewGroup類的作用是什麼呢?
View:
為用戶界面組件提供基本的搭建區域 。View類是widgets的父類,widgets通常用來創建交互UI組件
如button,TextView等等。View類同時也是ViewGroup類的父類。
ViewGroup:
是layout類的父類,而layout類是保存其他View或ViewGroup的可視化容器(invisible containers),並且能定義它們的布局屬性。
通過添加額外的布局對象(layout object)或窗口(widgets)作為子元素來逐漸完善視圖層。
下面通過一個layout文件來具體學習以下:
復制代碼
1 <!-- 確定的根元素 LinearLayout是ViewGroup的子類layout的對象 -->
2 <LinearLayout xmlns:android="http://schemas.android.com/apk/res/android"
3 xmlns:tools="http://schemas.android.com/tools"
4 android:layout_width="match_parent"
5 android:layout_height="wrap_content"
6 android:orientation="vertical" >
7 <!-- 添加子組件來豐富視圖層 -->
8 <Button
9 android:layout_width="match_parent"
10 android:layout_height="wrap_content"
11 android:background="#f00"
12 android:layout_weight="1"
13 android:text="ThisIsAButton" />
14 <TextView
15 android:layout_width="match_parent"
16 android:layout_height="wrap_content"
17 android:background="#0f0"
18 android:text="ThisIsATextView"
19 />
20 </LinearLayout>
 android handler詳解
 Android左右滑出菜單實例分析
 Android滑動組件懸浮固定在頂部效果
 高版本Android如何利用反射調用系統隱藏的遠程服務攔截來電