編輯:關於Android編程
這種方式也是比較常用的方式,下面就為大家介紹如何對圖片進行降質:
將圖片降質我們可以使用Bitmap的這個方法:boolean android.graphics.Bitmap.compress(CompressFormat format, int quality, OutputStream stream)
其中,參數format表示壓縮後的格式,quality壓縮後的圖片質量(0表示最低,100表示不壓縮),stream表示要將壓縮後的圖片保存到的輸出流。
下面是詳細代碼:
/**
 * 多線程壓縮圖片的質量
 * @author JPH
 * @param bitmap 內存中的圖片
 * @param imgPath 圖片的保存路徑
 * @date 2014-12-5下午11:30:43
 */
public static void compressImageByQuality(final Bitmap bitmap,final String imgPath){
	new Thread(new Runnable() {//開啟多線程進行壓縮處理
		@Override
		public void run() {
			// TODO Auto-generated method stub
			ByteArrayOutputStream baos = new ByteArrayOutputStream();
			options = 100;
			bitmap.compress(Bitmap.CompressFormat.JPEG, options, baos);//質量壓縮方法,把壓縮後的數據存放到baos中 (100表示不壓縮,0表示壓縮到最小)
			while (baos.toByteArray().length / 1024 > 100) {//循環判斷如果壓縮後圖片是否大於100kb,大於繼續壓縮
				baos.reset();//重置baos即讓下一次的寫入覆蓋之前的內容
				options -= 10;//圖片質量每次減少10
				if(options<0)options=0;//如果圖片質量小於10,則將圖片的質量壓縮到最小值
				bitmap.compress(Bitmap.CompressFormat.JPEG, options, baos);//將壓縮後的圖片保存到baos中
				if(options==0)break;//如果圖片的質量已降到最低則,不再進行壓縮
			}
			try {
				FileOutputStream fos = new FileOutputStream(new File(imgPath));//將壓縮後的圖片保存的本地上指定路徑中
				fos.write(baos.toByteArray());
				fos.flush();
				fos.close();
			} catch (Exception e) {
				e.printStackTrace();
			}
		}
	}).start();
}
方法解析:
由於此方法中包含I/O操作和遞歸調用比較耗時所以我采用了多線程去處理。
此種方法主要是使用android.graphics.BitmapFactory.Options.Options()方法將圖片以指定的采用率加載到內存然後輸出到本地以達到壓縮像素的目的。
詳細代碼:
/**
 * 按比例縮小圖片的像素以達到壓縮的目的
 * @author JPH
 * @param imgPath
 * @date 2014-12-5下午11:30:59
 */
public static void compressImageByPixel(String imgPath) {
	BitmapFactory.Options newOpts = new BitmapFactory.Options();
	newOpts.inJustDecodeBounds = true;//只讀邊,不讀內容
	Bitmap bitmap = BitmapFactory.decodeFile(imgPath, newOpts);
	newOpts.inJustDecodeBounds = false;
	int width = newOpts.outWidth;
	int height = newOpts.outHeight;
	float maxSize = 1000f;//默認1000px
	int be = 1;
	if (width > height && width > maxSize) {//縮放比,用高或者寬其中較大的一個數據進行計算
		be = (int) (newOpts.outWidth / maxSize);
	} else if (width < height && height > maxSize) {
		be = (int) (newOpts.outHeight / maxSize);
	}
	be++;
	newOpts.inSampleSize = be;//設置采樣率
	newOpts.inPreferredConfig = Config.ARGB_8888;//該模式是默認的,可不設
	newOpts.inPurgeable = true;// 同時設置才會有效
	newOpts.inInputShareable = true;//。當系統內存不夠時候圖片自動被回收
	bitmap = BitmapFactory.decodeFile(imgPath, newOpts);

	ByteArrayOutputStream baos = new ByteArrayOutputStream();
	bitmap.compress(Bitmap.CompressFormat.JPEG, 100, baos);
	try {
		FileOutputStream fos = new FileOutputStream(new File(imgPath));
		fos.write(baos.toByteArray());
		fos.flush();
		fos.close();
	} catch (Exception e) {
		e.printStackTrace();
	}
}
此種方式主要結合第二種和第三種方法以下是詳細代碼:
/**
 * 多線程壓縮圖片的質量
 * @author JPH
 * @param bitmap 內存中的圖片
 * @param imgPath 圖片的保存路徑
 * @date 2014-12-5下午11:30:43
 */
public static void compressImageByQuality(final Bitmap bitmap,final String imgPath){
	new Thread(new Runnable() {//開啟多線程進行壓縮處理
		@Override
		public void run() {
			// TODO Auto-generated method stub
			ByteArrayOutputStream baos = new ByteArrayOutputStream();
			options = 100;
			bitmap.compress(Bitmap.CompressFormat.JPEG, options, baos);//質量壓縮方法,把壓縮後的數據存放到baos中 (100表示不壓縮,0表示壓縮到最小)
			while (baos.toByteArray().length / 1024 > 100) {//循環判斷如果壓縮後圖片是否大於100kb,大於繼續壓縮
				baos.reset();//重置baos即讓下一次的寫入覆蓋之前的內容
				options -= 10;//圖片質量每次減少10
				if(options<0)options=0;//如果圖片質量小於10,則將圖片的質量壓縮到最小值
				bitmap.compress(Bitmap.CompressFormat.JPEG, options, baos);//將壓縮後的圖片保存到baos中
				if(options==0)break;//如果圖片的質量已降到最低則,不再進行壓縮
			}
			try {
				FileOutputStream fos = new FileOutputStream(new File(imgPath));//將壓縮後的圖片保存的本地上指定路徑中
				fos.write(baos.toByteArray());
				fos.flush();
				fos.close();
			} catch (Exception e) {
				e.printStackTrace();
			}
		}
	}).start();
}
/**
 * 按比例縮小圖片的像素以達到壓縮的目的
 * @author JPH
 * @param imgPath
 * @date 2014-12-5下午11:30:59
 */
public static void compressImageByPixel(String imgPath) {
	BitmapFactory.Options newOpts = new BitmapFactory.Options();
	newOpts.inJustDecodeBounds = true;//只讀邊,不讀內容
	Bitmap bitmap = BitmapFactory.decodeFile(imgPath, newOpts);
	newOpts.inJustDecodeBounds = false;
	int width = newOpts.outWidth;
	int height = newOpts.outHeight;
	float maxSize = 1000f;//默認1000px
	int be = 1;
	if (width > height && width > maxSize) {//縮放比,用高或者寬其中較大的一個數據進行計算
		be = (int) (newOpts.outWidth / maxSize);
	} else if (width < height && height > maxSize) {
		be = (int) (newOpts.outHeight / maxSize);
	}
	be++;
	newOpts.inSampleSize = be;//設置采樣率
	newOpts.inPreferredConfig = Config.ARGB_8888;//該模式是默認的,可不設
	newOpts.inPurgeable = true;// 同時設置才會有效
	newOpts.inInputShareable = true;//。當系統內存不夠時候圖片自動被回收
	bitmap = BitmapFactory.decodeFile(imgPath, newOpts);
	compressImageByQuality(bitmap,imgPath);//壓縮好比例大小後再進行質量壓縮
}
 MUI窗口管理
1、頁面初始化在app開發中,若要使用HTML5+擴展api,必須等plusready事件發生後才能正常使用,mui將該事件封裝成了mui.plusReady()方法,涉
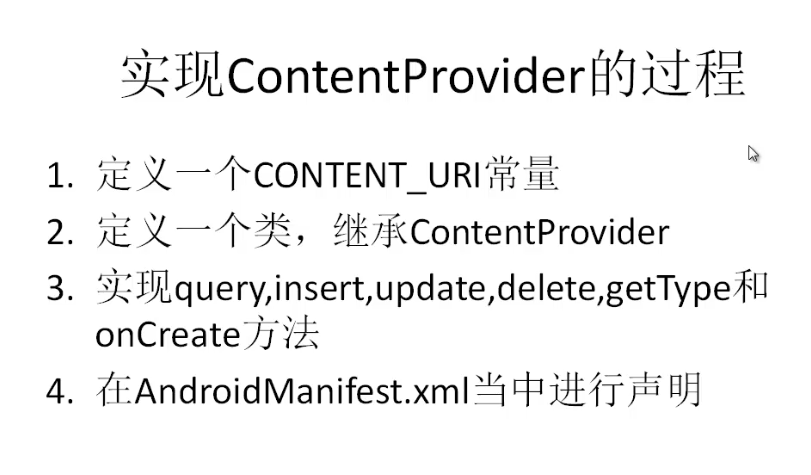 Android開發之ContentProvider的使用詳解
前言 Content Provider為存儲數據和獲取數據提供了統一的
 不怕應用名字亂 在手機端輕松給APK重命名
很多Android手機用戶都喜歡收集APK安裝包並保存在存儲卡內。可是,網上下載的APK大都以英文或亂碼命名,管理起來好不麻煩。那麼,無需借助PC,我們能否
 Android學習路線(二十四)ActionBar Fragment運用最佳實踐
通過前面的幾篇博客,大家看到了Google是如何解釋action bar和fragment以及推薦的用法。俗話說沒有demo的博客不是好博客,下面我會介紹一