編輯:關於Android編程
定義一個服務
在項目中定義一個服務,新建一個ServiceTest項目,然後在這個項目中新增一個名為MyService的類,並讓它繼承自Service,完成後的代碼如下所示:
package com.jack.servicetest;

import android.app.Service;
import android.content.Intent;
import android.os.IBinder;

public class MyService extends Service {

	@Override
	public IBinder onBind(Intent arg0) {
		// TODO Auto-generated method stub
		return null;
	}

}
package com.jack.servicetest;

import android.app.Service;
import android.content.Intent;
import android.os.IBinder;

public class MyService extends Service {

	@Override
	public IBinder onBind(Intent arg0) {
		// TODO Auto-generated method stub
		return null;
	}

	@Override
	public void onCreate() {
		// TODO Auto-generated method stub
		super.onCreate();
	}

	@Override
	public void onDestroy() {
		// TODO Auto-generated method stub
		super.onDestroy();
	}

	@Override
	public int onStartCommand(Intent intent, int flags, int startId) {
		// TODO Auto-generated method stub
		return super.onStartCommand(intent, flags, startId);
	}


}
可以看到,這裡我們又重寫了onCreate(),onDestroy()和onStartCommand(Intent intent, int flags, int startId)這三個方法,它們是每個服務中最常用到的三個方法。其中onCreate方法會在服務創建的時候調用,onStartCommand方法會在每次服務啟動的時候調用。onDestroy()方法會在服務銷毀的時候調用。
通常情況下,如果我們希望服務一旦啟動就立刻去執行某個動作,就可以將邏輯寫在onStartCommand方法裡。而當服務銷毀時,我們又應該在onDestroy()方法中去回收那些不在使用的資源。
另外需要注意的是,沒一個服務都需要在AndroidManifest.xml文件中進行注冊才能生效,android四大組件都需要進行注冊。於是我們修改AndroidManifest.xml文件,代碼如下所示:
啟動和停止服務
定義好了服務後,接下來就應該考慮如何啟動以及停止這個服務。啟動服務和停止服務主要借助Intent來實現,下面我們在ServiceTest項目中嘗試去啟動已經停止MyService這個服務。
首先修改activity_main.xml中的代碼,如下所示:
然後修改MainActivity中的代碼,如下所示:
package com.jack.servicetest;

import android.app.Activity;
import android.content.Intent;
import android.os.Bundle;
import android.view.Menu;
import android.view.View;
import android.view.View.OnClickListener;
import android.widget.Button;

public class MainActivity extends Activity implements OnClickListener{

	private Button startService;
	private Button stopService;
	@Override
	protected void onCreate(Bundle savedInstanceState) {
		super.onCreate(savedInstanceState);
		setContentView(R.layout.activity_main);
		startService=(Button) findViewById(R.id.start_service);
		stopService=(Button) findViewById(R.id.stop_service);
		startService.setOnClickListener(this);
		stopService.setOnClickListener(this);
	}

	@Override
	public boolean onCreateOptionsMenu(Menu menu) {
		// Inflate the menu; this adds items to the action bar if it is present.
		getMenuInflater().inflate(R.menu.main, menu);
		return true;
	}

	@Override
	public void onClick(View v) {
		// TODO Auto-generated method stub
		switch(v.getId()){
		case R.id.start_service:
			Intent startIntent =new Intent(this,MyService.class);
			startService(startIntent);//啟動服務
			break;
		case R.id.stop_service:
			Intent stopIntent =new Intent(this,MyService.class);
			stopService(stopIntent);//停止服務
			break;
		default:
			break;
		}
	}

}
上面我們在onCreate方法中分別獲取到start service按鈕和stop service按鈕的實例,並給它們注冊了點擊
事件。然後在start service按鈕的點擊事件裡面,我們構建出了一個Intent對象,並調用startService()
方法來啟動MyService這個服務。在stop service按鈕的點擊事件裡,我們同樣構建出了一個Intent對象,並調用
stopService()方法來停止MyService這個服務。startService()和stopService()方法都是定義在Context
類中的,所以我們在活動裡可以直接調用這兩個方法。注意,這裡完全是由活動來決定服務何時停止的,如果沒有點擊stop service
按鈕,服務就會一直處於運行狀態。那服務有什麼辦法讓自己停下來了?只需要在MyService的任何一個位置調用shopSelf()
方法就能讓服務停止下來了。
接下來我們要考慮,如何才能證明服務已經成功啟動或者停止了?最簡單的方法就是在MyService的幾個方法中加入打印日志,如下所示:
package com.jack.servicetest;

import android.app.Service;
import android.content.Intent;
import android.os.IBinder;
import android.util.Log;

public class MyService extends Service {

	@Override
	public IBinder onBind(Intent arg0) {
		// TODO Auto-generated method stub
		return null;
	}

	@Override
	public void onCreate() {
		// TODO Auto-generated method stub
		super.onCreate();
		Log.d(MyService, onCreate());
	}

	@Override
	public void onDestroy() {
		// TODO Auto-generated method stub
		super.onDestroy();
		Log.d(MyService, onDestroy());
	}

	@Override
	public int onStartCommand(Intent intent, int flags, int startId) {
		// TODO Auto-generated method stub

		Log.d(MyService, onStartCommand);

		return super.onStartCommand(intent, flags, startId);

	}


}
由此證明MyService服務確實已經成功停止下來了。
onCreate方法和onStartCommand方法的區別:onCreate方法是在服務第一次創建的時候調用的,而onStartCommand方法則在每次啟動服務的時候都會調用,由於剛才我們是第一次點擊start service按鈕,服務此時還未創建過,所以兩個方法都會執行,之後如果你在連續多點擊幾次start service按鈕,你就會發現只有onStartCommand方法可以得到執行了。
活動和服務進行通信
目前我們希望在MyService裡提供一個下載的功能,然後再活動中可以決定何時開始下載,以及隨時查看下載進。實現這個功能的思路是創建一個專門的Binder對象來對下載功能進行管理,修改MyService中的代碼:如下所示:
package com.jack.servicetest;

import android.app.Service;
import android.content.Intent;
import android.os.Binder;
import android.os.IBinder;
import android.util.Log;

public class MyService extends Service {

	private DownloadBinder mBinder=new DownloadBinder();
	class DownloadBinder extends Binder{
		public void startDownload(){
			Log.d(MyService, startdownload executed);
		}

		public int getProgress(){
			Log.d(MyService, getProgress executed);
			return 0;
		}

	}
	@Override
	public IBinder onBind(Intent intent) {
		// TODO Auto-generated method stub
		return mBinder;
	}

	@Override
	public void onCreate() {
		// TODO Auto-generated method stub
		super.onCreate();
		Log.d(MyService, onCreate());
	}

	@Override
	public void onDestroy() {
		// TODO Auto-generated method stub
		super.onDestroy();
		Log.d(MyService, onDestroy());
	}

	@Override
	public int onStartCommand(Intent intent, int flags, int startId) {
		// TODO Auto-generated method stub

		Log.d(MyService, onStartCommand);

		return super.onStartCommand(intent, flags, startId);

	}


}
接著,在MyService中創建了DownloadBinder的實例,然後再onBind()方法裡返回了這個實例,這樣MyService中的工作就全部完成了。
下面我們需要在活動中調用服務裡的方法,首先需要在布局文件中新曾兩個按鈕,修改activity_main.xml中的代碼,如下所示:
package com.jack.servicetest;

import com.jack.servicetest.MyService.DownloadBinder;

import android.app.Activity;
import android.content.ComponentName;
import android.content.Intent;
import android.content.ServiceConnection;
import android.os.Bundle;
import android.os.IBinder;
import android.view.Menu;
import android.view.View;
import android.view.View.OnClickListener;
import android.widget.Button;

public class MainActivity extends Activity implements OnClickListener{

	private Button startService;
	private Button stopService;
	private Button bindService;
	private Button unbindService;
	private MyService.DownloadBinder downloadBinder;
	private ServiceConnection connection=new ServiceConnection() {
		/*
		 * 這裡創建了一個ServiceConnection的匿名類,在這裡重寫了onServiceConnected方法和
		 * onServiceDisconnected方法,這兩個方法分別會在活動與服務成功綁定以及解除綁定的時候調用。
		 * 在onServiceConnected方法中,我們又通過向下轉型得到了DownloadBinder的實例,有了這個
		 * 實例,活動和服務之間的關系就變得非常緊密了,現在我們可以在活動中根據具體的場景來調用DownloadBinder
		 * 中的任何public方法,及實現了指揮服務干什麼,服務就干什麼的功能,這裡只做了簡單的測試,在onServiceConnected
		 * 中調用了DownloadBinder的startDownload(),getProgress()方法。
		 * */
		@Override
		public void onServiceDisconnected(ComponentName name) {
			// TODO Auto-generated method stub

		}

		@Override
		public void onServiceConnected(ComponentName name, IBinder service) {
			// TODO Auto-generated method stub
			downloadBinder=(MyService.DownloadBinder) service;
			downloadBinder.startDownload();
			downloadBinder.getProgress();
		}
	};
	@Override
	protected void onCreate(Bundle savedInstanceState) {
		super.onCreate(savedInstanceState);
		setContentView(R.layout.activity_main);
		startService=(Button) findViewById(R.id.start_service);
		stopService=(Button) findViewById(R.id.stop_service);
		startService.setOnClickListener(this);
		stopService.setOnClickListener(this);

		bindService = (Button) findViewById(R.id.bind_service);
		unbindService = (Button) findViewById(R.id.unbind_service);
		bindService.setOnClickListener(this);
		unbindService.setOnClickListener(this);

	}

	@Override
	public boolean onCreateOptionsMenu(Menu menu) {
		// Inflate the menu; this adds items to the action bar if it is present.
		getMenuInflater().inflate(R.menu.main, menu);
		return true;
	}

	@Override
	public void onClick(View v) {
		// TODO Auto-generated method stub
		switch(v.getId()){
		case R.id.start_service:
			Intent startIntent =new Intent(this,MyService.class);
			startService(startIntent);//啟動服務
			break;
		case R.id.stop_service:
			Intent stopIntent =new Intent(this,MyService.class);
			stopService(stopIntent);//停止服務
			break;
		case R.id.bind_service:
			/*
			 *現在我們需要進行活動和服務的綁定,構建一個Intent對象,然後調用bindService()方法將
			 *MainActivity()和MyService進行綁定。 bindService方法接收三個參數,第一個參數就是
			 *上面創建出的Intent對象,第二個參數就是前面創建出的ServiceConnection的實例,第三個
			 *參數則是一個標志位,這裡傳入BIND_AUTO_CREATE表示在活動和服務進行綁定後自動創建服務。
			 *這會使得MyService中的onCreate()方法得到執行,但onStartCommand()方法不會執行。
			 * */
			Intent bindIntent=new Intent(this,MyService.class);
	        bindService(bindIntent, connection, BIND_AUTO_CREATE);//綁定服務
			break;
		case R.id.unbind_service:
			/*
			 * 如果我們想解除活動和服務之間的綁定,調用一下unbindService()方法就可以了。
			 * */
			unbindService(connection);//解綁服務
			break;
		default:
			break;
		}
	}

}
可以看到,首先是MyService的onCreate()方法得到了執行,然後startDownload和getProgeress方法得到了執行,說明我們確實已經在活動力成功的調用了服務裡提供的方法了。另外需要注意的,任何一個服務在整個應用程序范圍內都是通用的,即MyService不僅可以和MainActivity綁定,還可以和任何一個其他的活動進行綁定,而且在綁定完成之後他們都可以獲取到相同的DownloadBinder實例。
服務的生命周期
服務也有自己的生命周期,前面我們使用到的onCreate(),onStartCommand(),onBind()和onDestroy()等方法
都是在服務的生命周期內可能回掉的方法。
一旦在項目的任何位置調用了Context的startService()方法,相應的服務就會啟動起來,並回調onStartCommand()。如果 這個服務之前還沒創建過,onCreate()方法會先於onStartCommand()方法執行。服務啟動了之後一直保持運行狀態,
直到stopService()或stopSelf()方法被調用。注意雖然每調用一次startService()方法,onStartCommand()就會
執行一次,但實際上每個服務都只會存在一個實例。所以不管你調用了多少次startService()方法,只需調用一次stopService()或stopSelf()方法,服務就會停止下來了。
另外,還可以調用Context的bindService()來獲取一個服務的持久連接,這時就會回調服務中的onBind()方法。類似地,如果這個服務之前還沒有創建過,onCreate()方法會先於onBind()方法執行。之後,調用方可以獲取到onBind()方法裡返回的IBinder對象的實例,這樣就能自由地和服務進行通信了。只要調用方和服務之間的連接沒有斷開,服務就會一直保持運行狀態。
當調用了startService()方法後,又去調用stopService()方法,這時服務中的onDestroy()方法就會執行,表示
服務已經銷毀了。類似地,當調用了bindService()方法後,又去調用unbindService()方法,onDestroy()方法也會執行,這
兩種情況都很好理解。但是需要注意,我們是完全有可能對一個服務既調用了startService()方法,又調用了bindService()方法的,這種情況下該如何才能讓服務銷毀掉?根據android系統的機制,一個服務只要被啟動或者綁定了之後就會一直處於運行狀態,必須要讓以上兩種條件同時不滿足,服務才能被銷毀。所以,這種情況下需要同時調用stopService()和unbindService()方法,onDestroy()方法才會執行。
使用前台服務
服務幾乎都是在後台運行的,一直以來它都是默默的做著辛苦的工作。但是服務的系統優先級還是比較低的,當系統出現內存不足的情況時,就有可能會回收掉正在後台運行的服務。如果你希望服務可以一直 保持運行狀態,而 不會由於系統內存不足的原因導致被回收,就可以考慮使用前台服務。前台服務和普通服務最大的區別就在於,它會一直有一個正在運行的系統狀態欄顯示,下拉狀態欄後可以看到更加詳細的信息,非常類似於通知的效果。
下面我們創建一個前台服務吧,修改MyService中的代碼,如下所示:
package com.jack.servicetest;

import android.app.Notification;
import android.app.PendingIntent;
import android.app.Service;
import android.content.Intent;
import android.os.Binder;
import android.os.IBinder;
import android.util.Log;

public class MyService extends Service {

	private DownloadBinder mBinder=new DownloadBinder();
	class DownloadBinder extends Binder{
		public void startDownload(){
			Log.d(MyService, startdownload executed);
		}

		public int getProgress(){
			Log.d(MyService, getProgress executed);
			return 0;
		}

	}
	@Override
	public IBinder onBind(Intent intent) {
		// TODO Auto-generated method stub
		return mBinder;
	}

	@Override
	public void onCreate() {
		// TODO Auto-generated method stub
		super.onCreate();
		@SuppressWarnings(deprecation)
		Notification notification=new Notification(R.drawable.ic_launcher,
				Notification comes,System.currentTimeMillis());
		Intent notificationIntent=new Intent(this,MainActivity.class);
		PendingIntent pendingIntent=PendingIntent.getActivity(this, 0,notificationIntent,
				0);
		notification.setLatestEventInfo(this, this is title, this is content,
				pendingIntent);
		startForeground(1, notification);
		/*
		 可以看到,這裡只是修改了onCreate()方法中的代碼,相信這部分代碼你會非常眼熟。這就是我們前面學習的
		 創建通知的方法。只不過這次在構建出Notification對象並沒有使用NotificationManager來將通知顯示
		 出來,而是調用了startForeground()方法。這個方法接收兩個參數,第一個參數是通知的id,類似於notify()方法
		 的第一個參數,第二個參數則是構建出來的Notification對象。調用startForeground()方法後就會讓MyService變成
		 一個前台服務,並在系統狀態顯示出來。

		 */
		Log.d(MyService, onCreate());
	}

	@Override
	public void onDestroy() {
		// TODO Auto-generated method stub
		super.onDestroy();
		Log.d(MyService, onDestroy());
	}

	@Override
	public int onStartCommand(Intent intent, int flags, int startId) {
		// TODO Auto-generated method stub

		Log.d(MyService, onStartCommand);

		return super.onStartCommand(intent, flags, startId);

	}


}
使用IntentService
我們知道服務中的代碼都是默認運行在主線程當中,如果直接在服務裡去處理一些耗時的邏輯,就很容易出現ANR(Application Not Responding)的情況。
所以這個時候,就需要用到Android多線程編程的技術了,我們應該在服務的每個具體的方法裡開啟一個子線程,然後再這裡去處理那些耗時的邏輯。因此,一個比較標准的服務就可以寫成如下形式了:
package com.jack.servicetest;

import android.app.Notification;
import android.app.PendingIntent;
import android.app.Service;
import android.content.Intent;
import android.os.Binder;
import android.os.IBinder;
import android.util.Log;

public class MyService extends Service {

	/*private DownloadBinder mBinder=new DownloadBinder();
	class DownloadBinder extends Binder{
		public void startDownload(){
			Log.d(MyService, startdownload executed);
		}

		public int getProgress(){
			Log.d(MyService, getProgress executed);
			return 0;
		}

	}*/
	@Override
	public IBinder onBind(Intent intent) {
		// TODO Auto-generated method stub
		//return mBinder;
		return null;
	}

	/*@Override
	public void onCreate() {
		// TODO Auto-generated method stub
		super.onCreate();
		@SuppressWarnings(deprecation)
		Notification notification=new Notification(R.drawable.ic_launcher,
				Notification comes,System.currentTimeMillis());
		Intent notificationIntent=new Intent(this,MainActivity.class);
		PendingIntent pendingIntent=PendingIntent.getActivity(this, 0,notificationIntent,
				0);
		notification.setLatestEventInfo(this, this is title, this is content,
				pendingIntent);
		startForeground(1, notification);

		 可以看到,這裡只是修改了onCreate()方法中的代碼,相信這部分代碼你會非常眼熟。這就是我們前面學習的
		 創建通知的方法。只不過這次在構建出Notification對象並沒有使用NotificationManager來將通知顯示
		 出來,而是調用了startForeground()方法。這個方法接收兩個參數,第一個參數是通知的id,類似於notify()方法
		 的第一個參數,第二個參數則是構建出來的Notification對象。調用startForeground()方法後就會讓MyService變成
		 一個前台服務,並在系統狀態顯示出來。


		Log.d(MyService, onCreate());
	}
*/
	/*@Override
	public void onDestroy() {
		// TODO Auto-generated method stub
		super.onDestroy();
		Log.d(MyService, onDestroy());
	}*/

	@Override
	public int onStartCommand(Intent intent, int flags, int startId) {
		// TODO Auto-generated method stub

		Log.d(MyService, onStartCommand);
		new Thread(new Runnable(){

			@Override
			public void run() {
				// TODO Auto-generated method stub
				//處理具體的邏輯
			}

		}).start();
		return super.onStartCommand(intent, flags, startId);

	}


}
但是,這種服務一旦啟動之後,就會一直處於運行狀態,必須調用stopService()或者stopSelf()方法才能讓服務停止下來。所以,如果想要實現一個服務執行完畢後自動停止的功能,就可以這樣寫:
package com.jack.servicetest;

import android.app.Notification;
import android.app.PendingIntent;
import android.app.Service;
import android.content.Intent;
import android.os.Binder;
import android.os.IBinder;
import android.util.Log;

public class MyService extends Service {

	/*private DownloadBinder mBinder=new DownloadBinder();
	class DownloadBinder extends Binder{
		public void startDownload(){
			Log.d(MyService, startdownload executed);
		}

		public int getProgress(){
			Log.d(MyService, getProgress executed);
			return 0;
		}

	}*/
	@Override
	public IBinder onBind(Intent intent) {
		// TODO Auto-generated method stub
		//return mBinder;
		return null;
	}

	/*@Override
	public void onCreate() {
		// TODO Auto-generated method stub
		super.onCreate();
		@SuppressWarnings(deprecation)
		Notification notification=new Notification(R.drawable.ic_launcher,
				Notification comes,System.currentTimeMillis());
		Intent notificationIntent=new Intent(this,MainActivity.class);
		PendingIntent pendingIntent=PendingIntent.getActivity(this, 0,notificationIntent,
				0);
		notification.setLatestEventInfo(this, this is title, this is content,
				pendingIntent);
		startForeground(1, notification);

		 可以看到,這裡只是修改了onCreate()方法中的代碼,相信這部分代碼你會非常眼熟。這就是我們前面學習的
		 創建通知的方法。只不過這次在構建出Notification對象並沒有使用NotificationManager來將通知顯示
		 出來,而是調用了startForeground()方法。這個方法接收兩個參數,第一個參數是通知的id,類似於notify()方法
		 的第一個參數,第二個參數則是構建出來的Notification對象。調用startForeground()方法後就會讓MyService變成
		 一個前台服務,並在系統狀態顯示出來。


		Log.d(MyService, onCreate());
	}
*/
	/*@Override
	public void onDestroy() {
		// TODO Auto-generated method stub
		super.onDestroy();
		Log.d(MyService, onDestroy());
	}*/

	@Override
	public int onStartCommand(Intent intent, int flags, int startId) {
		// TODO Auto-generated method stub

		Log.d(MyService, onStartCommand);
		new Thread(new Runnable(){

			@Override
			public void run() {
				// TODO Auto-generated method stub
				//處理具體的邏輯
				stopSelf();
			}

		}).start();
		return super.onStartCommand(intent, flags, startId);

	}


}
雖然這種寫法並不復雜,但是總會有一些人忘記開啟線程,或者忘記調用stopSelf()方法。為了可以簡單地創建一個異步的,會自動停止的服務,android專門提供了一個IntentService類,這個類就很好的解決了前面所提到的兩種尴尬,下面我們來看下它的用法。
新建一個MyIntentService類繼承IntentService,代碼如下所示:
package com.jack.servicetest;

import android.app.IntentService;
import android.content.Intent;
import android.util.Log;

public class MyIntentService extends IntentService {

	/*
	 這裡首先是提供了一個無參的構造函數,並且必須在其內部調用父類的有參構造函數。然後要在子類中去實現
	 onHandleIntent()這個抽象方法,在這個方法中可以處理一些具體的邏輯,而且不用擔心ANR的問題,因為
	 這個方法已經是在子線程中運行的了。這裡為了證實一下,我們在onHandleIntent()方法中打印了當前線程的id。
	 另外根據IntentService的特性,這個服務在運行結束後應該是會自動停止的,所以我們又重寫了onDestroy()方法,在
	 這裡也打印l一行日志,以證實是不是停止掉了。
	 */
	public MyIntentService() {
		super(MyIntentService);//調用父類的有參構造函數
		// TODO Auto-generated constructor stub
	}

	@Override
	protected void onHandleIntent(Intent arg0) {
		// TODO Auto-generated method stub

		//打印當前線程的id
		Log.d(MyIntentService, Thread id is +Thread.currentThread().getId());
	}

	@Override
	public void onDestroy() {
		// TODO Auto-generated method stub
		super.onDestroy();
		Log.d(MyIntentService, onDestroy() executed);
	}


}
接下來修改activity_main.xml中的代碼,加入一個用於啟動MyIntentService這個服務的按鈕,如下所示:
package com.jack.servicetest;

//import com.jack.servicetest.MyService.DownloadBinder;

import android.app.Activity;
import android.content.ComponentName;
import android.content.Intent;
import android.content.ServiceConnection;
import android.os.Bundle;
import android.os.IBinder;
import android.util.Log;
import android.view.Menu;
import android.view.View;
import android.view.View.OnClickListener;
import android.widget.Button;

public class MainActivity extends Activity implements OnClickListener{

	private Button startService;
	private Button stopService;
	private Button bindService;
	private Button unbindService;
	private Button startIntentService;
	//private MyService.DownloadBinder downloadBinder;
	private ServiceConnection connection=new ServiceConnection() {
		/*
		 * 這裡創建了一個ServiceConnection的匿名類,在這裡重寫了onServiceConnected方法和
		 * onServiceDisconnected方法,這兩個方法分別會在活動與服務成功綁定以及解除綁定的時候調用。
		 * 在onServiceConnected方法中,我們又通過向下轉型得到了DownloadBinder的實例,有了這個
		 * 實例,活動和服務之間的關系就變得非常緊密了,現在我們可以在活動中根據具體的場景來調用DownloadBinder
		 * 中的任何public方法,及實現了指揮服務干什麼,服務就干什麼的功能,這裡只做了簡單的測試,在onServiceConnected
		 * 中調用了DownloadBinder的startDownload(),getProgress()方法。
		 * */
		@Override
		public void onServiceDisconnected(ComponentName name) {
			// TODO Auto-generated method stub

		}

		@Override
		public void onServiceConnected(ComponentName name, IBinder service) {
			// TODO Auto-generated method stub
			/*downloadBinder=(MyService.DownloadBinder) service;
			downloadBinder.startDownload();
			downloadBinder.getProgress();*/
		}
	};
	@Override
	protected void onCreate(Bundle savedInstanceState) {
		super.onCreate(savedInstanceState);
		setContentView(R.layout.activity_main);
		startService=(Button) findViewById(R.id.start_service);
		stopService=(Button) findViewById(R.id.stop_service);
		startService.setOnClickListener(this);
		stopService.setOnClickListener(this);

		bindService = (Button) findViewById(R.id.bind_service);
		unbindService = (Button) findViewById(R.id.unbind_service);
		bindService.setOnClickListener(this);
		unbindService.setOnClickListener(this);


		startIntentService=(Button) findViewById(R.id.start_intent_service);
		startIntentService.setOnClickListener(this);


	}

	@Override
	public boolean onCreateOptionsMenu(Menu menu) {
		// Inflate the menu; this adds items to the action bar if it is present.
		getMenuInflater().inflate(R.menu.main, menu);
		return true;
	}

	@Override
	public void onClick(View v) {
		// TODO Auto-generated method stub
		switch(v.getId()){
		case R.id.start_service:
			Intent startIntent =new Intent(this,MyService.class);
			startService(startIntent);//啟動服務
			break;
		case R.id.stop_service:
			Intent stopIntent =new Intent(this,MyService.class);
			stopService(stopIntent);//停止服務
			break;
		case R.id.bind_service:
			/*
			 *現在我們需要進行活動和服務的綁定,構建一個Intent對象,然後調用bindService()方法將
			 *MainActivity()和MyService進行綁定。 bindService方法接收三個參數,第一個參數就是
			 *上面創建出的Intent對象,第二個參數就是前面創建出的ServiceConnection的實例,第三個
			 *參數則是一個標志位,這裡傳入BIND_AUTO_CREATE表示在活動和服務進行綁定後自動創建服務。
			 *這會使得MyService中的onCreate()方法得到執行,但onStartCommand()方法不會執行。
			 * */
			Intent bindIntent=new Intent(this,MyService.class);
	        bindService(bindIntent, connection, BIND_AUTO_CREATE);//綁定服務
			break;
		case R.id.unbind_service:
			/*
			 * 如果我們想解除活動和服務之間的綁定,調用一下unbindService()方法就可以了。
			 * */
			unbindService(connection);//解綁服務
			break;
		case R.id.start_intent_service:
			//打印主線程的id
			Log.d(MainActivity, Thread id is+Thread.currentThread().getId());
			Intent intentService=new Intent(this,MyIntentService.class);
			startService(intentService);
			break;
		default:
			break;
		}
	}

}

/*
 服務也有自己的生命周期,前面我們使用到的onCreate(),onStartCommand(),onBind()和onDestroy()等方法
 都是在服務的生命周期內可能回掉的方法。
    一旦在項目的任何位置調用了Context的startService()方法,相應的服務就會啟動起來,並回調onStartCommand()。如果
    這個服務之前還沒創建過,onCreate()方法會先於onStartCommand()方法執行。服務啟動了之後一直保持運行狀態,
    直到stopService()或stopSelf()方法被調用。注意雖然每調用一次startService()方法,onStartCommand()就會
    執行一次,但實際上每個服務都只會存在一個實例。所以不管你調用了多少次startService()方法,只需調用一次stopService()
  或stopSelf()方法,服務就會停止下來了。
  另外,還可以調用Context的bindService()來獲取一個服務的持久連接,這時就會回調服務中的onBind()方法。類似地,
  如果這個服務之前還沒有創建過,onCreate()方法會先於onBind()方法執行。之後,調用方可以獲取到onBind()方法裡
  返回的IBinder對象的實例,這樣就能自由地和服務進行通信了。只要調用方和服務之間的連接沒有斷開,服務就會一直保持運行狀態。
   當調用了startService()方法後,又去調用stopService()方法,這時服務中的onDestroy()方法就會執行,表示
   服務已經銷毀了。類似地,當調用了bindService()方法後,又去調用unbindService()方法,onDestroy()方法也會執行,這
   兩種情況都很好理解。但是需要注意,我們是完全有可能對一個服務既調用了startService()方法,又調用了bindService()方法的,
   這種情況下該如何才能讓服務銷毀掉?根據android系統的機制,一個服務只要被啟動或者綁定了之後就會一直處於運行狀態,必須要讓以上兩種條件同時
   不滿足,服務才能被銷毀。所以,這種情況下需要同時調用stopService()和unbindService()方法,onDestroy()方法才會執行。
 */
可以看到,我們在start intentservice按鈕的點擊事件裡面去啟動MyIntentService這個服務,並在這裡打印了一下主線程的id,其實IntentService的用法和普通的服務沒什麼兩樣。
在AndroidManifest.xml裡注冊,如下所示:
可以看到MyIntentService和MainActivity所在的線程id不一樣,而且onDestory()方法也得到了執行,說明MyIntentService在運行完畢後確實自動停止了。集開啟線程和自動停止於一身。
服務的最佳實踐---------後台執行的定時任務
Android中實現定時任務一般有兩種方式,一種是使用java api裡提供的Timer類,一種是使用android的Alarm機制。
這兩種方式在多數情況下都能實現類似的效果,但是Timer有一個明顯的短板,它並不太適用於那些需要長期在後台運行的定時任務。我們都知道,為了能讓電池更加耐用,每種手機都會有自己的休眠策略,andorid手機就會在長時間不操作的情況下自動讓cpu進入的到睡眠狀態,這就有可能導致Timer中的定時任務無法正常運行。而Alarm機制不存在這種情況,它具有喚醒cpu的功能,即可以保證每次需要執行定時任務的時候cpu都能正常工作。需要注意,這裡的喚醒cpu和喚醒屏幕完全不是同一個概念,不要弄混淆了。
我們來看看Alarm機制的用法吧,主要需要借助AlarmManager類來實現。這個類和NotificationManager有點類似,都是通過調用Context的getSystemService()方法來獲取實例的,只是這裡需要傳入的參數是Context.ALARM_SERVICE.
因此,獲取一個AlarmManager的實例就可以寫成:
AlarmManager manager=(AlarmManager)getSystemService(Context.ALARM_SERVICE);
接下來調用AarmManager的set()方法就可以設置一個定時任務了,比如說想要設定一個任務在10秒後執行,就可以寫成:
long triggerAtTime=SystemClock.elapsedRealtime()+10*1000;
manager.set(AlarmManager.ELAPSED_REALTIME_WAKEUP,triggerAtTime,pendingIntent);
第一個參數是一個整形參數,用於指定AlarmManager的工作類型,有四種值可選,分別是ELAPSED_REALTIME,ELAPSED_REALTIME_WAKEUP,
RTC 和 RTC_WAKEUP。其中ELAPSED_REALTIME表示讓定時任務的觸發從系統開機開始算起,但不會喚醒cpu。
ELAPSED_REALTIME_WAKEUP同樣表示讓定時任務的觸發時間從系統開機開始算起,但會喚醒cpu。
RTC表示讓定時任務的觸發時間從1970年1月1日0點開始算起,但不會喚醒cpu。
RTC_WAKEUP同樣表示讓定時任務的觸發時間從1970年1月1日0點開始算起,但會喚醒cpu。使用SystemClock.elapsedRealtime()方法
可以獲取到系統開機至今所歷經的毫秒數,使用System.currentTimeMillis()方法可以獲取到1970年1月1日0點
至今所經歷時間的毫秒數。
第二個參數就是定時任務觸發的時間,以毫秒為單位。如果第一個參數使用的是ELAPSED_REALTIME或ELAPSED_REALTIME_WAKEUP則這裡傳入開機至今的時間在加上延遲執行的時間。如果第一個參數使用的是RTC或RTC_WAKEUP,則這裡傳入1970年1月1日0點至今的時間再加上延遲執行的時間。
第三個參數是一個PendingIntent,對於它應該不會陌生了 吧。這裡我們一般會調用getBroadcast()方法來
獲取一個能夠執行廣播的PendingIntent。這樣當定時任務被觸發的時候,廣播接收器的onReceive()方法就可以得到執行。
了解了 set()方法的每個參數之後,你應該能想到,設定一個任務在10秒後執行還可以寫成:
long triggerAtTime=System.curentTimeMillis()+10*1000;
manager.set(AlarmManager.RTC_WAKEUP,triggerAtTime,pendingIntent);
現在已經掌握了Alarm機制的基本用法,下面我們就來創建一個可以長期在後台執行定時任務的服務。創建一個ServiceBestPractice項目,
然後新增一個LongRunningService類,代碼如下所示:
package com.jcak.servicebestpractice;

import java.util.Date;

import android.app.AlarmManager;
import android.app.PendingIntent;
import android.app.Service;
import android.content.Intent;
import android.os.IBinder;
import android.os.SystemClock;
import android.util.Log;

public class LongRunningService extends Service {

	@Override
	public IBinder onBind(Intent intent) {
		// TODO Auto-generated method stub
		return null;
	}

	@Override
	public int onStartCommand(Intent intent, int flags, int startId) {
		// TODO Auto-generated method stub
		new Thread(new Runnable(){

			@Override
			public void run() {
				// TODO Auto-generated method stub
				Log.d(LongRunningService,executed at +new Date().toString());
			}

		}).start();
		AlarmManager manager=(AlarmManager) getSystemService(ALARM_SERVICE);
		int anHour=10*1000;
		long triggerAtTime=SystemClock.elapsedRealtime()+anHour;
		Intent i=new Intent(this,AlarmReceiver.class);
		PendingIntent pi=PendingIntent.getBroadcast(this, 0, i, 0);
		manager.set(AlarmManager.ELAPSED_REALTIME_WAKEUP,
				triggerAtTime, pi);

		return super.onStartCommand(intent, flags, startId);
	}

}
在onStartCommand()方法中開啟了一個子線程,然後在子線程裡就可以執行具體的邏輯操作了,這裡簡單的,只是打印了當前的時間。
創建線程之後的代碼就是上面講解的Alarm機制的用法,先是獲取到了AlarmManager的實例,然後定義任務的觸發時間為10秒,在使用PendingIntent指定處理定時任務的廣播接收器為AlarmReceiver,最後調用set()方法完成設定。顯然,AlarmReceiver不存在,我們就創建一個,代碼如下所示:
package com.jcak.servicebestpractice;

import android.content.BroadcastReceiver;
import android.content.Context;
import android.content.Intent;

public class AlarmReceiver extends BroadcastReceiver {

	@Override
	public void onReceive(Context context, Intent intent) {
		// TODO Auto-generated method stub

		Intent i=new Intent(context,LongRunningService.class);
		context.startService(i);
	}

}
。這就已經將一個長期服務在後台定時運行的服務完成了。因為一旦啟動了LongRunningService,就會在onStartCommand()方法裡設定一個定時任務,這樣10秒後AlarmReceiver的onReceive()方法就將得到執行了,然後我們在這裡再次啟動LongRunningService,這樣就形成了一個永久的循環,保證LongRunningService可以每隔10秒就會啟動一次,這個長期在後台運行的服務就完成了。
接下來,我們需要在打開程序的時候啟動一次LongRunningService,之後LongRunningService就可以一直運行了。修改MainActivity中的代碼,如下所示:
package com.jcak.servicebestpractice;

import android.os.Bundle;
import android.app.Activity;
import android.content.Intent;
import android.view.Menu;

public class MainActivity extends Activity {

	@Override
	protected void onCreate(Bundle savedInstanceState) {
		super.onCreate(savedInstanceState);
		setContentView(R.layout.activity_main);
		Intent intent=new Intent(this,LongRunningService.class);
		startService(intent);

	}

	@Override
	public boolean onCreateOptionsMenu(Menu menu) {
		// Inflate the menu; this adds items to the action bar if it is present.
		getMenuInflater().inflate(R.menu.main, menu);
		return true;
	}

}
可以看到LongRunningService每隔10秒打印一條日志。
另外需要注意的是,從android4.4版開始,Alarm任務的觸發時間將會變得不准確,有可能會延遲一段時間後任務才能得到執行。這並不是bug,而是系統在耗電方面進行的優化。系統會自動檢測目前有多少Alarm任務存在,然後將觸發時間將近的幾個任務存放在一起執行,這就可以大幅度減少cpu被喚醒的次數,從而有效延長電池的使用時間。
當然,如果要求Alarm任務的執行時間必須准確無誤,android仍然提供l解決方案。使用AlarmManager的setExact()方法來替代set()方法,就可以保證任務准時執行了。
 Android7.0 MessageQueue
Android中的消息處理機制大量依賴於Handler。每個Handler都有對應的Looper,用於不斷地從對應的MessageQueue中取出消息處理。一直以來,覺得
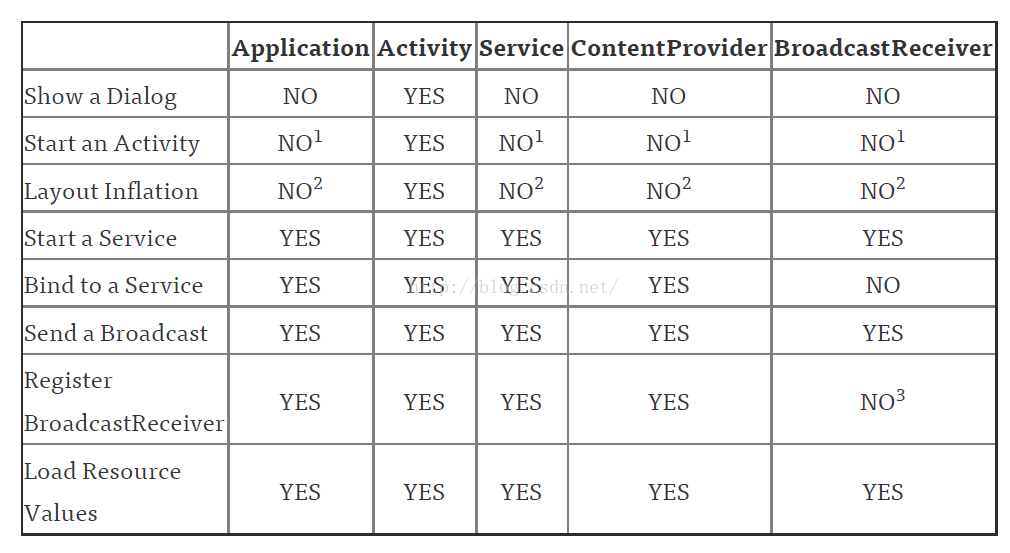 android中Context的應用總結
概述作為一名Android開發人員,每天使用最多的類中,恐怕Context可以排的上一號了。因為Context對象在我們的項目中實在是太常見了,我們在加載資源,啟動Act
 Android自定義ListView實現下拉刷新
首先呈上效果圖當今APP,哪個沒有點滑動刷新功能,簡直就太落伍了。正因為需求多,因此自然而然開源的也就多。但是若想引用開源庫,則很麻煩,比如PullToRefreshVi
 Android Service總結及詳細介紹
1、Service的種類按運行地點分類: 類別 區別 優點 缺點 應用