編輯:關於Android編程
大家都知道在Android中通過AIDL可以跨進程調用Service中的數據,網上也有很多實例,但是大部分實例都是關於基本數據類型的遠程調用,很少講到復雜數據的調用,今天我用一個例子來演示一下怎樣用AIDL Service 傳遞復雜數據。
我們分2步開始:
第一步:部署我們的服務端,也就是Service端:
1:在Service端我先自定義2個類型:Person和Pet。因為我們需要跨進程傳遞Person對象和Pet對象,所以Person類和Pet類都必須實現Parcelable接口,並要求在實現類中定義一個名為CREATER,類型為Parcelable.creator的靜態Field。
代碼如下:
  1 package com.example.remoteservice;
  2
  3 import android.os.Parcel;
  4 import android.os.Parcelable;
  5
  6 public class Person implements Parcelable {
  7     int id;
  8     String name;
  9     String pass;
 10
 11     public Person() {
 12
 13     }
 14
 15     public Person(int id, String name, String pass) {
 16         this.id = id;
 17         this.name = name;
 18         this.pass = pass;
 19     }
 20
 21     @Override
 22     public boolean equals(Object o) {
 23         if (this == o) {
 24             return true;
 25         }
 26         if (o == null) {
 27             return false;
 28         }
 29
 30         if (getClass() != o.getClass()) {
 31             return false;
 32         }
 33         Person other = (Person) o;
 34
 35         if (name == null) {
 36             if (other.name != null) {
 37                 return false;
 38             }
 39         } else if (!name.equals(other.name)) {
 40             return false;
 41         }
 42
 43         if (pass == null) {
 44             if (other.pass != null) {
 45                 return false;
 46             }
 47         } else if (!pass.equals(other.pass)) {
 48             return false;
 49         }
 50
 51         return true;
 52     }
 53
 54     @Override
 55     public int hashCode() {
 56         final int prime = 31;
 57         int result = 1;
 58         result = prime * result + (name == null ? 0 : name.hashCode());
 59         result = prime * result + (pass == null ? 0 : pass.hashCode());
 60         return result;
 61     }
 62
 63     @Override
 64     public int describeContents() {
 65
 66         return 0;
 67     }
 68
 69     @Override
 70     public void writeToParcel(Parcel arg0, int arg1) {
 71         arg0.writeInt(id);
 72         arg0.writeString(name);
 73         arg0.writeString(pass);
 74     }
 75
 76     public static final Parcelable.Creator CREATOR = new Creator() {
 77
 78         @Override
 79         public Person createFromParcel(Parcel source) {
 80
 81             return new Person(source.readInt(), source.readString(), source.readString());
 82         }
 83
 84         @Override
 85         public Person[] newArray(int size) {
 86
 87             return new Person[size];
 88         }
 89     };
 90
 91     public int getId() {
 92         return id;
 93     }
 94
 95     public void setId(int id) {
 96         this.id = id;
 97     }
 98
 99     public String getName() {
100         return name;
101     }
102
103     public void setName(String name) {
104         this.name = name;
105     }
106
107     public String getPass() {
108         return pass;
109     }
110
111     public void setPass(String pass) {
112         this.pass = pass;
113     }
114
115 }

因為我們會對Person進行比較,所以在Person類中我重寫了
public int hashCode() 和 public boolean equals(Object o)方法
 1 package com.example.remoteservice;
 2
 3 import android.os.Parcel;
 4 import android.os.Parcelable;
 5
 6 public class Pet implements Parcelable {
 7     String name;
 8     float weight;
 9
10     public Pet(String name, float weight) {
11         this.name = name;
12         this.weight = weight;
13     }
14
15     public String getName() {
16         return name;
17     }
18
19     public void setName(String name) {
20         this.name = name;
21     }
22
23     public float getWeight() {
24         return weight;
25     }
26
27     public void setWeight(float weight) {
28         this.weight = weight;
29     }
30
31     @Override
32     public int describeContents() {
33
34         return 1;
35     }
36
37     @Override
38     public void writeToParcel(Parcel dest, int flags) {
39         dest.writeString(name);
40         dest.writeFloat(weight);
41
42     }
43
44     public static final Parcelable.Creator CREATOR = new Creator() {
45
46         @Override
47         public Pet createFromParcel(Parcel source) {
48
49             return new Pet(source.readString(), source.readFloat());
50         }
51
52         @Override
53         public Pet[] newArray(int size) {
54
55             return new Pet[size];
56         }
57     };
58
59     @Override
60     public String toString() {
61
62         return name: + this.name + ;weight: + this.weight;
63     }
64
65 }
2:創建完自定義類型之後還需要用AIDL來定義它們,Person.aidl和Pet.aidl的代碼如下:
1 package com.example.remoteservice;
2 parcelable Person;
1 package com.example.remoteservice;
2 parcelable Pet;
3:完成1,2之後就可以使用AIDL定義通信接口了,在這裡我定義一個IPet.aidl的接口,代碼如下:
1 package com.example.remoteservice; //必須導入包
2 import com.example.remoteservice.Person; //指定自定義類的位置
3 import com.example.remoteservice.Pet;
4
5 interface IPet
6 {
7 List getPets(in Person owner);//這裡的in表示Person對象是輸入的參數
8 }
4:服務端的最後一步就是實現Service了,當然不要忘了注冊Service,代碼如下:
 1 package com.example.remoteservice;
 2
 3 import com.example.remoteservice.IPet.Stub;
 4
 5 import java.util.ArrayList;
 6 import java.util.HashMap;
 7 import java.util.List;
 8 import java.util.Map;
 9
10 import android.app.Service;
11 import android.content.Intent;
12 import android.os.IBinder;
13 import android.os.RemoteException;
14 import android.util.Log;
15
16 public class RemoteService extends Service {
17
18     private PetBinder petBinder;
19
20     private static Map> pets = new HashMap>();
21     static {
22         ArrayList list1 = new ArrayList();
23         list1.add(new Pet(candy, 2.2f));
24         list1.add(new Pet(sandy, 4.2f));
25         pets.put(new Person(1, sun, sun), list1);
26
27         ArrayList list2 = new ArrayList();
28         list2.add(new Pet(moon, 5.2f));
29         list2.add(new Pet(hony, 6.2f));
30         pets.put(new Person(1, csx, csx), list2);
31
32     }
33
34     public class PetBinder extends Stub {// 繼承IPet接口中的Stub類,Stub類繼承了Binder類,所有PetBinder也間接的繼承了Binder類
35
36         @Override
37         public List getPets(Person owner) throws RemoteException {
38
39             return pets.get(owner);
40         }
41
42     }
43
44     @Override
45     public IBinder onBind(Intent intent) {
46
47         Log.i(csx, onBind);
48         return petBinder;
49     }
50
51     @Override
52     public void onCreate() {
53
54         super.onCreate();
55         Log.i(csx, onCreate);
56         petBinder = new PetBinder();// 實例化Binder
57
58     }
59
60     @Override
61     public boolean onUnbind(Intent intent) {
62
63         Log.i(csx, onUnbind);
64         return super.onUnbind(intent);
65     }
66
67     @Override
68     public void onDestroy() {
69
70         super.onDestroy();
71         Log.i(csx, onDestroy);
72     }
73
74 }
這是我Service端的部署情況(其中MainActivity可以不用去實現,因為我們只提供服務,沒有窗口顯示):

第二步:部署客戶端:
1.在客戶端新建一個包,命名需要和服務端放置aidl文件的包名相同(我這裡是com.example.remoteservice),然後把服務端的Person.java,Pet.java,Person.aidl,Pet.aidl,IPet.aidl復制到這個包下面

2.在activity中綁定遠程服務進行數據交換,layout布局和activity代碼如下:
110 11 15 16 20 21 27 28 29

  1 package com.example.remoteclient;
  2
  3 import android.app.Service;
  4 import android.content.ComponentName;
  5 import android.content.Intent;
  6 import android.content.ServiceConnection;
  7 import android.os.Bundle;
  8 import android.os.IBinder;
  9 import android.os.RemoteException;
 10 import android.support.v7.app.ActionBarActivity;
 11 import android.util.Log;
 12 import android.view.View;
 13 import android.view.View.OnClickListener;
 14 import android.widget.ArrayAdapter;
 15 import android.widget.Button;
 16 import android.widget.EditText;
 17 import android.widget.ListView;
 18
 19 import com.example.remoteservice.IPet;
 20 import com.example.remoteservice.Person;
 21 import com.example.remoteservice.Pet;
 22
 23 import java.util.List;
 24
 25 public class RemoteClient extends ActionBarActivity {
 26
 27     public static final String REMOTE_SERVICE_ACTION = com.example.remoteservice.RemoteService.ACTION;
 28     EditText editText;
 29     Button button;
 30     ListView listView;
 31
 32     IPet petService;// 聲明IPet接口
 33     List pets;
 34     ServiceConnection conn = new ServiceConnection() {
 35
 36         @Override
 37         public void onServiceDisconnected(ComponentName name) {
 38             Log.i(csx, onServiceDisconnected);
 39             conn = null;
 40         }
 41
 42         @Override
 43         public void onServiceConnected(ComponentName name, IBinder service) {
 44             Log.i(csx, onServiceConnected);
 45             petService = IPet.Stub.asInterface(service);// 通過遠程服務的Binder實現接口
 46
 47         }
 48     };
 49
 50     @Override
 51     protected void onCreate(Bundle savedInstanceState) {
 52         super.onCreate(savedInstanceState);
 53         setContentView(R.layout.remote_client_layout);
 54         editText = (EditText) findViewById(R.id.editText_person);
 55         button = (Button) findViewById(R.id.button_ok);
 56         listView = (ListView) findViewById(R.id.listView_pet);
 57
 58         Intent service = new Intent();
 59         service.setAction(REMOTE_SERVICE_ACTION);
 60
 61         bindService(service, conn, Service.BIND_AUTO_CREATE);// 綁定遠程服務
 62
 63         button.setOnClickListener(new OnClickListener() {
 64
 65             @Override
 66             public void onClick(View v) {
 67                 String personName = editText.getText().toString();
 68                 if (personName == null || personName.equals()) {
 69
 70                     return;
 71                 }
 72
 73                 try {
 74                     pets = petService.getPets(new Person(1, personName, personName));// 調用遠程service的getPets方法
 75                     updataListView();
 76
 77                 } catch (RemoteException e) {
 78
 79                     e.printStackTrace();
 80                 } catch (NullPointerException e) {
 81                     e.printStackTrace();
 82                 }
 83
 84             }
 85         });
 86
 87     }
 88
 89     public void updataListView() {
 90         listView.setAdapter(null);
 91
 92         if (pets == null || pets.isEmpty()) {
 93             return;
 94
 95         }
 96         ArrayAdapter adapter = new ArrayAdapter(RemoteClient.this,
 97                 android.R.layout.simple_list_item_1, pets);
 98         listView.setAdapter(adapter);
 99
100     }
101
102     @Override
103     protected void onDestroy() {
104
105         unbindService(conn);// 解除綁定
106         super.onDestroy();
107     }
108
109 }
到此為止所有的工作都完成了,下面我們看一下效果:我在編輯框中輸入“csx”,點擊確定,就會顯示出服務端RemoteService中pets的相應數據。

 andriod 利用ExpandableList做三級樹
源碼DEMO 等待審核中....... --------------------------------------------------------------
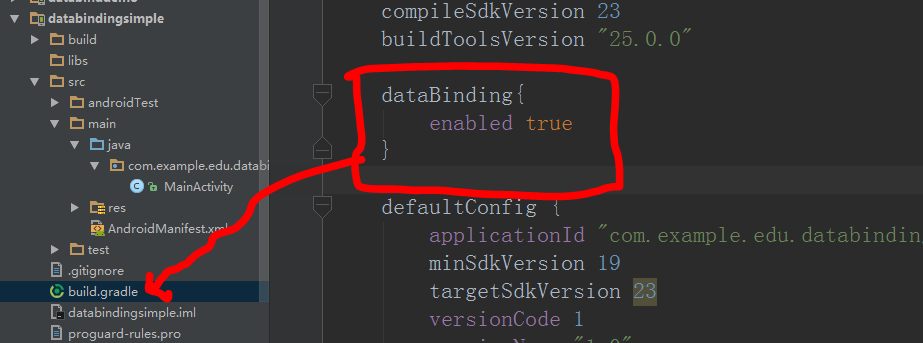 Android之DataBinding初體驗(一)
DataBinding是谷歌推出的一個官方的數據綁定框架,所以我們有必要學下怎麼使用它。如果你英文足夠好就可以去官網看。https://developer.android
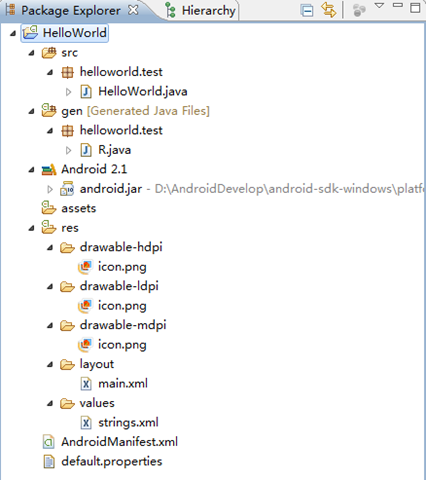 Android編程入門之HelloWorld項目目錄結構分析
本文實例講述了Android編程入門之HelloWorld項目目錄結構。分享給大家供大家參考,具體如下:我們介紹了如何搭建Android開發環境及簡單地建立一個Hello
 Android 框架啟動流程
As we all know,Android手機系統本質上是一個基於Linux的應用程序,它以Linux系統為內核。因此系統的啟動過程包括Linux內核啟動和Androi