編輯:關於Android編程
寫在前面:
本篇博文漏譯了很多,英文功底比較好的同學可以選擇閱讀原版文檔,如果方便請分享翻譯後文檔給大家,謝謝。
recovery有一個側面安裝(sideloading)機制來方便我們手動的安裝更新而不在使用OTA的方式。這種機制對於調試和維護是很有幫助的,特別是當我們無法正常啟動我們的系統的時候。
目前來說我們,有了這種機制,我們可以在設備的SD卡中載入更新包。在沒有啟動設備的情況下,我們可以通過電腦將更新包拷貝到SD卡上,然後再將SD卡插入到設備中進行側面安裝。而且如果Android設備當前並沒有可移動存儲設備(SD卡),這種sideloading機制同樣提供了另外兩種方案:從cache分區加載更新包、通過USB連接使用adb命令加載。
那麼我們如何使用這三種sideloading機制呢,我們來了解一下Device:InvokeMenuItem()函數。
APPLY_EXT.sideloading機制允許我們使用外部存儲設備來安裝更新。這就要求我們在recovery.fstab中必須定義“/sdcard”這個掛載點。這裡不推薦使用符號鏈接的方式在/data分區下模擬一個SD卡,因為通常情況下/data分區對recovery來說是不可見的,因為/data分區很有可能會被加密。我們在使用APPLY_EXT時,RecoveryUI會顯示出一個類似於文件管理器的界面來讓用戶選擇對應的更新包(僅限於.zip文件)。APPLY_CACHE.這種方式與APPLY_EXT比較相似。通常來說,/cache分區對recovery是可見的,因此我們可以選擇在安裝更新的時候從/cache分區下加載更新包。但是這種方式的實用性是很有限的,因為在實際運行的android系統中,/cache分區僅僅是部分有特殊權限進程才可以訪問的到,如果設備沒有啟動,/cache分區肯本無法進行讀寫。APPLY_ADB_SIDELOAD.這種方式允許用戶使用adb通過USB發送更新包給我們的設備。在recovery中有一套迷你版的adbd程序來幫助我們通過adb與主機建立連接,這套迷你版的adbd守護進程只支持一條adb命令:adb sideload filename.通過這條命令我們就可以進行更新包的校驗與安裝了。
關於APPLY_ADB_SIDELOAD的幾點說明:
僅支持USB傳輸當我們使用adb sideload mode時,接收更新包完成之後會重啟設備,且在該模式下除了fideload可用,其他所有命令均無效(logcat,reboot,push,pull,shell等)。如果在使用adb sideload mode時想要退出的話,可以選擇發送無效的更新包來中斷操作。因為如果revovery驗證更新包失敗的時候會終止安裝程序,重新進入RecoveryUI,那麼接下來我們可以進行一系列的按鍵操作。
下面為原文:
You can use device-specific code in the installation of the update package by providing your own extension functions that can be called from within your updater script. Here's a sample function for the tardis device:
device/yoyodyne/tardis/recovery/recovery_updater.c
#include#include #include "edify/expr.h"
Every extension function has the same signature. The arguments are the name by which the function was called, a State* cookie, the number of incoming arguments, and an array of Expr* pointers representing the arguments. The return value is a newly-allocated Value*.
Value* ReprogramTardisFn(const char* name, State* state, int argc, Expr* argv[]) {
    if (argc != 2) {
        return ErrorAbort(state, "%s() expects 2 args, got %d", name, argc);
    }
Your arguments have not been evaluated at the time your function is called—your function's logic determines which of them get evaluated and how many times. Thus, you can use extension functions to implement your own control structures. Call Evaluate() to evaluate an Expr* argument, returning a Value*. If Evaluate() returns NULL, you should free any resources you're holding and immediately return NULL (this propagates aborts up the edify stack). Otherwise, you take ownership of the Value returned and are responsible for eventually callingFreeValue() on it.
Suppose the function needs two arguments: a string-valued key and a blob-valued image. You could read arguments like this:
   Value* key = EvaluateValue(state, argv[0]);
    if (key == NULL) {
        return NULL;
    }
    if (key->type != VAL_STRING) {
        ErrorAbort(state, "first arg to %s() must be string", name);
        FreeValue(key);
        return NULL;
    }
    Value* image = EvaluateValue(state, argv[1]);
    if (image == NULL) {
        FreeValue(key);    // must always free Value objects
        return NULL;
    }
    if (image->type != VAL_BLOB) {
        ErrorAbort(state, "second arg to %s() must be blob", name);
        FreeValue(key);
        FreeValue(image)
        return NULL;
    }
Checking for NULL and freeing previously evaluated arguments can get tedious for multiple arguments. TheReadValueArgs() function can make this easier. Instead of the code above, you could have written this:
   Value* key;
    Value* image;
    if (ReadValueArgs(state, argv, 2, &key, &image) != 0) {
        return NULL;     // ReadValueArgs() will have set the error message
    }
    if (key->type != VAL_STRING || image->type != VAL_BLOB) {
        ErrorAbort(state, "arguments to %s() have wrong type", name);
        FreeValue(key);
        FreeValue(image)
        return NULL;
    }
ReadValueArgs() doesn't do type-checking, so you must do that here; it's more convenient to do it with one ifstatement at the cost of producing a somewhat less specific error message when it fails. But ReadValueArgs()does handle evaluating each argument and freeing all the previously-evaluated arguments (as well as setting a useful error message) if any of the evaluations fail. You can use a ReadValueVarArgs() convenience function for evaluating a variable number of arguments (it returns an array of Value*).
After evaluating the arguments, do the work of the function:
   // key->data is a NUL-terminated string
    // image->data and image->size define a block of binary data
    //
    // ... some device-specific magic here to
    // reprogram the tardis using those two values ...
The return value must be a Value* object; ownership of this object will pass to the caller. The caller takes ownership of any data pointed to by this Value*—specifically the datamember.
In this instance, you want to return a true or false value to indicate success. Remember the convention that the empty string is false and all other strings are true. You must malloc a Value object with a malloc'd copy of the constant string to return, since the caller will free() both. Don't forget to call FreeValue() on the objects you got by evaluating your arguments!
   FreeValue(key);
    FreeValue(image);

    Value* result = malloc(sizeof(Value));
    result->type = VAL_STRING;
    result->data = strdup(successful ? "t" : "");
    result->size = strlen(result->data);
    return result;
}
The convenience function StringValue() wraps a string into a new Value object. Use to write the above code more succinctly:
   FreeValue(key);
    FreeValue(image);

    return StringValue(strdup(successful ? "t" : ""));
}
To hook functions into the edify interpreter, provide the function Register_foo where foo is the name of the static library containing this code. Call RegisterFunction() to register each extension function. By convention, name device-specific functions device.whatever to avoid conflicts with future built-in functions added.
void Register_librecovery_updater_tardis() {
    RegisterFunction("tardis.reprogram", ReprogramTardisFn);
}
You can now configure the makefile to build a static library with your code. (This is the same makefile used to customize the recovery UI in the previous section; your device may have both static libraries defined here.)
device/yoyodyne/tardis/recovery/Android.mk
include $(CLEAR_VARS)
LOCAL_SRC_FILES := recovery_updater.c
LOCAL_C_INCLUDES += bootable/recovery
The name of the static library must match the name of the Register_libname function contained within it.
LOCAL_MODULE := librecovery_updater_tardis
include $(BUILD_STATIC_LIBRARY)
Finally, configure the build of recovery to pull in your library. Add your library to TARGET_RECOVERY_UPDATER_LIBS (which may contain multiple libraries; they all get registered). If your code depends on other static libraries that are not themselves edify extensions (i.e., they don't have aRegister_libname function), you can list those in TARGET_RECOVERY_UPDATER_EXTRA_LIBS to link them to updater without calling their (non-existent) registration function. For example, if your device-specific code wanted to use zlib to decompress data, you would include libz here.
device/yoyodyne/tardis/BoardConfig.mk
 [...]

# add device-specific extensions to the updater binary
TARGET_RECOVERY_UPDATER_LIBS += librecovery_updater_tardis
TARGET_RECOVERY_UPDATER_EXTRA_LIBS +=
The updater scripts in your OTA package can now call your function as any other. To reprogram your tardis device, the update script might contain: tardis.reprogram("the-key", package_extract_file("tardis-image.dat")) . This uses the single-argument version of the built-in function package_extract_file(), which returns the contents of a file extracted from the update package as a blob to produce the second argument to the new extension function.
The final component is getting the OTA package generation tools to know about your device-specific data and emit updater scripts that include calls to your extension functions.
First, get the build system to know about a device-specific blob of data. Assuming your data file is indevice/yoyodyne/tardis/tardis.dat, declare the following in your device's AndroidBoard.mk:
device/yoyodyne/tardis/AndroidBoard.mk
  [...]

$(call add-radio-file,tardis.dat)
You could also put it in an Android.mk instead, but then it must to be guarded by a device check, since all the Android.mk files in the tree are loaded no matter what device is being built. (If your tree includes multiple devices, you only want the tardis.dat file added when building the tardis device.)
device/yoyodyne/tardis/Android.mk
  [...]

# an alternative to specifying it in AndroidBoard.mk
ifeq (($TARGET_DEVICE),tardis)
  $(call add-radio-file,tardis.dat)
endif
These are called radio files for historical reasons; they may have nothing to do with the device radio (if present). They are simply opaque blobs of data the build system copies into the target-files .zip used by the OTA generation tools. When you do a build, tardis.dat is stored in the target-files.zip as RADIO/tardis.dat. You can call add-radio-file multiple times to add as many files as you want.
To extend the release tools, write a Python module (must be named releasetools.py) the tools can call into if present. Example:
device/yoyodyne/tardis/releasetools.py
import common

def FullOTA_InstallEnd(info):
  # copy the data into the package.
  tardis_dat = info.input_zip.read("RADIO/tardis.dat")
  common.ZipWriteStr(info.output_zip, "tardis.dat", tardis_dat)

  # emit the script code to install this data on the device
  info.script.AppendExtra(
      """tardis.reprogram("the-key", package_extract_file("tardis.dat"));""")
A separate function handles the case of generating an incremental OTA package. For this example, suppose you need to reprogram the tardis only when the tardis.dat file has changed between two builds.
def IncrementalOTA_InstallEnd(info):
  # copy the data into the package.
  source_tardis_dat = info.source_zip.read("RADIO/tardis.dat")
  target_tardis_dat = info.target_zip.read("RADIO/tardis.dat")

  if source_tardis_dat == target_tardis_dat:
      # tardis.dat is unchanged from previous build; no
      # need to reprogram it
      return

  # include the new tardis.dat in the OTA package
  common.ZipWriteStr(info.output_zip, "tardis.dat", target_tardis_dat)

  # emit the script code to install this data on the device
  info.script.AppendExtra(
      """tardis.reprogram("the-key", package_extract_file("tardis.dat"));""")
You can provide the following functions in the module (implement only the ones you need).
FullOTA_Assertions()FullOTA_InstallBegin()FullOTA_InstallEnd()IncrementalOTA_Assertions()FullOTA_Assertions() but called when generating an incremental update package.IncrementalOTA_VerifyBegin()IncrementalOTA_VerifyEnd()IncrementalOTA_InstallBegin()IncrementalOTA_InstallEnd()Note: If the device loses power, OTA installation may restart from the beginning. Be prepared to cope with devices on which these commands have already been run, fully or partially.
Pass functions to a single info object that contains various useful items:
zipfile.ZipFile object for the input target-files .zip.zipfile.ZipFile object for the source target-files .zip (the build already on the device when the incremental package is being installed).zipfile.ZipFile object for the target target-files .zip (the build the incremental package puts on the device).zipfile.ZipFile object opened for writing. Use common.ZipWriteStr(info.output_zip, filename, data) to add a file to the package.info.script.AppendExtra(script_text) to output text into the script. Make sure output text ends with a semicolon so it does not run into commands emitted afterwards.
For details on the info object, refer to the Python Software Foundation documentation for ZIP archives.
Specify the location of your device's releasetools.py script in your BoardConfig.mk file:
device/yoyodyne/tardis/BoardConfig.mk
 [...]

TARGET_RELEASETOOLS_EXTENSIONS := device/yoyodyne/tardis
If TARGET_RELEASETOOLS_EXTENSIONS is not set, it defaults to the $(TARGET_DEVICE_DIR)/../common directory (device/yoyodyne/common in this example). It's best to explicitly define the location of the releasetools.py script. When building the tardis device, the releasetools.py script is included in the target-files .zip file (META/releasetools.py ).
When you run the release tools (either img_from_target_files or ota_from_target_files), the releasetools.py script in the target-files .zip, if present, is preferred over the one from the Android source tree. You can also explicitly specify the path to the device-specific extensions with the -s (or --device_specific) option, which takes the top priority. This enables you to correct errors and make changes in the releasetools extensions and apply those changes to old target-files.
Now, when you run ota_from_target_files, it automatically picks up the device-specific module from the target_files .zip file and uses it when generating OTA packages:
% ./build/tools/releasetools/ota_from_target_files \
    -i PREVIOUS-tardis-target_files.zip \
    dist_output/tardis-target_files.zip incremental_ota_update.zip
unzipping target target-files...
using device-specific extensions from target_files
unzipping source target-files...
   [...]
done.
Alternatively, you can specify device-specific extensions when you run ota_from_target_files.
% ./build/tools/releasetools/ota_from_target_files \
    -s device/yoyodyne/tardis \  # specify the path to device-specific extensions
    -i PREVIOUS-tardis-target_files.zip \
    dist_output/tardis-target_files.zip incremental_ota_update.zip
unzipping target target-files...
loaded device-specific extensions from device/yoyodyne/tardis
unzipping source target-files...
   [...]
done.
Note: For a complete list of options, refer to the ota_from_target_files comments inbuild/tools/releasetools/ota_from_target_files.
Recovery has a sideloading mechanism for manually installing an update package without downloading it over-the-air by the main system. Sideloading is useful for debugging or making changes on devices where the main system can't be booted.
Historically, sideloading has been done through loading packages off the device's SD card; in the case of a non-booting device, the package can be put onto the SD card using some other computer and then the SD card inserted into the device. To accommodate Android devices without removable external storage, recovery supports two additional mechanisms for sideloading: loading packages from the cache partition, and loading them over USB using adb.
To invoke each sideload mechanism, your device's Device::InvokeMenuItem() method can return the following values of BuiltinAction:
/sdcard directory). Your recovery.fstab must define the /sdcard mount point. This is not usable on devices that emulate an SD card with a symlink to/data (or some similar mechanism). /data is typically not available to recovery because it may be encrypted. The recovery UI displays a menu of .zip files in /sdcard and allows the user to select one./sdcard except that the /cache directory (which is always available to recovery) is used instead. From the regular system, /cache is only writable by privileged users, and if the device isn't bootable then the /cache directory can't be written to at all (which makes this mechanism of limited utility).adb sideloadfilename. The named file is sent from the host machine to the device, which then verifies and installs it just as if it had been on local storage.
A few caveats:
sideload work ( logcat, reboot, push, pull , shell, etc. all fail)./dev/null (or anything else that's not a valid package) as the package, and then the device will fail to verify it and stop the installation procedure. The RecoveryUI implementation's CheckKey() method will continue to be called for keypresses, so you can provide a key sequence that reboots the device and works in adb sideload mode.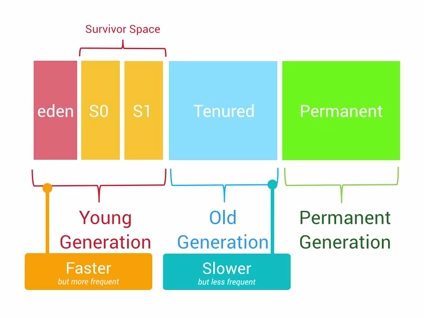 Android內存優化之OOM
Android的內存優化是性能優化中很重要的一部分,而避免OOM又是內存優化中比較核心的一點,這是一篇關於內存優化中如何避免OOM的總結性概要文章,內容大多都是和OOM有
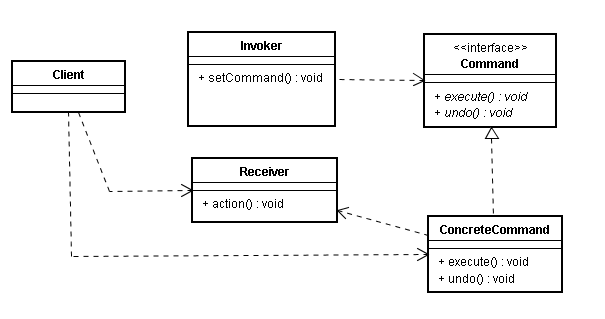 Android源碼中的命令模式
寫在前面從裝飾者模式到Context類族當觀察者模式和回調機制遇上Android源碼Android源碼中的靜態工廠方法Android中的工廠方法模式前面跟大家分享了裝飾者
 將Gradle項目發布到Jcenter和Maven Central
將Gradle項目發布到Jcenter和Maven Central:為了方便我們理解Android studio是如何幫助我們獲取開源庫的,我們需要理清幾個概念。Apac
 Android內存優化(使用SparseArray和ArrayMap代替HashMap)
在Android開發時,我們使用的大部分都是Java的api,比如HashMap這個api,使用率非常高,但是對於Android這種對內存非常敏感的移動平台,很多時候使用