編輯:關於Android編程
main(int argc, char **argv) {

    ......

    Device* device = make_device();
    ui = device->GetUI();
    gCurrentUI = ui;

    ui->Init();
    ui->SetLocale(locale);
    ui->SetBackground(RecoveryUI::NONE);
    if (show_text) ui->ShowText(true);

    ......

    if (status != INSTALL_SUCCESS || ui->IsTextVisible()) {
        prompt_and_wait(device, status);
    }

    ......
}
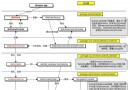
1、首先新建了一個Device類的對象, Device類封裝了一些操作,包括UI的操作 2、調用Device類的GetUI()返回一個DefaultUI對象,recovery中涉及到三個UI類,三個類之間為繼承關系,分別為DefaultUI、 ScreenRecoveryUI、RecoveryUI 3、調用DefaultUI類的Init(), DefaultUI類沒有Init()方法,因此將調用它的父類ScreenRecoveryUI的Init() 4、同理,調用ScreenRecoveryUI類的SetLocale()來標識幾個比較特別的區域 5、同理,調用ScreenRecoveryUI類的SetBackground()設置初始狀態的背景圖 6、顯示recovery的主界面,即一個選擇菜單
void ScreenRecoveryUI::Init()
{
    gr_init();

    gr_font_size(&char_width, &char_height);

    text_col = text_row = 0;
    text_rows = gr_fb_height() / char_height;
    if (text_rows > kMaxRows) text_rows = kMaxRows;
    text_top = 1;

    text_cols = gr_fb_width() / char_width;
    if (text_cols > kMaxCols - 1) text_cols = kMaxCols - 1;

    LoadBitmap(icon_installing, &backgroundIcon[INSTALLING_UPDATE]);
    backgroundIcon[ERASING] = backgroundIcon[INSTALLING_UPDATE];
    LoadBitmap(icon_error, &backgroundIcon[ERROR]);
    backgroundIcon[NO_COMMAND] = backgroundIcon[ERROR];

    LoadBitmap(progress_empty, &progressBarEmpty);
    LoadBitmap(progress_fill, &progressBarFill);

    LoadLocalizedBitmap(installing_text, &backgroundText[INSTALLING_UPDATE]);
    LoadLocalizedBitmap(erasing_text, &backgroundText[ERASING]);
    LoadLocalizedBitmap(no_command_text, &backgroundText[NO_COMMAND]);
    LoadLocalizedBitmap(error_text, &backgroundText[ERROR]);

    int i;

    progressBarIndeterminate = (gr_surface*)malloc(indeterminate_frames *
                                                    sizeof(gr_surface));
    for (i = 0; i  0) {
        installationOverlay = (gr_surface*)malloc(installing_frames *
                                                   sizeof(gr_surface));
        for (i = 0; i
1、gr_init() 初始化圖形設備,分配Pixelflinger庫渲染的內存
2、gr_font_size() 將字體對應的surface長寬賦值給char_width和char_height
3、LoadBitmap() 將png生成surface, 每個png圖片對應一個surface, 所有surface存放在一個數組中 4、LoadLocalizedBitmap() 將區域文字所在的圖片中的text信息根據當前的locale提取出來,生成對應的surface, 所以 surface也存放在一個數組中 6、pthread_create(&progress_t, NULL, progress_thread, NULL) 創建一個線程,該線程的任務是一個死循環,在該循環中不停 地檢測currentIcon以及progressBarType來決定是不是要更新進度條。 7、調用RecoveryUI的Init(),初始化輸入事件處理。
void ScreenRecoveryUI::SetLocale(const char* locale) {
    if (locale) {
        char* lang = strdup(locale);
        for (char* p = lang; *p; ++p) {
            if (*p == '_') {
                *p = '';
                break;
            }
        }

        // A bit cheesy: keep an explicit list of supported languages
        // that are RTL.
        if (strcmp(lang, ar) == 0 ||   // Arabic
            strcmp(lang, fa) == 0 ||   // Persian (Farsi)
            strcmp(lang, he) == 0 ||   // Hebrew (new language code)
            strcmp(lang, iw) == 0 ||   // Hebrew (old language code)
            strcmp(lang, ur) == 0) {   // Urdu
            rtl_locale = true;
        }
        free(lang);
    }
}
void ScreenRecoveryUI::SetBackground(Icon icon)
{
    pthread_mutex_lock(&updateMutex);

    // Adjust the offset to account for the positioning of the
    // base image on the screen.
    if (backgroundIcon[icon] != NULL) {
        gr_surface bg = backgroundIcon[icon];
        gr_surface text = backgroundText[icon];
        overlay_offset_x = install_overlay_offset_x + (gr_fb_width() - gr_get_width(bg)) / 2;
        overlay_offset_y = install_overlay_offset_y +
            (gr_fb_height() - (gr_get_height(bg) + gr_get_height(text) + 40)) / 2;
    }

    currentIcon = icon;
    update_screen_locked();

    pthread_mutex_unlock(&updateMutex);
}
SetBackground函數比較簡潔,關鍵部分在update_screen_locked,下面我們重點分析一下。 update_screen_locked和update_progress_locked是recovery的UI部分的關鍵函數,update_screen_locked用來更新背景, update_progress_locked用來更新進度條,因為顯示的畫面會一直在更新,所以這兩個函數會在不同的地方被反復調用
void ScreenRecoveryUI::update_screen_locked()
{
    draw_screen_locked();
    gr_flip();
}
update_screen_locked包含兩個操作,一是更新screen, 二是切換前後buffer。
void ScreenRecoveryUI::draw_screen_locked()
{
    draw_background_locked(currentIcon);
    draw_progress_locked();

    if (show_text) {
        SetColor(TEXT_FILL);
        gr_fill(0, 0, gr_fb_width(), gr_fb_height());

        int y = 0;
        int i = 0;
        if (show_menu) {
            SetColor(HEADER);

            for (; i  y+2 && count


draw_background_locked函數的實現代碼中又出現了幾個以gr_開頭的函數,以gr_開頭的函數來自minui庫,minui庫的代碼在recovery源碼下的minui目錄下,minui提供的接口實現了圖形的描繪以及固定大小的文字顯示。


gr_color(unsigned char r, unsigned char g, unsigned char b, unsigned char a);  /* 設置字體顏色 */
gr_fill(int x, int y, int w, int h);  /* 填充矩形區域,參數分別代表起始坐標、矩形區域大小 */
gr_blit(gr_surface source, int sx, int sy, int w, int h, int dx, int dy);  /* 填充由source指定的圖片 */


draw_background_locked函數先將整個渲染buffer填充為黑色,然後計算背景surface的長寬,文字surface的長寬,再結合fb的長寬計算出背景surface以及文字surface顯示的坐標,有長寬和坐標就可以調用Pixelflinger的接口在渲染buffer上進行渲染。
void ScreenRecoveryUI::draw_progress_locked() { if (currentIcon == ERROR) return; if (currentIcon == INSTALLING_UPDATE || currentIcon == ERASING) { draw_install_overlay_locked(installingFrame); } if (progressBarType != EMPTY) { int iconHeight = gr_get_height(backgroundIcon[INSTALLING_UPDATE]); int width = gr_get_width(progressBarEmpty); int height = gr_get_height(progressBarEmpty); int dx = (gr_fb_width() - width)/2; int dy = (3*gr_fb_height() + iconHeight - 2*height)/4; // Erase behind the progress bar (in case this was a progress-only update) gr_color(0, 0, 0, 255); gr_fill(dx, dy, width, height); if (progressBarType == DETERMINATE) { float p = progressScopeStart + progress * progressScopeSize; int pos = (int) (p * width); if (rtl_locale) { // Fill the progress bar from right to left. if (pos > 0) { gr_blit(progressBarFill, width-pos, 0, pos, height, dx+width-pos, dy); } if (pos 0) { gr_blit(progressBarFill, 0, 0, pos, height, dx, dy); } if (pos draw_progress_locked函數的原理與 update_screen_locked函數類似, 最終是將進度條的surface輸出到渲染buffer, recovery中各個場景的畫面,就是由背景、文字、進度條的重疊,不同的是所用的surface 以及surface的坐標。 recovery main函數中的UI代碼基本上已經分析過了,最後一點主菜單的顯示,就是通過上面介紹的這些接口將文字圖片顯示出來,因此就不再多講。總的來說,recovery的UI顯示部分難度不大,應用層調用minui庫實現了圖形的描繪以及固定大小的文字顯示,minui庫調用了Pixelflinger庫來進行渲染。 附上minui部分接口的說明,供參考
int gr_init(void); /* 初始化圖形顯示,主要是打開設備、分配內存、初始化一些參數 */ void gr_exit(void); /* 注銷圖形顯示,關閉設備並釋放內存 */ int gr_fb_width(void); /* 獲取屏幕的寬度 */ int gr_fb_height(void); /* 獲取屏幕的高度 */ gr_pixel *gr_fb_data(void); /* 獲取顯示數據緩存的地址 */ void gr_flip(void); /* 刷新顯示內容 */ void gr_fb_blank(bool blank); /* 清屏 */ void gr_color(unsigned char r, unsigned char g, unsigned char b, unsigned char a); /* 設置字體顏色 */ void gr_fill(int x, int y, int w, int h); /* 填充矩形區域,參數分別代表起始坐標、矩形區域大小 */ int gr_text(int x, int y, const char *s); /* 顯示字符串 */ int gr_measure(const char *s); /* 獲取字符串在默認字庫中占用的像素長度 */ void gr_font_size(int *x, int *y); /* 獲取當前字庫一個字符所占的長寬 */ void gr_blit(gr_surface source, int sx, int sy, int w, int h, int dx, int dy); /* 填充由source指定的圖片 */ unsigned int gr_get_width(gr_surface surface); /* 獲取圖片寬度 */ unsigned int gr_get_height(gr_surface surface); /* 獲取圖片高度 */ /* 根據圖片創建顯示資源數據,name為圖片在mk文件指定的相對路徑 */ int res_create_surface(const char* name, gr_surface* pSurface); void res_free_surface(gr_surface surface); /* 釋放資源數據 */
 Android——滑動監聽SwipeRefreshLayout+瀑布流Recycl+Butter自動生成
package c.example.jreduch09;import android.os.AsyncTask;import android.os.Bundle;impo
 uboot移植
1.windows共享文件夾裡 下載、解壓三星官方uboot源碼 2.復制到linux下的目錄 3.在共享文件夾裡面建立SourceInsight 工
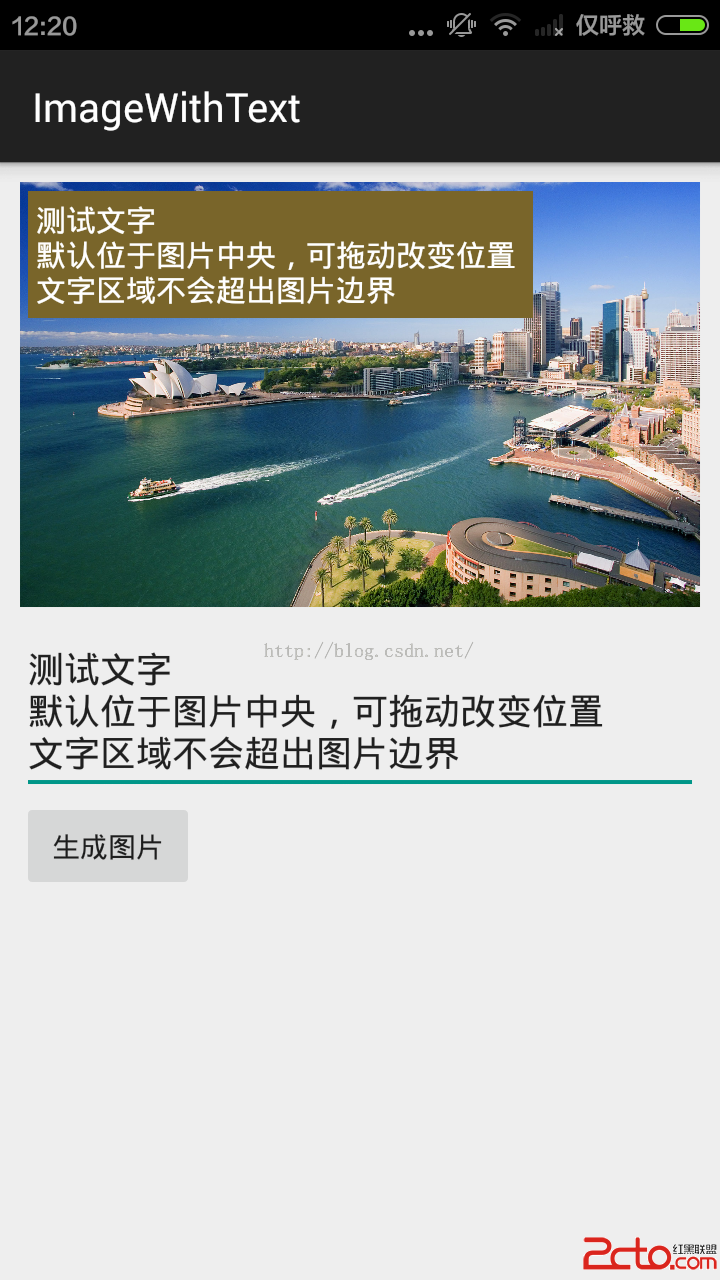 Android:圖片中疊加文字,支持拖動改變位置
之所以做了這麼一個Demo,是因為最近項目中有一個奇葩的需求:用戶拍攝照片後,分享到微信的同時添加備注,想獲取用戶在微信的彈出框輸入的內容,保存在自己的服務器上。而事實上
 三大框架SSH成長路程(六)
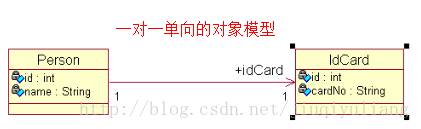
一對一雙向關聯映射(六)上篇博文一對一單向關聯映射(五),我們介紹了一對一的單向關聯映射,單向是指只能從人(Person)這端加載身份證端(IdCard),但是反過來,不