編輯:關於Android編程
 1 /**
 2      * 顯示提示消息的對話框
 3      * @author codingblock 2015-8-11
 4      * @param  context     上下文
 5      * @param  title       對話框標題
 6      * @param  message     對話框提示內容
 7      * @return
 8      */
 9     public AlertDialog.Builder simpleDialog(final Context context, String title, String message){
10         AlertDialog.Builder builder = new AlertDialog.Builder(context)
11         .setTitle(title)
12         .setIcon(R.drawable.ic_launcher)
13         .setMessage(message)
14         .setPositiveButton("完成", null)
15         .setNegativeButton("取消", null);
16         return builder;
上面的代碼是將一個簡單提示對話框封裝成了一個方法,調用時可以省去重復代碼,直接傳遞title,message等參數即可,其中該對話框用設置了icon,title等屬性,還調用了setPositiveButton()和setNegativeButton()方法添加按鈕,因為該方法(simpleDialog())在這裡僅提供調用,所以沒有實現按鈕的具體功能,可在實際調用中重寫這兩個方法從而實現具體功能。 調用方式如下,其他幾種方式的對話框與此方法調用方式基本一致,以下就不再一一給出。
 1   public void onClickSimple(View v){
 2         builder = new Dialog().simpleDialog(this, "簡單對話框", "對話框內容");
 3         builder.setPositiveButton("確定", new OnClickListener() {
 4             @Override
 5             public void onClick(DialogInterface arg0, int arg1) {
 6                 //確定
 7             }
 8         })
 9         .setNegativeButton("取消", new OnClickListener() {
10             @Override
11             public void onClick(DialogInterface arg0, int arg1) {
12                 //取消
13             }
14         });
15         builder.create().show();
16     }
除此之外,AlertDialog.Builder還提供了setNeutralButton()方法來添加一個裝飾性的按鈕。因此Android的對話一共可以生成三個按鈕的對話框。 2、簡單列表項對話框
 1   /**
 2      * 簡單列表項對話框
 3      * @author codingblock 2015-8-11
 4      * @param  context     上下文
 5      * @param  title       對話框標題
 6      * @param  items       對話框列表項CharSequence類型數組,也可根據需要改成其他類型
 7      * @return
 8      */
 9     public AlertDialog.Builder simpleListDialog(final Context context, String title, final CharSequence[] items){
10         AlertDialog.Builder builder = new AlertDialog.Builder(context)
11         .setTitle(title)
12         .setIcon(R.drawable.ic_launcher)
13         .setItems(items, new OnClickListener() {
14
15             @Override
16             public void onClick(DialogInterface dialog, int which) {
17                 Toast.makeText(context, "您選中了:"+ items[which], Toast.LENGTH_SHORT).show();
18             }
19         });
20         return builder;
21     }
上面的代碼通過調用setItems()方法為對話框設置了多個列表項,其中setItems的第一個參數可以是Charsequence和int類型。 3、單選列表項對話框
 1   /**
 2      * 單選列表項對話框
 3      * @author codingblock 2015-8-11
 4      * @param  context     上下文
 5      * @param  title       對話框標題
 6      * @param  items       對話框列表項 CharSequence類型數組
 7      * @return
 8      */
 9     public AlertDialog.Builder simpleChoiceDialog(final Context context, String title, final CharSequence[] items){
10         AlertDialog.Builder builder = new AlertDialog.Builder(context)
11         .setTitle(title)
12         .setIcon(R.drawable.ic_launcher)
13         //第二個參數為默認選中項, 0:代表默認選中第一項
14         .setSingleChoiceItems(items, 0, new OnClickListener() {
15             @Override
16             public void onClick(DialogInterface dialog, int which) {
17                 Toast.makeText(context, "您選中了:"+ items[which], Toast.LENGTH_SHORT).show();
18             }
19         });
20         return builder;
以上代碼通過調用setSingleChoiceItems()方法創建了帶單選列表的對話框。調用setSingleChoiceItems()方法時既可傳入數組作為參數,也可傳入Cursor(相當於數據庫查詢結果集)作為參數,也可傳入ListAdapter作為參數。另外,如果傳入ListAdapter作為參數,則由ListAdapter來提供多個列表項組件。 4、多選列表對話框
 1   /**
 2      * 多選列表項對話框
 3      * @author codingblock 2015-8-11
 4      * @param  context     上下文
 5      * @param  title            對話框標題
 6      * @param  items       對話框列表項 CharSequence類型數組
 7      * @param  checked     對話框初始選定狀態  boolean類型數組
 8      * @return
 9      */
10     public AlertDialog.Builder multiChoiceDialog(final Context context, String title, final CharSequence[] items, final boolean[] checked){
11         AlertDialog.Builder builder = new AlertDialog.Builder(context)
12         .setTitle(title)
13         .setIcon(R.drawable.ic_launcher)
14         //第二個參數為默認選中項,是一個boolean型的數組
15         .setMultiChoiceItems(items, checked, null)
16         .setPositiveButton("完成", null)
17         .setNegativeButton("取消", null);
18         return builder;
19     }
以上代碼通過調用setMultiChoiceItems()方法創建了一個多選列表的對話框。在調用setMultiChoiceItems()時既可傳入數組作為參數,也可傳入Cursor作為參數。需要注意的時在調用setMultiChoiceItems()方法添加多選列表時,還需要傳入一個boolean[]參數,該參數有兩個作用:①設置初始化時選中哪些列表項。②該boolean[]類型的參數還可用於動態的獲取多選列表項的選中狀態。 5、自定義列表項對話框
 1   /**
 2      * 自定義列表項對話框
 3      * @author codingblock 2015-8-11
 4      * @param  context     上下文
 5      * @param  title       對話框標題
 6      * @param  items       對話框列表項 String類型數組,也可更具需要改成其他類型
 7      * @return
 8      */
 9     public AlertDialog.Builder customListDialog(final Context context, String title, String[] items){
10         AlertDialog.Builder builder = new AlertDialog.Builder(context)
11         .setTitle(title)
12         .setIcon(R.drawable.ic_launcher)
13         .setAdapter(new ArrayAdapter<String>(context, R.layout.array_item, R.id.tv_item, items), null)
14         .setPositiveButton("完成", null)
15         .setNegativeButton("取消", null);
16         return builder;
17     }
以上代碼通過setAdapter()設置了對話框的內容,該方法需要傳入一個Adapter參數,這樣的話,就可以通過Adapter實現多個組件的繪制。其中setAdapter方法中調用的布局文件array_item.xml代碼如下:
 1 <LinearLayout xmlns:android="http://schemas.android.com/apk/res/android"
 2     xmlns:tools="http://schemas.android.com/tools"
 3     android:id="@+id/container"
 4     android:layout_width="match_parent"
 5     android:layout_height="match_parent"
 6     android:gravity="center"
 7     android:padding="10dp"
 8     android:orientation="horizontal">
 9     <ImageView
10         android:id="@+id/iv_img"
11         android:layout_width="30dp"
12         android:layout_height="30dp"
13         android:src="@drawable/ic_launcher" />
14     <TextView
15         android:id="@+id/tv_item"
16         android:layout_width="fill_parent"
17         android:layout_height="wrap_content"
18         android:layout_margin="10dp"
19         android:gravity="center"
20         android:text="列表項" />
21 </LinearLayout>
其實,不僅setAdapter()方法可以接受Adapter作為參數,setSingleChoice()方法也可以接受Adapter參數,也就是說,使用setSingleChoice()方法也可以實現自定義列表項對話框。 6、自定義View的對話框
 1   /**
 2      * 自定義View的對話框
 3      * @author codingblock 2015-8-11
 4      * @param  context     上下文
 5      * @param  title       對話框標題
 6      */
 7     public AlertDialog.Builder customeViewDialog(final Context context, String title){
 8         LinearLayout loginDialog = (LinearLayout)LayoutInflater.from(context).inflate(R.layout.login_dialog, null);
 9         AlertDialog.Builder builder = new AlertDialog.Builder(context)
10         .setTitle(title)
11         .setIcon(R.drawable.ic_launcher)
12         .setView(loginDialog)
13         .setPositiveButton("完成", null)
14         .setNegativeButton("取消", null);
15         return builder;
16     }
以上代碼通過setView()方法調用自定義的布局文件顯示界面。代碼中首先顯示裝載了login_dialog.xml文件,並返回該文件對應的View,接下來程序調用了setView()方法來顯示View。 其中的login_dialog.xml文件代碼如下:
 1 <LinearLayout xmlns:android="http://schemas.android.com/apk/res/android"
 2     xmlns:tools="http://schemas.android.com/tools"
 3     android:id="@+id/container"
 4     android:layout_width="match_parent"
 5     android:layout_height="match_parent"
 6     android:padding="10dp"
 7     android:orientation="vertical">
 8     <LinearLayout
 9         android:layout_width="fill_parent"
10         android:layout_height="wrap_content"
11         android:orientation="horizontal">
12         <TextView
13             android:id="@+id/tv_name"
14             android:layout_width="wrap_content"
15             android:layout_height="wrap_content"
16             android:text="用戶名:"/>
17         <EditText
18             android:id="@+id/et_name"
19             android:layout_width="match_parent"
20             android:layout_height="wrap_content"
21             android:focusable="true"
22             android:hint="input name" />
23     </LinearLayout>
24     <LinearLayout
25         android:layout_width="fill_parent"
26         android:layout_height="wrap_content"
27         android:orientation="horizontal">
28         <TextView
29             android:id="@+id/tv_pwd"
30             android:layout_width="wrap_content"
31             android:layout_height="wrap_content"
32             android:text="密碼:"/>
33         <EditText
34             android:id="@+id/et_pwd"
35             android:layout_width="match_parent"
36             android:layout_height="wrap_content"
37             android:hint="input password" />
38     </LinearLayout>
39 </LinearLayout>
 Android實現平鋪圖片效果
最近開發App,美工設計了一個有鋸齒邊沿效果的背景圖,只給了我一個鋸齒,然後需要平鋪展示鋸齒效果: android中實現平鋪圖片有兩種方式:(1)在drawable中的d
 Android中的Handler與多線程應用實例
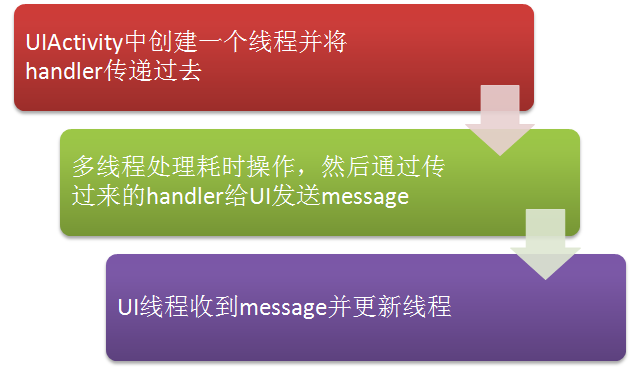
本文首先解釋一下handler是用來干嘛的,然後通過例子介紹其在多線程中的應用。什麼是Handlerhandler通俗一點講就是用來在各個進程之間發送數據的處理對象。在任
 Android仿新浪微博發布微博界面設計(5)
本教程為大家分享了Android發布微博、添加表情等功能的具體代碼,供大家參考,具體內容如下發布一條新微博接口:http://open.weibo.com/wiki/2/
 Android-AndFix 熱修復框架原理及源碼解析
AndFix原理AndFix的原理就是通過c++指針進行方法的替換,把有bug的方法替換成補丁文件中的方法。方法替換過程:源碼解析解析源碼從使用的方法一一解析。在自定義A