編輯:關於Android編程
本篇只分析SystemUI的加載過程和SystemUI的其中的一個模塊StatusBar的小模塊NavigationBar,以Android6.0代碼進行分析
跟StatusBar相關的服務為SystemUIService,我們查看SystemUIService源碼
public class SystemUIService extends Service {

    @Override
    public void onCreate() {
        super.onCreate();
        ((SystemUIApplication) getApplication()).startServicesIfNeeded();
        //獲取Application調用startServicesIfNeeded
    }

    @Override
    public IBinder onBind(Intent intent) {
        return null;
    }

    /*打印堆棧信息*/
    @Override
    protected void dump(FileDescriptor fd, PrintWriter pw, String[] args) {
        SystemUI[] services = ((SystemUIApplication) getApplication()).getServices();
        if (args == null || args.length == 0) {
            for (SystemUI ui: services) {
                pw.println("dumping service: " + ui.getClass().getName());
                ui.dump(fd, pw, args);
            }
        } else {
            String svc = args[0];
            for (SystemUI ui: services) {
                String name = ui.getClass().getName();
                if (name.endsWith(svc)) {
                    ui.dump(fd, pw, args);
                }
            }
        }
    }
}
分析SystemUIService代碼,可以知道SystemUI主要做了兩件事
Application對象加載SystemUI相關的類,這個等下分析SystemUIApplication代碼可以知道 dump打印SystenUISerice運行過程中相關的堆棧信息
那麼SystemUIService又是哪裡開始啟動的呢?竟然SystemUIService是個服務,那麼啟動服務要麼就是startService
要麼就是bindService進行啟動,其啟動方式則需要通過Intent來傳入類名或者包名,因此在源碼中搜索SystemUIService可以對比發現,它在
frameworks\base\services\java\com\android\server\SystemServer.java中進行啟動
static final void startSystemUi(Context context) {
    Intent intent = new Intent();
    intent.setComponent(new ComponentName("com.android.systemui",
                "com.android.systemui.SystemUIService"));
    //Slog.d(TAG, "Starting service: " + intent);
    context.startServiceAsUser(intent, UserHandle.OWNER);
}
在SystemServer的run方法中startOtherServices來啟動SystemUIService服務,至於SystemServer則涉及到Android的啟動流程,其大概流程為
int -> ServerManager -> Zygote -> SystemServer
SystemServer中會初始化一些Android的java層的服務,如ActivityManagerService、WindowManagerService等
這裡SystemUI的加載過程就到此告一段落了,下面分析StatusBar的加載流程
上面講到在SystemUIService的onCreate中獲取SystemUIApplication對象來初始化SystemUI相關的類,這些類裡面就包括了StatusBar相關的類,我們查看SystemUIApplication類
@Override
public void onCreate() {
    super.onCreate();
    // Set the application theme that is inherited by all services. Note that setting the
    // application theme in the manifest does only work for activities. Keep this in sync with
    // the theme set there.
    setTheme(R.style.systemui_theme);
    //注釋廣播
    IntentFilter filter = new IntentFilter(Intent.ACTION_BOOT_COMPLETED);
    filter.setPriority(IntentFilter.SYSTEM_HIGH_PRIORITY);
    registerReceiver(new BroadcastReceiver() {
        @Override
        public void onReceive(Context context, Intent intent) {
            //開啟直接返回
            if (mBootCompleted) return;

            if (DEBUG) Log.v(TAG, "BOOT_COMPLETED received");
            unregisterReceiver(this);
            //標記啟動
            mBootCompleted = true;
            //服務是否啟動
            if (mServicesStarted) {
                final int N = mServices.length;
                for (int i = 0; i < N; i++) {
                    //回調各服務的onBootCompleted函數
                    mServices[i].onBootCompleted();
                }
            }
        }
    }, filter);
}
在SystemUIApplication的onCreate中主要做了
設置主題(這個會影響其SystemUI的界面顯示效果) 注冊開機廣播,設置標志位SystemUIService中的onCreate啟動了這個方法,我們著重分析這個方法
public void startServicesIfNeeded() {
    if (mServicesStarted) {
        return;
    }

    if (!mBootCompleted) {
        // check to see if maybe it was already completed long before we began
        // see ActivityManagerService.finishBooting()
        //獲取系統文件中的sys.boot_completed的值
        if ("1".equals(SystemProperties.get("sys.boot_completed"))) {
            mBootCompleted = true;
            if (DEBUG) Log.v(TAG, "BOOT_COMPLETED was already sent");
        }
    }

    Log.v(TAG, "Starting SystemUI services.");
    final int N = SERVICES.length;
    for (int i=0; i cl = SERVICES[i];
        if (DEBUG) Log.d(TAG, "loading: " + cl);
        //實例化各個類實例,放入mServices數組中
        try {
            mServices[i] = (SystemUI)cl.newInstance();
        } catch (IllegalAccessException ex) {
            throw new RuntimeException(ex);
        } catch (InstantiationException ex) {
            throw new RuntimeException(ex);
        }
        mServices[i].mContext = this;
        mServices[i].mComponents = mComponents;
        if (DEBUG) Log.d(TAG, "running: " + mServices[i]);
        mServices[i].start();

        if (mBootCompleted) {
            mServices[i].onBootCompleted();
        }
    }
    //服務啟動標志
    mServicesStarted = true;
}
這個方法中,首先判斷mServicesStarted標志為來判斷SystemUI相關的服務是否啟動,同時根據系統配置文件來檢查ActivityManagerService是否finishBooting,然後通過類加載機制來初始化SERVICES數組裡面相關的類加入mServices中,然後start
 /**
 * The classes of the stuff to start.
 */
private final Class[] SERVICES = new Class[] {
        com.android.systemui.tuner.TunerService.class,//定制狀態欄服務
        com.android.systemui.keyguard.KeyguardViewMediator.class,//鎖屏相關
        com.android.systemui.recents.Recents.class,//近期任務
        com.android.systemui.volume.VolumeUI.class,//音量條
        com.android.systemui.statusbar.SystemBars.class,//狀態欄
        com.android.systemui.usb.StorageNotification.class,//通知欄
        com.android.systemui.power.PowerUI.class,//電源相關
        com.android.systemui.media.RingtonePlayer.class,//鈴聲播放相關
};

/**
 * Hold a reference on the stuff we start.
 */
private final SystemUI[] mServices = new SystemUI[SERVICES.length];
從mServices和SERVICES的定義可以發現SERVICES是一組包含全路徑的相關的類,這些類包含一些我們常見的TunerService(定制狀態欄服務)、
KeyguardViewMediator(鎖屏相關)、Recents(近期任務)、VolumeUI(音量條)、SystemBars(狀態欄)、StorageNotification(通知欄)、PowerUI(電源相關)、RingtonePlayer(鈴聲播放相關)類,它們都是繼承與SystemUI抽象類,現在只分析StatusBar相關的SystemBars類
public class SystemBars extends SystemUI implements ServiceMonitor.Callbacks {
    private static final String TAG = "SystemBars";
    private static final boolean DEBUG = false;
    private static final int WAIT_FOR_BARS_TO_DIE = 500;

    // manages the implementation coming from the remote process
    private ServiceMonitor mServiceMonitor;

    // in-process fallback implementation, per the product config
    private BaseStatusBar mStatusBar;

    @Override
    public void start() {
        if (DEBUG) Log.d(TAG, "start");
        //實例化ServiceMonitor
        mServiceMonitor = new ServiceMonitor(TAG, DEBUG,
                mContext, Settings.Secure.BAR_SERVICE_COMPONENT, this);
        //start
        mServiceMonitor.start();  // will call onNoService if no remote service is found
    }
    /*服務沒啟動時,ServiceMonitor會回調onNoService*/
    @Override
    public void onNoService() {
        if (DEBUG) Log.d(TAG, "onNoService");
        createStatusBarFromConfig();  // fallback to using an in-process implementation
    }
    /*服務已經啟動的回調*/
    @Override
    public long onServiceStartAttempt() {
        if (DEBUG) Log.d(TAG, "onServiceStartAttempt mStatusBar="+mStatusBar);
        if (mStatusBar != null) {
            // tear down the in-process version, we'll recreate it again if needed
            mStatusBar.destroy();
            mStatusBar = null;
            return WAIT_FOR_BARS_TO_DIE;
        }
        return 0;
    }
    /*系統配置改變*/
    @Override
    protected void onConfigurationChanged(Configuration newConfig) {
        if (mStatusBar != null) {
            mStatusBar.onConfigurationChanged(newConfig);
        }
    }
    /*打印堆棧*/
    @Override
    public void dump(FileDescriptor fd, PrintWriter pw, String[] args) {
        if (mStatusBar != null) {
            mStatusBar.dump(fd, pw, args);
        }
    }
    /*從xml文件中獲取PhoneStatusBar全路徑,通過類加載器實例化類,調用其start*/
    private void createStatusBarFromConfig() {
        if (DEBUG) Log.d(TAG, "createStatusBarFromConfig");
        final String clsName = mContext.getString(R.string.config_statusBarComponent);
        if (clsName == null || clsName.length() == 0) {
            throw andLog("No status bar component configured", null);
        }
        Class cls = null;
        try {
            cls = mContext.getClassLoader().loadClass(clsName);
        } catch (Throwable t) {
            throw andLog("Error loading status bar component: " + clsName, t);
        }
        try {
            mStatusBar = (BaseStatusBar) cls.newInstance();
        } catch (Throwable t) {
            throw andLog("Error creating status bar component: " + clsName, t);
        }
        mStatusBar.mContext = mContext;
        mStatusBar.mComponents = mComponents;
        mStatusBar.start();
        if (DEBUG) Log.d(TAG, "started " + mStatusBar.getClass().getSimpleName());
    }

    private RuntimeException andLog(String msg, Throwable t) {
        Log.w(TAG, msg, t);
        throw new RuntimeException(msg, t);
    }
}
我們先從start方法開始分析
    @Override
    public void start() {
        if (DEBUG) Log.d(TAG, "start");
        mServiceMonitor = new ServiceMonitor(TAG, DEBUG,
                mContext, Settings.Secure.BAR_SERVICE_COMPONENT, this);
        mServiceMonitor.start();  // will call onNoService if no remote service is found
    }
這裡實例化ServiceMonitor類start,繼續分析ServiceMonitor
    ...
    public ServiceMonitor(String ownerTag, boolean debug,
            Context context, String settingKey, Callbacks callbacks) {
        mTag = ownerTag + ".ServiceMonitor";
        mDebug = debug;
        mContext = context;
        mSettingKey = settingKey; // Settings.Secure.BAR_SERVICE_COMPONENT
        mCallbacks = callbacks;
    }

    public void start() {
        // listen for setting changes
        /*Settings.Secure.BAR_SERVICE_COMPONENT改變時回調*/
        ContentResolver cr = mContext.getContentResolver();
        cr.registerContentObserver(Settings.Secure.getUriFor(mSettingKey),
                false /*notifyForDescendents*/, mSettingObserver, UserHandle.USER_ALL);

        // listen for package/component changes
        //應用安裝,改變,卸載會觸發mBroadcastReceiver廣播
        IntentFilter filter = new IntentFilter();
        filter.addAction(Intent.ACTION_PACKAGE_ADDED);
        filter.addAction(Intent.ACTION_PACKAGE_CHANGED);
        filter.addAction(Intent.ACTION_PACKAGE_REMOVED);
        filter.addDataScheme("package");
        mContext.registerReceiver(mBroadcastReceiver, filter);

        mHandler.sendEmptyMessage(MSG_START_SERVICE);
    }
    ...
ServiceMOnitor是一個監聽Settings.Secure.BAR_SERVICE_COMPONENT是否改變的類,在start中通過監聽系統系統時應用的變化來啟動服務
private final BroadcastReceiver mBroadcastReceiver = new BroadcastReceiver() {
    public void onReceive(Context context, Intent intent) {
        String pkg = intent.getData().getSchemeSpecificPart();
        if (mServiceName != null && mServiceName.getPackageName().equals(pkg)) {
            mHandler.sendMessage(mHandler.obtainMessage(MSG_PACKAGE_INTENT, intent));
        }
    }
};
應用裝載時,通過Handler發送MSG_PACKAGE_INTENT消息事件,我們查看Handler消息回調
    // internal handler + messages used to serialize access to internal state
    public static final int MSG_START_SERVICE = 1; //啟動服務,並非真正啟動,會根據ServiceName進行判斷
    public static final int MSG_CONTINUE_START_SERVICE = 2; //啟動服務
    public static final int MSG_STOP_SERVICE = 3;//停止服務消息
    public static final int MSG_PACKAGE_INTENT = 4;//包安裝事件消息
    public static final int MSG_CHECK_BOUND = 5;//包改變或者卸載時,重新啟動服務消息
    public static final int MSG_SERVICE_DISCONNECTED = 6;//服務斷開消息

    private final Handler mHandler = new Handler() {
        public void handleMessage(Message msg) {
            switch(msg.what) {
                case MSG_START_SERVICE:
                    startService();
                    break;
                case MSG_CONTINUE_START_SERVICE:
                    continueStartService();
                    break;
                case MSG_STOP_SERVICE:
                    stopService();
                    break;
                case MSG_PACKAGE_INTENT:
                    packageIntent((Intent)msg.obj);
                    break;
                case MSG_CHECK_BOUND:
                    checkBound();
                    break;
                case MSG_SERVICE_DISCONNECTED:
                    serviceDisconnected((ComponentName)msg.obj);
                    break;
            }
        }
    };

    private void packageIntent(Intent intent) {
        if (mDebug) Log.d(mTag, "packageIntent intent=" + intent
                + " extras=" + bundleToString(intent.getExtras()));
        if (Intent.ACTION_PACKAGE_ADDED.equals(intent.getAction())) {
            mHandler.sendEmptyMessage(MSG_START_SERVICE);//發送啟動服務消息
        } else if (Intent.ACTION_PACKAGE_CHANGED.equals(intent.getAction())
                || Intent.ACTION_PACKAGE_REMOVED.equals(intent.getAction())) {
            final PackageManager pm = mContext.getPackageManager();
            final boolean serviceEnabled = isPackageAvailable()
                    && pm.getApplicationEnabledSetting(mServiceName.getPackageName())
                            != PackageManager.COMPONENT_ENABLED_STATE_DISABLED
                    && pm.getComponentEnabledSetting(mServiceName)
                            != PackageManager.COMPONENT_ENABLED_STATE_DISABLED;
            if (mBound && !serviceEnabled) {
                stopService();
                scheduleCheckBound();
            } else if (!mBound && serviceEnabled) {
                startService();
            }
        }
    }
當我們SystemUI應用檢測到有新應用裝載時,會發送MSG_START_SERVICE消息來啟動服務,我們接著分析Handler的回調MSG_START_SERVICE消息
    private void startService() {
        mServiceName = getComponentNameFromSetting();
        if (mDebug) Log.d(mTag, "startService mServiceName=" + mServiceName);
        if (mServiceName == null) {
            mBound = false;
            mCallbacks.onNoService();
        } else {
            long delay = mCallbacks.onServiceStartAttempt();
            mHandler.sendEmptyMessageDelayed(MSG_CONTINUE_START_SERVICE, delay);
        }
    }
    /*從ContentProvider數據庫中取得包名*/
    private ComponentName getComponentNameFromSetting() {
        String cn = Settings.Secure.getStringForUser(mContext.getContentResolver(),
                mSettingKey, UserHandle.USER_CURRENT);
        return cn == null ? null : ComponentName.unflattenFromString(cn);
    }
首先從ContentProvider數據庫中取得包名,如果沒有啟動,則回調CallBaback的onNoService服務,否則發送MSG_CONTINUE_START_SERVICE消息啟動服務
    private void continueStartService() {
        if (mDebug) Log.d(mTag, "continueStartService");
        Intent intent = new Intent().setComponent(mServiceName);
        try {
            mServiceConnection = new SC();
            mBound = mContext.bindService(intent, mServiceConnection, Context.BIND_AUTO_CREATE);
            if (mDebug) Log.d(mTag, "mBound: " + mBound);
        } catch (Throwable t) {
            Log.w(mTag, "Error binding to service: " + mServiceName, t);
        }
        if (!mBound) {
            mCallbacks.onNoService();
        }
    }
至此可以知道,當遠程服務沒有啟動時,會回調SystemBar的onNoService函數,我們回到SystemBar,分析onNoService函數
     ...
     @Override
        public void onNoService() {
            if (DEBUG) Log.d(TAG, "onNoService");
            createStatusBarFromConfig();  // fallback to using an in-process implementation
        }
     ...
     private void createStatusBarFromConfig() {
        if (DEBUG) Log.d(TAG, "createStatusBarFromConfig");
        final String clsName = mContext.getString(R.string.config_statusBarComponent);//從xml文件讀取類名
        if (clsName == null || clsName.length() == 0) {
            throw andLog("No status bar component configured", null);
        }
        //通過類加載器實例化類
        Class cls = null;
        try {
            cls = mContext.getClassLoader().loadClass(clsName);
        } catch (Throwable t) {
            throw andLog("Error loading status bar component: " + clsName, t);
        }
        try {
            mStatusBar = (BaseStatusBar) cls.newInstance();
        } catch (Throwable t) {
            throw andLog("Error creating status bar component: " + clsName, t);
        }
        mStatusBar.mContext = mContext;
        mStatusBar.mComponents = mComponents;
        mStatusBar.start();//調用類的start方法
        if (DEBUG) Log.d(TAG, "started " + mStatusBar.getClass().getSimpleName());
    }
上面分析可以得知,當遠程服務沒有啟動時,首先從xml文件讀取要啟動的類名,我們來查看這個xml文件
res\values\config.xml
com.android.systemui.statusbar.phone.PhoneStatusBar
從上面可以知道,最終程序會加載PhoneStatusBar這個類,接下來分析PhoneStatusBar
首先我們從上面分析得知,當實例化PhoneStatusBar類後會調用start方法,我們就從PhoneStatusBar的start方法開始分析
    ...
    @Override
    public void start() {
        //獲取WindowManager,初始化當前顯示界面大小
        mDisplay = ((WindowManager)mContext.getSystemService(Context.WINDOW_SERVICE))
                .getDefaultDisplay();
        updateDisplaySize();
        //src繪圖模式
        mScrimSrcModeEnabled = mContext.getResources().getBoolean(
                R.bool.config_status_bar_scrim_behind_use_src);
        //調用父類start方法
        super.start(); // calls createAndAddWindows()
        //MediaSession相關
        mMediaSessionManager
                = (MediaSessionManager) mContext.getSystemService(Context.MEDIA_SESSION_SERVICE);
        // TODO: use MediaSessionManager.SessionListener to hook us up to future updates
        // in session state
        //添加導航欄
        addNavigationBar();

        // Lastly, call to the icon policy to install/update all the icons.
        //更新狀態欄圖標
        mIconPolicy = new PhoneStatusBarPolicy(mContext, mCastController, mHotspotController,
                mUserInfoController, mBluetoothController);
        mIconPolicy.setCurrentUserSetup(mUserSetup);
        mSettingsObserver.onChange(false); // set up

        mHeadsUpObserver.onChange(true); // set up
        if (ENABLE_HEADS_UP) {
            mContext.getContentResolver().registerContentObserver(
                    Settings.Global.getUriFor(Settings.Global.HEADS_UP_NOTIFICATIONS_ENABLED), true,
                    mHeadsUpObserver);
            mContext.getContentResolver().registerContentObserver(
                    Settings.Global.getUriFor(SETTING_HEADS_UP_TICKER), true,
                    mHeadsUpObserver);
        }
        mUnlockMethodCache = UnlockMethodCache.getInstance(mContext);
        mUnlockMethodCache.addListener(this);
        //鎖屏
        startKeyguard();

        mDozeServiceHost = new DozeServiceHost();
        KeyguardUpdateMonitor.getInstance(mContext).registerCallback(mDozeServiceHost);
        putComponent(DozeHost.class, mDozeServiceHost);
        putComponent(PhoneStatusBar.class, this);

        /// M:add for multi window @{
        if(MultiWindowProxy.isSupported()) {
            registerMWProxyAgain();
        }
        /// @}
        setControllerUsers();

        notifyUserAboutHiddenNotifications();

        mScreenPinningRequest = new ScreenPinningRequest(mContext);
    }
    ...
我們接著分析PhoneStatusBar父類的BaseStatusBar的start方法
...
public void start() {
//獲取Dispaly
mWindowManager = (WindowManager)mContext.getSystemService(Context.WINDOW_SERVICE);
mWindowManagerService = WindowManagerGlobal.getWindowManagerService();
mDisplay = mWindowManager.getDefaultDisplay();
mDevicePolicyManager = (DevicePolicyManager)mContext.getSystemService(
Context.DEVICE_POLICY_SERVICE);
mNotificationColorUtil = NotificationColorUtil.getInstance(mContext);
mNotificationData = new NotificationData(this);
mAccessibilityManager = (AccessibilityManager)
mContext.getSystemService(Context.ACCESSIBILITY_SERVICE);
mDreamManager = IDreamManager.Stub.asInterface(
ServiceManager.checkService(DreamService.DREAM_SERVICE));
mPowerManager = (PowerManager) mContext.getSystemService(Context.POWER_SERVICE);
//監聽設置文件的改變,以便更新ContenProvider數據庫
mContext.getContentResolver().registerContentObserver(
Settings.Global.getUriFor(Settings.Global.DEVICE_PROVISIONED), true,
mSettingsObserver);
mContext.getContentResolver().registerContentObserver(
Settings.Global.getUriFor(Settings.Global.ZEN_MODE), false,
mSettingsObserver);
mContext.getContentResolver().registerContentObserver(
Settings.Secure.getUriFor(Settings.Secure.LOCK_SCREEN_SHOW_NOTIFICATIONS), false,
mSettingsObserver,
UserHandle.USER_ALL);
mContext.getContentResolver().registerContentObserver(
Settings.Secure.getUriFor(Settings.Secure.LOCK_SCREEN_ALLOW_PRIVATE_NOTIFICATIONS),
true,
mLockscreenSettingsObserver,
UserHandle.USER_ALL);
//加載startbarService服務
mBarService = IStatusBarService.Stub.asInterface(
ServiceManager.getService(Context.STATUS_BAR_SERVICE));
//設置近期任務回調
mRecents = getComponent(Recents.class);
mRecents.setCallback(this);
//獲取本地配置
final Configuration currentConfig = mContext.getResources().getConfiguration();
mLocale = currentConfig.locale;
mLayoutDirection = TextUtils.getLayoutDirectionFromLocale(mLocale);
mFontScale = currentConfig.fontScale;
mUserManager = (UserManager) mContext.getSystemService(Context.USER_SERVICE);
//加載動畫
mLinearOutSlowIn = AnimationUtils.loadInterpolator(mContext,
android.R.interpolator.linear_out_slow_in);
mFastOutLinearIn = AnimationUtils.loadInterpolator(mContext,
android.R.interpolator.fast_out_linear_in);
// Connect in to the status bar manager service
StatusBarIconList iconList = new StatusBarIconList();
mCommandQueue = new CommandQueue(this, iconList);
int[] switches = new int[8];
ArrayList binders = new ArrayList();
try {
mBarService.registerStatusBar(mCommandQueue, iconList, switches, binders);
} catch (RemoteException ex) {
// If the system process isn't there we're doomed anyway.
}
//調用createAndAddWindows方法
createAndAddWindows();
mSettingsObserver.onChange(false); // set up
disable(switches[0], switches[6], false /* animate */);
setSystemUiVisibility(switches[1], 0xffffffff);
topAppWindowChanged(switches[2] != 0);
// StatusBarManagerService has a back up of IME token and it's restored here.
setImeWindowStatus(binders.get(0), switches[3], switches[4], switches[5] != 0);
// Set up the initial icon state
int N = iconList.size();
int viewIndex = 0;
for (int i=0; i<n; i++)="" {="" statusbaricon="" icon="iconList.getIcon(i);" if="" (icon="" !="null)" addicon(iconlist.getslot(i),="" i,="" viewindex,="" icon);="" viewindex++;="" }="" set="" up="" the="" initial="" notification="" state.="" try="" mnotificationlistener.registerassystemservice(mcontext,="" new="" componentname(mcontext.getpackagename(),="" getclass().getcanonicalname()),="" userhandle.user_all);="" catch="" (remoteexception="" e)="" log.e(tag,="" "unable="" to="" register="" listener",="" e);="" (debug)="" log.d(tag,="" string.format(="" "init:="" icons="%d" disabled="0x%08x" lights="0x%08x" menu="0x%08x" imebutton="0x%08x"," iconlist.size(),="" switches[0],="" switches[1],="" switches[2],="" switches[3]="" ));="" mcurrentuserid="ActivityManager.getCurrentUser();" setheadsupuser(mcurrentuserid);="" intentfilter="" filter="new" intentfilter();="" filter.addaction(intent.action_user_switched);="" filter.addaction(intent.action_user_added);="" filter.addaction(intent.action_user_present);="" filter.addaction(banner_action_cancel);="" filter.addaction(banner_action_setup);="" mcontext.registerreceiver(mbroadcastreceiver,="" filter);="" allusersfilter="new" allusersfilter.addaction(="" devicepolicymanager.action_device_policy_manager_state_changed);="" mcontext.registerreceiverasuser(mallusersreceiver,="" userhandle.all,="" allusersfilter,="" null,="" null);="" updatecurrentprofilescache();="" ...
BaseStatusBar關於StatusBar相關的最主要是調用了createAndAddWindows方法,我們看下這個方法的定義
    /**
     * Create all windows necessary for the status bar (including navigation, overlay panels, etc)
     * and add them to the window manager.
     */
    protected abstract void createAndAddWindows();
這是一個抽象方法,也就是說,它會回調到子類的createAndAddWindows的實現方法中,我們重新回到PhoneStatusBar中,找到createAndAddWindows的方法實現
createAndAddWindows
    ...
    @Override
    public void createAndAddWindows() {
        addStatusBarWindow();
    }

    private void addStatusBarWindow() {
        makeStatusBarView();//創建statusbar視圖
        mStatusBarWindowManager = new StatusBarWindowManager(mContext);
        //通過StatusBarWindowManager類的add方法加載到Window窗體中
        mStatusBarWindowManager.add(mStatusBarWindow, getStatusBarHeight());
    }
    ...
    protected PhoneStatusBarView makeStatusBarView() {
        final Context context = mContext;
        //通過Resources更新顯示大小和一些資源文件
        Resources res = context.getResources();

        updateDisplaySize(); // populates mDisplayMetrics
        updateResources();
        //加載StartBarWindowView視圖
        mStatusBarWindow = (StatusBarWindowView) View.inflate(context,
                R.layout.super_status_bar, null);
        mStatusBarWindow.setService(this);
        //監聽下拉事件
        mStatusBarWindow.setOnTouchListener(new View.OnTouchListener() {
            @Override
            public boolean onTouch(View v, MotionEvent event) {
                checkUserAutohide(v, event);
                if (event.getAction() == MotionEvent.ACTION_DOWN) {
                    if (mExpandedVisible) {
                        animateCollapsePanels();
                    }
                }
                return mStatusBarWindow.onTouchEvent(event);
            }
        });
        //狀態欄
        mStatusBarView = (PhoneStatusBarView) mStatusBarWindow.findViewById(R.id.status_bar);
        mStatusBarView.setBar(this);
        //
        PanelHolder holder = (PanelHolder) mStatusBarWindow.findViewById(R.id.panel_holder);
        mStatusBarView.setPanelHolder(holder);
        //通知欄
        mNotificationPanel = (NotificationPanelView) mStatusBarWindow.findViewById(
                R.id.notification_panel);
        mNotificationPanel.setStatusBar(this);

        //  M: setBackground in 512 low ram device
        if (!ActivityManager.isHighEndGfx() && !FeatureOptions.LOW_RAM_SUPPORT) {
            mStatusBarWindow.setBackground(null);
            mNotificationPanel.setBackground(new FastColorDrawable(context.getColor(
                    R.color.notification_panel_solid_background)));
        }
        //狀態欄通知
        mHeadsUpManager = new HeadsUpManager(context, mStatusBarWindow);
        mHeadsUpManager.setBar(this);
        mHeadsUpManager.addListener(this);
        mHeadsUpManager.addListener(mNotificationPanel);
        mNotificationPanel.setHeadsUpManager(mHeadsUpManager);
        mNotificationData.setHeadsUpManager(mHeadsUpManager);

        if (MULTIUSER_DEBUG) {
            mNotificationPanelDebugText = (TextView) mNotificationPanel.findViewById(
                    R.id.header_debug_info);
            mNotificationPanelDebugText.setVisibility(View.VISIBLE);
        }

        try {
            //是否顯示導航欄
            boolean showNav = mWindowManagerService.hasNavigationBar();
             Log.v(TAG, "hasNavigationBar=" + showNav);
            if (showNav) {
                /// M: add for multi window @{
                //加載導航欄布局
                int layoutId = R.layout.navigation_bar;
                if(MultiWindowProxy.isSupported()) {
                    layoutId = R.layout.navigation_bar_float_window;
                }
                mNavigationBarView = (NavigationBarView) View.inflate(context,
                        /*R.layout.navigation_bar*/layoutId, null);
                /// @}

                mNavigationBarView.setDisabledFlags(mDisabled1);
                mNavigationBarView.setBar(this);
                mNavigationBarView.setOnVerticalChangedListener(
                        new NavigationBarView.OnVerticalChangedListener() {
                    @Override
                    public void onVerticalChanged(boolean isVertical) {
                        if (mAssistManager != null) {
                            mAssistManager.onConfigurationChanged();
                        }
                        mNotificationPanel.setQsScrimEnabled(!isVertical);
                    }
                });
                //設置導航欄觸摸事件
                mNavigationBarView.setOnTouchListener(new View.OnTouchListener() {
                    @Override
                    public boolean onTouch(View v, MotionEvent event) {
                        checkUserAutohide(v, event);
                        return false;
                    }});
            }
        } catch (RemoteException ex) {
            // no window manager? good luck with that
        }

        mAssistManager = new AssistManager(this, context);

        // figure out which pixel-format to use for the status bar.
        mPixelFormat = PixelFormat.OPAQUE;
        //下拉通知欄
        mStackScroller = (NotificationStackScrollLayout) mStatusBarWindow.findViewById(
                R.id.notification_stack_scroller);
        mStackScroller.setLongPressListener(getNotificationLongClicker());
        mStackScroller.setPhoneStatusBar(this);
        mStackScroller.setGroupManager(mGroupManager);
        mStackScroller.setHeadsUpManager(mHeadsUpManager);
        mGroupManager.setOnGroupChangeListener(mStackScroller);

        mKeyguardIconOverflowContainer =
                (NotificationOverflowContainer) LayoutInflater.from(mContext).inflate(
                        R.layout.status_bar_notification_keyguard_overflow, mStackScroller, false);
        mKeyguardIconOverflowContainer.setOnActivatedListener(this);
        mKeyguardIconOverflowContainer.setOnClickListener(mOverflowClickListener);
        mStackScroller.setOverflowContainer(mKeyguardIconOverflowContainer);

        SpeedBumpView speedBump = (SpeedBumpView) LayoutInflater.from(mContext).inflate(
                        R.layout.status_bar_notification_speed_bump, mStackScroller, false);
        mStackScroller.setSpeedBumpView(speedBump);
        mEmptyShadeView = (EmptyShadeView) LayoutInflater.from(mContext).inflate(
                R.layout.status_bar_no_notifications, mStackScroller, false);
        mStackScroller.setEmptyShadeView(mEmptyShadeView);
        //下拉清除鍵
        mDismissView = (DismissView) LayoutInflater.from(mContext).inflate(
                R.layout.status_bar_notification_dismiss_all, mStackScroller, false);
        mDismissView.setOnButtonClickListener(new View.OnClickListener() {
            @Override
            public void onClick(View v) {
                MetricsLogger.action(mContext, MetricsLogger.ACTION_DISMISS_ALL_NOTES);
                clearAllNotifications();
            }
        });
        mStackScroller.setDismissView(mDismissView);
        mExpandedContents = mStackScroller;

        mBackdrop = (BackDropView) mStatusBarWindow.findViewById(R.id.backdrop);
        mBackdropFront = (ImageView) mBackdrop.findViewById(R.id.backdrop_front);
        mBackdropBack = (ImageView) mBackdrop.findViewById(R.id.backdrop_back);

        ScrimView scrimBehind = (ScrimView) mStatusBarWindow.findViewById(R.id.scrim_behind);
        ScrimView scrimInFront = (ScrimView) mStatusBarWindow.findViewById(R.id.scrim_in_front);
        View headsUpScrim = mStatusBarWindow.findViewById(R.id.heads_up_scrim);
        mScrimController = new ScrimController(scrimBehind, scrimInFront, headsUpScrim,
                mScrimSrcModeEnabled);
        mHeadsUpManager.addListener(mScrimController);
        mStackScroller.setScrimController(mScrimController);
        mScrimController.setBackDropView(mBackdrop);
        mStatusBarView.setScrimController(mScrimController);
        mDozeScrimController = new DozeScrimController(mScrimController, context);

        mHeader = (StatusBarHeaderView) mStatusBarWindow.findViewById(R.id.header);
        mHeader.setActivityStarter(this);
        //鎖屏相關
        mKeyguardStatusBar = (KeyguardStatusBarView) mStatusBarWindow.findViewById(R.id.keyguard_header);
        mKeyguardStatusView = mStatusBarWindow.findViewById(R.id.keyguard_status_view);
        mKeyguardBottomArea =
                (KeyguardBottomAreaView) mStatusBarWindow.findViewById(R.id.keyguard_bottom_area);
        mKeyguardBottomArea.setActivityStarter(this);
        mKeyguardBottomArea.setAssistManager(mAssistManager);
        mKeyguardIndicationController = new KeyguardIndicationController(mContext,
                (KeyguardIndicationTextView) mStatusBarWindow.findViewById(
                        R.id.keyguard_indication_text),
                mKeyguardBottomArea.getLockIcon());
        mKeyguardBottomArea.setKeyguardIndicationController(mKeyguardIndicationController);

        // set the inital view visibility
        setAreThereNotifications();
        //主要是控制一些系統圖標,第三方圖標等的顯示和更新
        mIconController = new StatusBarIconController(
                mContext, mStatusBarView, mKeyguardStatusBar, this);

        // Background thread for any controllers that need it.
        mHandlerThread = new HandlerThread(TAG, Process.THREAD_PRIORITY_BACKGROUND);
        mHandlerThread.start();

        // Other icons
        //位置控制
        mLocationController = new LocationControllerImpl(mContext,
                mHandlerThread.getLooper()); // will post a notification
        //電池
        mBatteryController = new BatteryController(mContext);
        mBatteryController.addStateChangedCallback(new BatteryStateChangeCallback() {
            @Override
            public void onPowerSaveChanged() {
                mHandler.post(mCheckBarModes);
                if (mDozeServiceHost != null) {
                    mDozeServiceHost.firePowerSaveChanged(mBatteryController.isPowerSave());
                }
            }
            @Override
            public void onBatteryLevelChanged(int level, boolean pluggedIn, boolean charging) {
                // noop
            }
        });
        //網絡
        mNetworkController = new NetworkControllerImpl(mContext, mHandlerThread.getLooper());
        //熱點
        mHotspotController = new HotspotControllerImpl(mContext);
        //藍牙
        mBluetoothController = new BluetoothControllerImpl(mContext, mHandlerThread.getLooper());
        mSecurityController = new SecurityControllerImpl(mContext);
        /// M: add extra tiles @{
        // add HotKnot in quicksetting
        if (SIMHelper.isMtkHotKnotSupport()) {
            Log.d(TAG, "makeStatusBarView : HotKnotControllerImpl");
            mHotKnotController = new HotKnotControllerImpl(mContext);
        } else {
            mHotKnotController = null;
        }

        // add AudioProfile in quicksetting
        if (SIMHelper.isMtkAudioProfilesSupport()) {
            Log.d(TAG, "makeStatusBarView : AudioProfileControllerImpl");
            mAudioProfileController = new AudioProfileControllerImpl(mContext);
        } else {
            mAudioProfileController = null;
        }

        SIMHelper.setContext(mContext);
        // /@}

        if (mContext.getResources().getBoolean(R.bool.config_showRotationLock)) {
            mRotationLockController = new RotationLockControllerImpl(mContext);
        }
        mUserInfoController = new UserInfoController(mContext);
        mVolumeComponent = getComponent(VolumeComponent.class);
        if (mVolumeComponent != null) {
            mZenModeController = mVolumeComponent.getZenController();
        }
        Log.d(TAG, "makeStatusBarView : CastControllerImpl +");
        mCastController = new CastControllerImpl(mContext);
        Log.d(TAG, "makeStatusBarView : CastControllerImpl -");
        final SignalClusterView signalCluster =
                (SignalClusterView) mStatusBarView.findViewById(R.id.signal_cluster);
        final SignalClusterView signalClusterKeyguard =
                (SignalClusterView) mKeyguardStatusBar.findViewById(R.id.signal_cluster);
        final SignalClusterView signalClusterQs =
                (SignalClusterView) mHeader.findViewById(R.id.signal_cluster);
        mNetworkController.addSignalCallback(signalCluster);
        mNetworkController.addSignalCallback(signalClusterKeyguard);
        mNetworkController.addSignalCallback(signalClusterQs);
        signalCluster.setSecurityController(mSecurityController);
        signalCluster.setNetworkController(mNetworkController);
        signalClusterKeyguard.setSecurityController(mSecurityController);
        signalClusterKeyguard.setNetworkController(mNetworkController);
        signalClusterQs.setSecurityController(mSecurityController);
        signalClusterQs.setNetworkController(mNetworkController);
        final boolean isAPhone = mNetworkController.hasVoiceCallingFeature();
        if (isAPhone) {
            mNetworkController.addEmergencyListener(mHeader);
        }

        /// M: Support "Operator plugin - Customize Carrier Label for PLMN" @{
        mStatusBarPlmnPlugin = PluginFactory.getStatusBarPlmnPlugin(context);
        if (supportCustomizeCarrierLabel()) {
            mCustomizeCarrierLabel = mStatusBarPlmnPlugin.customizeCarrierLabel(
                    mNotificationPanel, null);
        }
        /// M: Support "Operator plugin - Customize Carrier Label for PLMN" @}
        //手電筒
        mFlashlightController = new FlashlightController(mContext);
        //鍵盤
        mKeyguardBottomArea.setFlashlightController(mFlashlightController);
        mKeyguardBottomArea.setPhoneStatusBar(this);
        mKeyguardBottomArea.setUserSetupComplete(mUserSetup);
        mAccessibilityController = new AccessibilityController(mContext);
        mKeyguardBottomArea.setAccessibilityController(mAccessibilityController);
        mNextAlarmController = new NextAlarmController(mContext);
        mKeyguardMonitor = new KeyguardMonitor(mContext);
        if (UserSwitcherController.isUserSwitcherAvailable(UserManager.get(mContext))) {
            mUserSwitcherController = new UserSwitcherController(mContext, mKeyguardMonitor,
                    mHandler);
        }
        mKeyguardUserSwitcher = new KeyguardUserSwitcher(mContext,
                (ViewStub) mStatusBarWindow.findViewById(R.id.keyguard_user_switcher),
                mKeyguardStatusBar, mNotificationPanel, mUserSwitcherController);


        // Set up the quick settings tile panel
        mQSPanel = (QSPanel) mStatusBarWindow.findViewById(R.id.quick_settings_panel);
        if (mQSPanel != null) {
            final QSTileHost qsh = new QSTileHost(mContext, this,
                    mBluetoothController, mLocationController, mRotationLockController,
                    mNetworkController, mZenModeController, mHotspotController,
                    mCastController, mFlashlightController,
                    mUserSwitcherController, mKeyguardMonitor,
                    mSecurityController,
                    /// M: add HotKnot in quicksetting
                    mHotKnotController,
                    /// M: add AudioProfile in quicksetting
                    mAudioProfileController
            );
            mQSPanel.setHost(qsh);
            mQSPanel.setTiles(qsh.getTiles());
            mBrightnessMirrorController = new BrightnessMirrorController(mStatusBarWindow);
            mQSPanel.setBrightnessMirror(mBrightnessMirrorController);
            mHeader.setQSPanel(mQSPanel);
            qsh.setCallback(new QSTileHost.Callback() {
                @Override
                public void onTilesChanged() {
                    mQSPanel.setTiles(qsh.getTiles());
                }
            });
        }

        // User info. Trigger first load.
        mHeader.setUserInfoController(mUserInfoController);
        mKeyguardStatusBar.setUserInfoController(mUserInfoController);
        mKeyguardStatusBar.setUserSwitcherController(mUserSwitcherController);
        mUserInfoController.reloadUserInfo();

        mHeader.setBatteryController(mBatteryController);
        ((BatteryMeterView) mStatusBarView.findViewById(R.id.battery)).setBatteryController(
                mBatteryController);
        mKeyguardStatusBar.setBatteryController(mBatteryController);
        mHeader.setNextAlarmController(mNextAlarmController);

        PowerManager pm = (PowerManager) mContext.getSystemService(Context.POWER_SERVICE);
        mBroadcastReceiver.onReceive(mContext,
                new Intent(pm.isScreenOn() ? Intent.ACTION_SCREEN_ON : Intent.ACTION_SCREEN_OFF));


        // receive broadcasts
        //注冊系統廣播
        IntentFilter filter = new IntentFilter();
        filter.addAction(Intent.ACTION_CLOSE_SYSTEM_DIALOGS);
        filter.addAction(Intent.ACTION_SCREEN_OFF);
        filter.addAction(Intent.ACTION_SCREEN_ON);
        context.registerReceiverAsUser(mBroadcastReceiver, UserHandle.ALL, filter, null, null);

        IntentFilter demoFilter = new IntentFilter();
        if (DEBUG_MEDIA_FAKE_ARTWORK) {
            demoFilter.addAction(ACTION_FAKE_ARTWORK);
        }
        demoFilter.addAction(ACTION_DEMO);
        context.registerReceiverAsUser(mDemoReceiver, UserHandle.ALL, demoFilter,
                android.Manifest.permission.DUMP, null);

        // listen for USER_SETUP_COMPLETE setting (per-user)
        resetUserSetupObserver();

        // disable profiling bars, since they overlap and clutter the output on app windows
        ThreadedRenderer.overrideProperty("disableProfileBars", "true");

        // Private API call to make the shadows look better for Recents
        ThreadedRenderer.overrideProperty("ambientRatio", String.valueOf(1.5f));
        mStatusBarPlmnPlugin.addPlmn((LinearLayout)mStatusBarView.
                                     findViewById(R.id.status_bar_contents), mContext);

        return mStatusBarView;
    }
    ...
因為這塊涉及的太廣,所以接下來只分析StatusBar相關的一塊,以導航欄為例進行講解,我們重新回到PhoneStatusBar的start方法中,找到導航欄這塊,發現它是調用addNavigationBar函數,所以我們查看這個函數:
    ...
    // For small-screen devices (read: phones) that lack hardware navigation buttons
    private void addNavigationBar() {
        if (DEBUG) Log.v(TAG, "addNavigationBar: about to add " + mNavigationBarView);
        //1.判斷mNavigationBarView是否為空,這個視圖有上面分析的makeStatusBarView方法中進行創建
        if (mNavigationBarView == null) return;
        //2.加載導航欄的具體顯示(導航欄的顯示由橫向顯示和豎向顯示,後面分析)
        prepareNavigationBarView();
        //3.根據LayoutParams,加載導航欄到窗體中
        mWindowManager.addView(mNavigationBarView, getNavigationBarLayoutParams());
    }
    ...
        private void prepareNavigationBarView() {
        mNavigationBarView.reorient();
        //設置導航欄三個圖標的點擊事件
        mNavigationBarView.getRecentsButton().setOnClickListener(mRecentsClickListener);
        mNavigationBarView.getRecentsButton().setOnTouchListener(mRecentsPreloadOnTouchListener);
        mNavigationBarView.getRecentsButton().setLongClickable(true);
        mNavigationBarView.getRecentsButton().setOnLongClickListener(mLongPressBackRecentsListener);
        mNavigationBarView.getBackButton().setLongClickable(true);
        mNavigationBarView.getBackButton().setOnLongClickListener(mLongPressBackRecentsListener);
        mNavigationBarView.getHomeButton().setOnTouchListener(mHomeActionListener);
        mNavigationBarView.getHomeButton().setOnLongClickListener(mLongPressHomeListener);
        mAssistManager.onConfigurationChanged();
        /// M: add for multi window @{
        if(MultiWindowProxy.isSupported()){
            mNavigationBarView.getFloatButton().setOnClickListener(mFloatClickListener);
            if(mIsSplitModeEnable){
                mNavigationBarView.getFloatModeButton().setOnClickListener(mFloatModeClickListener);
                mNavigationBarView.getSplitModeButton().setOnClickListener(mSplitModeClickListener);
            }
            MultiWindowProxy.getInstance().setSystemUiCallback(new MWSystemUiCallback());
        }
        /// @}
    }
我們根據上面的注釋來進行分析,主要內容有

1. 導航欄布局的創建

2. 導航欄布局分析及加載

3. 導航欄LayoutParams分析
導航欄布局的創建在PhoneStatusBar的makeStatusBarView方法中,我們可以看到導航欄是怎麼創建的
    ...
    protected PhoneStatusBarView makeStatusBarView() {
        ...
        ...

        try {
            //是否顯示導航欄
            boolean showNav = mWindowManagerService.hasNavigationBar();
             Log.v(TAG, "hasNavigationBar=" + showNav);
            if (showNav) {
                /// M: add for multi window @{
                //加載導航欄布局
                int layoutId = R.layout.navigation_bar;
                //是否支持多窗口
                if(MultiWindowProxy.isSupported()) {
                    layoutId = R.layout.navigation_bar_float_window;
                }
                mNavigationBarView = (NavigationBarView) View.inflate(context,
                        /*R.layout.navigation_bar*/layoutId, null);
                /// @}
                mNavigationBarView.setDisabledFlags(mDisabled1);
                mNavigationBarView.setBar(this);
                mNavigationBarView.setOnVerticalChangedListener(
                        new NavigationBarView.OnVerticalChangedListener() {
                    @Override
                    public void onVerticalChanged(boolean isVertical) {
                        if (mAssistManager != null) {
                            mAssistManager.onConfigurationChanged();
                        }
                        mNotificationPanel.setQsScrimEnabled(!isVertical);
                    }
                });
                //設置導航欄觸摸事件
                mNavigationBarView.setOnTouchListener(new View.OnTouchListener() {
                    @Override
                    public boolean onTouch(View v, MotionEvent event) {
                        checkUserAutohide(v, event);
                        return false;
                    }});
            }
        } catch (RemoteException ex) {
            // no window manager? good luck with that
        }

        ...
        ...
    }
    ...
首先由mWindowManagerService的hasNavigationBar來決定是否顯示導航欄,同時通過加載navigation_bar(多窗口加載navigation_bar_float_window)布局來顯示導航欄,我們來查看hasNavigationBar方法,因為mWidnwoManagerService是IWindowManagerService由PhoneWindowManager進行調用:

frameworks\base\service\core\java\com\android\server\PhoneWindowManager.java
PhoneWindowManager
    ...
    // Use this instead of checking config_showNavigationBar so that it can be consistently
    // overridden by qemu.hw.mainkeys in the emulator.
    @Override
    public boolean hasNavigationBar() {
        return mHasNavigationBar;
    }
    ...
    mHasNavigationBar = res.getBoolean(com.android.internal.R.bool.config_showNavigationBar);
    // Allow a system property to override this. Used by the emulator.
    // See also hasNavigationBar().
    String navBarOverride = SystemProperties.get("qemu.hw.mainkeys");
    if ("1".equals(navBarOverride)) {
         mHasNavigationBar = false;
     } else if ("0".equals(navBarOverride)) {
         mHasNavigationBar = true;
    }
    ...
從framework\base\core\res\res\valuse\config.xml中獲取mHashNavigationBar的值
ture
然後從系統配置位置中取qemu.hw.mainkeys的值,所以這裡給我們提供了一個隱藏狀態欄的新思路,除了在createAndAddWindows中注釋掉addNavigationBar函數外,我們也可以通過修改framework下的config.xml的config_showNavigationBar的值和修改系統配置文件的值來達到隱藏狀態欄的目的
導航欄布局分析及加載
    ...
        private void prepareNavigationBarView() {
        mNavigationBarView.reorient();
        //設置導航欄三個圖標的點擊事件
        mNavigationBarView.getRecentsButton().setOnClickListener(mRecentsClickListener);
        mNavigationBarView.getRecentsButton().setOnTouchListener(mRecentsPreloadOnTouchListener);
        mNavigationBarView.getRecentsButton().setLongClickable(true);
        mNavigationBarView.getRecentsButton().setOnLongClickListener(mLongPressBackRecentsListener);
        mNavigationBarView.getBackButton().setLongClickable(true);
        mNavigationBarView.getBackButton().setOnLongClickListener(mLongPressBackRecentsListener);
        mNavigationBarView.getHomeButton().setOnTouchListener(mHomeActionListener);
        mNavigationBarView.getHomeButton().setOnLongClickListener(mLongPressHomeListener);
        mAssistManager.onConfigurationChanged();
        /// M: add for multi window @{
        if(MultiWindowProxy.isSupported()){
            mNavigationBarView.getFloatButton().setOnClickListener(mFloatClickListener);
            if(mIsSplitModeEnable){
                mNavigationBarView.getFloatModeButton().setOnClickListener(mFloatModeClickListener);
                mNavigationBarView.getSplitModeButton().setOnClickListener(mSplitModeClickListener);
            }
            MultiWindowProxy.getInstance().setSystemUiCallback(new MWSystemUiCallback());
        }
        /// @}
    }
    ...
導航欄布局的確切顯示在prepareNavigationBarView中的mNavigationBarView.reorient();來決定,我們查看reorient方法
reorient
    ...
    public void reorient() {
        //獲取屏幕方向
        final int rot = mDisplay.getRotation();
        //隱藏導航欄布局
        for (int i=0; i<4; i++) {
            mRotatedViews[i].setVisibility(View.GONE);
        }
        //根據屏幕方向顯示導航欄布局
        mCurrentView = mRotatedViews[rot];
        mCurrentView.setVisibility(View.VISIBLE);
        setLayoutTransitionsEnabled(mLayoutTransitionsEnabled);

        getImeSwitchButton().setOnClickListener(mImeSwitcherClickListener);

        mDeadZone = (DeadZone) mCurrentView.findViewById(R.id.deadzone);

        // force the low profile & disabled states into compliance
        mBarTransitions.init();
        setDisabledFlags(mDisabledFlags, true /* force */);
        setMenuVisibility(mShowMenu, true /* force */);

        if (DEBUG) {
            Log.d(TAG, "reorient(): rot=" + mDisplay.getRotation());
        }

        updateTaskSwitchHelper();

        setNavigationIconHints(mNavigationIconHints, true);
    }
    ...
導航欄的顯示由屏幕的方向來決定,而導航欄有兩種不同的顯示方式,橫向顯示和豎向顯示,我們可以從mRotatedViews進行追查到
    ...
    View[] mRotatedViews = new View[4];
    ...
    @Override
    public void onFinishInflate() {
        //屏幕方位0和180方向顯示的導航欄為rot0
        mRotatedViews[Surface.ROTATION_0] =
        mRotatedViews[Surface.ROTATION_180] = findViewById(R.id.rot0);
        //屏幕訪問90和270顯示的導航欄為rot90
        mRotatedViews[Surface.ROTATION_90] = findViewById(R.id.rot90);

        mRotatedViews[Surface.ROTATION_270] = mRotatedViews[Surface.ROTATION_90];

        //mCurrentView = mRotatedViews[Surface.ROTATION_0];
        mCurrentView = mRotatedViews[Surface.ROTATION_90];
        getImeSwitchButton().setOnClickListener(mImeSwitcherClickListener);

        updateRTLOrder();
    }
    ...
布局加載完成後,會回調onFinishInflate方法,在這方法中對屏幕的幾個方向初始化4個導航欄view,其中0和180為橫向布局,90和270為縱向布局,我們可以從導航欄(NavigationBarView)布局文件中可以看出

res\layout\navigation_bar.xml和res\layout\navigation_bar
    <framelayout android:id="@+id/rot0" android:layout_height="match_parent" android:layout_width="match_parent">


            <framelayout android:layout_height="match_parent" android:layout_weight="0" android:layout_width="@dimen/navigation_side_padding">


            </framelayout>


    </framelayout>

    <framelayout android:id="@+id/rot90" android:layout_height="match_parent" android:layout_width="match_parent" android:paddingtop="0dp" android:visibility="gone">


            <framelayout android:layout_height="@dimen/navigation_side_padding" android:layout_weight="0" android:layout_width="match_parent">


            </framelayout>


    </framelayout>
所以說,當我們的需求為0或者90度方向,要想導航欄縱向顯示,我們只需要修改成導航欄縱向布局即可,當然我們也可以按需求來隱藏某些導航欄按鍵(布局中設置某些控件為gone)
    @Override
    public void onFinishInflate() {
        mRotatedViews[Surface.ROTATION_0] =
        mRotatedViews[Surface.ROTATION_180] = findViewById(R.id.rot0);

        mRotatedViews[Surface.ROTATION_90] = findViewById(R.id.rot90);

        mRotatedViews[Surface.ROTATION_270] = mRotatedViews[Surface.ROTATION_90];

        //mCurrentView = mRotatedViews[Surface.ROTATION_0];
        //顯示縱向的導航欄
        mCurrentView = mRotatedViews[Surface.ROTATION_90];
        getImeSwitchButton().setOnClickListener(mImeSwitcherClickListener);

        updateRTLOrder();
    }
導航欄LayoutParams分析我們回到PhoneStatusBar的addNavigationBar繼續分析最後一個導航欄的LayoutParameters,它決定了導航欄在窗體上的顯示位置
    private WindowManager.LayoutParams getNavigationBarLayoutParams() {
        //充滿父布局
        WindowManager.LayoutParams lp = new WindowManager.LayoutParams(
                LayoutParams.MATCH_PARENT, LayoutParams.MATCH_PARENT,
                WindowManager.LayoutParams.TYPE_NAVIGATION_BAR,//導航欄
                    0
                    | WindowManager.LayoutParams.FLAG_TOUCHABLE_WHEN_WAKING//當手機處於睡眠狀態時,如果屏幕被按下,那麼該window將第一個收到到事件
                    | WindowManager.LayoutParams.FLAG_NOT_FOCUSABLE//不獲取焦點
                    | WindowManager.LayoutParams.FLAG_NOT_TOUCH_MODAL//即使在該window在可獲得焦點情況下,仍然把該window之外的任何event發送到該window之後的其他window
                    | WindowManager.LayoutParams.FLAG_WATCH_OUTSIDE_TOUCH//不接受事件,轉發到其他window
                    | WindowManager.LayoutParams.FLAG_SPLIT_TOUCH,//當該window在可以接受觸摸屏情況下,讓因在該window之外,而發送到後面的window的觸摸屏可以支持split touch.
                PixelFormat.TRANSLUCENT);
        // this will allow the navbar to run in an overlay on devices that support this
        if (ActivityManager.isHighEndGfx()) {
            lp.flags |= WindowManager.LayoutParams.FLAG_HARDWARE_ACCELERATED;//硬件加速
        }
        //lp.gravity = Gravity.RIGHT;
        lp.setTitle("NavigationBar");
        lp.windowAnimations = 0;
        return lp;
    }
上面的LayoutParames決定了導航欄在窗體的大小(受父布局影響)和顯示的位置效果,當我們的需求如果要把導航欄顯示在屏幕的右邊時,我們可以在上面代碼中加上下面一句
lp.gravity = Gravity.RIGHT;
SystemUI包含了太多內容,本篇只是分析了SystemUI的加載流程,同時初步的分析了StatusBar中一個小模塊NavigationBar,後續會針對SystemUI的其他模塊進行分析。
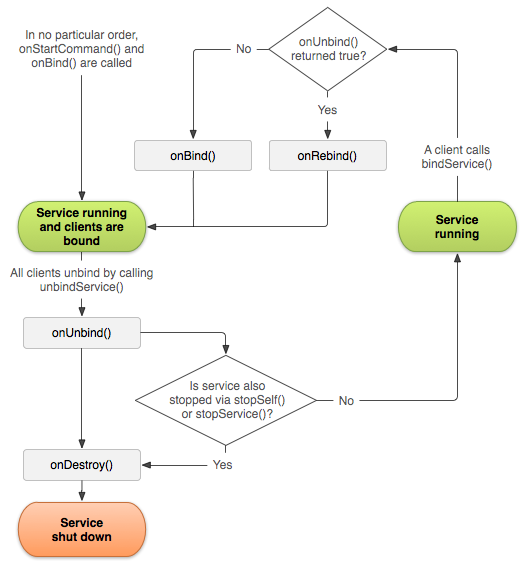 Android官方文檔之Bound Services
綁定式Service在CS結構中扮演著Server的角色。綁定式Service允許其他組件(如Activity)綁定該Service、發送請求、接收響應、甚至IPC通信(
 Android UI編程之自定義控件初步——ImageButton
概述: 我想我們在使用一些App的時候,應該不會出現一些“裸控件”的吧。除非是一些系統中的軟件,那是為了保持風格的一致性,做出的一些權衡。我這裡並
 Android消息處理機制深度解析筆記
前言很多程序猿(媛)都對消息處理機制做過分析,大家都基本了解了MessageQueue、Handler、Looper之間相互之間怎麼協同工作,但是具體到消息是如何傳遞,取
 android代碼審查工具---lint工具的使用
轉載請著名出處:http://blog.csdn.net/lijunhuayc 搞了這麼久android我居然不知道lint工具是干啥的,雖然每次在eclip