編輯:關於Android編程
前面我們分析了Activity、Dialog、PopupWindow的加載繪制流程,相信大家對整個Android系統中的窗口繪制流程已經有了一個比較清晰的認識了,這裡最後再給大家介紹一下Toast的加載繪制流程。
其實Toast窗口和Activity、Dialog、PopupWindow有一個不太一樣的地方,就是Toast窗口是屬於系統級別的窗口,他和輸入框等類似的,不屬於某一個應用,即不屬於某一個進程,所以自然而然的,一旦涉及到Toast的加載繪制流程就會涉及到進程間通訊,看過前面系列文章的同學應該知道,Android間的進程間通訊采用的是Android特有的Binder機制,所以Toast的加載繪制流程也會涉及到Binder進程間通訊。
Toast的顯示流程其實內部還是通過Window的窗口機制實現加載繪制的,只不過由於是系統級別的窗口,在顯示過程中涉及到了進程間通訊等機制。
下面我們來具體看一下Toast窗口的簡單使用。
Toast.makeText(context, msg, Toast.LENGTH_SHORT).show();上面的代碼是Toast的典型使用方式,通過makeText方法創建出一個Toast對象,然後調用show方法將Toast窗口顯示出來。
下面我們來看一下makeText方法的具體實現:
public static Toast makeText(Context context, CharSequence text, @Duration int duration) {
        Toast result = new Toast(context);

        LayoutInflater inflate = (LayoutInflater)
                context.getSystemService(Context.LAYOUT_INFLATER_SERVICE);
        View v = inflate.inflate(com.android.internal.R.layout.transient_notification, null);
        TextView tv = (TextView)v.findViewById(com.android.internal.R.id.message);
        tv.setText(text);

        result.mNextView = v;
        result.mDuration = duration;

        return result;
    }
方法體不是很長,在makeText方法中,我們首先通過Toast對象的構造方法,創建了一個新的Toast對象,這樣我們就先來看一下Toast的構造方法做了哪些事。
public Toast(Context context) {
        mContext = context;
        mTN = new TN();
        mTN.mY = context.getResources().getDimensionPixelSize(
                com.android.internal.R.dimen.toast_y_offset);
        mTN.mGravity = context.getResources().getInteger(
                com.android.internal.R.integer.config_toastDefaultGravity);
    }
可以看到這裡初始化了Toast對象的成員變量mContext和mTN,這裡的mContext是一個Context類型的成員變量,那mTN是什麼東西呢?
private static class TN extends ITransientNotification.Stub從類的源碼定義來看,我們知道TN是一個繼承自ITransientNotification.Stub的類,這裡我們暫時只用知道他的繼承關系就好了,知道其是一個Binder對象,可以用於進程間通訊,然後回到我們的makeText方法,在調用了Toast的構造方法創建了Toast對象之後,我們又通過context.getSystemService方法獲取到LayoutInflater,然後通過調用LayoutInflater的inflate方法加載到了Toast的布局文件:
LayoutInflater inflate = (LayoutInflater)
                context.getSystemService(Context.LAYOUT_INFLATER_SERVICE);
        View v = inflate.inflate(com.android.internal.R.layout.transient_notification, null);
這裡我們可以看一下布局文件的具體代碼:
可以發現Toast加載的布局文件只有一個LinearLayout布局,並且只包含一個TextView組件。。。。
然後我們通過調用:
TextView tv = (TextView)v.findViewById(com.android.internal.R.id.message);
        tv.setText(text);

        result.mNextView = v;
        result.mDuration = duration;

        return result;
初始化了布局文件,Toast的mNextView和mDuration成員變量並返回Toast類型的result對象。這樣我們的Toast對象就構造完成了。
然後我們回到我們的Toast.show方法,調用完這個方法之後就准備開始顯示Toast窗口了,我們來具體看一下show方法的具體實現:
public void show() {
        if (mNextView == null) {
            throw new RuntimeException("setView must have been called");
        }

        INotificationManager service = getService();
        String pkg = mContext.getOpPackageName();
        TN tn = mTN;
        tn.mNextView = mNextView;

        try {
            service.enqueueToast(pkg, tn, mDuration);
        } catch (RemoteException e) {
            // Empty
        }
    }
首先判斷我們的mNextView是否為空,為空的話,顯示邏輯就無法進行了,所以這裡判斷如果mNextView為空的話,就直接拋出異常,不在往下執行。。。。
然後我們執行了:
INotificationManager service = getService();這裡的INotificationManager是服務器端NotificationManagerService的Binder客戶端,我們可以看一下getService方法的實現方式:
static private INotificationManager getService() {
        if (sService != null) {
            return sService;
        }
        sService = INotificationManager.Stub.asInterface(ServiceManager.getService("notification"));
        return sService;
    }
這裡獲取了INotificationManager對象,然後我們調用了service.enqueueToast方法,並傳遞了package,TN對象,duration等參數,這裡實際執行的是NotificationManagerService的內部類的INotificationManager.Stub的enqueueToast方法,而我們的NoticationManagerService是在SystemServer進程中執行的,這裡的底層其實是通過Binder機制傳輸數據的,具體的Binder機制相關知識可自行學習。。
好吧,我們在看一下INotificationManager.Stub的enqueueToast方法的具體實現:
@Override
        public void enqueueToast(String pkg, ITransientNotification callback, int duration)
        {
            ...
            synchronized (mToastQueue) {
                int callingPid = Binder.getCallingPid();
                long callingId = Binder.clearCallingIdentity();
                try {
                    ToastRecord record;
                    int index = indexOfToastLocked(pkg, callback);
                    // If it's already in the queue, we update it in place, we don't
                    // move it to the end of the queue.
                    if (index >= 0) {
                        record = mToastQueue.get(index);
                        record.update(duration);
                    } else {
                        // Limit the number of toasts that any given package except the android
                        // package can enqueue.  Prevents DOS attacks and deals with leaks.
                        if (!isSystemToast) {
                            int count = 0;
                            final int N = mToastQueue.size();
                            for (int i=0; i= MAX_PACKAGE_NOTIFICATIONS) {
                                         Slog.e(TAG, "Package has already posted " + count
                                                + " toasts. Not showing more. Package=" + pkg);
                                         return;
                                     }
                                 }
                            }
                        }

                        record = new ToastRecord(callingPid, pkg, callback, duration);
                        mToastQueue.add(record);
                        index = mToastQueue.size() - 1;
                        keepProcessAliveLocked(callingPid);
                    }
                    // If it's at index 0, it's the current toast.  It doesn't matter if it's
                    // new or just been updated.  Call back and tell it to show itself.
                    // If the callback fails, this will remove it from the list, so don't
                    // assume that it's valid after this.
                    if (index == 0) {
                        showNextToastLocked();
                    }
                } finally {
                    Binder.restoreCallingIdentity(callingId);
                }
            }
        }
可以發現我們首先將我們的ToastRecord(Toast對象在server端的對象)保存到一個List列表mToastQueue中,然後調用了showNextToastLocked方法,這樣我們在看一下showNextToastLocked方法的具體實現。
void showNextToastLocked() {
        ToastRecord record = mToastQueue.get(0);
        while (record != null) {
            if (DBG) Slog.d(TAG, "Show pkg=" + record.pkg + " callback=" + record.callback);
            try {
                record.callback.show();
                scheduleTimeoutLocked(record);
                return;
            } catch (RemoteException e) {
                Slog.w(TAG, "Object died trying to show notification " + record.callback
                        + " in package " + record.pkg);
                // remove it from the list and let the process die
                int index = mToastQueue.indexOf(record);
                if (index >= 0) {
                    mToastQueue.remove(index);
                }
                keepProcessAliveLocked(record.pid);
                if (mToastQueue.size() > 0) {
                    record = mToastQueue.get(0);
                } else {
                    record = null;
                }
            }
        }
    }
這裡主要執行了record.callback.show方法,而這裡的callback對象就是我們創建Toast對象的時候傳遞的TN對象,顯然的,這了的show方法就是我們的Toast內部類TN的show方法,然後我們調用了scheduleTimeoutLocked方法,這裡先看一下scheduleTimeoutLocked方法的實現。
private void scheduleTimeoutLocked(ToastRecord r)
    {
        mHandler.removeCallbacksAndMessages(r);
        Message m = Message.obtain(mHandler, MESSAGE_TIMEOUT, r);
        long delay = r.duration == Toast.LENGTH_LONG ? LONG_DELAY : SHORT_DELAY;
        mHandler.sendMessageDelayed(m, delay);
    }
可以發現這裡發送了一個異步消息,並且這裡的異步消息是在duration時間之後發送的,也就是說我們在Toast端傳遞的duration參數就是這裡的message消息delay發送的時間,而我們發送MESSAGE_TIMEOUT異步消息之後最終會被方法handleTimeout執行。
private void handleTimeout(ToastRecord record)
    {
        if (DBG) Slog.d(TAG, "Timeout pkg=" + record.pkg + " callback=" + record.callback);
        synchronized (mToastQueue) {
            int index = indexOfToastLocked(record.pkg, record.callback);
            if (index >= 0) {
                cancelToastLocked(index);
            }
        }
    }
好吧,方法體裡面又調用了cancelToastLocked方法,然後我們看一下cancelToastLocked方法的實現:
void cancelToastLocked(int index) {
        ToastRecord record = mToastQueue.get(index);
        try {
            record.callback.hide();
        } catch (RemoteException e) {
            Slog.w(TAG, "Object died trying to hide notification " + record.callback
                    + " in package " + record.pkg);
            // don't worry about this, we're about to remove it from
            // the list anyway
        }
        mToastQueue.remove(index);
        keepProcessAliveLocked(record.pid);
        if (mToastQueue.size() > 0) {
            // Show the next one. If the callback fails, this will remove
            // it from the list, so don't assume that the list hasn't changed
            // after this point.
            showNextToastLocked();
        }
    }
好吧,這裡又是調用了record.callback.hide方法,顯然的這裡的hide方法和剛剛的show方法是相似的,都是調用的Toast內部類TN的hide方法,所以這裡可以看出Toast的顯示與隱藏操作都是在Toast內部類TN的show和hide方法實現的,然後我們調用了:
mToastQueue.remove(index);清除這個Toast對象,並繼續執行showNextToastLocked方法,直到mToastQueue的大小為0。。。
這樣關於Toast窗口的顯示與隱藏操作都是在Toast內部類TN的show方法和hide方法中,我們先看一下TN內部類的show方法的具體實現:
@Override
        public void show() {
            if (localLOGV) Log.v(TAG, "SHOW: " + this);
            mHandler.post(mShow);
        }
好吧,這裡也是發送一個異步消息,我們看一下Runnable類型的mShow的定義。
final Runnable mShow = new Runnable() {
            @Override
            public void run() {
                handleShow();
            }
        };
可以看到再其run方法中調用了handleShow方法,繼續看handleShow方法的實現邏輯。
public void handleShow() {
            if (localLOGV) Log.v(TAG, "HANDLE SHOW: " + this + " mView=" + mView
                    + " mNextView=" + mNextView);
            if (mView != mNextView) {
                // remove the old view if necessary
                handleHide();
                mView = mNextView;
                Context context = mView.getContext().getApplicationContext();
                String packageName = mView.getContext().getOpPackageName();
                if (context == null) {
                    context = mView.getContext();
                }
                mWM = (WindowManager)context.getSystemService(Context.WINDOW_SERVICE);
                // We can resolve the Gravity here by using the Locale for getting
                // the layout direction
                final Configuration config = mView.getContext().getResources().getConfiguration();
                final int gravity = Gravity.getAbsoluteGravity(mGravity, config.getLayoutDirection());
                mParams.gravity = gravity;
                if ((gravity & Gravity.HORIZONTAL_GRAVITY_MASK) == Gravity.FILL_HORIZONTAL) {
                    mParams.horizontalWeight = 1.0f;
                }
                if ((gravity & Gravity.VERTICAL_GRAVITY_MASK) == Gravity.FILL_VERTICAL) {
                    mParams.verticalWeight = 1.0f;
                }
                mParams.x = mX;
                mParams.y = mY;
                mParams.verticalMargin = mVerticalMargin;
                mParams.horizontalMargin = mHorizontalMargin;
                mParams.packageName = packageName;
                if (mView.getParent() != null) {
                    if (localLOGV) Log.v(TAG, "REMOVE! " + mView + " in " + this);
                    mWM.removeView(mView);
                }
                if (localLOGV) Log.v(TAG, "ADD! " + mView + " in " + this);
                mWM.addView(mView, mParams);
                trySendAccessibilityEvent();
            }
        }
好吧,在handleShow方法中經過一系列的初始化操作,初始化mWN對象,初始化mView對象,初始化了mParams對象,然後調用了mWM的addView方法,到了這裡大家應該就很熟悉了(不熟悉的同學可以看一下Activity的加載繪制流程等文章http://blog.csdn.net/qq_23547831/article/details/51285804
http://blog.csdn.net/qq_23547831/article/details/51284556)通過這個方法就實現了Toast窗口的顯示邏輯。
繼續看一下TN的hide方法:
@Override
        public void hide() {
            if (localLOGV) Log.v(TAG, "HIDE: " + this);
            mHandler.post(mHide);
        }
好吧,和show方法類似,也是發送了一個異步消息,這裡看一下Runnable類型的mHide對象的定義:
final Runnable mHide = new Runnable() {
            @Override
            public void run() {
                handleHide();
                // Don't do this in handleHide() because it is also invoked by handleShow()
                mNextView = null;
            }
        };
可以發現在其run方法中調用了handleHide方法,顯然的,與show方法類似,這裡的handleHide方法也是執行Toast窗口銷毀的邏輯:
public void handleHide() {
            if (localLOGV) Log.v(TAG, "HANDLE HIDE: " + this + " mView=" + mView);
            if (mView != null) {
                // note: checking parent() just to make sure the view has
                // been added...  i have seen cases where we get here when
                // the view isn't yet added, so let's try not to crash.
                if (mView.getParent() != null) {
                    if (localLOGV) Log.v(TAG, "REMOVE! " + mView + " in " + this);
                    mWM.removeView(mView);
                }

                mView = null;
            }
        }
可以發現,在方法體重調用了mWM.removeView(mView),又是熟悉的代碼,通過執行這裡的removeView方法,我們可以實現Toast窗口的銷毀流程,至此我們就分析完了Toast窗口的顯示與銷毀流程。
總結:
Toast是一個系統窗口,Toast在顯示與銷毀流程設計到進程間通訊(Binder機制實現)
Toast的show方法首先會初始化一個Toast對象,然後將內部對象TN與duration傳遞給NotificationManagerService,並在NotificationManagerService端維護一個Toast對象列表。
NotificationManagerService接收到Toast的show請求之後,保存Toast對象並回調Toast.TN的show方法具體實現Toast窗口的顯示邏輯。
Toast窗口的顯示與銷毀機制與Activity、Dialog、PopupWIndow都是類似的,都是通過WIndow對象實現的。
NotificationManagerService端在執行show方法執行會發送一個異步消息用於銷毀Toast窗口,這個異步消息會在duration時間段之後發出,這樣,在設置Toast顯示的時間就會被傳遞到NotificationManagerService端,並在這段時間之後發送異步消息銷毀Toast窗口。
 Android上傳文件到服務端並顯示進度條
最近在做上傳文件的服務,簡單看了網上的教程。結合實踐共享出代碼。由於網上的大多數沒有服務端的代碼,這可不行呀,沒服務端怎麼調試呢。Ok,先上代碼。Android 上傳比較
 Android 滑輪組件
今天開源一個時間滑輪組件,在網上有各種開源比如wheel和其它改寫,多多少少不夠實用和缺陷。 該項目地址位於:https://github.com/apple317/d
 AngularJS進階(二十八)解決AngualrJS頁面刷新導致異常顯示問題
解決AngualrJS頁面刷新導致異常顯示問題 緒 俗話說,細節決定成敗,編程亦是如此。編程過程中我們可能會不自覺的忽視一些細節問題,殊不知,這些細節
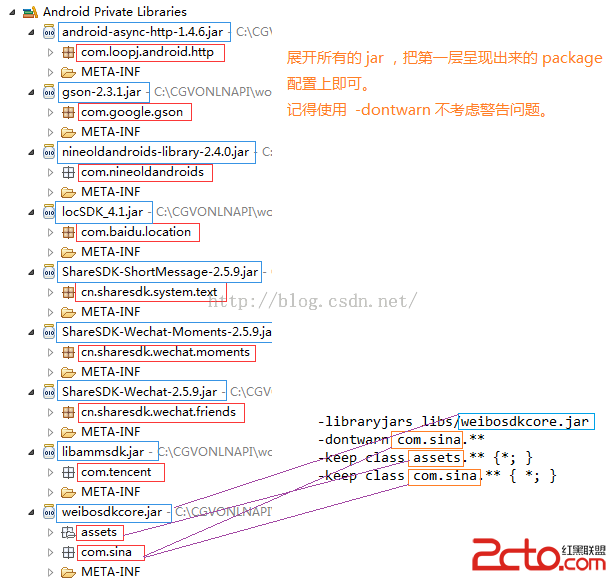 Android 項目的代碼混淆,Android proguard 使用說明
簡介 Java代碼是非常容易反編譯的。為了很好的保護Java源代碼,我們往往會對編譯好的class文件進行混淆處理。 ProGuard是一個混淆代