編輯:關於Android編程
首先AndroidAnnotations是一個比較全面的注解框架。
接下來看一下官方解釋:
Fast Android Development. Easy maintenance.
AndroidAnnotations is an Open Source framework that speeds up Android development. It takes care of the plumbing, and lets you concentrate on what’s really important. By simplifying your code, it facilitates its maintenance.
大致是這樣的:
快速Android開發,易於維護。
AndroidAnnotations是一個能讓你快速進行Android開發的開源框架。它使代碼更加精簡,讓你專注於真正重要的地方。通過簡化你的代碼,使項目更容易維護。
官網:http://androidannotations.org/
項目地址:https://github.com/excilys/androidannotations
開發環境使用Android Studio
(1)在build.gradle文件中添加依賴,如下:
apply plugin: 'com.android.application'
// AndroidAnnotations
apply plugin: 'com.neenbedankt.android-apt'
def AAVersion = '4.0.0'

android {
    ...
}

dependencies {
    compile fileTree(dir: 'libs', include: ['*.jar'])

    // AndroidAnnotations
    apt "org.androidannotations:androidannotations:$AAVersion"
    compile "org.androidannotations:androidannotations-api:$AAVersion"
}

// apt settings
apt {
    arguments {
        androidManifestFile variant.outputs[0].processResources.manifestFile
    }
}
來看一個Activity:
public class MainActivity extends Activity {
    TextView textView;
    @Override
    protected void onCreate(Bundle savedInstanceState) {
        super.onCreate(savedInstanceState);
        setContentView(R.layout.activity_main);
        textView = (TextView) findViewById(R.id.textView);
        // 初始化View
        initView();
    }
    public void initView() {
       ...
    }
}
注入後:
@EActivity(R.layout.activity_main)
public class MainActivity extends Activity {
    @ViewById(R.id.textView)
    TextView textView;
    @AfterViews
    void initView() {
        ...
    }
}
注意:需要把AndroidManifest.xml中MainActivity改成MainActivity_,這是AndroidAnnotations一個特別的地方,改完後記得build一下工程。
改為:
來看一個Activity:
public class MainActivity extends Activity implements View.OnClickListener {
    Button button;
    @Override
    protected void onCreate(Bundle savedInstanceState) {
        super.onCreate(savedInstanceState);
        setContentView(R.layout.activity_main);

        button = (Button) findViewById(R.id.button);
        button.setOnClickListener(this);
    }
    @Override
    public void onClick(View v) {
        switch(v.getId()) {
            case R.id.button:
                Intent intent = new Intent(this, TwoActivity.class);
                intent.putExtra("message", "haha!");
                startActivity(intent);
                break;
        }
    }
}
注入後 implements View.OnClickListener 這些就不需要寫了:
@EActivity(R.layout.activity_main)
public class MainActivity extends Activity {
    @ViewById(R.id.button)
    Button button;

    @Click(R.id.button)
    void buttonAction(View view) {
        TwoActivity_.intent(this).msg("haha!").start();
    }
}
我們來看一下官方的Overview:
AndroidAnnotations works in a very simple way. It automatically adds an extra compilation step that generates source code, using the standard Java Annotation Processing Tool.
What source code ? For each enhanced class, for example each @EActivity annotated activity, a subclass of this activity is generated, with the same name plus an underscore appended at the end.
For instance, the following class:
package com.some.company;
@EActivity
public class MyActivity extends Activity {
  // ...
}
Will generate the following subclass, in the same package but in another source folder:
package com.some.company;
public final class MyActivity_ extends MyActivity {
  // ...
}
This subclass adds behavior to your activity by overriding some methods (for instance onCreate()), yet delegating the calls to super.
That is the reason why you must add _ to your activity names in AndroidManifest.xml:
下來簡單翻譯一下:
AndroidAnnotations是一個非常簡單的工作方式。它會自動使用Java的APT(標准的java注釋處理工具,jdk1.6引入的特性)增加一個額外的編譯步驟生成Java源代碼。
什麼源代碼?每個增強類,對於每個標注@EActivity注釋的Activity會生成一個子類,這個子類是帶下劃線的並繼承來自於您自己的Activity。
例如,下面的類:
package com.some.company;
@EActivity
public class MyActivity extends Activity {
  // ...
}
將生成下面的子類,在同一個包中,但在另一個源文件夾中:
package com.some.company;
public final class MyActivity_ extends MyActivity {
  // ...
}
該類通過重寫一些方法(比如oncreate())添加行為活動,但委托調用父類。
這就是為什麼必須要在AndroidManifest.xml中添加XxxActivity_的原因:
 android自學之第一個HelloWorld程序
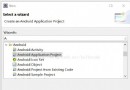
話不多說開弄:打開eclipse,左上角File=》New=》Android Application Projicet,如圖: Next,Next,Next,N
 Android:關於Animation的幾種常見的動畫
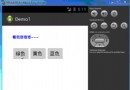
適當的添加一些動畫效果,能夠獲得更好的用戶體驗,這次講講一些常見的動畫~如:透明動畫,漸變動畫等等。先看一下運行截圖:package com.vrinux.animoti
 Android學習筆記十二之Android基礎UI三
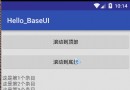
ScrollView滾動視圖ScrollView是繼承於FrameLayout,也是一個顯示容器,由於手機屏幕是有限的,當需要組件安排多組信息的時候,ScrollView
 從零開始學android小示例程序
布局文件復制代碼 代碼如下:<RelativeLayout xmlns:android=http://schemas.android.com/apk/res/and