編輯:關於Android編程
Android N 引入了一些新的API,允許應用發布具有高度可見性和交互性的通知。
Android N 擴展了現有 RemoteInput 通知 API,以支持手持式設備上的內聯回復。 此功能允許用戶從通知欄快速進行回復,無需訪問應用。
此外,Android N 還允許捆綁類似的通知並將它們顯示為一則通知。 為了實現此功能,Android N 使用現有的 NotificationCompat.Builder.setGroup() 方法。用戶可以從通知欄展開各通知,並分別對每則通知進行回復和清除等操作。
最後,Android N 還添加了一些新 API,允許您在應用的自定義通知視圖中使用系統裝飾元素。 這些 API 可幫助確保通知視圖與標准模板的展示效果相一致。
本文重點介紹您在應用中使用新通知功能時應加以考慮的一些重要變更。
利用 Android N 中的直接回復功能,用戶可以直接在通知界面內快速回復短信或更新任務列表。 在手持式設備上,可通過通知中另外附加的按鈕進行內聯回復操作。 當用戶通過鍵盤回復時,系統會將文本回復附加到您為通知操作指定的 Intent,並將 Intent 發送到手持式設備應用。需要直接回復。
要創建支持直接回復的通知操作:
創建一個可添加到通知操作的 RemoteInput.Builder 實例。 該類的構造函數接受系統用作文本輸入密鑰的字符串。 之後,手持式設備應用使用該密鑰檢索輸入的文本。
 //遠程的輸入控件構造一個

   RemoteInput remoteInput = new RemoteInput.Builder(KEY_TEXT_REPLY).setLabel("回復點什麼呢?").build();
使用 addRemoteInput() 向操作附加 RemoteInput 對象。
    // Create the reply action and add the remote input.
Intent intent = new Intent();
intent.putExtra("id", id);
intent.setClass(MainActivity.this, MainActivity.class);
PendingIntent replyPendingIntent = PendingIntent.getActivity(MainActivity.this, 0, intent, PendingIntent.FLAG_ONE_SHOT);
Notification.Action action = new Notification.Action.Builder(R.mipmap.ic_launcher, "點擊這裡回復東西", replyPendingIntent)
.addRemoteInput(remoteInput).build();
對通知應用操作並發出通知。
 // Build the notification and add the action.
final Notification newMessageNotification = new Notification.Builder(MainActivity.this).setSmallIcon(R.mipmap.ic_launcher).setContentTitle("通知欄標題")
.setContentText("通知欄內容").setPriority(Notification.PRIORITY_HIGH).setDefaults(Notification.DEFAULT_VIBRATE).addAction(action).build();
// Issue the notification.
NotificationManager notificationManager = (NotificationManager) getSystemService(NOTIFICATION_SERVICE);
notificationManager.notify(id++, newMessageNotification);
然後用戶就可以在通知欄看到我們發出的通知並且進行回復了。

從pendingintent換起來的組件我們可以通過intent這樣拿到我們的數據。然後通過相同的id發送通知更新我們的回復。
Bundle remoteInput = RemoteInput.getResultsFromIntent(intent);
String res = null;
if (remoteInput != null) {
res = (String) remoteInput.getCharSequence(KEY_TEXT_REPLY);
}
Notification repliedNotification = new Notification.Builder(this).setSmallIcon(R.mipmap.ic_launcher).setContentText(res + "回復成功").build();
// Issue the new notification.使用這個相同的ID沖掉以前的notifacation
NotificationManager notificationManager = (NotificationManager) getSystemService(NOTIFICATION_SERVICE);
int id = intent.getIntExtra("id", 1);
Log.d("EDSHENG", "onNewIntent: " + id);
notificationManager.notify(id, repliedNotification);

分組通知需要主意的有兩點一個是要構造一個分組的信息,然後對子通知進行分組。
注意:如果沒有分組普通的通知欄在N上超過4個系統就會默認的分到一個組裡面。
 //遠程的輸入控件構造一個
RemoteInput remoteInput = new RemoteInput.Builder(KEY_TEXT_REPLY).setLabel("group回復點什麼呢?").build();

// Create the reply action and add the remote input.
Intent intent = new Intent();
intent.putExtra("id", id);
intent.setClass(MainActivity.this, MainActivity.class);
PendingIntent replyPendingIntent = PendingIntent.getActivity(MainActivity.this, 0, intent, PendingIntent.FLAG_ONE_SHOT);
Notification.Action action = new Notification.Action.Builder(R.mipmap.ic_launcher, "group點擊這裡回復東西", replyPendingIntent)
.addRemoteInput(remoteInput).build();

// Build the notification and add the action.

final Notification group = new Notification.Builder(MainActivity.this).setSmallIcon(R.mipmap.ic_launcher).setContentTitle("group通知欄標題")
.setGroup("分組信息").setAutoCancel(true).setStyle(new Notification.InboxStyle()).setGroupSummary(true)
.setContentText("group通知欄內容").addAction(action).build();
Notification newMessageNotification = new Notification.Builder(MainActivity.this).setSmallIcon(R.mipmap.ic_launcher).setContentTitle("group子通知欄標題")
.setGroup("分組信息").setAutoCancel(true).setStyle(new Notification.InboxStyle())
.setContentText("group子通知欄內容").addAction(action).build();
// Issue the notification.
 NotificationManager notificationManager = (NotificationManager) getSystemService(NOTIFICATION_SERVICE);
notificationManager.notify(id++, newMessageNotification);
notificationManager.notify(1000, group);
通過構造一個分組調用的setGroupSummary方法分為一個組,然後第二個通知欄調用setGroup被分到這個組裡面,如果下面還有其他的通知過來也調用這個setGroup為同一組就可以在這個組裡面了。

ndroid N 引入了一項新的 API 來自定義通知樣式。 使用 MessageStyle 類,您可以更改在通知中顯示的多個標簽,包括會話標題、其他消息和通知的內容視圖。常用在對話當中。
以下代碼段演示了如何使用 MessageStyle 類來自定義通知樣式。
Notification notification = new Notification.Builder(MainActivity.this).setSmallIcon(R.mipmap.ic_launcher)
.setStyle(new Notification.MessagingStyle("Me")
.setConversationTitle("Team lunch")
.addMessage("Hi", System.currentTimeMillis(), null) // Pass in null for user.
.addMessage("What's up?", System.currentTimeMillis(), "Coworker")
.addMessage("Not much", System.currentTimeMillis(), null)
.addMessage("How about lunch?", System.currentTimeMillis(), "Coworker")).build();
// Issue the notification.
NotificationManager notificationManager = (NotificationManager) getSystemService(NOTIFICATION_SERVICE);
notificationManager.notify(id++, notification);

Android N上還加入了一個名字叫TileService的類,這個類主要是針對快捷通知欄的擴展,讓開發者可以自定義下拉通知欄的快捷設置圖標。

我們可以把我們應用內的一些快捷入口放置在這裡。那麼我們就來看一下如何實現我們的這個快捷通知欄吧。
我們繼承一個TileService然後實現它的onclick方法。我們在這裡是啟動我們的activity然後在收起我們的下拉通知欄。但是需要注意的是在我們的androidMainifest裡面配置。一個是收起和展開通知欄的權限
這個就是就是service的聲明。
然後這裡就是我們的實現。
public class TitleService extends TileService {
public TitleService() {
}

@Override
public void onTileAdded() {
super.onTileAdded();
}

@Override
public void onTileRemoved() {
super.onTileRemoved();
}

@Override
public void onClick() {
super.onClick();
Intent intent = new Intent();
intent.setClass(getApplicationContext(),MainActivity.class);
//intent.setComponent(new ComponentName("com.tencent.mtt", "com.tencent.mtt.external.wifi.WifiLaunchActivity"));
intent.addFlags(Intent.FLAG_ACTIVITY_NEW_TASK);
 getBaseContext().startActivity(intent);
collapseStatusBar(getBaseContext());

}

public static void collapseStatusBar(Context context)
{
try
{
Object statusBarManager = context.getSystemService("statusbar");
Method collapse;

if (Build.VERSION.SDK_INT <= 16)
{
collapse = statusBarManager.getClass().getMethod("collapse");
}
else
{
collapse = statusBarManager.getClass().getMethod("collapsePanels");
}
collapse.invoke(statusBarManager);
}
catch (Exception localException)
{
localException.printStackTrace();
}
}
}
 Android學習筆記之Button的點擊事件切換點擊圖片
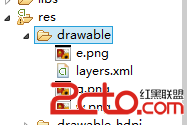
android:background=@drawable/button_selector (2)在res文件夾下創建drawable文件夾,創建一個s
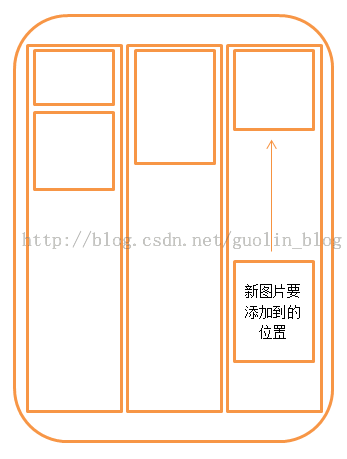 Android App中實現相冊瀑布流展示的實例分享
傳統界面的布局方式總是行列分明、坐落有序的,這種布局已是司空見慣,在不知不覺中大家都已經對它產生了審美疲勞。這個時候瀑布流布局的出現,就給人帶來了耳目一新的感覺,這種布局
 Android4.1手機開發中遇到的問題
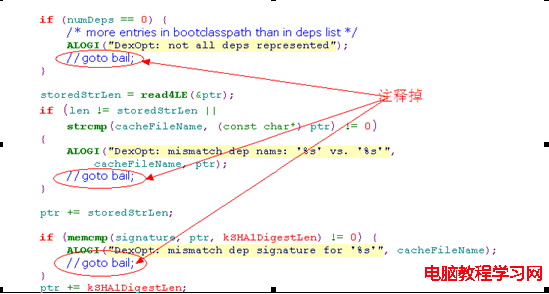
1.只push odex 到手機手機無法運行解決:修改dalvik/vm/analysis/DexPrepare.cpp中的dvmCheckOptHeade
 android界面布局之實現文本塊布局效果示例
復制代碼 代碼如下:package cn.aibow.android.layoutdemo1;import android.os.Bundle;import androi