編輯:關於Android編程
剛接觸android的時候看到項目裡面用到了ImageLoader這個圖片緩存插件,當初抱著“知其然必要知其所以然”的想法還專門下載了它的源碼沒頭蒼蠅似的毫無章法的去看了看,當然最終因為對android相關知識的了解有限而作罷。本篇也不會細致深入的對此多做說明,只是對ImageLoader的創建過程等略作梳理,方便以後的使用。
在這裡,從使用的源頭開始說起慢慢抽絲撥繭,ImagerLoader提供了如下的來加載展示圖片的方法:

通常直接會使用上圖中的前五個來,至於的五個接口十八ImageView先包裝秤ImageAware來使用。
在使用上圖中的前五個方法的時候,簡單查看源碼:
    public void displayImage(String uri, ImageView imageView, DisplayImageOptions options) {
        displayImage(uri, new ImageViewAware(imageView), options, null, null);
    }
就是把imageView封裝成ImageViewAware後傳給了如下方法:
public void displayImage(String uri, ImageAware imageAware, DisplayImageOptions options,
            ImageLoadingListener listener, ImageLoadingProgressListener progressListener)
所以直接分析上面的方法就可以!
進入displayImage這個參數最多的方法,其實上圖中的其他重載方法都會調用這個方法,該方法首先會執行checkConfiguration();方法來檢測configuration是否為null,如果為null就拋出異常。
private void checkConfiguration() {
        if (configuration == null) {
            throw new IllegalStateException(ERROR_NOT_INIT);
        }
    }
那麼這個configuration是什麼呢?其實就是ImageLoaderConfiguration,其實用過ImageLoader的都應該清楚,我們在使用ImageLoader的時候首先就要在某一個地方比如Application的onCreate方法裡面配置ImageLoaderConfiguration,用來初始化ImageLoader的一些配置參數:諸如緩存策略、可以緩存的文件數量等。
簡單的配置代碼如下:
ImageLoaderConfiguration config = new ImageLoaderConfiguration.Builder(mContext)
                .threadPoolSize(Thread.NORM_PRIORITY - 2)
                .threadPriority(Thread.NORM_PRIORITY - 2)
                .memoryCache(new WeakMemoryCache())
                .memoryCacheSize(2 * 1024 * 1024)
                .memoryCacheSizePercentage(13) // default
                .diskCache(new UnlimitedDiscCache(cacheDir)
                .build(); // 開始構建
ImageLoader.getInstance().init(config);
這明顯是一個Builder模式的應用,Builder模式的好處之一就是可以對比較復雜的對象逐步創建一個個小組件,然後由這些小組件最終完成復雜對象的初始化(構建)。上面代碼通過Builder這個類來一步步創建ImageLoaderConfiguration這個類所需的一些參數之後,最終會通過build()方法來完成ImageLoaderConfiguation對象的創建!至於構建模式的說明讀者可以參考網上的一些介紹。
其實build()方面也很簡單:
public ImageLoaderConfiguration build() {
            initEmptyFieldsWithDefaultValues();
            //構造方法裡面的this,指的就是Builder對象
            return new ImageLoaderConfiguration(this);
        }
build方法做了兩個工作:
1)通過initEmptyFieldsWithDefaultValues()方法來設置一些默認的參數(前提是如果你通過Builder構建ImageLoaderConfiguation這個對象的過程中沒有配置ImageLoaderConfiguation所需的參數),比如在Build的過程中沒有調用Builder的imageDownloader方法來配置自己的下載圖片的邏輯,那麼在initEmptyFieldsWithDefaultValues方法中就會采用ImageLoader默認的下載方式來進行圖片的下載:
    if (downloader == null) {
                downloader = DefaultConfigurationFactory.createImageDownloader(context);
            }
2)返回ImageLoaderConfiguration對象。
ImageLoaderConfiguration的構造參數也很簡單,就是把Builder對象構建的一個個組件設置給ImageLoaderConfiguration!該類的構造器是private的,切ImageLoaderConfiguration類是final的,而且它所持有的所有屬性也是final的,一旦build完畢就不可更改!
private ImageLoaderConfiguration(final Builder builder) {
        resources = builder.context.getResources();
        maxImageWidthForMemoryCache = builder.maxImageWidthForMemoryCache;
        maxImageHeightForMemoryCache = builder.maxImageHeightForMemoryCache;
        maxImageWidthForDiskCache = builder.maxImageWidthForDiskCache;
        maxImageHeightForDiskCache = builder.maxImageHeightForDiskCache;
        processorForDiskCache = builder.processorForDiskCache;
        taskExecutor = builder.taskExecutor;
        taskExecutorForCachedImages = builder.taskExecutorForCachedImages;
        threadPoolSize = builder.threadPoolSize;
        threadPriority = builder.threadPriority;
        tasksProcessingType = builder.tasksProcessingType;
        diskCache = builder.diskCache;
        memoryCache = builder.memoryCache;
        defaultDisplayImageOptions = builder.defaultDisplayImageOptions;
        downloader = builder.downloader;
        decoder = builder.decoder;

        customExecutor = builder.customExecutor;
        customExecutorForCachedImages = builder.customExecutorForCachedImages;

        networkDeniedDownloader = new NetworkDeniedImageDownloader(downloader);
        slowNetworkDownloader = new SlowNetworkImageDownloader(downloader);

    }
上面主要講了checkConfiguration()以及ImageLoaderConfiguation的構建過程。下面接著對displayImage方法的說明。接著就是我們非常熟悉的DisplayImageOptions的使用了,如果用戶自己在使用displayImage一系列重載方法的時候沒有傳自定義的DisplayImageOptions對象,那麼就會使用默認的DisplayImageOptions對象:
if (options == null) {
  //configuration為上文所說的ImageLoaderConfiguration對象。
            options = configuration.defaultDisplayImageOptions;
        }
`這個默認的DisplayImageOptions是又Builder創建的ImageLoaderConfiguration來初始化的,代碼如下:
final DisplayImageOptions defaultDisplayImageOptions;
private ImageLoaderConfiguration(final Builder builder) {
       //此處省略了若干代碼
    defaultDisplayImageOptions = builder.defaultDisplayImageOptions;
正如上面代碼所示DisplayImageOptions類裡面的defaultDisplayImageOptions引用是由builder構建過來的!你可以通過Builder類的defaultDisplayImageOptions方法來完成對defaultDisplayImageOptions的初始化工作:
public Builder defaultDisplayImageOptions(DisplayImageOptions defaultDisplayImageOptions) {
            this.defaultDisplayImageOptions = defaultDisplayImageOptions;
            return this;
        }
那麼問題來了?如果在創建Builder的時候如果沒有調用defaultDisplayImageOptions()方法設置options豈不是為null?還記得上文build()方法裡面的調用的initEmptyFieldsWithDefaultValues()麼?這個方法就是:防止在使用Builder創建ImageLoaderConfiguration的時候客戶端沒有配置一些ImageLoader需要的組件而默認用ImageLoader一些組件。比如如果你的DisplayImageOptions沒有在客戶端指定,那麼在initEmptyFieldsWithDefaultValues()裡面有如下代碼確保了defaultDisplayImageOptions不為null:
if (defaultDisplayImageOptions == null) {

                defaultDisplayImageOptions = DisplayImageOptions.createSimple();
            }
    public static DisplayImageOptions createSimple() {
        return new Builder().build();
    }
其實上面的代碼createSimple也是Builder模式的應用。到此ImageLoaderConfiguration的創建才算最終完成了,那麼如何把這個對象叫給ImageLoader來使用呢?
ImageLoader是一個單例類,提供了如下方式來完成了ImageLoader的初始化工作:
Imageloader.getInstance().init(ImageLoaderConfiguration)
既然是通過init方法來完成ImageLoader與ImageLoaderCOnfiguration的關聯,那麼就讓我們看看init方法都做了些神馬?
public synchronized void init(ImageLoaderConfiguration configuration) {
        if (configuration == null) {
            throw new IllegalArgumentException(ERROR_INIT_CONFIG_WITH_NULL);
        }
        if (this.configuration == null) {
            engine = new ImageLoaderEngine(configuration);
            this.configuration = configuration;
        } else {

        }
    }
也很簡單,就是把configuration簡單的賦予了ImageLoader.configuration引用!到此處ImageLoader初始化也完畢了,同樣ImageLoaderConfiguration也初始化完畢了!所以就可以放心的調用ImageLoader.getInstance().displayImage來完成工作了!
在這裡說一個可能不是技巧的技巧:在用DisplayImageOptions來控制頁面顯示樣式的時候如果你的應用裡面的圖片樣式:比如失敗的圖片,加載過程中的圖片等都許多相似的地方,那麼你就可以通過Builder的defaultDisplayImageOptions方法來手動指定默認的Options,個別頁面如果需要不同的風格,就可以調用displayImage的其他重載方法傳入具體通過DisplayImageOptions的Builder構建Options的對象就可以了,簡單的配置代碼如下:
private void initImageLoader(Context context) {
        DisplayImageOptions options = new     DisplayImageOptions.Builder().build();
        ImageLoaderConfiguration config = new ImageLoaderConfiguration.Builder(context).
        defaultDisplayImageOptions(options)//把上面創建的options交給ImageLoaderConfiguration
        .build();
    ImageLoader.getInstance().init(config);
    }
在前面的一系列說明之後,終於進入的Imageloader的核心工作:展示圖片!
如果圖片資源地址為null的情況:處理邏輯很簡單,代碼如下:
if (TextUtils.isEmpty(uri)) {
            engine.cancelDisplayTaskFor(imageAware);
            listener.onLoadingStarted(uri, imageAware.getWrappedView());
            if (options.shouldShowImageForEmptyUri()) {
                imageAware.setImageDrawable(options.getImageForEmptyUri(configuration.resources));
            } else {//沒有指定emptyUri的情況
                imageAware.setImageDrawable(null);
            }
            listener.onLoadingComplete(uri, imageAware.getWrappedView(), null);
            return;
        }
如果在配置DisplayImageOptions的時候通過它的Builder調用了showImageForEmptyUri方法,那麼就讓ImageView顯示showImageForEmptyUri指定的那個圖片資源,否則就神馬都不顯示 如果閱讀仔細的話,上面也提供了加載圖片的監聽listener.onLoadingStarted,listener.onLoadingComplete,你也可以調用displayImage相關重載方法傳入自己的ImageLoadingListener對象,否則ImageLoader會調用自己的默認實現。
圖片資源非null的情況,那就很簡單了,就是使用緩存的思路了:先從緩存中讀取,如果緩存存在就用緩存中的圖片資源,否則就下載新的資源並進行緩存!代碼如下:
//1.對緩存進行一些配置
         ImageSize targetSize = ImageSizeUtils.defineTargetSizeForView(imageAware, configuration.getMaxImageSize());
        String memoryCacheKey = MemoryCacheUtils.generateKey(uri, targetSize);
        engine.prepareDisplayTaskFor(imageAware, memoryCacheKey);
        //2.開始加載圖片監聽
        listener.onLoadingStarted(uri, imageAware.getWrappedView());
        //3.從內存緩存中獲取Bitmap
         Bitmap bmp = configuration.memoryCache.get(memoryCacheKey);
        if (bmp != null && !bmp.isRecycled()) {//緩存存在
            if (options.shouldPostProcess()) {//如果對DisplayImageOptions設置了BitmapProcessor

                ImageLoadingInfo imageLoadingInfo = new ImageLoadingInfo(uri, imageAware, targetSize, memoryCacheKey,
                        options, listener, progressListener, engine.getLockForUri(uri));
                //開啟一個Runnable
                ProcessAndDisplayImageTask displayTask = new ProcessAndDisplayImageTask(engine, bmp, imageLoadingInfo,
                        defineHandler(options));
                if (options.isSyncLoading()) {//同步執行顯示圖片邏輯
                    displayTask.run();
                } else {//異步執行顯示圖片邏輯
                    engine.submit(displayTask);
                }
            } else {//如果沒有配置BitmapProcessor
                //通過BitmapDisplayer來完成顯示圖片的邏輯,該Displayer如果沒指定的話就是用DefaultConfigurationFactory.createBitmapDisplayer();
                options.getDisplayer().display(bmp, imageAware, LoadedFrom.MEMORY_CACHE);
                listener.onLoadingComplete(uri, imageAware.getWrappedView(), bmp);
            }
        } else {//如果緩存不存在執行網絡加載
            if (options.shouldShowImageOnLoading()) {//添加下載過程中的圖片
                imageAware.setImageDrawable(options.getImageOnLoading(configuration.resources));
            } else if (options.isResetViewBeforeLoading()) {
                imageAware.setImageDrawable(null);
            }

            ImageLoadingInfo imageLoadingInfo = new ImageLoadingInfo(uri, imageAware, targetSize, memoryCacheKey,
                    options, listener, progressListener, engine.getLockForUri(uri));
            //初始化一個下載的Runnable
            LoadAndDisplayImageTask displayTask = new LoadAndDisplayImageTask(engine, imageLoadingInfo,
                    defineHandler(options));
            if (options.isSyncLoading()) {//同步處理下載
                displayTask.run();
            } else {//異步下載圖片
                engine.submit(displayTask);
            }
        }
上面代碼中的注釋說明了各個模塊的作用,關於詳細的內容限於篇幅以及時間太晚就另外開一篇博客進行說明。
總結一下本博客的要點:
1)ImageLoader的使用先通過Builder模式構建ImageLoaderConfiguration對象
2)通過Builder模式一步步創建DisplayImageOptions對象。
3)通過ImageLoader的init方法把ImageLoaderConfiguration對象和ImageLoader對象關聯起來,當然也使得ImageLoader也關聯了DisplayImageOptions對象
4)通過ImageLoader的displayImage重載方法,結合ImageLoaderConfiguration對象和DisplayImageOptions對象完成了對ImageView的展示圖片的功能。
簡單的用圖片表示其三者之間的關系:
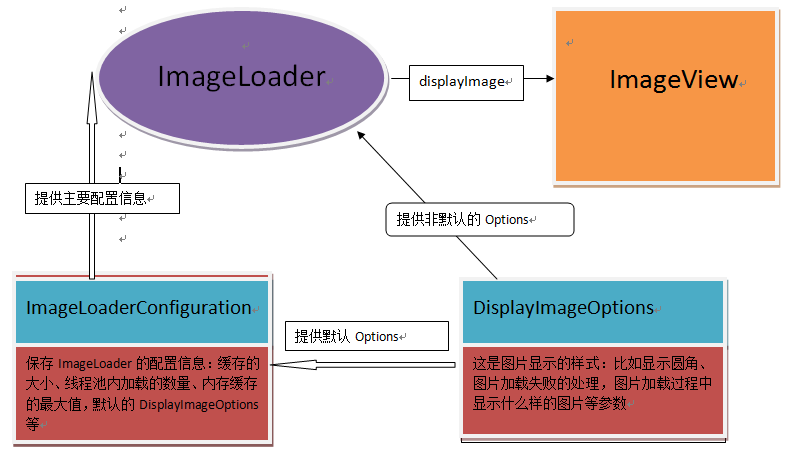
圖片畫的有點丑,不過也湊合,本篇博客到此為止,如有不當之處歡迎批評指正共同學習和提高。
 Day23-AutoCompleteTextView和Scroll
最簡單的使用xml布局文件 Activity.javaList list = new ArrayList<>();list.add("
 Android Studio下使用Android Fragment的簡單Demo(1)
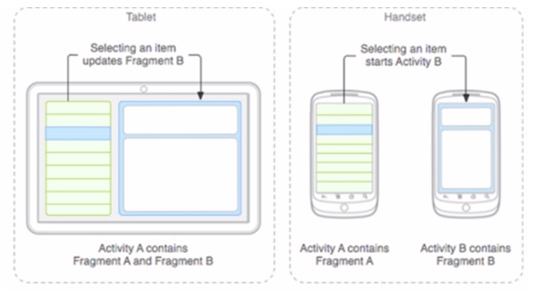
一、Fragment簡介Fragment介紹針對屏幕尺寸的差距,很多情況下,都是先針對手機開發一套app,然後拷貝一份,修改布局以適應什麼超級大屏的。Fragment的初
 Android實現對話框-附一個完整例子
Android其實沒有對話框的概念,有的只是用PopupWindow實現一個對話框的效果。下面給一個完整的例子,及用法。 新建一個PromptWindow類 packag
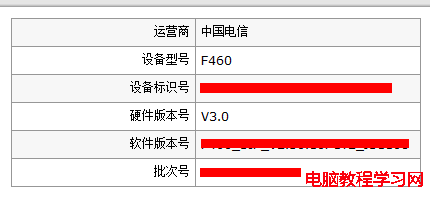 破解中興 ZXA10 F460 V3.0版本貓
春節放假回老家,發現家裡的貓換型號了,具備無線功能,但是悲劇的是連接到無線網絡後還得撥號上網,依據經驗,只能使用超級管理員開通自動撥號功能,知己知彼,我們首