編輯:關於Android編程
什麼是AsyncTask?AsyncTask內部封裝了Thread和Handler,可以讓我們在後台進行計算並且把計算的結果及時更新到UI上, 而這些正是Thread+Handler所做的事情,沒錯,AsyncTask的作用就是簡化Thread+Handler,讓我們能夠通過更少的代碼來 完成一樣的功能,但是AsyncTask只是簡化Thread+Handler而不是替代,實際上它也替代不了。
使用AsyncTask的規則
AsyncTask的類必須在UI線程加載(從4.1開始系統會幫我們自動完成)
AsyncTask對象必須在UI線程創建
execute方法必須在UI線程調用
不要在你的程序中去直接調用onPreExecute(), onPostExecute, doInBackground, onProgressUpdate方法
一個AsyncTask對象只能執行一次,即只能調用一次execute方法,否則會報運行時異常
AsyncTask不是被設計為處理耗時操作的,耗時上限為幾秒鐘,如果要做長耗時操作,強烈建議你使用Executor,ThreadPoolExecutor
以及FutureTask
在1.6之前,AsyncTask是串行執行任務的,1.6的時候AsyncTask開始采用線程池裡處理並行任務,但是從3.0開始,為了避免AsyncTask
所帶來的並發錯誤,AsyncTask又采用一個線程來串行執行任務
1 三個泛型類型
1)Params: 啟動任務執行的輸入參數,比如HTTP請求的URL。
2) Progress: 後台任務執行的百分比會發布到UI主線程中。
3) Result: 後台執行任務最終返回的結果,比如String,Integer等
【注意】如果三個泛型都沒有類型,我們就用void代替,如下所所示(注意類型是Void是大寫的)
private class MyTask extends AsyncTask {}
2 四個回調方法
1) onPreExecute(): 在任務執行之前在UI主線程中被調用的。這個通常是用來做任務的准備,比如獲得一個顯示進度條的實例等。
2) doInBackground(Params...): onPreExecute()執行完成後馬上被後台的進程中調用,用來處理耗時的操作,異步任務的輸入參數也
會傳遞到這裡。計算得到結果會通過後面的執行方法(onPostExecute()方法)推送到UI主線程中。這個步驟還可以使用使用 publishProgress(Progress...)
來顯示進度刻度。這些刻度會在UI主線程中實時顯示通過onProgressUpdate(Progress...)方法.
3) onProgressUpdate(Progress...): publishProgress(Progress...)方法執行之後會被UI主線程調用,用來在UI主線程中實時顯示計算刻度。
4) onPostExecute(Result): 在後台計算完成之後被UI主線程調用。doInBackground()方法返回的結果會作為它的一個參數來推送到UI主線程中。
3. AsyncTask的取消
異步任務可以在任意時間調用cancel(boolean)來取消,調用這個方法之後會造成後續的isCancelled()方法都是返回true,取消之後在執行完
doInBackground(Object[])後onCancelled(Object)方法會代替onPostExecute(Object)方法被執行。為了確保能夠盡快的取消一個任務,我們應該在
doInBackground(Object[])裡面周期性的檢查isCancelled()的返回值(例如在一個循環裡面)。
程序Demo
    /**
 * 使用異步任務從服務器上下載網絡圖片
 *
 */
public class MainActivity extends Activity {

    private Button btn;
    private ImageView img;
    private String imgPath = "http://f.hiphotos.baidu.com/image/w%3D2048/sign=05793c21bba1cd1105b675208d2ac9fc/43a7d933c895d14350ee3c3272f082025aaf0703.jpg";
    private ProgressDialog dialog;

    @Override
    protected void onCreate(Bundle savedInstanceState) {
        super.onCreate(savedInstanceState);
        setContentView(R.layout.activity_main);
        initComponent();
        dialog = new ProgressDialog(this);
        dialog.setTitle("提示信息");
        dialog.setMessage("正在下載,請稍後...");
        btn.setOnClickListener(new View.OnClickListener() {

            @Override
            public void onClick(View v) {
                // 執行異步任務的操作,這個必須寫在UI主線程中,由UI主線程去操作
                new MyTask().execute(imgPath);
            }
        });
    }

    /**
     * 使用異步任務的規則:
     * 1. 聲明一個類繼承AsyncTask, 指定好三個泛型的參數
     * 2. 第一個參數:啟動任務執行的輸入參數,比如HTTP請求的URL
     *    第二個參數:後台任務執行的百分比會發布到UI主線程中
     *    第三個參數:後台執行任務最終返回的結果,比如String,Integer等
     * 3. 小技巧
     *    這邊寫異步任務的時候先指定後三個參數在去實現對應的方法,這樣Eclipse會自動生成與我們參數類型相匹配的返回類型的方法。
     * @author AHuier
     *
     */
    public class MyTask extends AsyncTask{

        // 任務執行之前的准備工作
        @Override
        protected void onPreExecute() {
            // TODO Auto-generated method stub
            super.onPreExecute();
            dialog.show();
        }

        // 完成耗時操作,將結果推送到onPostExecute()方法中
        // String... params : 表示可以傳遞多個String類型的參數,我們只取一個所以用params[0]
        @Override
        protected Bitmap doInBackground(String... params) {
            // TODO Auto-generated method stub
            // 使用網絡鏈接類 HttpClient 類完成對網絡數據的提取
            HttpClient httpClient = new DefaultHttpClient();
            HttpGet httpGet = new HttpGet(params[0]);
            Bitmap bitmap = null;
            try {
                HttpResponse httpResponse = httpClient.execute(httpGet);
                if(httpResponse.getStatusLine().getStatusCode() == 200){
                    HttpEntity httpEntity = httpResponse.getEntity(); // 取出Http協議實體
                    byte[] data = EntityUtils.toByteArray(httpEntity); //轉換成字節數組
                    // 字節數組轉換成Bitmap對象
                    bitmap = BitmapFactory.decodeByteArray(data, 0, data.length);
                }
            } catch (ClientProtocolException e) {
                // TODO Auto-generated catch block
                e.printStackTrace();
            } catch (IOException e) {
                // TODO Auto-generated catch block
                e.printStackTrace();
            }
            // 返回bitmap對象,最終會作為參數到onPostExecute()方法中,用這個方法將其推送到UI主線程中。
            return bitmap;
        }

        @Override
        protected void onProgressUpdate(Void... values) {
            // TODO Auto-generated method stub
            super.onProgressUpdate(values);
        }

        // 更新UI線程
        @Override
        protected void onPostExecute(Bitmap result) {
            // TODO Auto-generated method stub
            super.onPostExecute(result);
            img.setImageBitmap(result);
            dialog.dismiss();
        }
    }

    @Override
    public boolean onCreateOptionsMenu(Menu menu) {
        // Inflate the menu; this adds items to the action bar if it is present.
        getMenuInflater().inflate(R.menu.main, menu);
        return true;
    }

    private void initComponent(){
        btn = (Button)findViewById(R.id.button1);
        img = (ImageView)findViewById(R.id.imageView1);
    }

    }
AsyncTask源碼分析
    /*
 * Copyright (C) 2008 The Android Open Source Project
 *
 * Licensed under the Apache License, Version 2.0 (the "License");
 * you may not use this file except in compliance with the License.
 * You may obtain a copy of the License at
 *
 *      http://www.apache.org/licenses/LICENSE-2.0
 *
 * Unless required by applicable law or agreed to in writing, software
 * distributed under the License is distributed on an "AS IS" BASIS,
 * WITHOUT WARRANTIES OR CONDITIONS OF ANY KIND, either express or implied.
 * See the License for the specific language governing permissions and
 * limitations under the License.
 */

package android.os;

import java.util.ArrayDeque;
import java.util.concurrent.BlockingQueue;
import java.util.concurrent.Callable;
import java.util.concurrent.CancellationException;
import java.util.concurrent.Executor;
import java.util.concurrent.ExecutionException;
import java.util.concurrent.FutureTask;
import java.util.concurrent.LinkedBlockingQueue;
import java.util.concurrent.ThreadFactory;
import java.util.concurrent.ThreadPoolExecutor;
import java.util.concurrent.TimeUnit;
import java.util.concurrent.TimeoutException;
import java.util.concurrent.atomic.AtomicBoolean;
import java.util.concurrent.atomic.AtomicInteger;

public abstract class AsyncTask {
    private static final String LOG_TAG = "AsyncTask";

    //獲取當前的cpu核心數
    private static final int CPU_COUNT = Runtime.getRuntime().availableProcessors();
    //線程池核心容量
    private static final int CORE_POOL_SIZE = CPU_COUNT + 1;
    //線程池最大容量
    private static final int MAXIMUM_POOL_SIZE = CPU_COUNT * 2 + 1;
    //過剩的空閒線程的存活時間
    private static final int KEEP_ALIVE = 1;
    //ThreadFactory 線程工廠,通過工廠方法newThread來獲取新線程
    private static final ThreadFactory sThreadFactory = new ThreadFactory() {
        //原子整數,可以在超高並發下正常工作
        private final AtomicInteger mCount = new AtomicInteger(1);

        public Thread newThread(Runnable r) {
            return new Thread(r, "AsyncTask #" + mCount.getAndIncrement());
        }
    };
    //靜態阻塞式隊列,用來存放待執行的任務,初始容量:128個
    private static final BlockingQueue sPoolWorkQueue =
            new LinkedBlockingQueue(128);

    /**
     * 靜態並發線程池,可以用來並行執行任務,盡管從3.0開始,AsyncTask默認是串行執行任務
     * 但是我們仍然能構造出並行的AsyncTask
     */
    public static final Executor THREAD_POOL_EXECUTOR
            = new ThreadPoolExecutor(CORE_POOL_SIZE, MAXIMUM_POOL_SIZE, KEEP_ALIVE,
                    TimeUnit.SECONDS, sPoolWorkQueue, sThreadFactory);

    /**
     * 靜態串行任務執行器,其內部實現了串行控制,
     * 循環的取出一個個任務交給上述的並發線程池去執行
     */
    public static final Executor SERIAL_EXECUTOR = new SerialExecutor();
    //消息類型:發送結果
    private static final int MESSAGE_POST_RESULT = 0x1;
    //消息類型:更新進度
    private static final int MESSAGE_POST_PROGRESS = 0x2;
    /**靜態Handler,用來發送上述兩種通知,采用UI線程的Looper來處理消息
     * 這就是為什麼AsyncTask必須在UI線程調用,因為子線程
     * 默認沒有Looper無法創建下面的Handler,程序會直接Crash
     */
    private static final InternalHandler sHandler = new InternalHandler();
    //默認任務執行器,被賦值為串行任務執行器,就是它,AsyncTask變成串行的了
    private static volatile Executor sDefaultExecutor = SERIAL_EXECUTOR;
    //如下兩個變量我們先不要深究,不影響我們對整體邏輯的理解
    private final WorkerRunnable mWorker;
    private final FutureTask mFuture;
    //任務的狀態 默認為掛起,即等待執行,其類型標識為易變的(volatile)
    private volatile Status mStatus = Status.PENDING;
    //原子布爾型,支持高並發訪問,標識任務是否被取消
    private final AtomicBoolean mCancelled = new AtomicBoolean();
    //原子布爾型,支持高並發訪問,標識任務是否被執行過
    private final AtomicBoolean mTaskInvoked = new AtomicBoolean();

    /*串行執行器的實現,我們要好好看看,它是怎麼把並行轉為串行的
     *目前我們需要知道,asyncTask.execute(Params ...)實際上會調用
     *SerialExecutor的execute方法,這一點後面再說明。也就是說:當你的asyncTask執行的時候,
     *首先你的task會被加入到任務隊列,然後排隊,一個個執行
     */
    private static class SerialExecutor implements Executor {
        //線性雙向隊列,用來存儲所有的AsyncTask任務
        final ArrayDeque mTasks = new ArrayDeque();
        //當前正在執行的AsyncTask任務
        Runnable mActive;

        public synchronized void execute(final Runnable r) {
            //將新的AsyncTask任務加入到雙向隊列中
            mTasks.offer(new Runnable() {
                public void run() {
                    try {
                        //執行AsyncTask任務
                        r.run();
                    } finally {
                        //當前AsyncTask任務執行完畢後,進行下一輪執行,如果還有未執行任務的話
                        //這一點很明顯體現了AsyncTask是串行執行任務的,總是一個任務執行完畢才會執行下一個任務
                        scheduleNext();
                    }
                }
            });
            //如果當前沒有任務在執行,直接進入執行邏輯
            if (mActive == null) {
                scheduleNext();
            }
        }

        protected synchronized void scheduleNext() {
            //從任務隊列中取出隊列頭部的任務,如果有就交給並發線程池去執行
            if ((mActive = mTasks.poll()) != null) {
                THREAD_POOL_EXECUTOR.execute(mActive);
            }
        }
    }

    /**
     * 任務的三種狀態
     */
    public enum Status {
        /**
         * 任務等待執行
         */
        PENDING,
        /**
         * 任務正在執行
         */
        RUNNING,
        /**
         * 任務已經執行結束
         */
        FINISHED,
    }

    /** 隱藏API:在UI線程中調用,用來初始化Handler */
    public static void init() {
        sHandler.getLooper();
    }

    /** 隱藏API:為AsyncTask設置默認執行器 */
    public static void setDefaultExecutor(Executor exec) {
        sDefaultExecutor = exec;
    }

    /**
     * Creates a new asynchronous task. This constructor must be invoked on the UI thread.
     */
    public AsyncTask() {
        mWorker = new WorkerRunnable() {
            public Result call() throws Exception {
                mTaskInvoked.set(true);

                Process.setThreadPriority(Process.THREAD_PRIORITY_BACKGROUND);
                //noinspection unchecked
                return postResult(doInBackground(mParams));
            }
        };

        mFuture = new FutureTask(mWorker) {
            @Override
            protected void done() {
                try {
                    postResultIfNotInvoked(get());
                } catch (InterruptedException e) {
                    android.util.Log.w(LOG_TAG, e);
                } catch (ExecutionException e) {
                    throw new RuntimeException("An error occured while executing doInBackground()",
                            e.getCause());
                } catch (CancellationException e) {
                    postResultIfNotInvoked(null);
                }
            }
        };
    }

    private void postResultIfNotInvoked(Result result) {
        final boolean wasTaskInvoked = mTaskInvoked.get();
        if (!wasTaskInvoked) {
            postResult(result);
        }
    }
    //doInBackground執行完畢,發送消息
    private Result postResult(Result result) {
        @SuppressWarnings("unchecked")
        Message message = sHandler.obtainMessage(MESSAGE_POST_RESULT,
                new AsyncTaskResult(this, result));
        message.sendToTarget();
        return result;
    }

    /**
     * 返回任務的狀態
     */
    public final Status getStatus() {
        return mStatus;
    }

    /**
     * 這個方法是我們必須要重寫的,用來做後台計算
     * 所在線程:後台線程
     */
    protected abstract Result doInBackground(Params... params);

    /**
     * 在doInBackground之前調用,用來做初始化工作
     * 所在線程:UI線程
     */
    protected void onPreExecute() {
    }

    /**
     * 在doInBackground之後調用,用來接受後台計算結果更新UI
     * 所在線程:UI線程
     */
    protected void onPostExecute(Result result) {
    }

    /**
     * Runs on the UI thread after {@link #publishProgress} is invoked.
     /**
     * 在publishProgress之後調用,用來更新計算進度
     * 所在線程:UI線程
     */
    protected void onProgressUpdate(Progress... values) {
    }

     /**
     * cancel被調用並且doInBackground執行結束,會調用onCancelled,表示任務被取消
     * 這個時候onPostExecute不會再被調用,二者是互斥的,分別表示任務取消和任務執行完成
     * 所在線程:UI線程
     */
    @SuppressWarnings({"UnusedParameters"})
    protected void onCancelled(Result result) {
        onCancelled();
    }

    protected void onCancelled() {
    }

    public final boolean isCancelled() {
        return mCancelled.get();
    }

    public final boolean cancel(boolean mayInterruptIfRunning) {
        mCancelled.set(true);
        return mFuture.cancel(mayInterruptIfRunning);
    }

    public final Result get() throws InterruptedException, ExecutionException {
        return mFuture.get();
    }

    public final Result get(long timeout, TimeUnit unit) throws InterruptedException,
            ExecutionException, TimeoutException {
        return mFuture.get(timeout, unit);
    }

    /**
     * 這個方法如何執行和系統版本有關,在AsyncTask的使用規則裡已經說明,如果你真的想使用並行AsyncTask,
     * 也是可以的,只要稍作修改
     * 必須在UI線程調用此方法
     */
    public final AsyncTask execute(Params... params) {
        //串行執行
        return executeOnExecutor(sDefaultExecutor, params);
        //如果我們想並行執行,這樣改就行了,當然這個方法我們沒法改
        //return executeOnExecutor(THREAD_POOL_EXECUTOR, params);
    }

    /**
     * 通過這個方法我們可以自定義AsyncTask的執行方式,串行or並行,甚至可以采用自己的Executor
     * 為了實現並行,我們可以在外部這麼用AsyncTask:
     * asyncTask.executeOnExecutor(AsyncTask.THREAD_POOL_EXECUTOR, Params... params);
     * 必須在UI線程調用此方法
     */
    public final AsyncTask executeOnExecutor(Executor exec,
            Params... params) {
        if (mStatus != Status.PENDING) {
            switch (mStatus) {
                case RUNNING:
                    throw new IllegalStateException("Cannot execute task:"
                            + " the task is already running.");
                case FINISHED:
                    throw new IllegalStateException("Cannot execute task:"
                            + " the task has already been executed "
                            + "(a task can be executed only once)");
            }
        }

        mStatus = Status.RUNNING;
        //這裡#onPreExecute會最先執行
        onPreExecute();

        mWorker.mParams = params;
        //然後後台計算#doInBackground才真正開始
        exec.execute(mFuture);
        //接著會有#onProgressUpdate被調用,最後是#onPostExecute

        return this;
    }

    /**
     * 這是AsyncTask提供的一個靜態方法,方便我們直接執行一個runnable
     */
    public static void execute(Runnable runnable) {
        sDefaultExecutor.execute(runnable);
    }

    /**
     * 打印後台計算進度,onProgressUpdate會被調用
     */
    protected final void publishProgress(Progress... values) {
        if (!isCancelled()) {
            sHandler.obtainMessage(MESSAGE_POST_PROGRESS,
                    new AsyncTaskResult
 Android動畫總結(屬性動畫,補間動畫,幀動畫)
動畫分類Android中動畫大概分為3類:TweenAnimation(補間動畫)TranslateAnimation ScaleAnimation RotateAnim
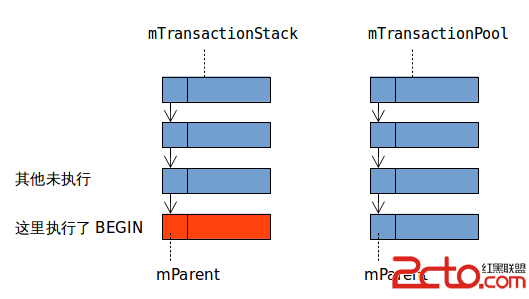 Android SQLite 支持嵌套事務嗎?
Android SQLite相關java源碼中多次提到支持 nested transaction。 而SQLite本身不支持嵌套事務,只能使用 savepoint 代替。
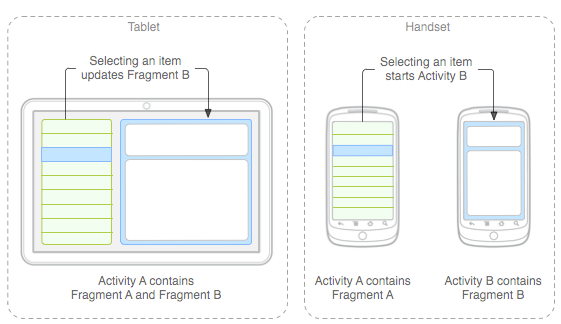 談談Android Fragments 詳細使用
Fragments 誕生初衷自從Android 3.0中引入fragments 的概念,根據詞海的翻譯可以譯為:碎片、片段。其上的是為了解決不同屏幕分辯率的動態和靈活UI
 Android性能測試
一直以來Android性能測試一直是Android測試中一個被一部分人遺忘,有被一部分人無可奈何的東西。在絕大部分的創業公司,性能測試基本上都是被遺忘的,因為功能測試和穩