編輯:關於Android編程
1.背景
做Android應用開發,大家都知道,顯示一個界面,就是在activity的子類中重寫onCreate方法,在裡面調用setContentView(…),那麼你在啟動activity的時候,就你顯示一個界面了。因此,接下來,我就通過源碼流程來簡單的梳理一下setContentView(…)的加載機制。
2.源碼梳理
2.1 在Activity源碼當中,setContentView有三個重載的方法,如下:
 public void setContentView(@LayoutRes int layoutResID) {
        getWindow().setContentView(layoutResID);
        initWindowDecorActionBar();
    }
    public void setContentView(View view) {
        getWindow().setContentView(view);
        initWindowDecorActionBar();
    }

    public void setContentView(View view, ViewGroup.LayoutParams params) {
        getWindow().setContentView(view, params);
        initWindowDecorActionBar();
    }
由源碼看出,三個重載方法都調用了getWindow().addContentView方法,緊接著就是調用了initWindowDecorActionBar()方法用來初始化ActionBar。getWindow返回的是一個Window類,進這個類一探究竟,你發現這是一個抽象類,裡面定義了抽象方法和一些接口等,其中就包括了setContentView方法。既然在這裡面找不到,那就去它的子類中看看呢。
 final void attach(Context context, ActivityThread aThread,
            Instrumentation instr, IBinder token, int ident,
            Application application, Intent intent, ActivityInfo info,
            CharSequence title, Activity parent, String id,
            NonConfigurationInstances lastNonConfigurationInstances,
            Configuration config, String referrer, IVoiceInteractor voiceInteractor) {
        attachBaseContext(context);

        mFragments.attachHost(null /*parent*/);

        mWindow = new PhoneWindow(this);
在Activity中的attach方法中,mWindow = new PhoneWindow(this);這句話,就是實例化了PhoneWindow,也就是上面我們提到的Window的實現類,那麼接下來就是到PhoneWindow中看一下.
2.2 PhoneWindow的窗口類中setContentView的方法梳理
Window是一個抽象類,裡面定義提供了繪制窗口的一組api以及接口等,而PhoneWindow是Window的具體實現類,它裡面包含了一個DecorView對象mDeco,繼承自FrameLayout,是對其功能的修飾,並且該對象是所有應用窗口的根view。
下面進入到PhoneWindow類的setContentView(…)方法裡面一探究竟。
    public void setContentView(int layoutResID) {
        // Note: FEATURE_CONTENT_TRANSITIONS may be set in the process of installing the window
        // decor, when theme attributes and the like are crystalized. Do not check the feature
        // before this happens.
        if (mContentParent == null) {
            installDecor();
        } else if (!hasFeature(FEATURE_CONTENT_TRANSITIONS)) {
            mContentParent.removeAllViews();
        }

        if (hasFeature(FEATURE_CONTENT_TRANSITIONS)) {
            final Scene newScene = Scene.getSceneForLayout(mContentParent, layoutResID,
                    getContext());
            transitionTo(newScene);
        } else {
            mLayoutInflater.inflate(layoutResID, mContentParent);
        }
        mContentParent.requestApplyInsets();
        final Callback cb = getCallback();
        if (cb != null && !isDestroyed()) {
            cb.onContentChanged();
        }
    }
代碼不是很長,首先是對mContentParent 的判斷,如果為null,則進入到installDecor()方法中,否在判斷是否設置了FEATURE_CONTENT_TRANSITIONS Window屬性,默認為false,如果沒有則移除所有的view;接著往下看,你會看到又是一個if判斷,就是判斷是否需要場景變化的,這個不做介紹,在else裡面,你發現調用了mLayoutInflater.inflate(layoutResID, mContentParent)這個api,就是把我們的資源文件通過LayoutInflate轉換成view樹,然後在添加到mContentParent裡面去。所以通過這裡的分析可以看出,當我們多次設置setContentView(…)之後,為什麼能正確的顯示我們想要的界面,因為mContentParent會removeAllViews啊!
2.3 PhoneWindow的窗口類中installDecor的方法梳理
在我們分析PhoneWindow類的setContentView(…)方法的時候,當mContentParent == null時,會進入到installDecor()方法,那麼我們就進去看看裡面到底做了一些什麼操作呢?
private void installDecor() {
        //對根View的判斷,DecorView的對象mDecor是否為null
        if (mDecor == null) {
            mDecor = generateDecor();
            mDecor.setDescendantFocusability(ViewGroup.FOCUS_AFTER_DESCENDANTS);
            mDecor.setIsRootNamespace(true);
            if (!mInvalidatePanelMenuPosted && mInvalidatePanelMenuFeatures != 0) {
                mDecor.postOnAnimation(mInvalidatePanelMenuRunnable);
            }
        }
        //對mContentParent 的判斷
        if (mContentParent == null) {
            //根據窗口的風格修飾,選擇對應的修飾布局文件,並且將id為content的FrameLayout賦值給mContentParent
            mContentParent = generateLayout(mDecor);

            //這裡會初始化一大堆的屬性值
            .........

        }
  }
方法installDecor()裡面的代碼有點長,但基本的注釋已在上面說明,下面就是看一下裡面其中的2個比較關鍵的點:
(1) 對mDecor的初始化
 protected DecorView generateDecor() {
        return new DecorView(getContext(), -1);
    }
很簡單的一句話,就是new一個DecorView對象而已。
(2) 對mContentParent 的初始化
這個很重要,因為我們要添加的布局文件就是要放到它裡面的。下面看一下對mContentParent 的初始化到底都做了些什麼讓我們意外的操作呢。
  protected ViewGroup generateLayout(DecorView decor) {
        // Apply data from current theme.
        //首先獲取android:theme="..."主題形式
        TypedArray a = getWindowStyle();

        //一大堆屬性值的獲取,擦擦的
        ........

        // Inflate the window decor.
        //根布局文件id
        int layoutResource;
        //獲取動態設置的Window屬性值
        int features = getLocalFeatures();

        //一大串的if...else... 語句判斷,歸根結底就是根據設定的不同features來選擇不同的根布局文件,得到layoutResource的值
        .......

        //重要的來了,根據上面得到的layoutResource來回去根view:in,並添加到根視圖中decor
        View in = mLayoutInflater.inflate(layoutResource, null);
        decor.addView(in, new ViewGroup.LayoutParams(MATCH_PARENT, MATCH_PARENT));
        mContentRoot = (ViewGroup) in;

        //獲取id為com.android.internal.R.id.content的view,也就是我們的mContentParent
        ViewGroup contentParent = (ViewGroup)findViewById(ID_ANDROID_CONTENT);
        if (contentParent == null) {
            throw new RuntimeException("Window couldn't find content container view");
        }

        //然後又是一大堆屬性值的設置等
        .......

        //返回得到的mContentParent
        return contentParent;
}
通過對以上函數方法體的分析看到,裡面其實主要做了2件重要的事,一是對Window屬性的設置,二是對mContentParent 的初始化。到這裡你會不會想得到,為什麼我們在動態設置Window屬性的時候,必須要寫在setContentView(…)方法之前了吧,是因為對Window窗口屬性的設置是在setContentView(…)裡面執行的,getLocalFeatures()方法是對動態設置Window屬性requestWindowFeature(…)的獲取,而getWindowStyle()是對靜態設置android:theme=”…”的獲取,恍然大悟有沒有。
2.4 Window類內部接口Callback的回調
在setContentView(…)方法的最後,你會發現一個回調方法
 final Callback cb = getCallback();
        if (cb != null && !isDestroyed()) {
            cb.onContentChanged();
        }
這是干啥的呢?就是說,當前的窗口的內容已經發生了變化,並且發出通知。因此,我們是不是有理由這樣想,把對view 的獲取findViewById放在這裡面呢,顯然是可以的啊。不過現如今各種注解模式的誕生,好像也用不到了,呵呵….
下面看一下onContentChanged()方法
public void onContentChanged();
咦,是一個空函數,注釋已經說明了就是當conetnt發生變化的時候回調。
3 LayoutInflater加載機制原理
很常用的一個類,當我們在Adapter的getView(…)方法裡面獲取一個布局的時候,LayoutInflater.inflater(….)是不是就常常用的到啊。下面開始從從實例的獲取到加載布局的機制一一看起。
3.1 實例對象的獲取
獲取一個實例,我們通常是這樣寫的,
LayoutInflater.from(context);
在更以前呢是這樣寫的,
(LayoutInflater) context.getSystemService(Context.LAYOUT_INFLATER_SERVICE);
兩者之間有什麼不同呢?下面看一下LayoutInflater.from(context)的方法體:
 public static LayoutInflater from(Context context) {
        LayoutInflater LayoutInflater =
                (LayoutInflater) context.getSystemService(Context.LAYOUT_INFLATER_SERVICE);
        if (LayoutInflater == null) {
            throw new AssertionError("LayoutInflater not found.");
        }
        return LayoutInflater;
    }
哎吆歪,沒啥啊,就是對後者一個安全封裝而已嘛。
3.2 實例獲取了,那麼接下來就是加載布局了,對View inflater(…)方法族的分析
方法主要有以下幾種
(1)public View inflate(@LayoutRes int resource, @Nullable ViewGroup root)(...)

(2)public View inflate(XmlPullParser parser, @Nullable ViewGroup root)(...)

(3)public View inflate(@LayoutRes int resource, @Nullable ViewGroup root, boolean attachToRoot)(...)

(4)public View inflate(XmlPullParser parser, @Nullable ViewGroup root, boolean attachToRoot)(...)
上面給出了inflater(…)的四種方法,但歸根最後都會到第四個方法裡面,去解析布局,加載文件。那我們就去研究看一下這個方法什麼怎麼執行的。
    public View inflate(XmlPullParser parser, @Nullable ViewGroup root, boolean attachToRoot) {
        //一個同步鎖區域
        synchronized (mConstructorArgs) {
            Trace.traceBegin(Trace.TRACE_TAG_VIEW, "inflate");

            final Context inflaterContext = mContext;
            final AttributeSet attrs = Xml.asAttributeSet(parser);
            Context lastContext = (Context) mConstructorArgs[0];
            mConstructorArgs[0] = inflaterContext;

            //定義返回的結果,初始化傳入root
            View result = root;

            try {
                // Look for the root node.
                //xml pull解析的標准模式,首先做判斷
                int type;
                while ((type = parser.next()) != XmlPullParser.START_TAG &&
                        type != XmlPullParser.END_DOCUMENT) {
                    // Empty
                }

                //如果一開始不是START_TAG,說明xml文件時有問題滴
                if (type != XmlPullParser.START_TAG) {
                    throw new InflateException(parser.getPositionDescription()
                            + ": No start tag found!");
                }

                final String name = parser.getName();

                if (DEBUG) {
                    System.out.println("**************************");
                    System.out.println("Creating root view: "
                            + name);
                    System.out.println("**************************");
                }

                //對merge文件的判斷
                if (TAG_MERGE.equals(name)) {
                //看到這個判斷你想到了什麼?merge標注的xml文件root不能為null,並且attachToRoot 必須為true(merge標簽,並不代表一個具體的view,只是將它包裹起來的view添加到另一個ViewGroup裡面,性能優化你懂得)
                    if (root == null || !attachToRoot) {
                        throw new InflateException(" can be used only with a valid "
                                + "ViewGroup root and attachToRoot=true");
                    }
                    //遞歸調用infalter(...)方法
                    rInflate(parser, root, inflaterContext, attrs, false);
                } else {
                    // Temp is the root view that was found in the xml
                    //xml文件的root view,暫存為temp
                    final View temp = createViewFromTag(root, name, inflaterContext, attrs);

                    ViewGroup.LayoutParams params = null;

                   //對傳入的root做判斷,下面這個if語句的作用就是,如果root!=null,attaToRoot=false,則給temp設置params屬性
                    if (root != null) {
                        if (DEBUG) {
                            System.out.println("Creating params from root: " +
                                    root);
                        }
                        // Create layout params that match root, if supplied
                        params = root.generateLayoutParams(attrs);
                        //對attachToRoot判斷
                        if (!attachToRoot) {
                            // Set the layout params for temp if we are not
                            // attaching. (If we are, we use addView, below)
                            temp.setLayoutParams(params);
                        }
                    }

                    if (DEBUG) {
                        System.out.println("-----> start inflating children");
                    }

                    // Inflate all children under temp against its context.
                    //開始解析加載所有的view
                    rInflateChildren(parser, temp, attrs, true);

                    if (DEBUG) {
                        System.out.println("-----> done inflating children");
                    }

                    // We are supposed to attach all the views we found (int temp)
                    // to root. Do that now.
                    //判斷是否要把temp添加到root裡面去
                    if (root != null && attachToRoot) {
                        root.addView(temp, params);
                    }

                    // Decide whether to return the root that was passed in or the
                    // top view found in xml.
                    //再次確認最後返回的view
                    if (root == null || !attachToRoot) {
                        result = temp;
                    }
                }

            } catch (XmlPullParserException e) {
                InflateException ex = new InflateException(e.getMessage());
                ex.initCause(e);
                throw ex;
            } catch (Exception e) {
                InflateException ex = new InflateException(
                        parser.getPositionDescription()
                                + ": " + e.getMessage());
                ex.initCause(e);
                throw ex;
            } finally {
                // Don't retain static reference on context.
                mConstructorArgs[0] = lastContext;
                mConstructorArgs[1] = null;
            }

            Trace.traceEnd(Trace.TRACE_TAG_VIEW);

            return result;
        }
    }
通過對以上代碼的分析,我們是不是發現了一些有用的額知識點呢,現總結如下:
方法(1) : 創建temp的view,它是xml布局的root view,當root == null時 ,直接返回temp,
當root != null時,執行root.addView(temp, params),最後返回root。
方法(3): 創建temp的view,它是xml布局的root view
當 root == null && attachToRoot == false時,直接返回temp;
當 root == null && attachToRoot == true時,直接返回temp;
當 root != null && attachToRoot == false時,執行temp.setLayoutParams(params),然後直接返回temp;
當 root == null && attachToRoot == true時,執行root.addView(temp, params);然後返回root;
3.3 LayoutInflater源碼inflate(…)方法中調運的一些非public方法分析
通過上面的分析,我們會發現,在解析的時候調用了這麼一個函數rInflate(…),那麼久進入這個函數,看下具體做了什麼
    void rInflate(XmlPullParser parser, View parent, Context context,
            AttributeSet attrs, boolean finishInflate) throws XmlPullParserException, IOException {

        final int depth = parser.getDepth();
        int type;

        //XmlPullParser解析器的標准解析模式
        while (((type = parser.next()) != XmlPullParser.END_TAG ||
                parser.getDepth() > depth) && type != XmlPullParser.END_DOCUMENT) {
            //找到START_TAG節點程序才繼續執行這個判斷語句之後的邏輯,否則說明xml布局文件有問題
            if (type != XmlPullParser.START_TAG) {
                continue;
            }

            //獲取name標記
            final String name = parser.getName();
            //處理TAG_REQUEST_FOCUS的標記
            if (TAG_REQUEST_FOCUS.equals(name)) {
                parseRequestFocus(parser, parent);
            } else if (TAG_TAG.equals(name)) {//處理TAG_TAG標記
                parseViewTag(parser, parent, attrs);
            } else if (TAG_INCLUDE.equals(name)) {//處理TAG_INCLUDE標記
                  //判斷include是否是根節點
                if (parser.getDepth() == 0) {
                    throw new InflateException(" cannot be the root element");
                }
                parseInclude(parser, context, parent, attrs);
            } else if (TAG_MERGE.equals(name)) {//處理TAG_MERGE標記,merge節點必須是根節點
                throw new InflateException(" must be the root element");
            } else {//處理其它標記
                final View view = createViewFromTag(parent, name, context, attrs);
                final ViewGroup viewGroup = (ViewGroup) parent;
                final ViewGroup.LayoutParams params = viewGroup.generateLayoutParams(attrs);
                rInflateChildren(parser, view, attrs, true);
                viewGroup.addView(view, params);
            }
        }
        //當所有的view都解析完成之後,回調onFinishInflate()方法
        if (finishInflate) {
            parent.onFinishInflate();
        }
    }
4.從以上的分析來簡單說一下布局上的優化
(1) 因為xml解析是遞歸滴,因此減少層級結構可以防止棧溢出,建議多用相對布局,Realtivelayout
(2) 使用merge屬性,可以有效的將某些符合條件的多余層級干掉。但是merge屬性必須作為根節點,必須指定一個ViewGroup作為其父布局,兵器attachToRoot必須為true。
(3) 使用ViewStub屬性,輕量級的預加載處理頁面,想什麼時候加載就什麼時候加載。它本身不會占用層級結構,當被加載的時候,它會被指定的層級替代。
(4) 使用include屬性,這個並不難優化層級結構,只是布局的重用,看起來更美觀一些
(5)當布局設置了權重widget的時候,最好相應的layout_hORW-xxx 設置為0dp,減少系統運算的次數。
5.總結
setContentView整個過程主要是如何把Activity的布局文件或者java的View添加至窗口裡,重點概括為:
(1) 創建一個DecorView的對象mDecor,該mDecor對象將作為整個應用窗口的根視圖。
(2) 依據Feature等style theme創建不同的窗口修飾布局文件,並且通過findViewById獲取Activity布局文件該存放的地方(窗口修飾布局文件中id為content的FrameLayout)。
(3) 將Activity的布局文件添加至id為content的FrameLayout內。
(4) 當setContentView設置顯示OK以後會回調Activity的onContentChanged方法。Activity的各種View的findViewById()方法等都可以放到該方法中,系統會幫忙回調。
LayoutInflater的使用中重點關注inflate方法的參數含義:
(1) inflate(xmlId, null); 只創建temp的View,然後直接返回temp。
(2) inflate(xmlId, parent); 創建temp的View,然後執行root.addView(temp, params);最後返回root。
(3) inflate(xmlId, parent, false); 創建temp的View,然後執行temp.setLayoutParams(params);然後再返回temp。
(4) inflate(xmlId, parent, true); 創建temp的View,然後執行root.addView(temp, params);最後返回root。
(5) inflate(xmlId, null, false); 只創建temp的View,然後直接返回temp。
(6) inflate(xmlId, null, true); 只創建temp的View,然後直接返回temp。
當我們自定義View時在構造函數inflate一個xml後可以實現onFinishInflate這個方法一些自定義的邏輯。
 Android ViewPager 動畫效果
找到個不錯的開源項目:https://github.com/jfeinstein10/JazzyViewPager Android ViewPager 動畫效果
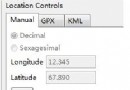 Android編程獲取GPS數據的方法詳解
本文實例講述了Android編程獲取GPS數據的方法。分享給大家供大家參考,具體如下:GPS是Android系統中重要的組成部分,通過它可以衍生出眾多的與位置相關的應用。
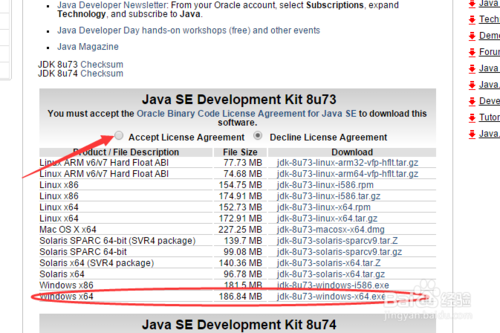
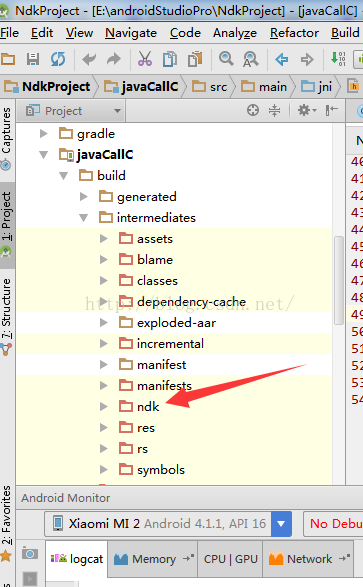 Android studio 中使用Jni
在使用Jni之前,我們需要對android studio進行一些配置:有網的時候:在設置 - plugin - Android NDK Support 勾選--insta
 android使用orm框架ormlite在控制台打印log日志信息
在默認情況下,在android下默認只打印info級別的日志信息,所以在默認情況只能打印ormlite中創建數據庫表的語句,而對於數據的插入和查詢等sql語句是不會打印出