編輯:關於Android編程
當 Activity 接收到焦點的時候,它會被請求繪制布局,該請求由Android framework 處理.繪制是從根節點開始,對布局樹進行 measure 和 draw 。整個 View 樹的繪圖流程在ViewRoot.java類的performTraversals()函數展開,該函數所做 的工作可簡單概況為是否需要重新計算視圖大小(measure)、是否需要重新安置視圖的位置(layout)、以及是否需要重繪(draw),流程圖如下:
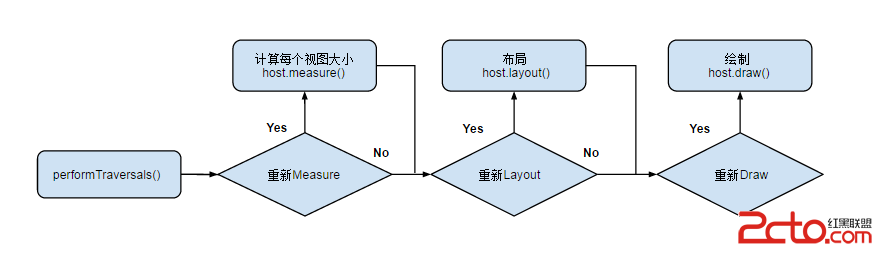
View 繪制流程函數調用鏈
圖片來自 https://plus.google.com/+ArpitMathur/posts/cT1EuBbxEgN
需要說明的是,用戶主動調用request,只會出發 measure 和 layout 過程,而不會執行 draw 過程
measure 和 layout
從整體上來看 Measure 和 Layout 兩個步驟的執行: 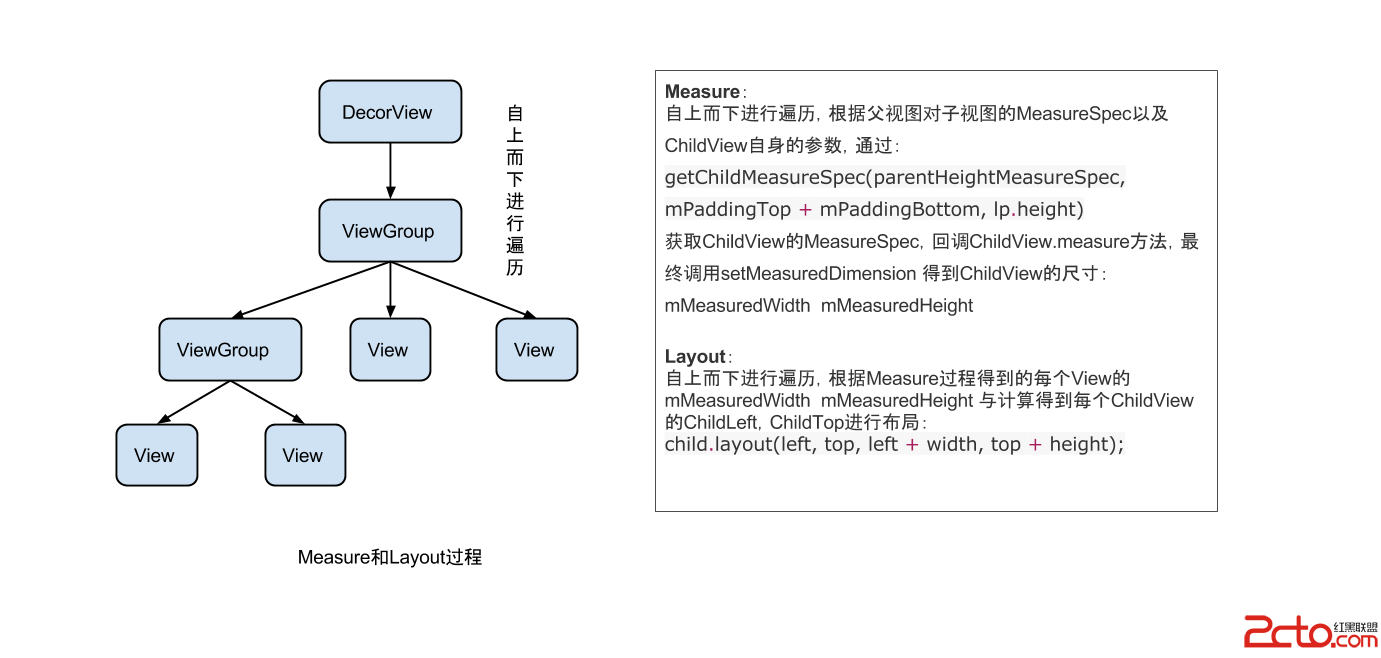
樹的遍歷是有序的,由父視圖到子視圖,每一個 ViewGroup 負責測繪它所有的子視圖,而最底層的 View 會負責測繪自身。
具體分析
measure 過程由measure(int, int)方法發起,從上到下有序的測量 View ,在 measure 過程的最後,每個視圖存儲了自己的尺寸大小和測量規格。 layout 過程由layout(int, int, int, int)方法發起,也是自上而下進行遍歷。在該過程中,每個父視圖會根據 measure 過程得到的尺寸來擺放自己的子視圖。
measure 過程會為一個View及所有子節點的 mMeasuredWidth 和 mMeasuredHeight 變量賦值,該值可以通過 getMeasuredWidth()和getMeasuredHeight()方法獲得。而且這兩個值必須在父視圖約束范圍之內,這樣才可以保證所有的父視圖都接收所有子視圖的測量。如果子視圖對於 Measure 得到的大小不滿意的時候,父視圖會介入並設置測量規則進行第二次 measure。比如,父視圖可以先根據未給定的 dimension 去測量每一個子視圖,如果最終子視圖的未約束尺寸太大或者太小的時候,父視圖就會使用一個確切的大小再次對子視圖進行 measure 。
measure 過程傳遞尺寸的兩個類
ViewGroup.LayoutParams
這個類我們很常見,就是用來指定視圖的高度和寬度等參數。對於每個視圖的 height 和 width,你有以下選擇:
ViewGroup 的子類有其對應的 ViewGroup.LayoutParams 的子類。比如 RelativeLayout 擁有的 ViewGroup.LayoutParams 的子類 RelativeLayoutParams。
有時我們需要使用 view.getLayoutParams() 方法獲取一個視圖 LayoutParams ,然後進行強轉,但由於不知道其具體類型,可能會導致強轉錯誤。其實該方法得到的就是其所在父視圖類型的 LayoutParams,比如 View 的父控件為 RelativeLayout,那麼得到的 LayoutParams 類型就為 RelativeLayoutParams。
MeasureSpecs
測量規格,包含測量要求和尺寸的信息,有三種模式:
UNSPECIFIED
父視圖不對子視圖有任何約束,它可以達到所期望的任意尺寸。比如ListView、ScrollView,一般自定義View中用不到,
EXACTLY
父視圖為子視圖指定一個確切的尺寸,而且無論子視圖期望多大,它都必須在該指定大小的邊界內,對應的屬性為 match_parent 或具體指,比如 100dp,父控件可以通過MeasureSpec.getSize(measureSpec)直接得到子控件的尺寸。
AT_MOST
父視圖為子視圖指定一個最大尺寸。子視圖必須確保它自己所有子視圖可以適應在該尺寸范圍內,對應的屬性為 wrap_content,這種模式下,父控件無法確定子 View 的尺寸,只能由子控件自己根據需求去計算自己的尺寸,這種模式就是我們自定義視圖需要實現測量邏輯的情況。
measure(int widthMeasureSpec, int heightMeasureSpec)
該方法定義在View.java類中,為final類型,不可被復寫,但 measure 調用鏈最終會回調 View/ViewGroup 對象的 onMeasure()方法,因此自定義視圖時,只需要復寫 onMeasure() 方法即可。
onMeasure(int widthMeasureSpec, int heightMeasureSpec)
該方法就是我們自定義視圖中實現測量邏輯的方法,該方法的參數是父視圖對子視圖的 width 和 height 的測量要求。在我們自身的自定義視圖中,要做的就是根據該 widthMeasureSpec 和 heightMeasureSpec 計算視圖的 width 和 height,不同的模式處理方式不同。
setMeasuredDimension()
測量階段終極方法,在 onMeasure(int widthMeasureSpec, int heightMeasureSpec) 方法中調用,將計算得到的尺寸,傳遞給該方法,測量階段即結束。該方法也是必須要調用的方法,否則會報異常。在我們在自定義視圖的時候,不需要關心系統復雜的 Measure 過程的,只需調用setMeasuredDimension()設置根據 MeasureSpec 計算得到的尺寸即可,你可以參考 ViewPagerIndicator 的onMeasure方法。
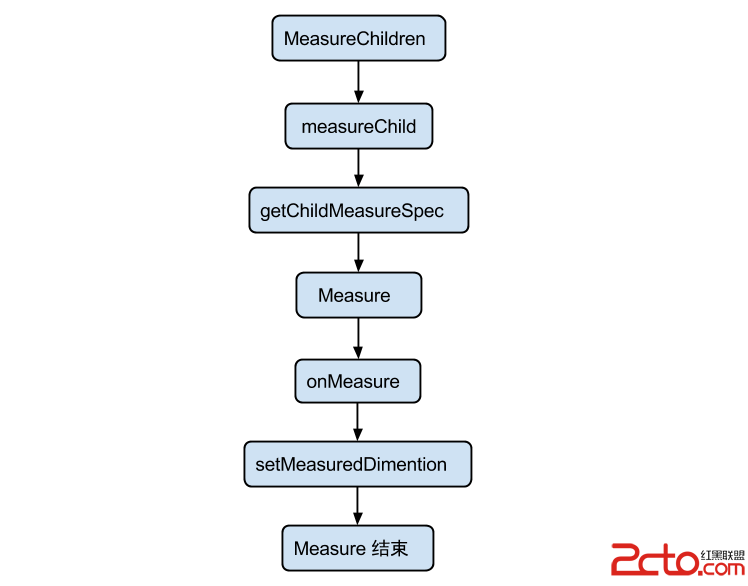
下面我們取 ViewGroup 的 measureChildren(int widthMeasureSpec, int heightMeasureSpec) 方法對復合 View 的 Measure 流程做一個分析: MeasureChild 的方法調用流程圖:
源碼分析
    /**
     * 請求所有子 View 去 measure 自己,要考慮的部分有對子 View 的測繪要求 MeasureSpec 以及其自身的 padding
     * 這裡跳過所有為 GONE 狀態的子 View ,最繁重的工作是在 getChildMeasureSpec 方法中處理的
     *
     * @param widthMeasureSpec  對該 View 的 width 測繪要求
     * @param heightMeasureSpec 對該 View 的 height 測繪要求
     */
    protected void measureChildren(int widthMeasureSpec, int heightMeasureSpec) {
        final int size = mChildrenCount;
        final View[] children = mChildren;
        for (int i = 0; i < size; ++i) {
            final View child = children[i];
            if ((child.mViewFlags & VISIBILITY_MASK) != GONE) {
                measureChild(child, widthMeasureSpec, heightMeasureSpec);
            }
        }
    }

    protected void measureChild(View child, int parentWidthMeasureSpec,
            int parentHeightMeasureSpec) {
        final LayoutParams lp = child.getLayoutParams();//獲取Child的LayoutParams

        final int childWidthMeasureSpec = getChildMeasureSpec(parentWidthMeasureSpec,// 獲取 ChildView的widthMeasureSpec
                mPaddingLeft + mPaddingRight, lp.width);
        final int childHeightMeasureSpec = getChildMeasureSpec(parentHeightMeasureSpec,// 獲取 ChildView的heightMeasureSpec
                mPaddingTop + mPaddingBottom, lp.height);

        child.measure(childWidthMeasureSpec, childHeightMeasureSpec);
    }

   /**
     * 該方法是 measureChildren 中最繁重的部分,為每一個 ChildView 計算出自己的 MeasureSpec。
     * 目標是將 ChildView 的 MeasureSpec 和 LayoutParams 結合起來去得到一個最合適的結果。
     *
     * @param spec 對該 View 的測繪要求
     * @param padding 當前 View 在當前唯獨上的 paddingand,也有可能含有 margins
     *
     * @param childDimension 在當前維度上(height或width)的具體指
     * @return 子視圖的 MeasureSpec
     */
    public static int getChildMeasureSpec(int spec, int padding, int childDimension) {

            .........

        // 根據獲取到的子視圖的測量要求和大小創建子視圖的MeasureSpec
        return MeasureSpec.makeMeasureSpec(resultSize, resultMode);
    }

   /**
     *
     * 用於獲取 View 最終的大小,父視圖提供了寬、高的約束信息
     * 一個 View 的真正的測量工作是在 onMeasure(int, int) 中,由該方法調用。
     * 因此,只有 onMeasure(int, int) 可以而且必須被子類復寫
     *
     * @param widthMeasureSpec 在水平方向上,父視圖指定的的 Measure 要求
     * @param heightMeasureSpec 在豎直方向上,控件上父視圖指定的 Measure 要求
     *
     */
    public final void measure(int widthMeasureSpec, int heightMeasureSpec) {
      ...

      onMeasure(widthMeasureSpec, heightMeasureSpec);

      ...
    }

    protected void onMeasure(int widthMeasureSpec, int heightMeasureSpec) {
        setMeasuredDimension(getDefaultSize(getSuggestedMinimumWidth(), widthMeasureSpec),
                getDefaultSize(getSuggestedMinimumHeight(), heightMeasureSpec));
    }
首先要明確的是,子視圖的具體位置都是相對於父視圖而言的。View 的 onLayout 方法為空實現,而 ViewGroup 的 onLayout 為 abstract 的,因此,如果自定義的 View 要繼承 ViewGroup 時,必須實現 onLayout 函數。
在layout過程中,子視圖會調用getMeasuredWidth()和getMeasuredHeight()方法獲取到 measure 過程得到的 mMeasuredWidth 和 mMeasuredHeight,作為自己的 width 和 height。然後調用每一個子視圖的layout(l, t, r, b)函數,來確定每個子視圖在父視圖中的位置。
LinearLayout 的 onLayout 源碼分析
  @Override
    protected void onLayout(boolean changed, int l, int t, int r, int b) {
        if (mOrientation == VERTICAL) {
            layoutVertical(l, t, r, b);
        } else {
            layoutHorizontal(l, t, r, b);
        }
    }

    /**
     * 遍歷所有的子 View,為其設置相對父視圖的坐標
     */
    void layoutVertical(int left, int top, int right, int bottom) {
    for (int i = 0; i < count; i++) {
                final View child = getVirtualChildAt(i);
                if (child == null) {
                    childTop += measureNullChild(i);
                } else if (child.getVisibility() != GONE) {//不需要立即展示的View設置為GONE可加快繪制
                    final int childWidth = child.getMeasuredWidth();//measure過程確定的Width
                    final int childHeight = child.getMeasuredHeight();//measure過程確定的height

                    ...確定 childLeft、childTop 的值

                    setChildFrame(child, childLeft, childTop + getLocationOffset(child),
                            childWidth, childHeight);
                }
            }
    }

    private void setChildFrame(View child, int left, int top, int width, int height) {
        child.layout(left, top, left + width, top + height);
    }

    View.java
    public void layout(int l, int t, int r, int b) {
        ...
        setFrame(l, t, r, b)
    }

    /**
     * 為該子 View 設置相對其父視圖上的坐標
     */
     protected boolean setFrame(int left, int top, int right, int bottom) {
         ...
     }
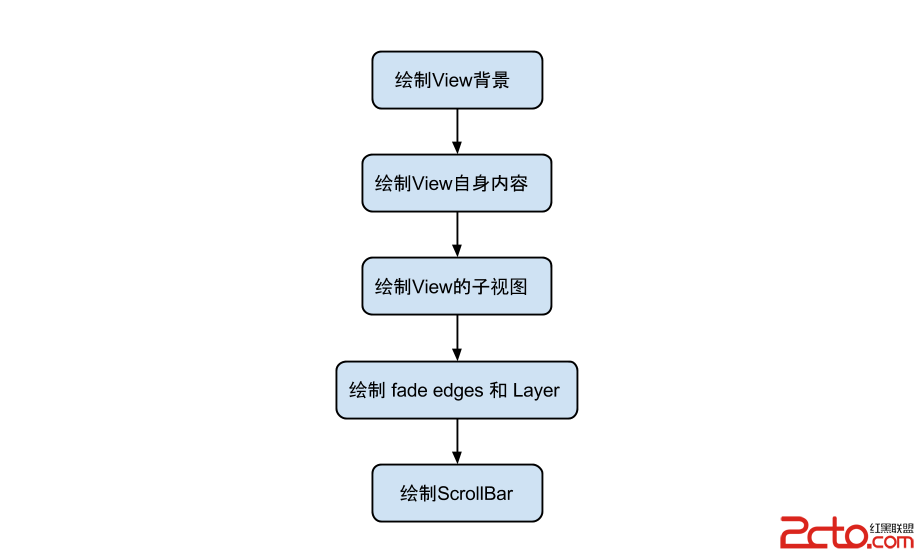
先來看下與 draw 過程相關的函數:
View.draw(Canvas canvas): 由於 ViewGroup 並沒有復寫此方法,因此,所有的視圖最終都是調用 View 的 draw 方法進行繪制的。在自定義的視圖中,也不應該復寫該方法,而是復寫 onDraw(Canvas) 方法進行繪制,如果自定義的視圖確實要復寫該方法,那麼請先調用 super.draw(canvas)完成系統的繪制,然後再進行自定義的繪制。
View.onDraw():
View的onDraw(Canvas)默認是空實現,自定義繪制過程需要復寫的方法,繪制自身的內容。
dispatchDraw() 發起對子視圖的繪制。View中默認是空實現,ViewGroup 復寫了dispatchDraw()來對其子視圖進行繪制。該方法我們不用去管,自定義的 ViewGroup 不應該對dispatchDraw()進行復寫。
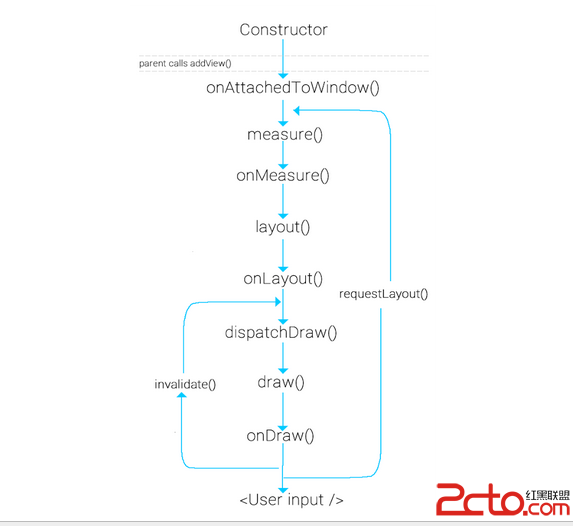
繪制流程圖
- View.draw(Canvas) 源碼分析
 /**
     * Manually render this view (and all of its children) to the given Canvas.
     * The view must have already done a full layout before this function is
     * called.  When implementing a view, implement
     * {@link #onDraw(android.graphics.Canvas)} instead of overriding this method.
     * If you do need to override this method, call the superclass version.
     *
     * @param canvas The Canvas to which the View is rendered.
     *
     * 根據給定的 Canvas 自動渲染 View(包括其所有子 View)。在調用該方法之前必須要完成 layout。當你自定義 view 的時候,
     * 應該去是實現 onDraw(Canvas) 方法,而不是 draw(canvas) 方法。如果你確實需要復寫該方法,請記得先調用父類的方法。
     */
    public void draw(Canvas canvas) {

        / * Draw traversal performs several drawing steps which must be executed
         * in the appropriate order:
         *
         *      1. Draw the background if need
         *      2. If necessary, save the canvas' layers to prepare for fading
         *      3. Draw view's content
         *      4. Draw children (dispatchDraw)
         *      5. If necessary, draw the fading edges and restore layers
         *      6. Draw decorations (scrollbars for instance)
         */

     // Step 1, draw the background, if needed
        if (!dirtyOpaque) {
            drawBackground(canvas);
        }

         // skip step 2 & 5 if possible (common case)
        final int viewFlags = mViewFlags;
        if (!verticalEdges && !horizontalEdges) {
            // Step 3, draw the content
            if (!dirtyOpaque) onDraw(canvas);

            // Step 4, draw the children
            dispatchDraw(canvas);

            // Step 6, draw decorations (scrollbars)
            onDrawScrollBars(canvas);

            if (mOverlay != null && !mOverlay.isEmpty()) {
                mOverlay.getOverlayView().dispatchDraw(canvas);
            }

            // we're done...
            return;
        }

        // Step 2, save the canvas' layers
        ...

        // Step 3, draw the content
        if (!dirtyOpaque)
            onDraw(canvas);

        // Step 4, draw the children
        dispatchDraw(canvas);

        // Step 5, draw the fade effect and restore layers

        // Step 6, draw decorations (scrollbars)
        onDrawScrollBars(canvas);
    }
由上面的處理過程,我們也可以得出一些優化的小技巧:當不需要繪制 Layer 的時候第二步和第五步會跳過。因此在繪制的時候,能省的 layer 盡可省,可以提高繪制效率
ViewGroup.dispatchDraw() 源碼分析
dispatchDraw(Canvas canvas){

...

 if ((flags & FLAG_RUN_ANIMATION) != 0 && canAnimate()) {//處理ChildView的動畫
     final boolean buildCache = !isHardwareAccelerated();
            for (int i = 0; i < childrenCount; i++) {
                final View child = children[i];
                if ((child.mViewFlags & VISIBILITY_MASK) == VISIBLE) {//只繪制 Visible 狀態的布局,因此可以通過延時加載來提高效率
                    final LayoutParams params = child.getLayoutParams();
                    attachLayoutAnimationParameters(child, params, i, childrenCount);// 添加布局變化的動畫
                    bindLayoutAnimation(child);//為Child綁定動畫
                    if (cache) {
                        child.setDrawingCacheEnabled(true);
                        if (buildCache) {
                            child.buildDrawingCache(true);
                        }
                    }
                }
            }

     final LayoutAnimationController controller = mLayoutAnimationController;
            if (controller.willOverlap()) {
                mGroupFlags |= FLAG_OPTIMIZE_INVALIDATE;
            }

    controller.start();// 啟動 View 的動畫
}

 // 繪制 ChildView
 for (int i = 0; i < childrenCount; i++) {
            int childIndex = customOrder ? getChildDrawingOrder(childrenCount, i) : i;
            final View child = (preorderedList == null)
                    ? children[childIndex] : preorderedList.get(childIndex);
            if ((child.mViewFlags & VISIBILITY_MASK) == VISIBLE || child.getAnimation() != null) {
                more |= drawChild(canvas, child, drawingTime);
            }
        }

...

}

protected boolean drawChild(Canvas canvas, View child, long drawingTime) {
        return child.draw(canvas, this, drawingTime);
}

/**
     * This method is called by ViewGroup.drawChild() to have each child view draw itself.
     * This draw() method is an implementation detail and is not intended to be overridden or
     * to be called from anywhere else other than ViewGroup.drawChild().
     */
    boolean draw(Canvas canvas, ViewGroup parent, long drawingTime) {
        ...
    }
drawChild(canvas, this, drawingTime)
直接調用了 View 的child.draw(canvas, this,drawingTime)方法,文檔中也說明了,除了被ViewGroup.drawChild()方法外,你不應該在其它任何地方去復寫或調用該方法,它屬於 ViewGroup。而View.draw(Canvas)方法是我們自定義控件中可以復寫的方法,具體可以參考上述對view.draw(Canvas)的說明。從參數中可以看到,child.draw(canvas, this, drawingTime) 肯定是處理了和父視圖相關的邏輯,但 View 的最終繪制,還是View.draw(Canvas)方法。
invalidate()
請求重繪 View 樹,即 draw 過程,假如視圖發生大小沒有變化就不會調用layout()過程,並且只繪制那些調用了invalidate()方法的 View。
requestLayout()
當布局變化的時候,比如方向變化,尺寸的變化,會調用該方法,在自定義的視圖中,如果某些情況下希望重新測量尺寸大小,應該手動去調用該方法,它會觸發measure()和layout()過程,但不會進行 draw。
 Android Layouts(Fragment)詳解
目錄:1.Fragment概述2.Fragment的生命周期3.Fragment靜態添加使用4.Fragment的動態添加使用5.Fragment之間的通信6.Fragm
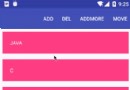 RecyclerView之更新UI數據的高級用法
以前在使用ListView當中,如果我們的列表數據發生了改變,我們會去調用Adapter.notifyDataSetChanged()去更新UI界面上的列表數據,當然這個
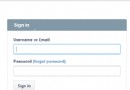 Android登錄界面賬號密碼輸入框選中時,選中背景變換的實現方法
關注finddreams,一起分享,一起進步:http://blog.csdn.net/finddreams/article/details/45502277 常常在網
 Android系統開發(2)——GDB調試工具
調試的過程我們在eclipse中來看一下一般調試的過程:1、debug模式編譯2、打上斷點3、運行調試4、單步調試step into:跳到函數體內部step over:不