編輯:關於Android編程
這是英文文檔的第三部分:IMAGE PIPELINE GUIDE
The image pipeline does everything necessary to get an image into a form where it can be rendered into an Android device.
The pipeline goes through the following steps when given an image to load:
This being an image library, an image is worth a thousand words:

(The 'disk' cache as pictured includes the encoded memory cache, to keep the logic path clearer.) See this page for more details on caching.
The pipeline can read from local files as well as network. PNG, GIF, and WebP are supported as well as JPEG.
WebP is often a useful image format, but Android did not support it at all until Android 3.0. Extended WebP format was not supported until Android 4.1.2.
The image pipeline transcodes unsupported WebP images into JPEG for you. This allows you to use WebP in your app all the way back to Android 2.3.
Most apps can initialize Fresco completely by the simple command:
Fresco.initialize(context);
For those apps that need more advanced customization, we offer it using theImagePipelineConfig class.
Here is a maximal example. Rare is the app that actually needs all of these settings, but here they are for reference.
ImagePipelineConfig config = ImagePipelineConfig.newBuilder()
    .setBitmapMemoryCacheParamsSupplier(bitmapCacheParamsSupplier)
    .setCacheKeyFactory(cacheKeyFactory)
    .setEncodedMemoryCacheParamsSupplier(encodedCacheParamsSupplier)
    .setExecutorSupplier(executorSupplier)
    .setImageCacheStatsTracker(imageCacheStatsTracker)
    .setMainDiskCacheConfig(mainDiskCacheConfig)
    .setMemoryTrimmableRegistry(memoryTrimmableRegistry)
    .setNetworkFetchProducer(networkFetchProducer)
    .setPoolFactory(poolFactory)
    .setProgressiveJpegConfig(progressiveJpegConfig)
    .setRequestListeners(requestListeners)
    .setSmallImageDiskCacheConfig(smallImageDiskCacheConfig)
    .build();
Fresco.initialize(context, config);
Be sure to pass your ImagePipelineConfig object to Fresco.initialize! Otherwise, Fresco will use a default configuration instead of the one you built.
Several of the configuration builder's methods take arguments of a Supplier of an instance rather than an instance itself. This is a little more complex to create, but allows you to change behaviors while your app is running. Memory caches, for one, check their Supplier every five minutes.
If you don't need to dynamically change the params, use a Supplier that returns the same object each time:
Supplier xSupplier = new Supplier() {
  public X get() {
    return new X(xparam1, xparam2...);
  }
);
// when creating image pipeline
.setXSupplier(xSupplier);
By default, the image pipeline uses three thread pools:
You can customize networking behavior by setting your own network layer.
To change the behavior for all other operations, pass in an instance of ExecutorSupplier.
The bitmap cache and the encoded memory cache are configured by a Supplier of aMemoryCacheParams object.
You use the builder pattern to create a DiskCacheConfig object:
DiskCacheConfig diskCacheConfig = DiskCacheConfig.newBuilder()
   .set....
   .set....
   .build()

// when building ImagePipelineConfig
.setMainDiskCacheConfig(diskCacheConfig)
If you want to keep track of metrics like the cache hit rate, you can implement theImageCacheStatsTracker class. This provides callbacks for every cache event that you can use to keep your own statistics.
The bitmap cache stores Android Bitmap objects. These are fully decoded images ready for display or postprocessing.
On Android 4.x and lower, the bitmap cache's data lives in the ashmem heap, not in the Java heap. This means that images don't force extra runs of the garbage collector, slowing down your app.
Android 5.0 has much improved memory management than earlier versions, so it is safer to leave the bitmap cache on the Java heap.
When your app is backgrounded, the bitmap cache is emptied.
This cache stores images in their original compressed form. Images retrieved from this cache must be decoded before display.
If other transformations, such as resizing, rotating or transcoding were requested, that happens before decode.
This cache is also emptied when your app is backgrounded.
(Yes, we know phones don't have disks, but it's too tedious to keep saying local storage cache...)
Like the encoded memory cache, this cache stores compressed image, which must be decoded and sometimes transformed before display.
Unlike the others, this cache is not cleared when your app is backgrounded, or if it exits, or even if the device is turned off. The user can, of course, always clear it from Android's Settings menu.
Most apps need only a single disk cache. But in some circumstances you may want to keep smaller images in a separate cache, to prevent them from getting evicted too soon by larger images.
To do this, just call both setMainDiskCacheConfig and setSmallImageDiskCacheConfig methods when configuring the image pipeline.
What defines small? Your app does. When making an image request, you set its ImageType:
ImageRequest request = ImageRequest.newBuilderWithSourceUri(uri)
    .setImageType(ImageType.SMALL)
If you need only one cache, you can simply avoid calling setSmallImageDiskCacheConfig. The pipeline will default to using the same cache for both and ImageType will be ignored.
When configuring the image pipeline, you can set the maximum size of each of the caches. But there are times when you might want to go lower than that. For instance, your application might have caches for other kinds of data that might need more space and crowd out Fresco's. Or you might be checking to see if the device as a whole is running out of storage space.
Fresco's caches implement the DiskTrimmable or MemoryTrimmable interfaces. These are hooks into which your app can tell them to do emergency evictions.
Your application can then configure the pipeline with objects implementing theDiskTrimmableRegistry and MemoryTrimmableRegistry interfaces.
These objects must keep a list of trimmables. They must use app-specific logic to determine when memory or disk space must be preserved. They then notify the trimmable objects to carry out their trims.
This page is intended for advanced usage only. Most apps should be using Drawees to interact with Fresco's image pipeline.
Using the image pipeline directly is challenging because of the memory usage. Drawees automatically keep track of whether or not your images need to be in memory. They will swap them out and load them back as soon as they need to be displayed. If you are using the image pipeline directly, your app must repeat this logic.
The image pipeline returns objects wrapped in a CloseableReference. Drawees call the.close() method on these objects when they are finished with them. If your app is not using Drawees, it must do the same.
The Java garbage collector will free image memory when Bitmap objects go out of scope, but this may be too late. Garbage collection is expensive, and relying on it for large objects leads to performance issues. This is especially true on Android 4.x and lower, when Android did not maintain a separate memory space for Bitmaps.
You must build an image request. Having done that, you can pass it directly to theImagePipeline:
ImagePipeline imagePipeline = Fresco.getImagePipeline();
DataSource>
    dataSource = imagePipeline.fetchDecodedImage(imageRequest);
See the page on DataSources for information on how to receive data from them.
If you don't want to decode the image, but want to keep it in its original compressed format, just use fetchEncodedImage instead:
DataSource>
    dataSource = imagePipeline.fetchEncodedImage(imageRequest);
Lookups to the bitmap cache, unlike the others, are done in the UI thread. If a Bitmap is there, you get it instantly.
DataSource> dataSource =
    imagePipeline.fetchImageFromBitmapCache(imageRequest);
try {
  CloseableReference imageReference = dataSource.getResult();
  if (imageReference != null) {
    try {
      CloseableImage image = imageReference.get();
      // do something with the image
    } finally {
      CloseableReference.closeSafely(imageReference);
    }
  }
} finally {
  dataSource.close();
}
Do not skip this finally blocks!
Prefetching images in advance of showing them can sometimes lead to shorter wait times for users. Remember, however, that there are trade-offs. Prefetching takes up your users' data, and uses up its share of CPU and memory. As a rule, prefetching is not recommended for most apps.
Nonetheless, the image pipeline allows you to prefetch to either disk or bitmap cache. Both will use more data for network URIs, but the disk cache will not do a decode and will therefore use less CPU.
Prefetch to disk:
imagePipeline.prefetchToDiskCache(imageRequest);
Prefetch to bitmap cache:
imagePipeline.prefetchToBitmapCache(imageRequest);
A DataSource is, like a Java Future, the result of an asynchronous computation. The different is that, unlike a Future, a DataSource can return you a whole series of results from a single command, not just one.
After submitting an image request, the image pipeline returns a data source. To get a result out if it, you need to use a DataSubscriber.
If your request to the pipeline is for a decoded image - an Android Bitmap, you can take advantage of our easier-to-use BaseBitmapDataSubscriber:
dataSource.subscribe(new BaseBitmapDataSubscriber() {
    @Override
    public void onNewResultImpl(@Nullable Bitmap bitmap) {
       // You can use the bitmap in only limited ways
      // No need to do any cleanup.
    }

    @Override
    public void onFailureImpl(DataSource dataSource) {
      // No cleanup required here.
    }
  });
A snap to use, right? There is a caveat.
You can not assign the bitmap to any variable not in the scope of the onNewResultImplmethod. The reason is that, after the subscriber has finished executing, the image pipeline will recycle the bitmap and free its memory. If you try to draw the bitmap after that, your app will crash with an IllegalStateException.
If you want to keep the bitmap around, you can't use raw Bitmaps at all. You must make use of closeable references and the BaseDataSubscriber:
DataSubscriber dataSubscriber =
    new BaseDataSubscriber>() {
  @Override
  public void onNewResultImpl(
      DataSource> dataSource) {

    if (!dataSource.isFinished()) {
      FLog.v("Not yet finished - this is just another progressive scan.");
    }

    CloseableReference imageReference = dataSource.getResult();
    if (imageReference != null) {
      try {
        CloseableImage image = imageReference.get();
        // do something with the image
      } finally {
        imageReference.close();
      }
    }
  }
  @Override
  public void onFailureImpl(DataSource dataSource) {
    Throwable throwable = dataSource.getFailureCause();
    // handle failure
  }
};

dataSource.subscribe(dataSubscriber, executor);
If you want to deviate from the example above and assign the CloseableReference to another variable somewhere else, you can. Just be sure to follow the rules.
This page is intended for advanced usage only.
Most apps should use Drawees and not worry about closing.
The Java language is garbage-collected and most developers are used to creating objects willy-nilly and taking it for granted they will eventually disappear from memory.
Until Android 5.0's improvements, this was not at all a good idea for Bitmaps. They take up a large share of the memory of a mobile device. Their existence in memory would make the garbage collector run more frequently, making image-heavy apps slow and janky.
Bitmaps were the one thing that makes Java developers miss C++ and its many smart pointer libraries, such as Boost.
Fresco's solution is found in the CloseableReference class. In order to use it correctly, you must follow the rules below:
Here, we create a reference, but since we're passing it to a caller, the caller takes it:
CloseableReference foo() {
  Val val;
  return CloseableReference.of(val);
}
Here we create a reference, but are not passing it to a caller. So we must close it:
void gee() {
  CloseableReference ref = foo();
  try {
    haa(ref);
  } finally {
    ref.close();
  }
}
The finally block is almost always the best way to do this.
Here, we are receiving the reference via argument. The caller is still the owner, so we are not supposed to close it.
void haa(CloseableReference ref) {
  Log.println("Haa: " + ref.get());
}
If we called .close() here by mistake, then if the caller tried to call .get(), anIllegalStateException would be thrown.
If we need to hold onto the reference, we need to clone it.
If using it in a class:
class MyClass {
  CloseableReference myValRef;

  void mmm(CloseableReference ref) {
    myValRef = ref.clone();
  };
  // caller can now safely close its copy as we made our own clone.

  void close() {
    CloseableReference.closeSafely(myValRef);
  }
}
// Now the caller of MyClass must close it!
If using it in an inner class:
void haa(CloseableReference ref) {
  final CloseableReference refClone = ref.clone();
  executor.submit(new Runnable() {
    public void run() {
      try {
        Log.println("Haa Async: " + refClone.get());
      } finally {
        refClone.close();
      }
    }
  });
  // caller can now safely close its copy as we made our own clone.
}
 sd卡壞了怎麼辦 sd卡壞了能修復嗎 sd卡壞了數據恢復
相信不少朋友在平常的學習和工作當中都會用到SD存儲卡,雖然它具有是很強大的存儲功能,但同時也是非常脆弱的。一旦SD卡罷工,真是欲哭無淚。那麼到底sd卡壞了怎
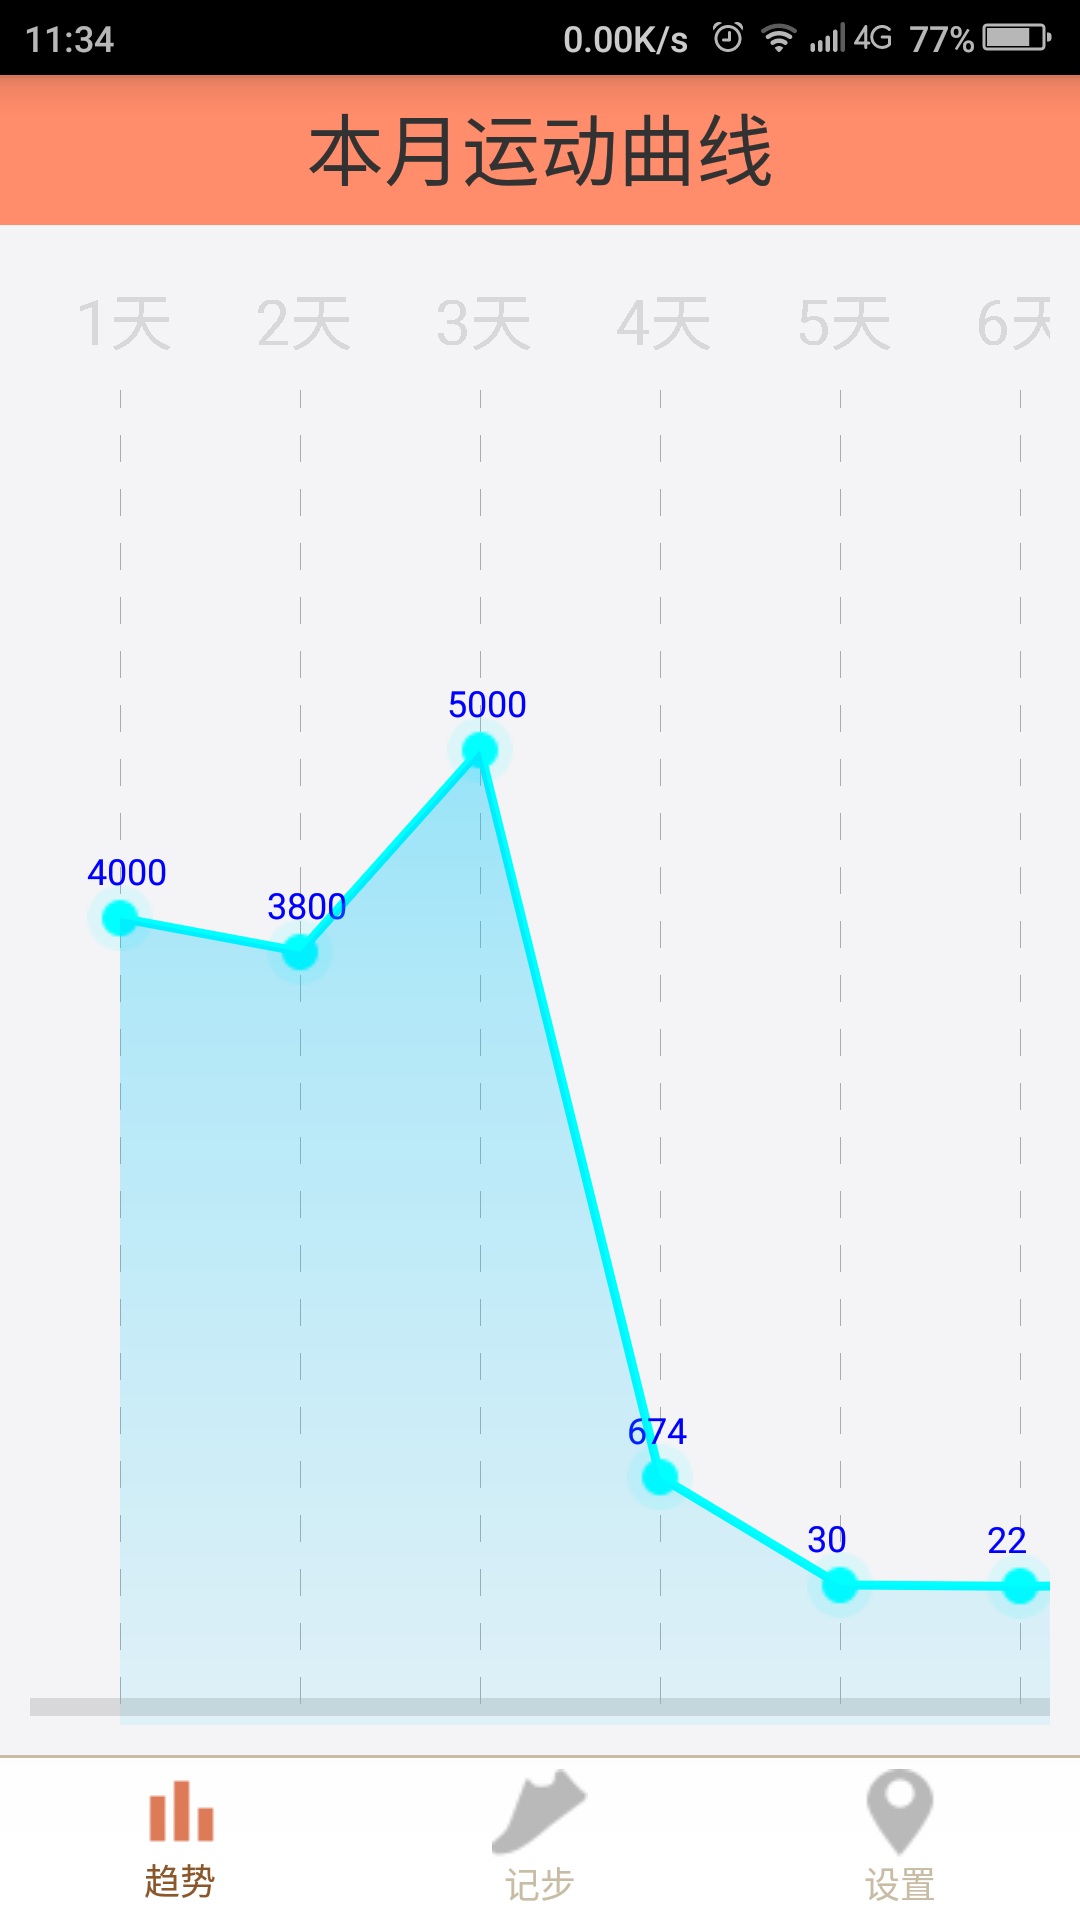 Android中自定義折線圖
有時候,我們在做開發的時候,需要讓用戶更直觀的看到數據變化,而又不應該給其提供一堆表格顯示,有時候就需要用到,類似Excel中的圖表,可是Google官方並沒有提供自帶的
 Android Tab -- 使用Fragment、FragmentManager來實現
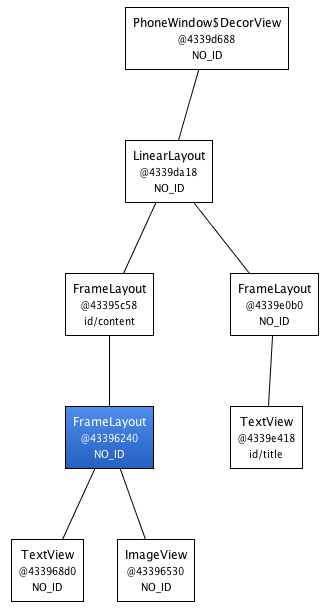
效果: 代碼:https://github.com/ldb-github/Layout_Tab1、布局:使用LinearLayout布置標簽;再使用FrameL
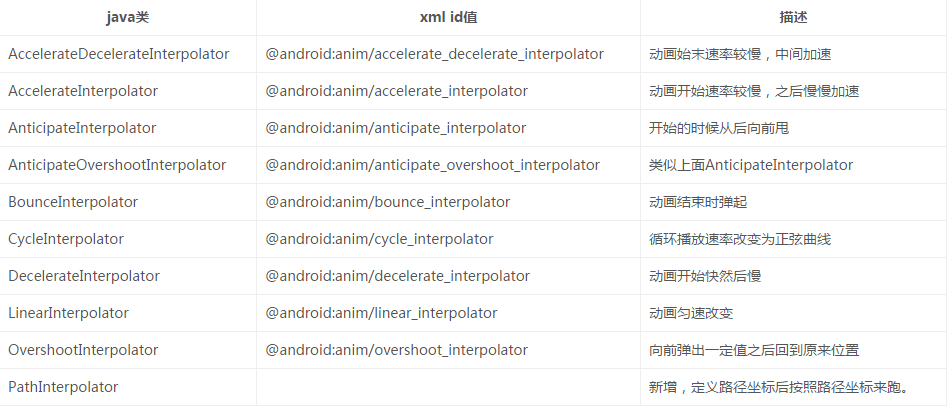 Android 動畫(View動畫,幀動畫,屬性動畫)詳細介紹
0. 前言 Android動畫是面試的時候經常被問到的話題。我們都知道Android動畫分為三類:View動畫、幀動畫和屬性動畫。先對這三種動畫做一個概述:V