編輯:關於Android編程
Android應用程序框架層中的ActivityManagerService啟動Activity的過程大致如下圖所示:
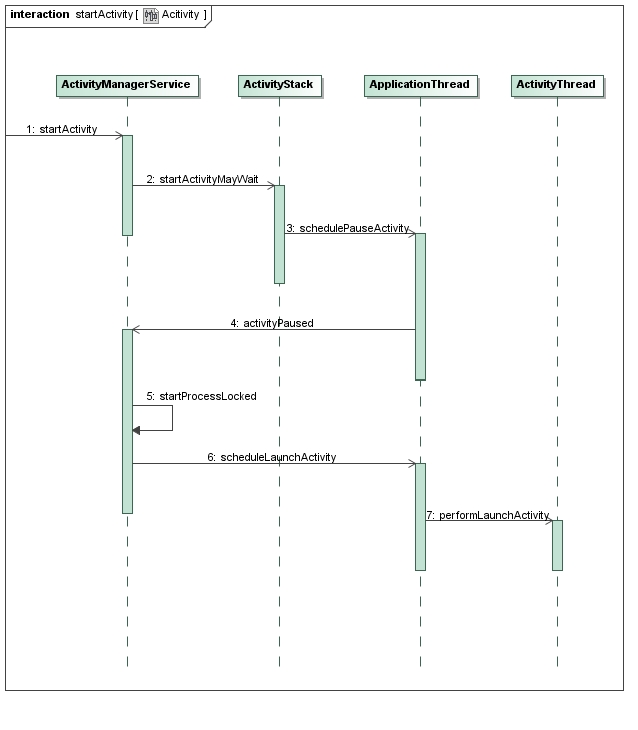
具體啟動過程不再做過多贅述,我們這裡只需要知道通過ActivityManagerService把這個啟動Activity的操作轉發給ActivityThread,ActivityThread通過ClassLoader導入相應的Activity類,然後把它啟動起來。
目錄(Android4.4/frameworks/base/core/java/android/app/ActivityThread.java)
那麼,我們下一步進入到ActivityThread執行handleLaunchActivity
private void handleLaunchActivity(ActivityClientRecord r, Intent customIntent)
{
.........
Activity a = performLaunchActivity(r, customIntent);
if (a != null) {
......
handleResumeActivity(r.token, false, r.isForward,!r.activity.mFinished && !r.startsNotResumed);
.......
}
.....
}
public final class ActivityThread {

	......

	private final Activity performLaunchActivity(ActivityClientRecord r, Intent customIntent) {

		ActivityInfo aInfo = r.activityInfo;
		if (r.packageInfo == null) {
			r.packageInfo = getPackageInfo(aInfo.applicationInfo,
				Context.CONTEXT_INCLUDE_CODE);
		}

		ComponentName component = r.intent.getComponent();
		if (component == null) {
			component = r.intent.resolveActivity(
				mInitialApplication.getPackageManager());
			r.intent.setComponent(component);
		}

		if (r.activityInfo.targetActivity != null) {
			component = new ComponentName(r.activityInfo.packageName,
				r.activityInfo.targetActivity);
		}
//以上 為收集Activity的Package 和 Component  信息
		Activity activity = null;
		try {
			java.lang.ClassLoader cl = r.packageInfo.getClassLoader();
			activity = mInstrumentation.newActivity(
				cl, component.getClassName(), r.intent);
			r.intent.setExtrasClassLoader(cl);
			if (r.state != null) {
				r.state.setClassLoader(cl);
			}
		} catch (Exception e) {
			......
		}
//通過ClassLoade 根據收集的信息把你的Activity加載進來
		try {
			Application app = r.packageInfo.makeApplication(false, mInstrumentation);
//根據AndroidManifest.xml配置文件中的Application標簽的信息來創建
			......

			if (activity != null) {
				ContextImpl appContext = new ContextImpl();
				appContext.init(r.packageInfo, r.token, this);
				appContext.setOuterContext(activity);
				CharSequence title = r.activityInfo.loadLabel(appContext.getPackageManager());
				Configuration config = new Configuration(mConfiguration);
				......
				activity.attach(appContext, this, getInstrumentation(), r.token,
					r.ident, app, r.intent, r.activityInfo, title, r.parent,
					r.embeddedID, r.lastNonConfigurationInstance,
					r.lastNonConfigurationChildInstances, config);
//這裡正式開始我們的窗口創建
				if (customIntent != null) {
					activity.mIntent = customIntent;
				}
				r.lastNonConfigurationInstance = null;
				r.lastNonConfigurationChildInstances = null;
				activity.mStartedActivity = false;
				int theme = r.activityInfo.getThemeResource();
				if (theme != 0) {
					activity.setTheme(theme);
				}

				activity.mCalled = false;
				mInstrumentation.callActivityOnCreate(activity, r.state);
				......
				r.activity = activity;
				r.stopped = true;
				if (!r.activity.mFinished) {
					activity.performStart();
					r.stopped = false;
				}
				if (!r.activity.mFinished) {
					if (r.state != null) {
						mInstrumentation.callActivityOnRestoreInstanceState(activity, r.state);
					}
				}
				if (!r.activity.mFinished) {
					activity.mCalled = false;
					mInstrumentation.callActivityOnPostCreate(activity, r.state);
					if (!activity.mCalled) {
						throw new SuperNotCalledException(
							"Activity " + r.intent.getComponent().toShortString() +
							" did not call through to super.onPostCreate()");
					}
				}
			}
			r.paused = true;

			mActivities.put(r.token, r);

		} catch (SuperNotCalledException e) {
			......

		} catch (Exception e) {
			......
		}

		return activity;
	}

	......
}
final void attach(Context context,ActivityThread aThread,
 Instrumentation instr, IBinder token,Application application,
Intent intent, ActivityInfo info, CharSequence title,Application application,
 Intent intent, ActivityInfo info, CharSequence title,Configuration config)
{
attach(context, aThread, instr, token, 0, application,intent, info, title,
parent, id,lastNonConfigurationInstances, config);
}

final void attach(Context context, ActivityThread aThread,
Instrumentation instr, IBinder token, int ident,Application application,

 Intent intent, ActivityInfo info,CharSequence title, Activity parent, String id,NonConfigurationInstances lastNonConfigurationInstances,
Configuration config) {
.....
mWindow = PolicyManager.makeNewWindow(this);
mWindow.setCallback(this);
......
//基本信息初始化
.......
mWindow.setWindowManager(
(WindowManager)context.getSystemService(Context.WINDOW_SERVICE),
mToken, mComponent.flattenToString(),
(info.flags & ActivityInfo.FLAG_HARDWARE_ACCELERATED) != 0);
if (mParent != null) {
      mWindow.setContainer(mParent.getWindow());
}
 mWindowManager = mWindow.getWindowManager();     ......}
走到這裡,我們終於看到了我們的Window 我們知道,在Android中,每一個Activity組件都有一個關聯的Window對象,用來描述一個應用程序窗口。 每一個應用程序窗口內部又包含有一個View對象,用來描述應用程序窗口的視圖。應用程序窗口視圖是真正用來實現UI內容和布局的,也就是說,每一個Activity組件的UI內容和布局都是通過與其所關聯的一個Window對象的內部的一個View對象來實現的 目錄(Android 4.4/frameworks/base/core/java/com/android/internal/policy/PolicyManager.java)
public final class PolicyManager {
private static final String POLICY_IMPL_CLASS_NAME =
"com.android.internal.policy.impl.Policy";
private static final IPolicy sPolicy;
static {
try{
Class policyClass = Class.forName(POLICY_IMPL_CLASS_NAME);
sPolicy = (IPolicy)policyClass.newInstance();
}catch(....){
.......
}
}
public static Window makeNewWindow(Context context) {
return sPolicy.makeNewWindow(context);
}

public static LayoutInflater makeNewLayoutInflater(Context context) {
return sPolicy.makeNewLayoutInflater(context);
}

public static WindowManagerPolicy makeNewWindowManager() {
return sPolicy.makeNewWindowManager();
}
}
public class Policy implements IPolicy {
private static final String[] preload_classes = {
"com.android.internal.policy.impl.PhoneLayoutInflater",
"com.android.internal.policy.impl.PhoneWindow",
.....
};

static {
for (String s : preload_classes) {
try{
Class.forName(s);
}catch (ClassNotFoundException ex) {
}
}
public Window makeNewWindow(Context context) {
return new PhoneWindow(context);
}
public LayoutInflater makeNewLayoutInflater(Context context) {
return new PhoneLayoutInflater(context);
}
public WindowManagerPolicy makeNewWindowManager() {
return new PhoneWindowManager();
}
}
 說說Android應用的persistent屬性
1 啟動persistent應用 在Android系統中,有一種永久性應用。它們對應的AndroidManifest.xml文件裡,會將per
 Android中的復制粘貼
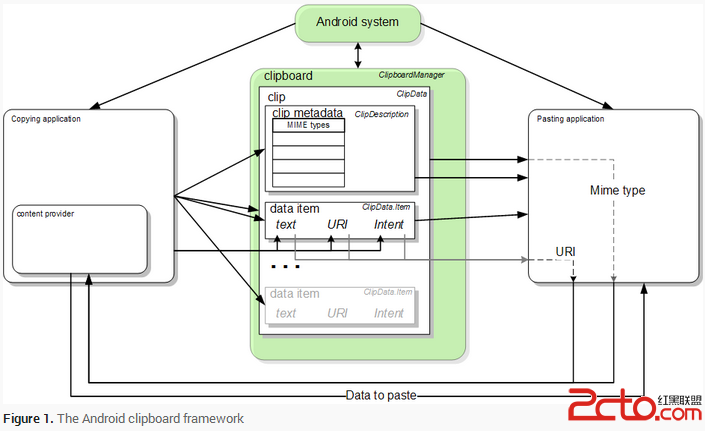
Android中的復制粘貼 The Clipboard Framework 當使用clipboard framework時,把數據放在一個
 飛信忘記密碼怎麼辦?
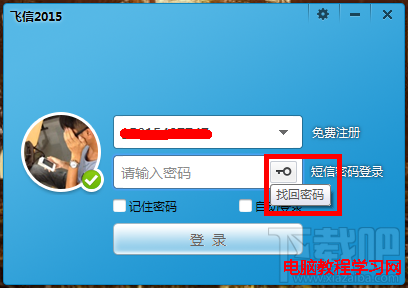
飛信現在在生活之中運用越來越廣泛,他是中國移動推出的一款可以免費點對點短信的軟件,那麼如果我們把密碼忘記了怎麼辦呢?怎樣修改呢?下面小編來給大家介紹怎樣去找
 Unity3D UNET 模仿局域網游戲
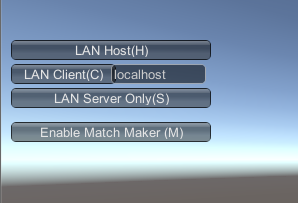
這兩天在學習的過程中,發現一個講Unity的unet組件的好教程,在這裡分享給大家。新建一個 UnetProject。新建一個GameObject重命名為Network