編輯:關於Android編程
锲而捨之,朽木不折;锲而不捨,金石可镂。——荀況
今天學習了一下Service的用法就和大家一起來討論Android中Service的相關知識點,如有謬誤,歡迎批評指正,如有疑問歡迎留言。
一、Service用途
Service在Android中和Activity是屬於同一級別上的組件,Android中的Service,其意思是“服務”,它在後台運行不可交互。Service自己不能運行,需要通過某一個Activity或者其它Context對象來調用,Context.startService()和Context.bindService()兩種方式啟動 Service 。 Service在Android中和Activity是屬於同一級別上的組件,Android 中的Service ,其意思是“服務”,它是在後台運行,不可交互的。Service自己不能運行,需要通過某一個Activity或者其它Context對象來調用,Context.startService()和Context.bindService()兩種方式啟動 Service 。
Android 中的服務,它與 Activity不同,它是不能與用戶交互的,不能自己啟動的,運行在後台的程序(干著重的工作,卻連個界面也沒有,因此我說它低調),如果我們退出應用時, Service進程並沒有結束,它仍然在後台運行,那我們什麼時候會用到Service呢?比如我們播放音樂的時候,有可能想邊聽音樂邊干些其他事情,當我們退出播放音樂的應用,如果不用 Service,我們就聽不到歌了,所以這時候就得用到Service了,又比如當我們一個應用的數據是通過網絡獲取的,不同時間(一段時間)的數據是不同的,這時候我們可以用 Service在後台定時更新,而不用每打開應用的時候在去獲取。如果在 Service的 onCreate或者 onStart方法中做一些很耗時的動作,最好是啟動一個新線程來運行這個 Service,因為,如果 Service運行在主線程中,會影響到程序的 UI操作或者阻塞主線程中的其它事情。
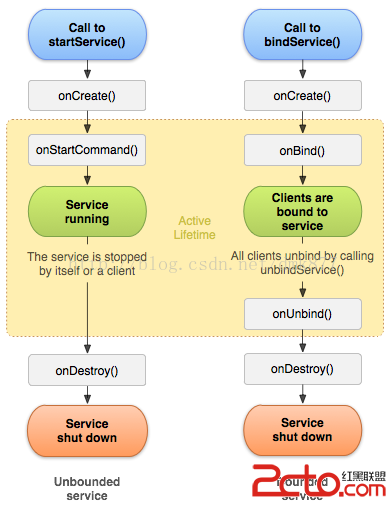
二、Service的生命周期
首先來看官網給出的Service的生命周期圖
1.onCreate() 創建Service

代碼如下: 1.Service的代碼
package com.example.servicepractice;

import android.app.Service;
import android.content.Intent;
import android.os.Binder;
import android.os.IBinder;
import android.util.Log;

public class MyService extends Service {

     private static final String TAG = MyService;

     @Override
     public void onCreate() {
            super.onCreate();
           Log. i(TAG,onCreate called );
     }

     @Override
     public void onStart(Intent intent, int startId) {
            super. onStart(intent, startId);
           Log. i(TAG,onStart called );
     }

     @Override
     public int onStartCommand(Intent intent, int flags, int startId) {
           Log. i(TAG,onStartCommand called );
            return super.onStartCommand(intent, flags, startId);
     }

     @Override
     public void onDestroy() {
            super.onDestroy();
           Log. i(TAG,onDestroy called );
     }

     @Override
     public IBinder onBind(Intent intent) {
           Log. i(TAG,onBind called );
            return null;
     }

     @Override
     public boolean onUnbind(Intent intent) {
           Log. i(TAG,onUnbind called );
            return super.onUnbind(intent);
     }
}
2.MainActivity的代碼
package com.example.servicepractice;

import android.os.Bundle;
import android.os.IBinder;
import android.app.Activity;
import android.content.ComponentName;
import android.content.Context;
import android.content.Intent;
import android.content.ServiceConnection;
import android.util.Log;
import android.view.Menu;
import android.view.View;
import android.view.View.OnClickListener;
import android.view.ViewGroup.LayoutParams;
import android.widget.Button;

public class MainActivity extends Activity {

     protected static final String TAG = MyService;

     private Button btn_start;
     private Button btn_stop;

     private Button btn_bind;
     private Button btn_unbind;
     @Override
     protected void onCreate(Bundle savedInstanceState) {
            super.onCreate(savedInstanceState);
           setContentView(R.layout. activity_main);

           findViews();

           setClick();
     }


     private void findViews() {
            btn_start=(Button) findViewById(R.id. btn_start);
            btn_stop=(Button) findViewById(R.id. btn_stop);

            btn_bind=(Button) findViewById(R.id. btn_bind);
            btn_unbind=(Button) findViewById(R.id. btn_unbind);

     }

     private void setClick() {
            //采用startService啟動服務
            btn_start.setOnClickListener( new OnClickListener() {

                 public void onClick(View v) {
                     Intent intent= new Intent(MainActivity.this,MyService.class );
                     startService(intent);
                }
           });
            //銷毀服務
            btn_stop.setOnClickListener( new OnClickListener() {

                 public void onClick(View v) {
                     Intent intent= new Intent(MainActivity.this,MyService.class );
                     stopService(intent);
                }
           });
            //綁定服務
            btn_bind.setOnClickListener( new OnClickListener() {

                 public void onClick(View v) {
                     Intent intent = new Intent(MainActivity.this,MyService.class );
                     bindService(intent, conn,Context. BIND_AUTO_CREATE);
                }
           });
            //解除綁定
            btn_unbind.setOnClickListener( new OnClickListener() {

                 public void onClick(View v) {
                     unbindService( conn);
                }
           });
     }

  private ServiceConnection conn=new ServiceConnection() {

       public void onServiceConnected(ComponentName name, IBinder service) {
                 //connected
                Log. i(TAG,onServiceConnection called. );
           }

     public void onServiceDisconnected(ComponentName name) {


     }
 };
}
因為服務是四大組件之一所以我們要在清單文件中配置,注意:如果啟動的服務沒有在清單文件中配置並不會報錯(這種錯誤很難發現,切記要配置),只是啟動時不啟動這個服務,所以在開發時一定要注意養成一個好的習慣--->對於四大組件一定要聲明好之後就去配置否則如果忘記了還得花好長時間去尋找錯誤 配置代碼如下:
如果我們的服務只在本應用中調用可以去掉
            //采用startService啟動服務
            btn_start.setOnClickListener( new OnClickListener() {

                 public void onClick(View v) {
                     Intent intent= new Intent(MainActivity.this,MyService.class );
                     startService(intent);
                }
           });

            //銷毀服務
            btn_stop.setOnClickListener( new OnClickListener() {

                 public void onClick(View v) {
                      Intent intent=new Intent(MainActivity.this,MyService. class);
                     stopService(intent);
                }
           });
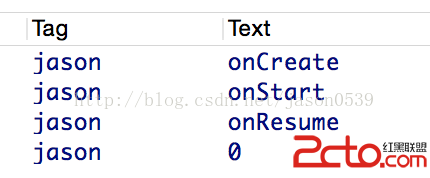
首先我們點擊啟動按鈕打印日志如下


我們發現再次啟動時系統並沒有重新實例化這個Service,因為系統發現這個服務已經啟動了,此時它會直接調用onStartCommand方法,在onStartCommand方法中會調用onStart方法
onStartCommand方法的源碼:
     /* @param intent The Intent supplied to {@link android.content.Context#startService},
     * as given.  This may be null if the service is being restarted after
     * its process has gone away, and it had previously returned anything
     * except {@link #START_STICKY_COMPATIBILITY}.
     * @param flags Additional data about this start request.  Currently either
     * 0, {@link #START_FLAG_REDELIVERY}, or {@link #START_FLAG_RETRY}.
     * @param startId A unique integer representing this specific request to
     * start.  Use with {@link #stopSelfResult(int)}.
     *
     * @return The return value indicates what semantics the system should
     * use for the service's current started state.  It may be one of the
     * constants associated with the {@link #START_CONTINUATION_MASK} bits.
     *
     * @see #stopSelfResult(int)
     */
    public int onStartCommand(Intent intent, int flags, int startId) {
        onStart(intent , startId);
        return mStartCompatibility ? START_STICKY_COMPATIBILITY : START_STICKY;
    }
操作完啟動服務按鈕後我們接著點擊銷毀服務按鈕打印日志如下
發現當調用 stopService(intent)這個方法是會調用Service的onDestroy方法從而銷毀服務。
2.綁定服務和解除綁定的學習
          //綁定服務
            btn_bind.setOnClickListener( new OnClickListener() {

                 public void onClick(View v) {
                     Intent intent = new Intent(MainActivity.this,MyService.class );
                     bindService(intent, conn,Context. BIND_AUTO_CREATE);
                }
           });
            //解除綁定
            btn_unbind.setOnClickListener( new OnClickListener() {

                 public void onClick(View v) {
                     unbindService( conn);
                }
           });
通過上面的 bindService(intent,conn,Context. BIND_AUTO_CREATE)這個方法我們發現通過需要一個ServiceConnection對象,ServiceConnection代表與服務的連接,它只有兩個方法,onServiceConnected和onServiceDisconnected,前者是在操作者在連接一個服務成功時被調用,而後者是在服務崩潰或被殺死導致的連接中斷時被調用,而如果我們自己解除綁定時則不會被調用,所以我們這裡只研究onServiceConnected這個方法。
  private ServiceConnection conn= new ServiceConnection() {
     /**
     * Called when a connection to the Service has been established, with
     * the {@link android.os.IBinder} of the communication channel to the
     * Service.
     *
     * @param name The concrete component name of the service that has
     * been connected.
     *
     * @param service The IBinder of the Service's communication channel,
     * which you can now make calls on.
     */
       public void onServiceConnected(ComponentName name, IBinder service) {
                 //connected
                Log. i( TAG,onServiceConnection called. );
           }

     /**
     * Called when a connection to the Service has been lost.  This typically
     * happens when the process hosting the service has crashed or been killed.
     * This does not  remove the ServiceConnection itself -- this
     * binding to the service will remain active, and you will receive a call
     * to {@link #onServiceConnected} when the Service is next running.
     *
     * @param name The concrete component name of the service whose
     * connection has been lost.
     */
      public void onServiceDisconnected(ComponentName name) {

     }
};
到這我們還差一步就可以綁定服務了,因為在前面服務中的onBind方法返回值為null,這樣是不行的,要想實現綁定操作,必須返回一個實現了IBinder接口類型的實例,該接口描述了與遠程對象進行交互的抽象協議,有了它我們才能與服務進行交互。所以我們要修改代碼
     @Override
     public IBinder onBind(Intent intent) {
           Log. i(TAG,onBind called );
            return new Binder(){};
     }
上面的代碼中返回了一個Binder的實例,而這個Binder恰恰是實現了IBinder接口,所以這樣就可以實現綁定服務的操作了
首先我們點擊一下”綁定服務“按鈕打印日志如下
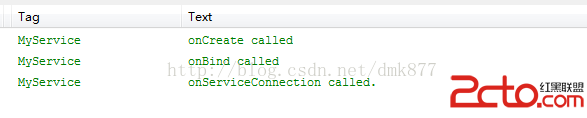 我們發現onCreate方法、onBind方法和onServiceConnection方法被調用了,此時服務已經進入運行狀態,如果此時我們再次點擊”綁定服務“按鈕,這三個方法都不會被調用然後點擊”解除綁定“按鈕打印日志如下
  可以看到onUnbind方法和onDestroy方法被調用了,此時Service已經被銷毀,整個生命周期結束。 由於bindService啟動的服務是和應用綁定到一起的所以當MainActivity退出程序時,服務也會隨之結束。 下面我們來說一種情況當我們點擊綁定服務按鈕之後我們點擊兩次“解除綁定”按鈕會發現程序崩潰了,日志如下
  還有一種情況,當我們點擊“綁定服務”按鈕後此時服務已經運行了,此時我們直接按“返回”鍵程序退出了,我們看到日志會報一個錯
 我們要解決這兩種問題,我們可以定義一個變量,然後在Activity的onDestroy方法中解除綁定就ok了,也就是做如下修改
     //定義一個變量,標識這個服務是否處於綁定狀態
     private boolean binded;
     //定義一個綁定服務的方法
     private void unbindService(){
         if( binded){
                unbindService( conn);
                 binded= false;
           }
      }

      //解除綁定
    btn_unbind.setOnClickListener( new OnClickListener() {

     public void onClick(View v) {
         unbindService();
           }
     });
   //在onDestroy方法中調用解除綁定的方法
      protected void onDestroy() {
           unbindService();
     };
這樣上面兩種錯誤就解決了,也體現了我們寫代碼的嚴謹性。
 這個和我們前面討論的匹配沒有問題,接著我們按下綁定服務按鈕打印日志如下


1、在調用 bindService 綁定到Service的時候,你就應當保證在某處調用 unbindService 解除綁定(盡管 Activity 被 finish 的時候綁定會自動解除,並且Service會自動停止);
2、在使用 startService 啟動服務之後,一定要使用 stopService停止服務,不管你是否使用bindService;
3、同時使用 startService 與 bindService 要注意到,Service 的終止,需要unbindService與stopService同時調用,才能終止 Service,不管 startService 與 bindService 的調用順序,如果先調用 unbindService 此時服務不會自動終止,再調用 stopService 之後服務才會停止,如果先調用 stopService 此時服務也不會終止,而再調用 unbindService 或者 之前調用 bindService 的 Context 不存在了(如Activity 被 finish 的時候)之後服務才會自動停止;
4、當在旋轉手機屏幕的時候,當手機屏幕在“橫”“豎”變換時,此時如果你的Activity 如果會自動旋轉的話,旋轉其實是 Activity 的重新創建,因此旋轉之前的使用 bindService 建立的連接便會斷開(Context 不存在了),對應服務的生命周期與上述相同。
5、在 sdk 2.0 及其以後的版本中,對應的 onStart 已經被否決變為了 onStartCommand,不過之前的 onStart 任然有效。這意味著,如果你開發的應用程序用的 sdk 為 2.0 及其以後的版本,那麼你應當使用 onStartCommand 而不是 onStart。
6、startService 啟動服務想要用startService啟動服務,不管Local (本地)還是 Remote(遠程) 我們需要做的工作都是一樣簡單。當然要記得在Androidmanifest.xml 中注冊 service。
 android開發之activity橫豎屏切換時的生命周期以及橫豎屏切換時的資源適配方案
背景:之前有過兩篇寫activity的博客 android之activity的生命周期詳解:詳細介紹了activity的整個生命周期、各狀態間的轉換和返回桌
 Android繪圖機制與處理技巧
一.屏幕的尺寸信息1屏幕參數屏幕大小 指屏幕對角線的長度,通常使用”寸”來度量,例如4.7寸手機 5.5寸手機等.分辨率 分辨率是指手機屏幕的像素
 Android學習之 換膚功能模塊的實現(二)
在上篇中 主要有學習到皮膚資源內置到應用程序中 的方式實現換膚的 基本思路,本篇將繼續以上篇的思路學習 皮膚資源內置的方式實現換膚效果、但本篇側重於應用中換膚功能的代碼設
 Android常見控件初探
溫故而知新。最近復習了一些android常用控件,接下來,根據android 官方API,總結一下它們的一些常見用法。(開發測試環境為Android4.4) 一、Text