編輯:關於Android編程
Android 中使用代碼動態布局
本文介紹在android中使用代碼動態布局,有時候根據不同的需求,比如需要根據服務器上的條目個數來決定app中頁面布局控件(顯示個數,圖標等)。此處介紹通過java代碼進行動態布局。

圖片隨便找的,將就將就吧
<framelayout android:clickable="true" android:layout_height="84dp" android:layout_weight="1.0" android:layout_width="match_parent" xmlns:android="http://schemas.android.com/apk/res/android">


</framelayout>
/**
 * @author gao_chun
 *
 */
public class MainActivity extends Activity implements OnClickListener{

    private ViewGroup mMoreLayout;  //父布局容器(動態加載的資源圖片和文字等布局都將添加在其裡面)

    /* (non-Javadoc)
     * @see app.ui.TitleActivity#onCreate(android.os.Bundle)
     */
    @Override
    protected void onCreate(Bundle savedInstanceState) {
        super.onCreate(savedInstanceState);
        initUI();   //保證啟動方法的唯一性
    }

    private void initUI() {
        setContentView(R.layout.activity_main);

        //找到該容器(這裡的控件為LinearLayout,轉換為ViewGroup是因為ViewGroup是容器的基類)
        mMoreLayout = (ViewGroup) findViewById(R.id.layout_more);

        //由於文字也是動態生成,使用android中array文件定義資源文件,並取出
        final String[] categories = getResources().getStringArray(R.array.categories);

        final int size = categories.length;     //String[]的長度
        final int rowCount = size / 3;          //需要布局的行數(每行三個)

        /**
         * 動態添加布局方法封裝
         * 參數 1.父容器    2.資源文字數組  3.從第幾個開始   4.行數
         */
        fillViews(mMoreLayout, categories, 0, rowCount);
    }

    private void fillViews(ViewGroup layout, String[] categories, int start, int end) {
        // 表格第一條線
        View.inflate(this, R.layout.layout_line_horizonal, layout);

        for (int i = start; i < end; i++) {

            //找到索引,便於根據索引添加圖片文件和文字
            final int firstIndex = i * 3;
            final int secondIndex = i * 3 + 1;
            final int thirdIndex = i * 3 + 2;

            final String firstCategory = categories[firstIndex];
            final String secondCategory = categories[secondIndex];
            final String thirdCategory = categories[thirdIndex];

            //這裡控制的是加載本地圖片,通過應用包命找到 有規則命名的圖片資源文件
            //--->因為這裡有兩種效果,一是默認的圖片,二是按下觸發後的圖片和文字
            final int firstDrawableNormal = getResources().getIdentifier(String.format(ic_department_%02d_normal,
                    firstIndex + 1),drawable,getApplicationContext().getPackageName());
            final int secondDrawableNormal = getResources().getIdentifier(String.format(ic_department_%02d_normal,
                    secondIndex + 1),drawable,getApplicationContext().getPackageName());
            final int thirdDrawableNormal = getResources().getIdentifier(String.format(ic_department_%02d_normal,
                    thirdIndex + 1),drawable,getApplicationContext().getPackageName());
            final int firstDrawablePressed = getResources().getIdentifier(String.format(ic_department_%02d_pressed,
                    firstIndex + 1),drawable,getApplicationContext().getPackageName());
            final int secondDrawablePressed = getResources().getIdentifier(String.format(ic_department_%02d_pressed,
                    secondIndex + 1),drawable,getApplicationContext().getPackageName());
            final int thirdDrawablePressed = getResources().getIdentifier(String.format(ic_department_%02d_pressed,
                    thirdIndex + 1),drawable,getApplicationContext().getPackageName());

            //這裡是將上面找到的   默認圖片  和  按下時的圖片 放入到  StateListDrawable緩存中
            final StateListDrawable firstDrawable = new StateListDrawable();
            firstDrawable.addState(new int[]{android.R.attr.state_pressed}, getResources().getDrawable(firstDrawablePressed));
            firstDrawable.addState(new int[]{}, getResources().getDrawable(firstDrawableNormal));

            final StateListDrawable secondDrawable = new StateListDrawable();
            secondDrawable.addState(new int[]{android.R.attr.state_pressed}, getResources().getDrawable(secondDrawablePressed));
            secondDrawable.addState(new int[]{}, getResources().getDrawable(secondDrawableNormal));

            final StateListDrawable thirdDrawable = new StateListDrawable();
            thirdDrawable.addState(new int[]{android.R.attr.state_pressed}, getResources().getDrawable(thirdDrawablePressed));
            thirdDrawable.addState(new int[]{}, getResources().getDrawable(thirdDrawableNormal));


            // 父布局
            final LinearLayout linearLayout = new LinearLayout(this);

            // 第一個子布局
            View.inflate(this, R.layout.layout_line_vertical, linearLayout);
            View.inflate(this, R.layout.layout_department, linearLayout);
            View.inflate(this, R.layout.layout_line_vertical, linearLayout);

            // 第二個子布局
            View.inflate(this, R.layout.layout_department, linearLayout);
            View.inflate(this, R.layout.layout_line_vertical, linearLayout);

            // 第三個子布局
            View.inflate(this, R.layout.layout_department, linearLayout);
            View.inflate(this, R.layout.layout_line_vertical, linearLayout);

            LayoutParams layoutParams = new LinearLayout.LayoutParams(LayoutParams.MATCH_PARENT,LayoutParams.WRAP_CONTENT);
            layout.addView(linearLayout, layoutParams);

            // 表格最後一條線
            View.inflate(this, R.layout.layout_line_horizonal, layout);

            //根據索引getChildAt到指定的位置
            final View firstView = linearLayout.getChildAt(1);
            firstView.setTag(firstCategory);        //設置tag,便於在後面判斷點擊的哪一個
            firstView.setOnClickListener(this);     //設置點擊
            final TextView firstTextView = (TextView) firstView.findViewById(R.id.text_title);
            firstTextView.setText(firstCategory);   //設置文字
            final ImageView firstImageView = (ImageView) firstView.findViewById(R.id.image_icon);
            firstImageView.setImageDrawable(firstDrawable); //將之前緩存的圖片設置出來

            final View secondView = linearLayout.getChildAt(3);
            secondView.setTag(secondCategory);
            secondView.setOnClickListener(this);
            final TextView secondTextView = (TextView) secondView.findViewById(R.id.text_title);
            secondTextView.setText(secondCategory);
            final ImageView secondImageView = (ImageView) secondView.findViewById(R.id.image_icon);
            secondImageView.setImageDrawable(secondDrawable);

            final View thirdView = linearLayout.getChildAt(5);
            thirdView.setTag(thirdCategory);
            thirdView.setOnClickListener(this);
            final TextView thirdTextView = (TextView) thirdView.findViewById(R.id.text_title);
            thirdTextView.setText(thirdCategory);
            final ImageView thirdImageView = (ImageView) thirdView.findViewById(R.id.image_icon);
            thirdImageView.setImageDrawable(thirdDrawable);

        }
    }

    /* (non-Javadoc)
     * @see app.ui.TitleActivity#onClick(android.view.View)
     */
    @Override
    public void onClick(View v) {
        final Object tag = v.getTag();      //通過之前setTag找到點擊位置
        if (tag != null) {
            String department = (String) tag;
            Toast.makeText(this, department, 0).show();
        } // else ignored
    }
}
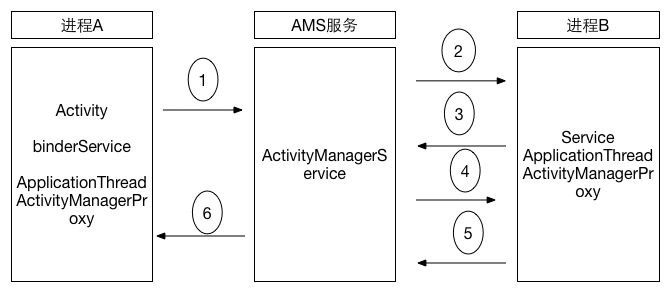 深入理解Binder
Binder概述一句話概括進程通信:進程間的數據傳遞。Binder是Anroid系統裡最重要的進程通信方式,很多文章會直接用代碼、原理類的文字進行描述,對於接觸Andro
 Android如何適配雙卡
這裡僅以獲取sim卡的IMSI接口(getSubscriberId)和發短信接口(sendTextMessage)為例來詳細講解一下Android5.0-6.0雙卡適配的
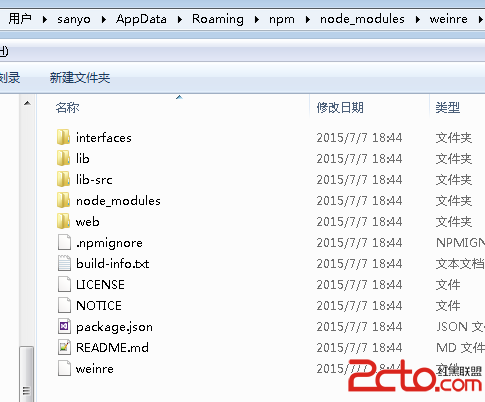 Android開發系列10 Cordova架構學習 Weinre遠程調試技術
手機上的頁面不像桌面開發這麼方便調試。可以使用Weinre進行遠程調試以方便開發。本文介紹windows下的安裝與使用。安裝使用npm安裝,可以運行: npm insta
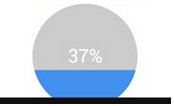 Android 實現自定義圓形進度條的實例代碼
Android 自定義圓形進度條今天無意中發現一個圓形進度,想想自己實現一個,如下圖:基本思路是這樣的:1.首先繪制一個實心圓2.繪制一個白色實心的正方形,遮住實心圓3.