編輯:關於Android編程
ConversationFragment的布局:
首先我們找到我們要寫的Fragment布局文件。
我們為了給button設置點擊的時候變換背景圖片。
我們需要在res文件夾下面創建一個drawable的文件夾。然後創建一個selector文件作為設置我們動態的圖片設置。
比如我們設置這兩個是在按下的時候,或者沒有按下的時候顯示不同的背景圖片。
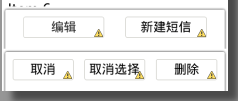 我們為了實現點擊編輯出現另外一組菜單。
我們應該先顯示一組在界面上,我們可以給linearLayout設置這樣一個屬性。
android:visibility="gone"讓當前你設置的這個菜單不可見。
但是我們應該使用動畫去實現它,所以我們不能直接使用gone去讓這個菜單直接消失。
我們應該使用一個RelativeLayout讓這兩個控件疊加在一起。
——————————————————————
菜單動畫的實現:
當我們點擊編輯按鈕的時候:會實現選擇菜單變回原來的位置,當前的編輯菜單向下移出屏幕。
public class ConversionFragment extends BaseFragment {

	private Button bt_conversation_edit;
	private Button bt_conversation_newSms;
	private Button bt_conversation_selectAll;
	private Button bt_conversation_cancel;
	private Button bt_conversation_delete;
	private LinearLayout ll_conversation_edit;
	private LinearLayout ll_conversation_select;

	@Override
	public View initView(LayoutInflater inflater, ViewGroup container,
			Bundle savedInstanceState) {
		View view = inflater.inflate(R.layout.fragment_conversation, null);
		bt_conversation_edit = (Button) view
				.findViewById(R.id.bt_conversation_edit);
		bt_conversation_newSms = (Button) view
				.findViewById(R.id.bt_conversation_newSms);
		bt_conversation_selectAll = (Button) view
				.findViewById(R.id.bt_conversation_selectAll);
		bt_conversation_cancel = (Button) view
				.findViewById(R.id.bt_conversation_cancel);
		bt_conversation_delete = (Button) view
				.findViewById(R.id.bt_conversation_delete);
		ll_conversation_edit = (LinearLayout) view
				.findViewById(R.id.ll_conversation_edit);
		ll_conversation_select = (LinearLayout) view
				.findViewById(R.id.ll_conversation_select);
		return view;
	}

	@Override
	public void initListener() {
		bt_conversation_edit.setOnClickListener(this);
		bt_conversation_newSms.setOnClickListener(this);
		bt_conversation_selectAll.setOnClickListener(this);
		bt_conversation_cancel.setOnClickListener(this);
		bt_conversation_delete.setOnClickListener(this);
	}

	@Override
	public void initData() {

	}

	@Override
	public void processClick(View v) {
		switch (v.getId()) {
		case R.id.bt_conversation_edit:
showSelectMenu();
			break;

		case R.id.bt_conversation_cancel:
showEditMenu();
			break;

		}
	}

	private void showEditMenu() {
		ViewPropertyAnimator.animate(ll_conversation_select).translationY(ll_conversation_edit.getHeight()).setDuration(200);
		new Handler().postDelayed(new Runnable() {

			@Override
			public void run() {
				ViewPropertyAnimator.animate(ll_conversation_edit).translationY(0).setDuration(200);

			}
		}, 200);

	}

	private void showSelectMenu() {
	ViewPropertyAnimator.animate(ll_conversation_edit).translationY(ll_conversation_edit.getHeight()).setDuration(200);
	new Handler().postDelayed(new Runnable() {

		@Override
		public void run() {
			ViewPropertyAnimator.animate(ll_conversation_select).translationY(0).setDuration(200);

		}
	}, 200);

	}

}
我們給tanslationY(0)設置為0是因為我們默認給他設置已經移動到屏幕外,設置0的意思就是讓這個控件回到原來的位置。
————————————————————————————
看源碼分析如何查會話:
我們要先去看看源碼怎麼查詢會話,發現他是在sms的conversations這個uri進行查詢的
所以我們定義一個常量類去設置這個uri常量。
public class ConstantValues {
public interface URI{
	Uri URI_SMS_CONVERSATION=Uri.parse("content://sms//conversations");
}
}
我們在Fragment裡面的initData方法裡面我們這樣去查詢
	public void initData() {
      getActivity().getContentResolver().query(ConstantValues.URI.URI_SMS_CONVERSATION, null, null, null, null);
	}
這裡為什麼查詢都為空.是因為在我們的源代碼裡面sms/conversations 已經幫我們查詢好了,他默認查詢的是sms這張表
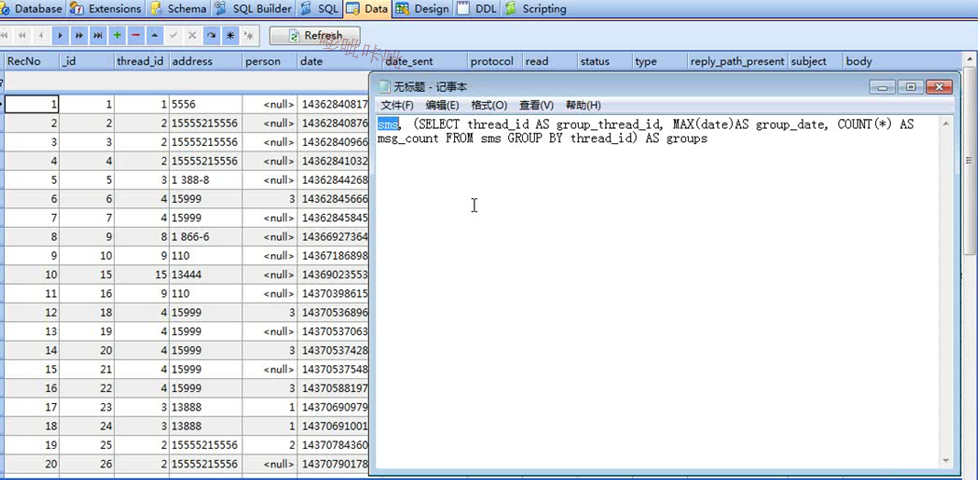
看完源碼我們發現他內部其實是這樣進行查詢的

查詢到的結果是這樣的
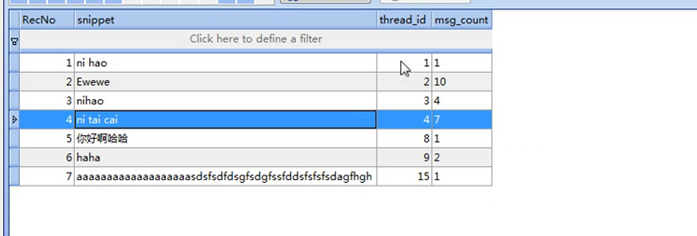
也就是說他能查詢到最新的一條會話,和這個會話的id 還有這個id一共有多少條短信。
記住查詢需要讀短信的權限。
————————————————————————————
異步查詢會話:
我們首先要先去查詢你的Cursor裡面有多少個數據。
我們定義一個CursorUtils去查詢你的cursor裡面的數據
	public void initData() {
      Cursor cursor = getActivity().getContentResolver().query(ConstantValues.URI.URI_SMS_CONVERSATION, null, null, null, null);
      CursorUtils.printCursor(cursor);
	}
public class CursorUtils {
	public static void printCursor(Cursor cursor){
		LogUtils.i("sys", "條數:"+cursor.getCount());
		while (cursor.moveToNext()) {
		for (int i = 0; i < cursor.getColumnCount(); i++) {
			String name=cursor.getColumnName(i);
			String content=cursor.getString(i);
			LogUtils.i("sys", name+":"+content);
		}
		LogUtils.i("sys", "++++++++++++++++++++++++++++++");

		}
	}

}
異步處理我們可以使用去new 一個子線程。但是每次都去創建子線程這樣會讓你的代碼變得不工整。
所以我們直接創建一個類,這個類就是專門用於處理異步查詢。
由於我們對數據庫操作,所以創建一個dao包。
然後創建一個AsyncQueryHandler類進行異步查詢。
public class SimpleQueryHandler extends AsyncQueryHandler {

	public SimpleQueryHandler(ContentResolver cr) {
		super(cr);

	}

}
SimpleQueryHandler queryHandler = new SimpleQueryHandler(getActivity().getContentResolver());
		queryHandler.startQuery(token, cookie, uri, projection, selection, selectionArgs, orderBy);
token和cookie是用來傳遞對象用的,一個是int 和object類型.
這個異步查詢是沒有返回值的,所以我們可以去他的類裡面調用 方法去獲取他的返回值,然後再去獲取他的查詢內容。
public class SimpleQueryHandler extends AsyncQueryHandler {


	//這個方法就是用來接收剛剛傳遞的兩個參數,當查詢完成的時候調用
     @Override
    protected void onQueryComplete(int token, Object cookie, Cursor cursor) {

    	super.onQueryComplete(token, cookie, cursor);
    }
}
————————————————————————————
創建CursorAdapter:
這個類是BaseAdapter的一個子類。
為什麼我們不直接用BaseAdapter,而用CursorAdapter.
因為我們的BaseAdapter的使用集合比較多。
然後List如果你先顯示三個數據。然後你再add一個數據,他並不會顯示到listView上面。
你需要刷新才能顯示上去。
所以我們使用CursorAdapter 它有一個方法是notifyDataSetChanged();可以用來刷新數據當你的數據改變的時候。
CursorAdapter 專門用來顯示數據庫數據的
public class ConversationListAdapter extends CursorAdapter {


	public ConversationListAdapter(Context context, Cursor c, int flags) {
		super(context, c, flags);

	}
//返回的view對象是就是listview的條目getView()
	@Override
	public View newView(Context context, Cursor cursor, ViewGroup parent) {
		// TODO Auto-generated method stub
		return null;
	}
//設置Listview每個條目顯示的內容
	@Override
	public void bindView(View view, Context context, Cursor cursor) {
		// TODO Auto-generated method stub

	}

}
記住CursorAdapter不是v4包下的。
我們這裡先把自己創建的CursorAdapter的子類創建出來。
@Override
	public void initData() {
		ConversationListAdapter adapter = new ConversationListAdapter(getActivity(), null);
		lv_conversation_list.setAdapter(adapter);
		SimpleQueryHandler queryHandler = new SimpleQueryHandler(getActivity().getContentResolver());
		queryHandler.startQuery(0, adapter, ConstantValues.URI.URI_SMS_CONVERSATION, null, null, null, null);
    /*  Cursor cursor = getActivity().getContentResolver().query(ConstantValues.URI.URI_SMS_CONVERSATION, null, null, null, null);
      CursorUtils.printCursor(cursor);*/

	}
這裡我們給構造函數 設置context為getActivity();給cursor設置為null
因為我們是在查詢完成的時候才能獲取到cursor對象。
所以我們給第二個參數設置為adapter 讓他傳遞進去,然後在完成查詢的時候給他設置cursor。
public class SimpleQueryHandler extends AsyncQueryHandler {

	public SimpleQueryHandler(ContentResolver cr) {
		super(cr);

	}
	//這個方法就是用來接收剛剛傳遞的兩個參數,當查詢完成的時候調用
     @Override
    protected void onQueryComplete(int token, Object cookie, Cursor cursor) {

    	super.onQueryComplete(token, cookie, cursor);
    	if(cookie!=null&& cookie instanceof CursorAdapter){
			//查詢得到的cursor,交給CursorAdapter,由它把cursor的內容顯示至listView
			((CursorAdapter)cookie).changeCursor(cursor);
    	}
    }
}
會話列表的布局文件:
那麼他可能會覆蓋掉你的日期。所以我們先定義出日期的控件。
然後在名字的textview裡面使用toleftof日期的textview的id.這樣名字過長就不會覆蓋掉日期。
————————————————————————————————
創建ViewHolder用於封裝條目的所有組件:
ListView我們都只要需要優化。不然內存會大量的使用。
不過cursorAdapter已經幫你做了復用緩存了。
但是ViewHolder沒有幫我們實現。
所以我們自己去實現。
先定義出ViewHolder類:
class ViewHolder{
		private ImageView iv_conversation_avator;
		private ImageView tv_conversation_address;
		private ImageView tv_conversation_body;
		private ImageView tv_conversation_date;

		public ViewHolder(View view) {
			iv_conversation_avator = (ImageView) view.findViewById(R.id.iv_conversation_avator);
			tv_conversation_address = (ImageView) view.findViewById(R.id.tv_conversation_address);
			tv_conversation_body = (ImageView) view.findViewById(R.id.tv_conversation_body);
			tv_conversation_date = (ImageView) view.findViewById(R.id.tv_conversation_date);

		}
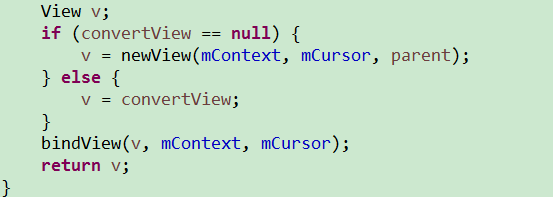
由於CursorAdapter內部是這樣實現的:
public ConversationListAdapter(Context context, Cursor c) {
		super(context, c);
		// TODO Auto-generated constructor stub
	}
//返回的view對象是就是listview的條目getView()
	@Override
	public View newView(Context context, Cursor cursor, ViewGroup parent) {
		//這個類就是用來設置布局文件給listView來顯示的
		return View.inflate(context, R.layout.item_conversation,null);
	}
//設置Listview每個條目顯示的內容
	@Override
	public void bindView(View view, Context context, Cursor cursor) {
		//通過這個就可以使用ViewHolder裡面的控件了
		ViewHolder holder = getViewHolder(view);


	}

	public ViewHolder getViewHolder(View view){
		//判斷你你的holder對象是否已經存在,如果存在直接使用
		ViewHolder holder = (ViewHolder) view.getTag();
		//如果不存在就創建出來
		if(holder==null){
			 holder = new ViewHolder(view);
			 //setTag可以用於存放數據。
			 view.setTag(holder);

		}


		return holder;

	}

	class ViewHolder{
		private ImageView iv_conversation_avator;
		private ImageView tv_conversation_address;
		private ImageView tv_conversation_body;
		private ImageView tv_conversation_date;

		public ViewHolder(View view) {
			iv_conversation_avator = (ImageView) view.findViewById(R.id.iv_conversation_avator);
			tv_conversation_address = (ImageView) view.findViewById(R.id.tv_conversation_address);
			tv_conversation_body = (ImageView) view.findViewById(R.id.tv_conversation_body);
			tv_conversation_date = (ImageView) view.findViewById(R.id.tv_conversation_date);

		}

	}

}
我們定義這樣一個ViewHolder,就是當你第一次創建的時候去new 一個對象。
下次使用的時候可以直接使用。
——————————————————————
ListView顯示查詢的會話:
由於我們bindView(View view, Context context, Cursor cursor);
獲得的Cursor對象,去使用的時候不是很清晰。所以我們還是創建一個bean。
把Cursor裡面的數據保存到bean裡面。這樣使用起來比較方便清晰。
public class ConversationBean {
	private String snippet;
	private String thread_id;
	private String msg_count;
	private String address;
	private Long date;

	public String getAddress() {
		return address;
	}

	public void setAddress(String address) {
		this.address = address;
	}

	public Long getDate() {
		return date;
	}

	public void setDate(Long date) {
		this.date = date;
	}

	public static ConversationBean creatConversationCursor(Cursor cursor) {
		ConversationBean conversationBean = new ConversationBean();
		conversationBean.setSnippet(cursor.getString(cursor
				.getColumnIndex("snippet")));
		conversationBean.setThread_id(cursor.getString(cursor
				.getColumnIndex("_id")));
		conversationBean.setMsg_count(cursor.getString(cursor
				.getColumnIndex("msg_count")));
		conversationBean.setAddress(cursor.getString(cursor
				.getColumnIndex("address")));
		conversationBean.setDate(cursor.getLong(cursor
				.getColumnIndex("date")));
		return conversationBean;

	}

	public String getSnippet() {
		return snippet;
	}

	public void setSnippet(String snippet) {
		this.snippet = snippet;
	}

	public String getThread_id() {
		return thread_id;
	}

	public void setThread_id(String thread_id) {
		this.thread_id = thread_id;
	}

	public String getMsg_count() {
		return msg_count;
	}

	public void setMsg_count(String msg_count) {
		this.msg_count = msg_count;
	}

}
	@Override
	public void bindView(View view, Context context, Cursor cursor) {
		//通過這個就可以使用ViewHolder裡面的控件了
		ViewHolder holder = getViewHolder(view);

		ConversationBean conversationBean = ConversationBean.creatConversationCursor(cursor);


	}
這是因為CursorAdapter源碼已經對cursor進行了移動判斷了。
由於他給我們提供的
queryHandler.startQuery(0, adapter,ConstantValues.URI_SMS_CONVERSATION, null, null, null, null);
這個方法只能查出 最新的一條短信的內容和短信數目,和短信的名字的id。
所以我們需要自己定義一些查詢條件,去查找我們需要的日期和名字等。
但是我們查詢的時候有一些注意事項。
第一點:就是當我們自己去創建查詢字段的時候他會覆蓋掉他默認查詢的內容。
所以我們需要把他默認查詢的內容也添加到查詢字段中。
		String[] projection = {
				"sms.body AS snippet",
				"sms.thread_id AS _id",
				"groups.msg_count AS msg_count",
				"address",
				"date"
		};
第二點:你這樣查還是會報錯,因為他的源碼規定了,查詢的時候必須要加AS或者as
AS代表給他一個別名。
		String[] projection = {
				"sms.body AS snippet",
				"sms.thread_id AS thead_id",
				"groups.msg_count AS msg_count",
				"Address AS address",
				"Date AS date"
		};
做完這些之後,我們需要把Cursor提交給Adapter.
    protected void onQueryComplete(int token, Object cookie, Cursor cursor) {

    	super.onQueryComplete(token, cookie, cursor);
    	if(cookie!=null&& cookie instanceof CursorAdapter){
			//查詢得到的cursor,交給CursorAdapter,由它把cursor的內容顯示至listView
			((CursorAdapter)cookie).changeCursor(cursor);
    	}
    }
是因為他規定你的cursor當中必須有一個字段是_id 字段。
所以我們直接在查詢的字段的時候隨便把一個字段的別名改成_id即可:
	String[] projection = {
				"sms.body AS snippet",
				"sms.thread_id AS _id",
				"groups.msg_count AS msg_count",
				"address AS address",
				"date AS date"
		};
然後記住在bean裡面添加這些字段進去。date日期我們使用Long類型。
然後我們就可以在Adapter裡面設置內容了。
public void bindView(View view, Context context, Cursor cursor) {
		//通過這個就可以使用ViewHolder裡面的控件了
		ViewHolder holder = getViewHolder(view);

		ConversationBean conversationBean = ConversationBean.creatConversationCursor(cursor);
		holder.tv_conversation_address.setText(conversationBean.getAddress());
		holder.tv_conversation_body.setText(conversationBean.getSnippet());
		holder.tv_conversation_date.setText(conversationBean.getDate()+"");


	}
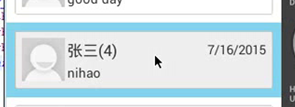
ListView顯示頭像、聯系人姓名:
時間顯示是這樣的:如果是今天的就顯示時間。如果是以前的就顯示年月日。
我們可以使用DateUtils.isToday(long)判斷是否是今天的時間,如果是返回true.
我們還可以使用DateFormat這個類來格式日期的顯示格式。
使用getTimeFormat(context).format(long)方法去把long型的時間格式化成時分格式顯示
使用getDateFormat(context),format(long)方法把long型的時間格式化成年月日格式顯示
		if (DateUtils.isToday(conversationBean.getDate())) {
			holder.tv_conversation_date.setText(DateFormat.getTimeFormat(
					context).format(conversationBean.getDate()));
		} else {
			holder.tv_conversation_date.setText(DateFormat.getDateFormat(
					context).format(conversationBean.getDate()));
		}
然後我們還需要按date 進行排序。要是降序desc,因為今天的日期應該是最上面的。
這個在查詢的時候進行排序即可。
		queryHandler.startQuery(0, adapter,
				ConstantValues.URI_SMS_CONVERSATION, projection, null, null, "date desc");
public class ContactDao {

public static String  getNameforAddress(ContentResolver resolver,String address){

	String name=null;
	Uri uri = Uri.withAppendedPath(PhoneLookup.CONTENT_FILTER_URI, address);
	 Cursor cursor = resolver.query(uri, new String []{PhoneLookup.DISPLAY_NAME}, null, null, null);
	 if (cursor.moveToFirst()) {
		 name = cursor.getString(0);
		 cursor.close();
	}
	return name;


}
}
這裡注意
	Uri uri = Uri.withAppendedPath(PhoneLookup.CONTENT_FILTER_URI, address);
	 Cursor cursor = resolver.query(uri, new String []{PhoneLookup.DISPLAY_NAME}, null, null, null);
withAppendedPath()方法的作用是拼接Uri。將裡面的數據拼接到Uri後面。
第一個參數是PhoneLookup提供的一個常量,裡面封裝的是聯系人的主機名+路徑。
第二個參數是我們要查詢的數據。
PhoneLookup.DISPALY_NAME常量是我們聯系人裡面的名字,通過你第二個參數查詢出來的名字。
因為一個號碼通常對應一個名字,所以我們查出來的名字應該只有一個結果。
所以我們直接使用movetofirst就可以了。
		String name = ContactDao.getNameforAddress(
				context.getContentResolver(), conversationBean.getAddress());
		if (TextUtils.isEmpty(name)) {

			holder.tv_conversation_address
					.setText(conversationBean.getAddress() +" "
							+ conversationBean.getMsg_count());
		} else {

			holder.tv_conversation_address.setText(name + " "
					+ conversationBean.getMsg_count() );

		}
我們需要去掉它

我們需要在ListView裡面這樣設置就可以去除這條線:
還有一個問題就是當你點擊條目的時候會有一個藍色的底色:
我們需要自己定義的灰色不需要這個藍色的底色所以我們需要給ListView默認的selector去掉。
android:listSelector="@android:color/transparent"
——————————————————
顯示聯系人頭像:
由於要使用數據庫查詢所以我們在dao裡面創建一個方法:
public static Bitmap getAvatorByAddress(ContentResolver resolver,String address){
	Bitmap bitmap=null;
	  Uri uri = Uri.withAppendedPath(PhoneLookup.CONTENT_FILTER_URI, address);
	 Cursor cursor = resolver.query(uri, new String []{PhoneLookup._ID}, null, null, null);
	 if (cursor.moveToFirst()) {
		String _id = cursor.getString(0);
		InputStream is = Contacts.openContactPhotoInputStream(resolver, Uri.withAppendedPath(Contacts.CONTENT_URI, _id));
		bitmap=BitmapFactory.decodeStream(is);
	 }
	 return bitmap;

}
我們使用Contacts這個類,它有一個方法openContactPhotoInputStream()方法。
這個方法是直接查詢你的聯系人裡面的頭像,將他轉化成一個輸入流。
記住我們需要通過_id去查詢。所以我們要用withAppendedPath()方法去拼接uri.
然後我們就獲得了輸入流既讓他轉換成Bitmap 返回就可以了。
然後我們在Adapter裡面設置頭像,就可以了
		Bitmap avtor = ContactDao.getAvatorByAddress(context.getContentResolver(), conversationBean.getAddress());
		if (avtor==null) {
			holder.iv_conversation_avator.setBackgroundResource(R.drawable.img_default_avatar);
		}else{
			holder.iv_conversation_avator.setBackgroundDrawable(new BitmapDrawable(avtor));

		}
		String name = ContactDao.getNameforAddress(
				context.getContentResolver(), conversationBean.getAddress());
		if (TextUtils.isEmpty(name)) {

			holder.tv_conversation_address.setText(conversationBean
					.getAddress() + " " + conversationBean.getMsg_count());
		} else {

			holder.tv_conversation_address.setText(name + " "
					+ conversationBean.getMsg_count());
			Bitmap avtor = ContactDao.getAvatorByAddress(context.getContentResolver(), conversationBean.getAddress());
			if (avtor==null) {
				holder.iv_conversation_avator.setBackgroundResource(R.drawable.img_default_avatar);
			}else{
				holder.iv_conversation_avator.setBackgroundDrawable(new BitmapDrawable(avtor));

			}
		}
假設你這樣去寫,如果沒有聯系人的話 他就不會去執行頭像的代碼,這樣他就會復用你以前使用過的代碼會出現 重復代碼
————————————————————————
選擇模式下選中條目:
我們現在布局中創建出一個imageView讓他顯示在聯系人條目的左邊
我們在Adapter裡面定義出來一個標簽。我們默認是 flase如果當我們點擊編輯的時候才讓他為true;
private boolean selectMode = false;
	public boolean getIsSelectMode() {
		return selectMode;
	}

	public void setIsSelectMode(boolean selectMode) {
		this.selectMode = selectMode;
	}
	public void processClick(View v) {
		switch (v.getId()) {
		case R.id.bt_conversation_edit:
			showSelectMenu();
			adapter.setIsSelectMode(true);
			adapter.notifyDataSetChanged();
			break;

		case R.id.bt_conversation_cancel:
			showEditMenu();
			adapter.setIsSelectMode(false);
			adapter.notifyDataSetChanged();
			break;

		}
他就不會去顯示。
然後我們在Adapter裡面的bindView();方法裡面去設置
		if (selectMode) {
			holder.iv_check.setVisibility(View.VISIBLE);

		}else
			holder.iv_check.setVisibility(View.GONE);

	}
我們在Fragment裡面創建一個lIstView的點擊事件。
			@Override
			public void onItemClick(AdapterView parent, View view,
					int position, long id) {
				//因為我們使用CursorAdapter這個類,他幫我們封裝好了getItem可以返回你指定的Cursor對象
				if(adapter.getIsSelectMode()){
					//選擇選框
				}else{
					//進入對話界面
				}


			}
		});
那麼我們點擊條目應該進入對話詳情。
如果是在選擇界面,我們應該點擊條目的時候我們需要選擇這個條目,也就是改變選擇按鈕的背景圖片。
接下來我們要創建一個集合,去保存我們點擊的條目的thead_id。因為我們要判斷我們這個條目是否點擊過,如果點擊過那麼就變回去,如果沒有就保存進來且變背景圖片。
private List
	public void SelectSingle(int position){
		Cursor cursor=(Cursor)getItem(position);
		ConversationBean conversationBean = ConversationBean.creatConversationCursor(cursor);
		if (selectedConversationId.contains(conversationBean.getThread_id())) {
		selectedConversationId.remove((Integer)conversationBean.getThread_id());
		}
		else{
		selectedConversationId.add(conversationBean.getThread_id());
		}
		notifyDataSetChanged();
	}
這裡要注意我們 remove的時候必須把int轉為對象。不然他就相當於刪除你指定的索引
還要注意我們需要點擊之後我們還需要刷新界面。
這裡我們使用getItem()方法的時候,其實它內部已經調用了movetoposition方法。
直接移動到了當前cursor的位置。
所以我們可以直接使用getItem方法傳遞一個position進來獲取指定的cursor
然後我們需要在編輯界面的時候給他定義背景圖片,如果是編輯模式且你點擊了那麼
//判斷當前是否進入選擇模式
		if(isSelectMode){
			holder.iv_check.setVisibility(View.VISIBLE);
			//判斷集合中是否包含會話id,從而確定該條目是否被選中
			if(selectedConversationIds.contains(conversation.getThread_id())){
				holder.iv_check.setBackgroundResource(R.drawable.common_checkbox_checked);
			}
			else{
				holder.iv_check.setBackgroundResource(R.drawable.common_checkbox_normal);
			}
		}
		else{
			holder.iv_check.setVisibility(View.GONE);
		}
	public void SelectAll(){
		Cursor cursor = getCursor();
		cursor.moveToPosition(-1);
		while (cursor.moveToNext()) {
			ConversationBean conversationCursor = ConversationBean.creatConversationCursor(cursor);
	        selectedConversationId.add(conversationCursor.getThread_id());

		}
		notifyDataSetChanged();

	}
	public void Selectcanel(){
		selectedConversationId.clear();
		notifyDataSetChanged();
	}
所以我們需要先給他移動到-1的位置,然後在開始便利,把所有的id都存入集合中。
我們改成set集合,因為list集合會出現同樣的。而set集合不會。
 打造Android 最實用的ViewPager 指示器控件
為什麼我說它是最實用的 ViewPager 指示器控件呢? 它有以下幾個特點: 1、通過自定義 View 來實現,代碼簡單易懂; 2、使用起來非常方便; 3、通用性高,大
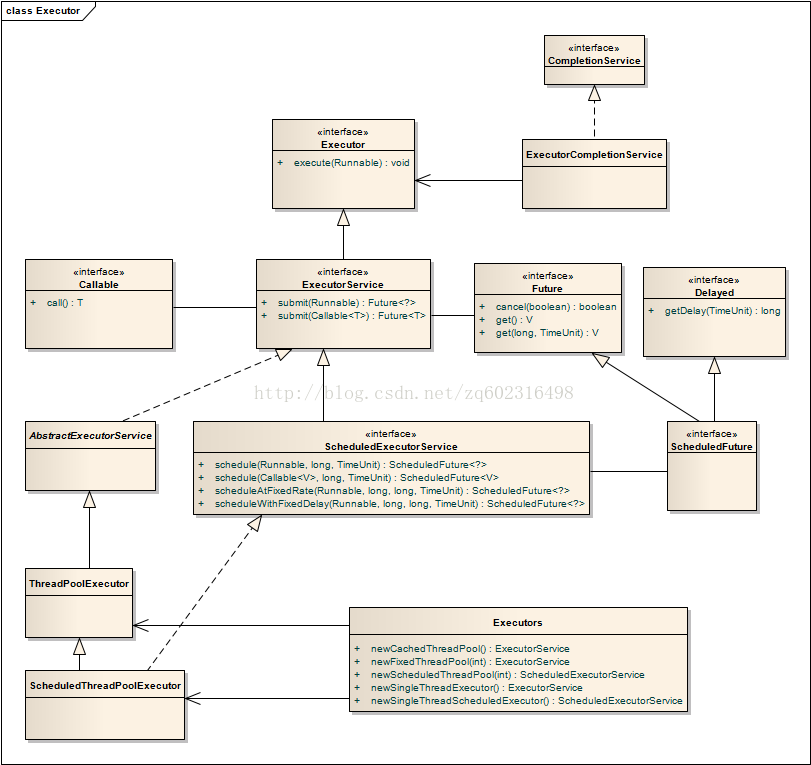 總結:Android中的線程,線程池相關(二)---線程池
前言在操作系統中,線程是操作系統調度的最小單元,同事線程又是一種受限的系統資源,即線程不能無限制地產生,並且線程的創建和銷毀都有一定的開銷.當系統中存在大量的線程時,系統
 Android實現廣告圖片輪播效果
本文實例介紹了Android廣告輪播圖效果實現方法,分享給大家供大家參考,具體內容如下首先看下一下布局文件:<RelativeLayout xmlns:androi
 Android中如何搭建一個WebServer
今天終於把老大交代的任務搞完了,感覺收獲挺多的,所以就寫一篇來記錄一下吧,首先還是來看一下,老大們的需求 需求: 希望移動端的用戶標識(IMEI)和HTML頁面的用戶