編輯:關於Android編程
經過上一篇的實驗,我門只是僅僅對View的事件的傳遞進行了分析,但是還有一個比較厲害的ViewGroup我們肯定是要說一下的,ViewGroup的二叉視圖分析 我們能看到,一邊是View一邊是ViewGroup,而ViewGroup中又可以添加View和ViewGroup,但是我們都知道,ViewGroup是可以有自己的孩子的,也可以對自己的孩子進行拜訪等等,而View就沒有這些特性,那麼我們就能想象一下它的傳遞機制到底和View有什麼樣的不同。下面給大家乘上我自己的實驗結果在ViewGroup中消息的傳遞多了一個方法,就是onInterceptTouchEvent(MotionEvent ev),這個方法有什麼用處那?這就和ViewGroup的機制有關了,ViewGroup裡面可以存放很多的子View,那麼ViewGroup就是通過onInterceptTouchEvent(MotionEvent ev)方法進行消息的攔截,默認的時候onInterceptTouchEvent(MotionEvent ev)分會的是false,也就是不攔截,如果onInterceptTouchEvent(MotionEvent ev)方法中返回true,那麼事件就會被父控件進行攔截,不再向子View進行傳遞。
下面貼出我所做的測試的代碼:
XML文件
<relativelayout xmlns:android="http://schemas.android.com/apk/res/android" xmlns:tools="http://schemas.android.com/tools" android:layout_width="match_parent" android:layout_height="match_parent">
<com.chaoli_chen.ontouchdemo.myrelativelayout android:layout_height="match_parent" android:layout_width="match_parent" android:id="@+id/mrll">
      <com.chaoli_chen.ontouchdemo.mybutton android:id="@+id/bt" android:onclick="bt_click" android:layout_height="wrap_content" android:layout_width="wrap_content" android:text="實驗按鈕">


</com.chaoli_chen.ontouchdemo.mybutton></com.chaoli_chen.ontouchdemo.myrelativelayout>

</relativelayout>
MainActivity
package com.chaoli_chen.ontouchdemo;

import android.app.Activity;
import android.os.Bundle;
import android.view.MotionEvent;
import android.view.View;
import android.view.View.OnClickListener;
import android.view.View.OnTouchListener;
import android.widget.Button;

public class MainActivity extends Activity {
	private Button bt;
	private MyRelativeLayout mrll;
	@Override
	protected void onCreate(Bundle savedInstanceState) {
		super.onCreate(savedInstanceState);
		setContentView(R.layout.activity_main);

		mrll = (MyRelativeLayout) findViewById(R.id.mrll);

		bt = (Button) findViewById(R.id.bt);

		mrll.setOnClickListener(new OnClickListener() {

			@Override
			public void onClick(View v) {
				System.out.println("...mrll...");
			}
		});

		mrll.setOnTouchListener(new OnTouchListener() {

			@Override
			public boolean onTouch(View v, MotionEvent event) {

				switch (event.getAction()) {
				case MotionEvent.ACTION_DOWN:
					System.out.println(".mrll..TouchEvent.ACTION_DOWN...");
					break;
				case MotionEvent.ACTION_UP:
					System.out.println(".mrll..TouchEvent.ACTION_UP...");
					break;
				}

				return false;
			}
		});

		bt.setOnTouchListener(new OnTouchListener() {
			@Override
			public boolean onTouch(View v, MotionEvent event) {
				switch (event.getAction()) {
				case MotionEvent.ACTION_DOWN:
					System.out.println(".bt..TouchEvent.ACTION_DOWN...");
					break;
				case MotionEvent.ACTION_UP:
					System.out.println(".bt..TouchEvent.ACTION_UP...");
					break;
				}
				return false;
			}
		});
	}
	public void bt_click(View view) {
		System.out.println("...bt_click...");
	}
	@Override
	public boolean dispatchTouchEvent(MotionEvent event) {

		switch (event.getAction()) {
		case MotionEvent.ACTION_DOWN:
			System.out.println(".main.dispatchTouchEvent.ACTION_DOWN...");
			break;
		case MotionEvent.ACTION_UP:
			System.out.println(".main.dispatchTouchEvent.ACTION_UP...");
			break;
		}
		return super.dispatchTouchEvent(event);
	}


	@Override
	public boolean onTouchEvent(MotionEvent event) {
		switch (event.getAction()) {
		case MotionEvent.ACTION_DOWN:
			System.out.println(".main.onTouchEvent.ACTION_DOWN...");
			break;
		case MotionEvent.ACTION_UP:
			System.out.println(".main.onTouchEvent.ACTION_UP...");
			break;
		}
		return super.onTouchEvent(event);
	}

}
自定義的Button按鈕
package com.chaoli_chen.ontouchdemo;

import android.content.Context;
import android.util.AttributeSet;
import android.view.MotionEvent;
import android.widget.Button;

public class Mybutton extends Button {

	public Mybutton(Context context, AttributeSet attrs, int defStyleAttr) {
		super(context, attrs, defStyleAttr);
	}

	public Mybutton(Context context, AttributeSet attrs) {
		super(context, attrs);
	}

	public Mybutton(Context context) {
		super(context);
	}

	@Override
	public boolean dispatchTouchEvent(MotionEvent event) {

		switch (event.getAction()) {
		case MotionEvent.ACTION_DOWN:
			System.out.println(".button.dispatchTouchEvent.ACTION_DOWN...");
			break;

		case MotionEvent.ACTION_UP:
			System.out.println(".button.dispatchTouchEvent.ACTION_UP...");
			break;
		}
		return super.dispatchTouchEvent(event);
	}


	@Override
	public boolean onTouchEvent(MotionEvent event) {

		switch (event.getAction()) {

		case MotionEvent.ACTION_DOWN:
			System.out.println(".button.onTouchEvent.ACTION_DOWN...");
			break;

		case MotionEvent.ACTION_UP:
			System.out.println(".button.onTouchEvent.ACTION_UP...");
			break;
		}

		return super.onTouchEvent(event);
	}
}
新建一個MyRelativeLayout類如下復寫其中的dispatchTouchEvent(MotionEvent ev)、onInterceptTouchEvent(MotionEvent ev)、onTouchEvent(MotionEvent event)方法
package com.chaoli_chen.ontouchdemo;

import android.content.Context;
import android.text.method.Touch;
import android.util.AttributeSet;
import android.view.MotionEvent;
import android.widget.RelativeLayout;

public class MyRelativeLayout extends RelativeLayout {

	public MyRelativeLayout(Context context, AttributeSet attrs,
			int defStyleAttr) {
		super(context, attrs, defStyleAttr);
	}

	public MyRelativeLayout(Context context, AttributeSet attrs) {
		super(context, attrs);
	}

	public MyRelativeLayout(Context context) {
		super(context);
	}

	@Override
	public boolean dispatchTouchEvent(MotionEvent ev) {

		switch (ev.getAction()) {
		case MotionEvent.ACTION_DOWN:
			System.out
					.println("..MyRelativeLayout..dispatchTouchEvent..ACTION_DOWN..");
			break;
		case MotionEvent.ACTION_UP:
			System.out
					.println("..MyRelativeLayout..dispatchTouchEvent..ACTION_UP..");
			break;
		}
		return super.dispatchTouchEvent(ev);
	}

	@Override
	public boolean onInterceptTouchEvent(MotionEvent ev) {
		switch (ev.getAction()) {
		case MotionEvent.ACTION_DOWN:
			System.out
					.println("..MyRelativeLayout..onInterceptTouchEvent..ACTION_DOWN..");
			break;
		case MotionEvent.ACTION_UP:
			System.out
					.println("..MyRelativeLayout..onInterceptTouchEvent..ACTION_UP..");
			break;
		}
		return super.onInterceptTouchEvent(ev);
	}

	@Override
	public boolean onTouchEvent(MotionEvent event) {
		switch (event.getAction()) {
		case MotionEvent.ACTION_DOWN:
			System.out
					.println("..MyRelativeLayout..onTouchEvent..ACTION_DOWN..");
			break;
		case MotionEvent.ACTION_UP:
			System.out
					.println("..MyRelativeLayout..onTouchEvent..ACTION_UP..");
			break;
		}
		return super.onTouchEvent(event);
	}

}
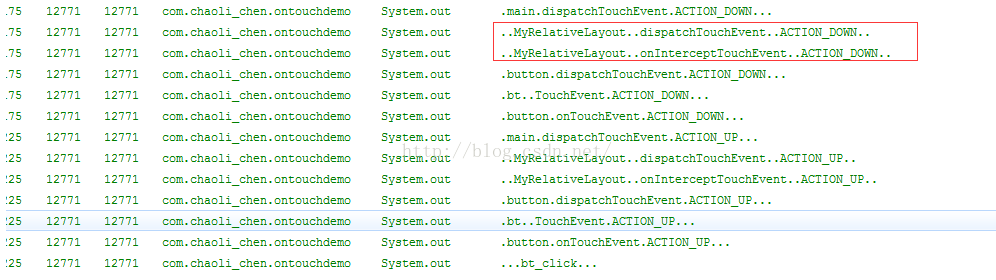
由結果分析 我們能夠看到,事件還是從Activity中的dispatchTouchEven方法入口,然後在我門自定義的MyRelativeLayout中先是進行事件的分發,緊接著就是執行了是否阻斷的方法,當然我門查看onInterceptTouchEvent(MotionEvent ev)方法中默認的super.onInterceptTouchEvent(ev)代碼如下:
public boolean onInterceptTouchEvent(MotionEvent ev) {
        return false;
    }
最後事件傳遞到了給我們自定義的button進行事件的分發,然後傳給button的setOnTouchListener(l)方法中。最後如第一張所說的一樣,調用了onclick()方法,執行了 onclick事件
有沒有發現我的們自定義的MyRelativeLayout並沒有響應setOnTouchListener(l)方法,那是因為它把事件傳遞給了button,並沒有進行攔截。
下面我門看一下onInterceptTouchEvent(MotionEvent ev)返回true的情況。
@Override
	public boolean onInterceptTouchEvent(MotionEvent ev) {
		switch (ev.getAction()) {
		case MotionEvent.ACTION_DOWN:
			System.out
					.println("..MyRelativeLayout..onInterceptTouchEvent..ACTION_DOWN..");
			break;
		case MotionEvent.ACTION_UP:
			System.out
					.println("..MyRelativeLayout..onInterceptTouchEvent..ACTION_UP..");
			break;
		}
		return true;
	}

是不是到下載測底的明白了,當我們自定義的MyrelativeLayout進行事件攔截的時候,其內部的子View是不會進行事件的相應的,恰恰是我們自定義的MyrelativeLayout響應了自身的setOnTouchListener(l)方法和setOnclick(l)方法。
到處出我們ViewGroup事件傳遞測試完成了。
 android sdk 8-10M/S下載速度,有圖有教程
1.強制使用http替換https鏈接 Tools》選擇Options,勾選上”Use Download Cache”和”Force
 Jack和Jill的陰暗面
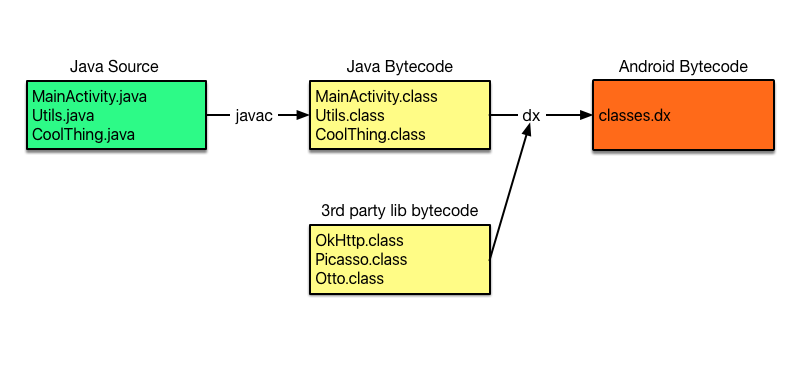
年Google發布了新的工具鏈 - Jack(Java Android 編譯工具)和Jill(Jack中間庫鏈接器),它們用於替換存在的javac+dx工具集。本文我將試
 Android系統應用信息中存儲和緩存的計算方法
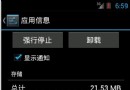
進行如下操作: 應用信息 會到達如下界面: 可以看到這個應用占用的磁盤空間。vcD4KPHA+z8jLtb3hufujrNXivLjP7rvhvMbL48TE0KnOx
 Android是如何根據限定符,來尋找合適的資源文件的?
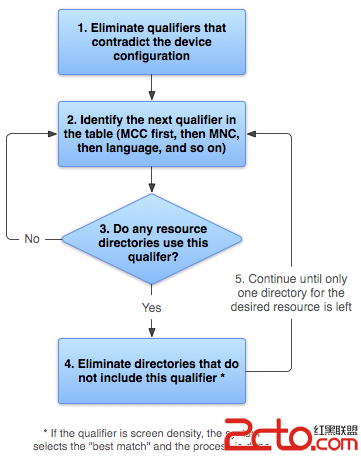
轉載請注明出處:http://blog.csdn.net/zhaokaiqiang1992 本文主要介紹了當我們使用限定符修飾我們的資源文件夾,例如drawable-en