編輯:關於Android編程
上篇介紹了Material Design中的各種動畫效果,結合第一篇就可以寫出很棒的UI界面了,這次再學習下Material Design中其它控件.
照常先貼學習鏈接:
https://github.com/traex/ExpandableLayout
http://githubonepiece.github.io/2015/11/26/Material-Design-Palette/
aspx">http://www.fx114.net/qa-26-168872.aspx
http://blog.csdn.net/jdsjlzx/article/details/41441083/
https://github.com/Flipboard/bottomsheet
這個組件還是很常用的,但是Android自帶的那個ExpandableListView使用起來不是很好,而且其適配器得繼承其自帶的適配器,使得代碼十分不好寫。今天在Github上看到ExpandableLayout真的是比Android自帶的ExpandableListView好用不是一點點。這個組件的效果大家都見過,比如QQ的好友展開等等就是使用了該控件。廢話不多說,直接開始使用吧。
要使用ExpandableLayout十分簡單,在build.gradle中添加:
dependencies {
    compile 'com.github.traex.expandablelayout:library:1.2.2'
}
就可以調用了。接下來在xml文件中就可以添加ExpandableLayout,ExpandableLayoutItem,ExpandableLayoutListView這三個控件了。
在xml文件中使用ExpandableLayout需要添加head layout和content layout(在下面代碼中去理解).
自己在寫兩個xml文件即可,測試效果就是點擊view_header後view_content顯示出來。效果自己也可以很好的實現,即寫兩個控件其中一個不可見,點擊其中一個設置另一個控件可見。
同樣的ExpandableLayoutListView也可以添加到xml文件。
而填充ListView則可以使用ExpandableLayoutItem
是不是特別的簡單。在MainAcitivity.java中也不需要你做太多的事情,只需要你簡單適配一下ListView就行,而ListView的適配就和正常ListView的適配相差無幾。剩下的具體使用可以去Github上去看。這裡只是做個簡介!
在Material Design設計中很重要的一部分內容是應用中的圖片顏色和文字顏色和主題相匹配。而在Android Lollipop發布的時候,Palette類則用來實現上面說的效果。這個類的作用就是提取某張圖片中的主要顏色,比如你有一張大海的圖片,那麼這個類可以提取出的這張照片的主要顏色可能是藍色。接下來看看怎麼使用這個類。
首先你要使用這個類的話,你得依賴於:
compile 'com.android.support:palette-v7:23.0.0'
Palette有四種生成方式,其中前兩種已經被google拋棄,但這裡學習下不至於以後碰到了看不懂。
兩種同步的方式:
Palette p = generate(Bitmap bitmap);
Palette p = generate(Bitmap bitmap ,int size)//設置調色板得大小為size
兩種異步得方式:
// 簡單快速的實現方法,內部使用AsyncTask
// 但是可能不是最優的方法(因為有線程的切換)
// 默認調色板大小(16).
Palette.generateAsync(bitmap, new Palette.PaletteAsyncListener() {
    @Override
    public void onGenerated(Palette palette) {
       // palette為生成的調色板
    }
});
// 設置調色板大小(24)
Palette.generateAsync(bitmap, 24, new Palette.PaletteAsyncListener() {
    @Override
    public void onGenerated(Palette palette) {
       // palette為生成的調色板
    }
});
Palette.Builder builder = Palette.from(bitmap);
builder.generate(new Palette.PaletteAsyncListener() {
    @Override
    public void onGenerated(Palette palette) {

    }
});

//或者很多時候也可以直接寫成

Palette.from(bitmap).generate(new PaletteAsyncListener() {
    public void onGenerated(Palette p) {
        // do something

    }
});
調色板的大小值越大,生成得調色的時間越長,數值越小,得到的顏色信息也越少,調色板的大小最好根據圖像類型來決定。(默認是16.)
生成了Palette對象後就可以嘗試獲取六種不同的色板了,具體如下:
1. Palette.Swatch s1 = Palette.getVibrantSwatch(); //充滿活力的色板
2. Palette.Swatch s2 = Palette.getDarkVibrantSwatch(); //充滿活力的暗色類型色板
3. Palette.Swatch s3 = Palette.getLightVibrantSwatch(); //充滿活力的亮色類型色板
4. Palette.Swatch s4 = Palette.getMutedSwatch(); //黯淡的色板
5. Palette.Swatch s5 = Palette.getDarkMutedSwatch(); //黯淡的暗色類型色板(翻譯過來沒有原汁原味的趕腳啊!)
6. Palette.Swatch s6 = Palette.getLightMutedSwatch(); //黯淡的亮色類型色板
可以根據需求自由選擇色板類型,有了色板就可以根據色板來獲取具體顏色信息,在Swatch色板中提供了五種顏色信息,分別如下:
1. getPopulation(): the number of pixels represented by this swatch
2. getRgb(): the RGB value of this color.
3. getHsl(): the HSL value of this color.
4. getBodyTextColor(): the RGB value of a text color which can be displayed on top of this color.
5. getTitleTextColor(): the RGB value of a text color which can be displayed on top of this color.
示例代碼如下:
Palette.Swatch swatch = palette.getVibrantSwatch();
TextView titleView = ...;
if (swatch != null) {
    titleView.setBackgroundColor(swatch.getRgb());
    titleView.setTextColor(swatch.getTitleTextColor()); //設置文本顏色
請注意必須對swatch進行是否為null的判斷,因為如果面板無法找到相匹配的標准色,那麼然後將返回null,不進行判斷將會出現空指針異常。也可以是用另一種方式
  tv1.setBackgroundColor(palette.getVibrantColor(0x999933));
        tv2.setBackgroundColor(palette.getDarkVibrantColor(0x999933));
        tv3.setBackgroundColor(palette.getLightVibrantColor(0x999933));
        tv4.setBackgroundColor(palette.getMutedColor(0x999933));
        tv5.setBackgroundColor(palette.getDarkMutedColor(0x999933));
        tv6.setBackgroundColor(palette.getLightMutedColor(0x999933));
設置默認的顏色0x999933即使為空也可以填充默認的顏色。
這裡也是個簡單的說明,效果大概如下:

這個代碼很簡單,大家按照上面的代碼試試就能得到了,具體Palette在Material Design的App中的應用大家可以看看這個項目,鏈接:
[Android Material Design之Toolbar與Palette實踐](http://blog.csdn.net/jdsjlzx/article/details/41441083/
),博主源碼也給了,大家可以試試看。
哇,這個看起來就不是一般的帥了。知乎的分享大家都用過吧,那個從底下彈出來然後一堆的可以分享應用(如微信,qq)給你選擇。你上滑整個界面也會往上劃,看上去是不是很帥。效果很棒代碼應該很難寫吧? No No No,代碼真的一點都不復雜,因為總有大神會幫你搞出個Library出來。今天學習的是Flipboard做的bottomsheet,鏈接已經貼在上面了。使用的話Github上有個sample你可以自己下下來看看效果然後實踐下即可,這裡就給大家拋磚引玉下吧。

那麼開始吧,如果你要使用bottom sheet的話,請記得在你的build.gradle中添加
dependencies{
    compile 'com.flipboard:bottomsheet-core:1.5.0'
    compile 'com.flipboard:bottomsheet-commons:1.5.0' //optional
}
這裡有個optional是什麼個意思,解釋下:如果你只需要bottom sheet顯示一個頁面的話,你可以不依賴第二個。否則請添加上。
布局文件上呢也有輕微的變化,比如你曾經是這麼寫布局文件的。
如果你要在這個布局文件中使用bottom sheet的話,請將你的布局文件該成下面這樣:
首先是最簡單的:只顯示一個界面那你只需要在你的.java文件中加下面2句話
BottomSheetLayout bottomSheet = (BottomSheetLayout) findViewById(R.id.bottomsheet);

bottomSheet.showWithSheetView(LayoutInflater.from(context).inflate(R.layout.my_sheet_layout, bottomSheet, false));
這裡的R.layout.my_sheet_layout即是你要顯示的頁面。
第二個種就是知乎分享按鈕彈出來的界面:即你可以在上面的View中進行點擊後執行相應的操作。

布局文件同樣如上,只是你不需要再寫一個需要顯示的布局文件。相關的代碼如下:
btn2.setOnClickListener(new View.OnClickListener() {
    @Override
    public void onClick(View v) {
        final Intent intent = new Intent(Intent.ACTION_SEND);
        intent.putExtra(Intent.EXTRA_TEXT, "dasjdasjdsadasd");
        intent.setType("text/plain");
        IntentPickerSheetView intentPickerSheet = new IntentPickerSheetView(MainActivity.this, intent,
                "I love you", new IntentPickerSheetView.OnIntentPickedListener() {
            @Override
            public void onIntentPicked(IntentPickerSheetView.ActivityInfo activityInfo) {
                bottomsheet.dismissSheet();
                startActivity(activityInfo.getConcreteIntent(intent));
            }
        });
        List activityInfo = new ArrayList<>();
        Drawable customDrawable = ResourcesCompat.getDrawable(getResources(), R.mipmap.ic_launcher, null);
        IntentPickerSheetView.ActivityInfo customInfo = new IntentPickerSheetView.ActivityInfo(customDrawable, "Custom mix-in", MainActivity.this, MainActivity.class);
        activityInfo.add(customInfo);
        Drawable customDrawable2 = ResourcesCompat.getDrawable(getResources(), R.mipmap.ic_launcher, null);
        IntentPickerSheetView.ActivityInfo customInfo2 = new IntentPickerSheetView.ActivityInfo(customDrawable2, "Custom mix-in123123", MainActivity.this, Main2Activity.class);
        activityInfo.add(customInfo2);
        intentPickerSheet.setMixins(activityInfo);

        bottomsheet.showWithSheetView(intentPickerSheet);
    }
});
這裡稍微做點說明,具體的還是大家測試才知道。我也是試了然後看了作者的函數以及調用參數後自己寫的。如果大家要實現知乎的那個分享效果的話,只需要把Intent.ACTION_SEND這裡換成分享的Intent就好了。具體的我這裡就不就不寫了,也不是本文的重點。下面還有一堆的代碼是我們用戶自己添加到bottomsheet界面上的,添加了一個icon,title和點擊該視圖所執行的操作
intentPickerSheet.setMixins(List ActivityInfo)
你可以根據上面的方式添加多個你想要的ActivityInfo,之後你把它添加到ActivityInfo的集合中去即可。
最後如果你想要自己定制的Bottom sheet的話,你就需要使用這個庫中MenuSheetView了,這個也很好寫。具體代碼如下:
首先你得創建一個menu文件夾(如果有就不必創建了),在menu文件夾下新建一個activity_menu.xml文件。代碼如下:
接著在MainActivity.java中為menu中的item添加點擊事件。
MenuSheetView menuSheetView =
        new MenuSheetView(MenuActivity.this, MenuSheetView.MenuType.LIST, "Create...", new MenuSheetView.OnMenuItemClickListener() {
            @Override
            public boolean onMenuItemClick(MenuItem item) {
                Toast.makeText(MenuActivity.this, item.getTitle(), Toast.LENGTH_SHORT).show();
                if (bottomSheetLayout.isSheetShowing()) {
                    bottomSheetLayout.dismissSheet();
                }
                return true;
            }
        });
menuSheetView.inflateMenu(R.menu.activity_menu);
bottomSheetLayout.showWithSheetView(menuSheetView);
當然MenuSheetView.MenuType除了LIST還有GRID,一個是列表一個是表格,上面的GIF已經把效果顯示出來了。
在它的sample中還有兩種其他的效果,一種是ImagePicker就是把相冊中的圖片放到了bottomsheet中。另一個是在bottomsheet中顯示一個Fragment,竟然都能顯示Fragment了那估計想干麼就能干麼了。但在實際的App中常見的用途是前面介紹的兩種,後面兩種等需要使用的時候在繼續學習。
 簡明adb使用教程
adb簡介adb介紹全稱是:Android Debug Bridge,即安卓調試橋,是安卓sdk的一個工具;B/S結構adb工具是一個客戶端-服務器的應用程序,包含三個方
 Android NDK學習筆記9-JNI調用Java方法
與域一樣,java中有兩類方法:實例方法和靜態方法。JNI提供訪問兩類方法的函數,例如:public class JavaClass {// 實例方法private St
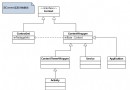 Android Context 到底是什麼?
什麼是Context?一個Context意味著一個場景,一個場景就是我們和軟件進行交互的一個過程。比如當你使用微信的時候,場景包括聊天界面、通訊錄、朋友圈,以及背後的一些
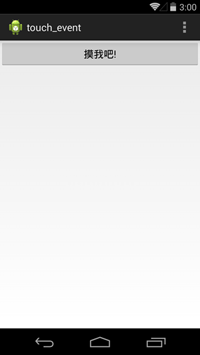 Android Touch事件分發過程詳解
本文以實例形式講述了Android Touch事件分發過程,對於深入理解與掌握Android程序設計有很大的幫助作用。具體分析如下:首先,從一個簡單示例入手:先看一個示例
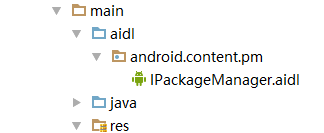 非ROOT實現靜默安裝的一些思考與體會,AIDL獲取IPackageManager,反射ServiceManager,系統簽名
最近自家的系統要做一個升級服務,裡面有三個功能,第一個是系統升級,也就是