編輯:關於Android編程
在Android系統中,發一個狀態欄通知還是很方便的。下面我們就來看一下,怎麼發送狀態欄通知,狀態欄通知又有哪些參數可以設置?
首先,發送一個狀態欄通知必須用到兩個類: NotificationManager 、Notification。
NotificationManager: 是狀態欄通知的管理類,負責發通知、清楚通知等。
NotificationManager 是一個系統Service,必須通過getSystemService()方法來獲取。
NotificationManager nm = (NotificationManager) getSystemService(NOTIFICATION_SERVICE);
Notification:是具體的狀態欄通知對象,可以設置icon、文字、提示聲音、振動等等參數。
下面是設置一個通知需要的基本參數:
An icon (通知的圖標)
A title and expanded message (通知的標題和內容)
APendingIntent (點擊通知執行頁面跳轉)
可選的設置:
A ticker-text message (狀態欄頂部提示消息)
An alert sound (提示音)
A vibrate setting (振動)
A flashing LED setting (燈光)
等等
一、創建Notification
通過NotificationManager 的notify(int, Notification) 方法來啟動Notification。
第一個參數唯一的標識該Notification,第二個參數就是Notification對象。
二、更新Notification
調用Notification的 setLatestEventInfo方法來更新內容,然後再調用NotificationManager的notify()方法即可。(具體可以看下面的實例)
三、刪除Notification
通過NotificationManager 的cancel(int)方法,來清除某個通知。其中參數就是Notification的唯一標識ID。
當然也可以通過cancelAll()來清除狀態欄所有的通知。
四、Notification設置(振動、鈴聲等)
1. 基本設置:
//新建狀態欄通知
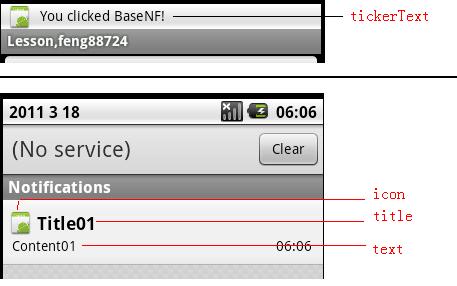
baseNF = new Notification();
//設置通知在狀態欄顯示的圖標
baseNF.icon = R.drawable.icon;
//通知時在狀態欄顯示的內容
baseNF.tickerText = "You clicked BaseNF!";
//通知的默認參數 DEFAULT_SOUND, DEFAULT_VIBRATE, DEFAULT_LIGHTS.
//如果要全部采用默認值, 用 DEFAULT_ALL.
//此處采用默認聲音
baseNF.defaults = Notification.DEFAULT_SOUND;
//第二個參數 :下拉狀態欄時顯示的消息標題 expanded message title
//第三個參數:下拉狀態欄時顯示的消息內容 expanded message text
//第四個參數:點擊該通知時執行頁面跳轉
baseNF.setLatestEventInfo(Lesson_10.this, "Title01", "Content01", pd);
//發出狀態欄通知
//The first parameter is the unique ID for the Notification
// and the second is the Notification object.
nm.notify(Notification_ID_BASE, baseNF);
配一張圖作說明:
2. 添加聲音
如果要采用默認聲音,只要使用default就可以了。
1baseNF.defaults = Notification.DEFAULT_SOUND;
如果要使用自定義聲音,那麼就要用到sound了。如下:
1notification.sound = Uri.parse("file:///sdcard/notification/ringer.mp3");
上面這種方法,使用的是自己的鈴聲,如果想用系統自帶的鈴聲,可以這樣:
1notification.sound = Uri.withAppendedPath(Audio.Media.INTERNAL_CONTENT_URI,"6");
需要注意一點,如果default、sound同時出現,那麼sound無效,會使用默認鈴聲。
默認情況下,通知的聲音播放一遍就會結束。 如果你想讓聲音循環播放,需要為flags參數加上FLAG_INSISTENT。 這樣聲音會到用戶響應才結束,比如下拉狀態欄。
1notification.flags |= notification.FLAG_INSISTENT;
3. 添加振動
如果是使用默認的振動方式,那麼同樣也是使用default。
1notification.defaults |= Notification.DEFAULT_VIBRATE;
當然也可以自己定義振動形式,這邊需要用到Long型數組。
1long[] vibrate = {0,100,200,300};
2notification.vibrate = vibrate;
這邊的Long型數組中,第一個參數是開始振動前等待的時間,第二個參數是第一次振動的時間,第三個參數是第二次振動的時間,以此類推,隨便定義多長的數組。但是采用這種方法,沒有辦法做到重復振動。
同樣,如果default、vibrate同時出現時,會采用默認形式。
另外還需要注意一點:使用振動器時需要權限,如下:
1"android.permission.VIBRATE">
4. 閃光
使用默認的燈光,如下:
1notification.defaults |= Notification.DEFAULT_LIGHTS;
自定義:
1notification.ledARGB =0xff00ff00;
2notification.ledOnMS =300;
3notification.ledOffMS =1000;
4notification.flags |= Notification.FLAG_SHOW_LIGHTS;
其中ledARGB 表示燈光顏色、ledOnMS 亮持續時間、ledOffMS 暗的時間。
注意:這邊的顏色跟設備有關,不是所有的顏色都可以,要看具體設備。
5.其他有用的設置:
flags:
Notification.FLAG_INSISTENT;//讓聲音、振動無限循環,直到用戶響應
Notification.FLAG_AUTO_CANCEL;//通知被點擊後,自動消失
Notification.FLAG_NO_CLEAR;//點擊'Clear'時,不清楚該通知(QQ的通知無法清除,就是用的這個)
全部代碼如下所示:
package com.yfz;
import android.app.Activity;
import android.app.Notification;
import android.app.NotificationManager;
import android.app.PendingIntent;
import android.content.Intent;
import android.net.Uri;
import android.os.Bundle;
import android.provider.MediaStore.Audio;
import android.util.Log;
import android.view.View;
import android.view.View.OnClickListener;
import android.widget.Button;
import android.widget.RemoteViews;
import android.widget.SeekBar;
import android.widget.TextView;
/**
 * Notification
 * @author  Administrator
 *
 */
public class Lesson_10 extends Activity {

    //BaseNotification
    private Button bt01;
    //UpdateBaseNotification
    private Button bt02;

    //ClearBaseNotification
    private Button bt03;

    //MediaNotification
    private Button bt04;

    //ClearMediaNotification
    private Button bt05;

    //ClearALL
    private Button bt06;

    //CustomNotification
    private Button bt07;

    //通知管理器
    private NotificationManager nm;

    //通知顯示內容
    private PendingIntent pd;

    @Override
     public void onCreate(Bundle savedInstanceState) {
            super.onCreate(savedInstanceState);
            /*加載頁面*/
            setContentView(R.layout.lesson10);

            init();
    }

    private void init() {
        bt01 = (Button)findViewById(R.id.le10bt01);
        bt02 = (Button)findViewById(R.id.le10bt02);
        bt03 = (Button)findViewById(R.id.le10bt03);
        bt04 = (Button)findViewById(R.id.le10bt04);
        bt05 = (Button)findViewById(R.id.le10bt05);
        bt06 = (Button)findViewById(R.id.le10bt06);
        bt07 = (Button)findViewById(R.id.le10bt07);

        bt01.setOnClickListener(onclick);
        bt02.setOnClickListener(onclick);
        bt03.setOnClickListener(onclick);
        bt04.setOnClickListener(onclick);
        bt05.setOnClickListener(onclick);
        bt06.setOnClickListener(onclick);
        bt07.setOnClickListener(onclick);

        nm = (NotificationManager) getSystemService(NOTIFICATION_SERVICE);

        Intent intent = new Intent(this,Lesson_10.class);

        pd = PendingIntent.getActivity(Lesson_10.this, 0, intent, 0);
    }

    OnClickListener onclick = new OnClickListener() {

        //BASE Notification ID
        private int Notification_ID_BASE = 110;

        private Notification baseNF;

        //Notification ID
        private int Notification_ID_MEDIA = 119;

        private Notification mediaNF;

        @Override
        public void onClick(View v) {
            switch(v.getId()) {
                case R.id.le10bt01:
                    //新建狀態欄通知
                    baseNF = new Notification();

                    //設置通知在狀態欄顯示的圖標
                    baseNF.icon = R.drawable.icon;

                    //通知時在狀態欄顯示的內容
                    baseNF.tickerText = "You clicked BaseNF!";

                    //通知的默認參數 DEFAULT_SOUND, DEFAULT_VIBRATE, DEFAULT_LIGHTS.
                    //如果要全部采用默認值, 用 DEFAULT_ALL.
                    //此處采用默認聲音
                    baseNF.defaults |= Notification.DEFAULT_SOUND;
                    baseNF.defaults |= Notification.DEFAULT_VIBRATE;
                    baseNF.defaults |= Notification.DEFAULT_LIGHTS;

                    //讓聲音、振動無限循環,直到用戶響應
                    baseNF.flags |= Notification.FLAG_INSISTENT;

                    //通知被點擊後,自動消失
                    baseNF.flags |= Notification.FLAG_AUTO_CANCEL;

                    //點擊'Clear'時,不清楚該通知(QQ的通知無法清除,就是用的這個)
                    baseNF.flags |= Notification.FLAG_NO_CLEAR;


                    //第二個參數 :下拉狀態欄時顯示的消息標題 expanded message title
                    //第三個參數:下拉狀態欄時顯示的消息內容 expanded message text
                    //第四個參數:點擊該通知時執行頁面跳轉
                    baseNF.setLatestEventInfo(Lesson_10.this, "Title01", "Content01", pd);

                    //發出狀態欄通知
                    //The first parameter is the unique ID for the Notification
                    // and the second is the Notification object.
                    nm.notify(Notification_ID_BASE, baseNF);

                    break;

                case R.id.le10bt02:
                    //更新通知
                    //比如狀態欄提示有一條新短信,還沒來得及查看,又來一條新短信的提示。
                    //此時采用更新原來通知的方式比較。
                    //(再重新發一個通知也可以,但是這樣會造成通知的混亂,而且顯示多個通知給用戶,對用戶也不友好)
                    baseNF.setLatestEventInfo(Lesson_10.this, "Title02", "Content02", pd);
                    nm.notify(Notification_ID_BASE, baseNF);
                    break;

                case R.id.le10bt03:

                    //清除 baseNF
                    nm.cancel(Notification_ID_BASE);
                    break;

                case R.id.le10bt04:
                    mediaNF = new Notification();
                    mediaNF.icon = R.drawable.icon;
                    mediaNF.tickerText = "You clicked MediaNF!";

                    //自定義聲音
                    mediaNF.sound = Uri.withAppendedPath(Audio.Media.INTERNAL_CONTENT_URI, "6");

                    //通知時發出的振動
                    //第一個參數: 振動前等待的時間
                    //第二個參數: 第一次振動的時長、以此類推
                    long[] vir = {0,100,200,300};
                    mediaNF.vibrate = vir;

                    mediaNF.setLatestEventInfo(Lesson_10.this, "Title03", "Content03", pd);

                    nm.notify(Notification_ID_MEDIA, mediaNF);
                    break;

                case R.id.le10bt05:
                    //清除 mediaNF
                    nm.cancel(Notification_ID_MEDIA);
                    break;

                case R.id.le10bt06:
                    nm.cancelAll();
                    break;

                case R.id.le10bt07:
                    //自定義下拉視圖,比如下載軟件時,顯示的進度條。
                    Notification notification = new Notification();

                    notification.icon = R.drawable.icon;
                    notification.tickerText = "Custom!";

                    RemoteViews contentView = new RemoteViews(getPackageName(), R.layout.custom);
                    contentView.setImageViewResource(R.id.image, R.drawable.icon);
                    contentView.setTextViewText(R.id.text, "Hello, this message is in a custom expanded view");
                    notification.contentView = contentView;

                    //使用自定義下拉視圖時,不需要再調用setLatestEventInfo()方法
                    //但是必須定義 contentIntent
                    notification.contentIntent = pd;

                    nm.notify(3, notification);
                    break;
            }
        }
    };

}
 Android支付寶支付集成,同時支持無客戶端H5支付
支付寶支付在app項目中非常常見,現在把集成步驟提出了,雖然非常簡單,但是,希望對第一次集成支付的同學有幫助。要集成別人的東西,第一步當然是去看他的開發文檔,支付寶支付以
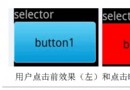 Android Selector和Shape的使用方法
1.背景選擇器(位於res/drawable/,使用方法:android:background=”@drawable/XXX”) 復制代碼 代碼如下: <?xml
 Android Orientation Sensor(方向傳感器)詳解與應用
一、前言 本篇blog是我的“Android進階”的第一篇文章,從初學Android到現在斷斷續續也有4個多月時間了,也算是有了一些自己的心得體會,也能自
 android計時器,時間計算器的實現方法
需求:默認為00:00:00,點擊開始按鈕時清零後開始計時,出現如10:28:34。點擊停止的時候停止計時。問題:使用Calendar DateFormat的方法,不設置