編輯:關於Android編程
1,如何修改主菜單圖標的位置?
[DESCRIPTION]
默認主菜單圖標在中間,如何修改它的位置?

Launcher3:
DynamicGrid.java文件
hotseatAllAppsRank = (int) (numColumns/2); //默認是列數除以2取整,可以設置為需要的值
Launcher2:
1. 請修改packages/apps/Laucher2/res/values/config.xml 中hotseat_all_apps_index的值,例如修改為1
2. 默認在hotseat配置時1的位置是contact,需要重新修改packages/apps/Laucher2/res/xml/default_workspace.xml 來重新配置hotseat圖標位置
2,Launcher3如何增加默認的HomeScreen數目?
[DESCRIPTION]
Launcher3如何增加默認的Home Screen數目?
Launcher3默認的Home Screen數目是由預置的桌面應用(default_workspace.xml)決定的。如果要增加Home Screen數目,需要在default_workspace.xml中將桌面應用配置在不同screen id上。
請修改res/xml/default_workspace.xml文件,添加如下代碼:
L:
1. AppsCustomizePagedView.java修改兩處如下:
1) private void setupPage(AppsCustomizeCellLayout layout) {
layout.setGridSize(mCellCountX, mCellCountY);
// Note: We force a measure here to get around the fact that when we do layout calculations
// immediately after syncing, we don't have a proper width. That said, we already know the
// expected page width, so we can actually optimize by hiding all the TextView-based
// children that are expensive to measure, and let that happen naturally later.
setVisibilityOnChildren(layout, View.GONE);
int widthSpec = MeasureSpec.makeMeasureSpec(mContentWidth, MeasureSpec.AT_MOST);
int heightSpec = MeasureSpec.makeMeasureSpec(mContentHeight, MeasureSpec.AT_MOST);
layout.measure(widthSpec, heightSpec);
if(!Launcher.DISABLE_APPLIST_WHITE_BG) {//mtk add
Drawable bg = getContext().getResources().getDrawable(R.drawable.quantum_panel);
if (bg != null) {
bg.setAlpha(mPageBackgroundsVisible ? 255: 0);
layout.setBackground(bg);
}
} else {//mtk add
layout.setBackground(null);//mtk add
}//mtk add
setVisibilityOnChildren(layout, View.VISIBLE);
}
2) public void syncAppsPageItems(int page, boolean immediate) {
......
AppInfo info = mApps.get(i);
BubbleTextView icon = (BubbleTextView) mLayoutInflater.inflate(
R.layout.apps_customize_application, layout, false);
if(Launcher.DISABLE_APPLIST_WHITE_BG) {//mtk add
icon.setTextColor(getContext().getResources().getColor(R.color.quantum_panel_transparent_bg_text_color))
;//mtk add
}//mtk add
icon.applyFromApplicationInfo(info);
icon.setOnClickListener(mLauncher);
icon.setOnLongClickListener(this);
......
2. colors.xml中新增:
#FFFFFF
3. DeviceProfile.java修改layout(Launcher launcher)方法如下:
......
pagedView.setWidgetsPageIndicatorPadding(pageIndicatorHeight);
if(Launcher.DISABLE_APPLIST_WHITE_BG) {//mtk add
fakePage.setBackground(null);//mtk add
} else {//mtk add
fakePage.setBackground(res.getDrawable(R.drawable.quantum_panel));
}//mtk add
// Horizontal padding for the whole paged view
int pagedFixedViewPadding =
res.getDimensionPixelSize(R.dimen.apps_customize_horizontal_padding);
......
4. Launcher.java
1) 新增:
//mtk add begin
/// M: Disable applist white background for jitter performance issue {@
public static boolean DISABLE_APPLIST_WHITE_BG = true;
public static final String PROP_DISABLE_APPLIST_WHITE_BG = "launcher.whitebg.disable";
// should kill and restart launcher process to re-execute static block if reset properties
// adb shell setprop launcher.applist.whitebg.disable true/false
// adb shell stop
// adb shell start
static {
DISABLE_APPLIST_WHITE_BG = android.os.SystemProperties.getBoolean(PROP_DISABLE_APPLIST_WHITE_BG, true);
}
/// @}
//mtk add end
2) showAppsCustomizeHelper方法修改如下:
......
if (isWidgetTray) {
revealView.setBackground(res.getDrawable(R.drawable.quantum_panel_dark));
} else {
if(Launcher.DISABLE_APPLIST_WHITE_BG) {//mtk add
revealView.setBackground(null);//mtk add
} else {//mtk add
revealView.setBackground(res.getDrawable(R.drawable.quantum_panel));
}//mtk add
}
......
3) hideAppsCustomizeHelper方法修改如下:
......
if (isWidgetTray) {
revealView.setBackground(res.getDrawable(R.drawable.quantum_panel_dark));
} else {
if(Launcher.DISABLE_APPLIST_WHITE_BG) {//mtk add
revealView.setBackground(null);//mtk add
} else {//mtk add
revealView.setBackground(res.getDrawable(R.drawable.quantum_panel));
}//mtk add
}
......
JB2/JB3:
1. 請修改 packages\apps\Launcher2\res\layout\apps_customize_pane.xml
 // 原值為#FF000000
2. 請修改packages\apps\Launcher2\src\com\android\launcher2\Launcher.java的hideAppsCustomizeHelper(boolean animated, final boolean
springLoaded)方法,如下:
......
setPivotsForZoom(fromView, scaleFactor);
updateWallpaperVisibility(true);
showHotseat(animated);
if(mDockDivider != null) { //mtk add
mDockDivider.setVisibility(View.VISIBLE); //mtk add
} //mtk add
......
3. 請修改Launcher.java的showAppsCustomizeHelper(boolean animated, final boolean springLoaded) 方法,如下:
......
// Shrink workspaces away if going to AppsCustomize from workspace
mWorkspace.changeState(Workspace.State.SMALL, animated);
// and hide hotseat and dock divider
hideHotseat(false); //mtk add
if(mDockDivider != null) {//mtk add
mDockDivider.setVisibility(View.INVISIBLE); //mtk add
}//mtk add
if(mWorkspace != null) {//mtk add
mWorkspace.setVisibility(View.INVISIBLE);//mtk add
}//mtk add
......
4. 請修改Launcher.java 文件,將showAppsCustomizeHelper(boolean animated, final boolean springLoaded)方法中出現的兩處
updateWallpaperVisibility(false);注釋掉
第一處是在此函數內的 public void onAnimationEnd(Animator animation) 方法的最後
第二處是在showAppsCustomizeHelpe方法的最後
5. 請修改Launcher.java的enterSpringLoadedDragMode()方法,如下:
void enterSpringLoadedDragMode() {
if (mState == State.APPS_CUSTOMIZE) {
mWorkspace.setVisibility(View.VISIBLE); //mtk add
mWorkspace.changeState(Workspace.State.SPRING_LOADED);
hideAppsCustomizeHelper(true, true);
hideDockDivider();
mState = State.APPS_CUSTOMIZE_SPRING_LOADED;
}
}
6. 請修改Launcher.java 中disableWallpaperIfInAllApps() 方法,如下:
void disableWallpaperIfInAllApps() {
// Only disable it if we are in all apps
if (isAllAppsVisible()) {
if (mAppsCustomizeTabHost != null &&
!mAppsCustomizeTabHost.isTransitioning()) {
updateWallpaperVisibility(true); //mtk modify }
}
}
7. 請修改packages\apps\Launcher2\res\layout\apps_customize_pane.xml中id 為 animation_buffer 的這個控件, 將其 android:background 設
置為 #0000000
8. 請修改Launcher.java的onResume()方法:
將setWorkspaceBackground(mState == State.WORKSPACE);
修改為
setWorkspaceBackground(true);
注意: 修改了第7步之後, 在切換 widget 及 app 的時候, 可能會短時間的看到 widget 與 app 相疊加的畫面。
這是 appsCustomizeTabHost.java 的 onTabChanged 方法內的 animSet.playTogether(outAnim, inAnim); 所指定的效果,可以自行客制化。
11,如何讓Launcher3的主菜單和桌面支持循環滑動?
如果項目不是operator定制項目,請找到DefaultWorkspaceExt.java,將其中的supportAppListCycleSliding()返回值修改為true。
如果項目是operator定制項目,請找到OP0XWorkspaceExt.java(例如移動是OP01WorkspaceExt.java),將其中的supportAppListCycleSliding()返回值修改為true。
12,如何將桌面和主菜單較長的圖標名稱顯示完整?
1. 請修改styles.xml,將
修改為:
2. BubbleTextView.javaapplyFromShortcutInfo
setCompoundDrawablePadding((int) ((grid.folderIconSizePx - grid.iconSizePx) / 2f));
3. PagedViewIcon.javaapplyFromApplicationInfo
public void applyFromApplicationInfo(AppInfo info, boolean scaleUp,
PagedViewIcon.PressedCallback cb) {
mIcon = info.iconBitmap;
mPressedCallback = cb;
setCompoundDrawablesWithIntrinsicBounds(null, Utilities.createIconDrawable(mIcon), null, null);
setCompoundDrawablePadding(xxxx);//mtk addxxxx
setText(info.title);
13,如何將主菜單圖標改成按安裝時間排序?
1. 在 LauncherModel.java 中加入如下方法:
public static final Comparator getInstallTimeComparator() {
return new Comparator() {
public final int compare(AppInfo a, AppInfo b) {
return a.firstInstallTime == b.firstInstallTime ? 0 : a.firstInstallTime >
b.firstInstallTime ? 1:-1;
}
};
}
public static class InstallTimeComparator implements
Comparator {
private PackageManager mPackageManager;
List mapps;
InstallTimeComparator(PackageManager pm, List apps)
{
mPackageManager = pm;
mapps = apps;
}
public final int compare(ResolveInfo a, ResolveInfo b) {
String packageNameA = a.activityInfo.applicationInfo.packageName;
String packageNameB = b.activityInfo.applicationInfo.packageName;
long firstInstallTimeA = 0, firstInstallTimeB = 0;
try{
firstInstallTimeA = mPackageManager.getPackageInfo(packageNameA,
0).firstInstallTime;
firstInstallTimeB = mPackageManager.getPackageInfo(packageNameB,
0).firstInstallTime;
}catch(Exception e){
e.printStackTrace();
return 0;
}
return firstInstallTimeA == firstInstallTimeB ? 0 : firstInstallTimeA >
firstInstallTimeB ? 1:-1;
}
};
2. 修改 LauncherModel.java 的 loadAllAppsByBatch() 方法:
將
Collections.sort(apps,new
LauncherModel.ShortcutNameComparator(packageManager, mLabelCache));
替換成:
Collections.sort(apps,new InstallTimeComparator(packageManager, apps));
3. 修改 AppsCustomizePagedview.java 的 setApps 方法
將
Collections.sort(mApps, LauncherModel.getAppNameComparator());
替換成:
Collections.sort(mApps, LauncherModel.getInstallTimeComparator());
4. reorderApps()在某些條件下會被調用,如果要求在那些條件下也要達到按照安裝時間排序,請在調用reorderApps方法前增加
Collections.sort(mApps, LauncherModel.getInstallTimeComparator());
14,如何將Launcher2的狀態欄修改為透明?
KK:
請修改packages/apps/Launcher2/res/value/Style.xml,增加下圖的屬性即可:

15,如何客制化Launcher的主菜單圖標?
1、請修改packages/apps/Launcher2的ApplicationInfo.java 或者
packages/apps/Launcher3的AppInfo.java,如下:
public ApplicationInfo(ResolveInfo info, IconCache iconCache) {
this.componentName = new ComponentName(
info.activityInfo.applicationInfo.packageName,
info.activityInfo.name);
this.container = ItemInfo.NO_ID;
this.setActivity(componentName,
Intent.FLAG_ACTIVITY_NEW_TASK |
Intent.FLAG_ACTIVITY_RESET_TASK_IF_NEEDED);
iconCache.getTitleAndIcon(this, info);
// mtk add
if ( (info.activityInfo.applicationInfo.flags &
android.content.pm.ApplicationInfo.FLAG_SYSTEM) != 0) {
this.iconBitmap=Bitmap.createBitmap(72, 72, Bitmap.Config.ARGB_8888); //
具體方法可以自行決定,這裡只是例子
}
// mtk add
}
2、如果是用戶安裝的第三方app,請修改packages/apps/Launcher2的
AllAppsList.java,修改updatePackage方法如下:
......
ApplicationInfo applicationInfo = findApplicationInfoLocked(pkgName,
className);
if (applicationInfo == null) {
add(new ApplicationInfo(context.getPackageManager(), info, mIconCache,
null));
} else {
mIconCache.remove(applicationInfo.componentName);
mIconCache.getTitleAndIcon(applicationInfo, info, null);
//mtk add
在此處添加修改applicationInfo.iconBitmap的代碼(同上)
//mtk add
modified.add(applicationInfo);
}
......
2、如果是系統預置的某個特定的應用圖標,請修改IconCache.java文件的
cacheLocked方法
最後修改原來的entry.icon為您需要的數據
entry.icon = Utilities.createIconBitmap(
getFullResIcon(info), mContext);
舉例如下:
if("com.android.contacts".equals(componentName.getPackageName())) {
Drawable drawable;
drawable = getFullResIcon(mContext.getResources(),
R.drawable.ic_hw_allbackup);
entry.icon = Utilities.createIconBitmap(drawable, mContext);
LauncherLog.d(TAG, "change");
}
else{
entry.icon = Utilities.createIconBitmap(
getFullResIcon(info), mContext);
LauncherLog.d(TAG, "no change");
}
}
PS:72/72表示主菜單Icon的圖標大小,color format是ARGB8888。這個設置默認把
用戶自己安裝的apk Icon刷成黑色。createBitmap這個方法有多種重載方式,用戶可
以根據實際需求,通過方法參數(顏色/bitmap/圖片資源id等)來構造自己的主菜單
Icon風格。
16,如何定制Launcher主菜單中應用程序圖標的顯示順序?
請修改Launcher2/res/xml/default_toppackage.xml文件:


請按照上面的格式來編輯,編輯為特定app的topPackageName,topClassName以及order的值(從0開始)。
備注:如果是運營商項目,會有resource_overlay機制,請以resource_overlay路徑下的default_toppackage.xml內
容為准。
17,如何在小部件列表中隱藏某個widget或者shortcut?
小部件列表包括兩種類型:widget和shortcut。如何在小部件列表中隱藏某個widget或者shortcut?例如隱藏設置的電量控制小部件(Power Control)?
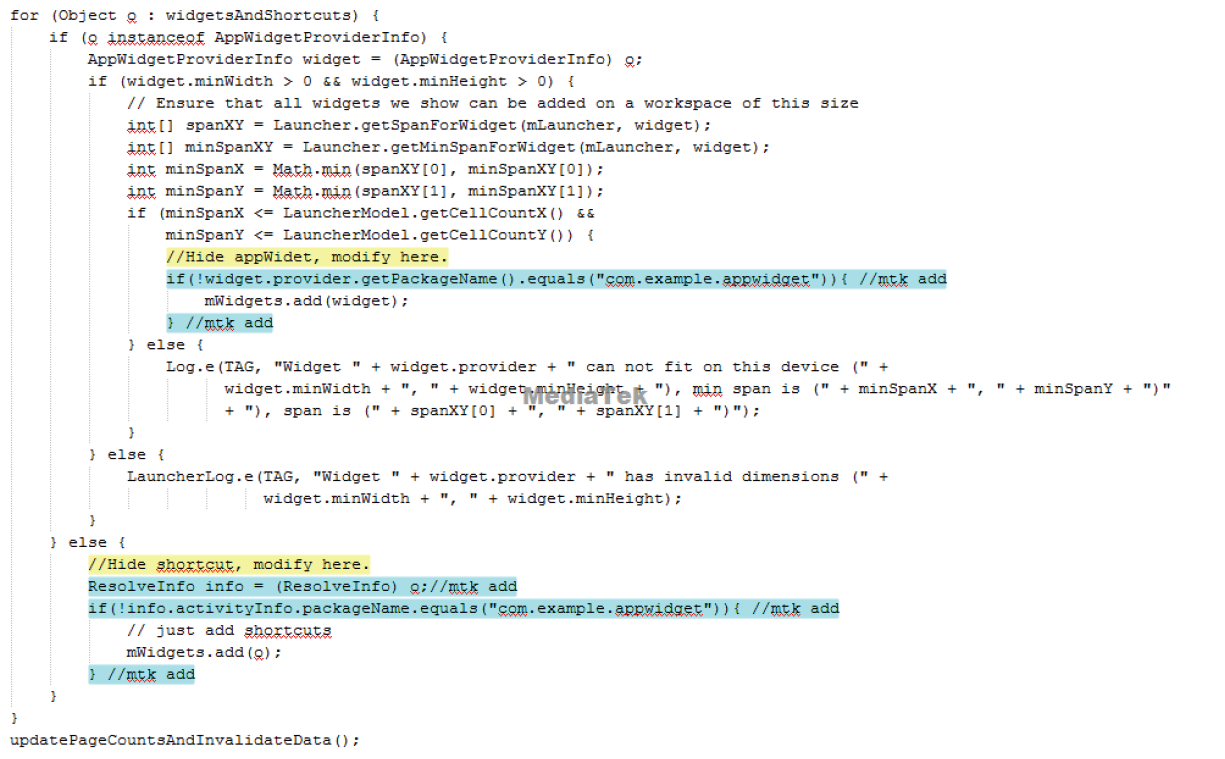
請修改AppsCustomizePagedView.java的onPackagesUpdated方法,如下圖所示:

18,如何在Launcher的主菜單中隱藏某個應用?
mIconCache, mLabelCache));
}
//mtk add begin
mBgAllAppsList.removePackage("packageName");
//mtk add end
mBgAllAppsList.reorderApplist();
......
2. 請在LauncherModel.java的PackageUpdatedTask的run()方法開頭,將mPackages變量中要求不顯示的package
name移除掉。
KK以前版本:
請修改LauncherModel.java的loadAllAppsByBatch()方法,如下:
......
if (!LauncherExtPlugin.getAllAppsListExt(mApp).isShowWifiSettings()) {
mBgAllAppsList.removeWifiSettings();
}
//mtk add begin
mBgAllAppsList.removeSpecificApp("packageName", "className");
//mtk add end
mBgAllAppsList.reorderApplist();
19,如何去除Launcher默認的googlesearch bar?
L1:
請修改Launcher3/src/com/android/launcher3/Launcher.java的getQsbBar()方法,直接return null。
L0/KK:
1. 請修改Launcher3/res/layout-port/qsb.xml(L0)或者Launcher3/res/layout-port/search_bar.xml(KK),如下:

2.請修改Launcher3/res/layout-port/launcher.xml,將voice_button_proxy這個view的clickable設置為false,並去
掉onClick="onClickVoiceButton",如下:

3. 請修改Launcher3/src/com/android/launcher3/SearchDropTargetBar.java的setup()方法,如下:
......
if (mEnableDropDownDropTargets) {
mQSBSearchBarAnim = ObjectAnimator.ofFloat(mQSBSearchBar, "translationY", -mBarHeight,
-mBarHeight);
} else {
mQSBSearchBarAnim = ObjectAnimator.ofFloat(mQSBSearchBar, "alpha", 0f, 0f);
}
......
4.請修改Launcher3/src/com/android/launcher3/SearchDropTargetBar.java的showSearchBar()方法,如下:
public void showSearchBar(boolean animated) {
boolean needToCancelOngoingAnimation = mQSBSearchBarAnim.isRunning() && !animated;
if (!mIsSearchBarHidden && !needToCancelOngoingAnimation) return;
if (animated) {
prepareStartAnimation(mQSBSearchBar);
mQSBSearchBarAnim.reverse();
} else {
mQSBSearchBarAnim.cancel();
if (mEnableDropDownDropTargets) {
mQSBSearchBar.setTranslationY(0);
} else {
mQSBSearchBar.setAlpha(0f);
}
}
mIsSearchBarHidden = false;
}
5.請修改Launcher3/src/com/android/launcher3/Workspace.java的getChangeStateAnimation()方法,如下:
......
float finalSearchBarAlpha = !stateIsNormal ? 0f : 0f;
......
JB2/JB3/JB5/JB9:
1. 請修改Launcher2/res/layout/qsb_bar.xml,如下:

2.請修改Launcher2/res/layout-port/launcher.xml,將voice_button_proxy這個view的clickable設置為false,並去
掉onClick="onClickVoiceButton",如下:

3. 請修改Launcher2/src/com/android/launcher2/SearchDropTargetBar.java的onFinishInflate()方法,如下:
......
// Create the various fade animations
if (mEnableDropDownDropTargets) {
mDropTargetBar.setTranslationY(-mBarHeight);
mDropTargetBarAnim = ObjectAnimator.ofFloat(mDropTargetBar, "translationY",
-mBarHeight, 0f);
mQSBSearchBarAnim = ObjectAnimator.ofFloat(mQSBSearchBar, "translationY",-mBarHeight,
-mBarHeight);
} else {
mDropTargetBar.setAlpha(0f);
mDropTargetBarAnim = ObjectAnimator.ofFloat(mDropTargetBar, "alpha", 0f, 1f);
mQSBSearchBarAnim = ObjectAnimator.ofFloat(mQSBSearchBar, "alpha",0f, 0f);
}
......
4.請修改Launcher2/src/com/android/launcher2/SearchDropTargetBar.java的showSearchBar()方法,如下:
public void showSearchBar(boolean animated) {
if (!mIsSearchBarHidden) return;
if (animated) {
prepareStartAnimation(mQSBSearchBar);
mQSBSearchBarAnim.reverse();
} else {
mQSBSearchBarAnim.cancel();
if (mEnableDropDownDropTargets) {
mQSBSearchBar.setTranslationY(0);
} else {
mQSBSearchBar.setAlpha(0f);
}
}
mIsSearchBarHidden = false;
}
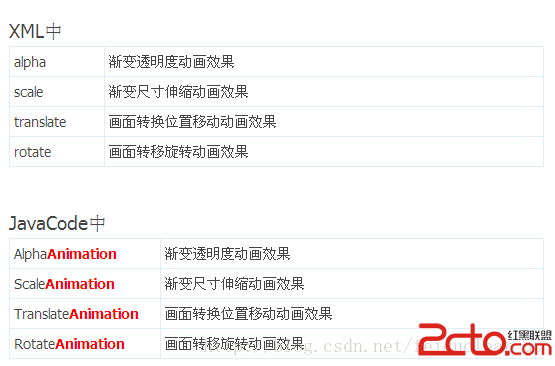
***20***Launcher如何去掉進入應用時的動畫效果?
請修改Launcher.java的startActivity方法,如下:
boolean startActivity(View v, Intent intent, Object tag) {
if (LauncherLog.DEBUG) {
LauncherLog.d(TAG, "startActivity v = " + v + ", intent = " + intent + ", tag = " + tag);
}
intent.addFlags(Intent.FLAG_ACTIVITY_NEW_TASK);
try {
// Only launch using the new animation if the shortcut has not opted out (this is a
// private contract between launcher and may be ignored in the future).
//boolean useLaunchAnimation = (v != null) && //mtkmodify
// !intent.hasExtra(INTENT_EXTRA_IGNORE_LAUNCH_ANIMATION); //mtk modify
boolean useLaunchAnimation = false; //mtkadd
/// M: add systrace to analyze application launche time.
Trace.traceBegin(Trace.TRACE_TAG_INPUT, "Launcher.startActivity");
if (useLaunchAnimation) {
ActivityOptions opts = ActivityOptions.makeScaleUpAnimation(v, 0, 0,
v.getMeasuredWidth(), v.getMeasuredHeight());
startActivity(intent, opts.toBundle());
} else {
startActivity(intent);
}
/// M: add systrace to analyze application launche time.
Trace.traceEnd(Trace.TRACE_TAG_INPUT);
return true;
} catch (SecurityException e) {
Toast.makeText(this, R.string.activity_not_found, Toast.LENGTH_SHORT).show();
Log.e(TAG, "Launcher does not have the permission to launch " + intent +
". Make sure to create a MAIN intent-filter for the corresponding activity " +
"or use the exported attribute for this activity. "
+ "tag=" + tag + " intent=" + intent, e);
}
return false;
}
KK:
直接將useLaunchAnimation 設置為false就好
21.Launcher3中主菜單的布局如何調整(譬如從5*4調整為4*4)?
Launcher3主菜單布局的行數和列數,都是在DynamicGrid.java中動態計算的,xml中無法配置。
如果想修改主菜單的布局,調整行數和列數,請修改DynamicGrid.java中allAppsNumRows和allAppsNumCols的值。
22,Launcher2的主菜單一直卡在加載狀態,如何解決?
1、請修改Launcher.java的onDestroy方法,將如下code:
mModel.stopLoader();
app.setLauncher(null);
修改為:
// It’s possible to receive onDestroy after a new Launcher activity has
// been created. In this case, don’t interfere with the new Launcher.
if (mModel.isCurrentCallbacks(this)) {
mModel.stopLoader();
app.setLauncher(null);
}
2、請在LauncherModel.java中增加如下code:
public boolean isCurrentCallbacks(Callbacks callbacks) {
return (mCallbacks != null && mCallbacks.get() == callbacks);
}
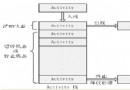 Android四大基本組件介紹與生命周期
Android四大基本組件分別是Activity,Service服務,Content Provider內容提供者,BroadcastReceiver廣播接收器。Activ
 Android中Action Bar的使用
內容概要示例演示和基本介紹啟用Action Bar在Action Bar上添加按鈕自定義Action Bar樣式自動隱藏Action BarAction Provider
 Android應用中使用百度地圖API定位自己的位置(二)
百度地圖SDK為開發者們提供了如下類型的地圖覆蓋物: 我的位置圖層(MyLocationOverlay):用於顯示用戶當前位置的圖層(支持自定義位置圖標
 Android優化——UI優化(三)
使用ViewStub延遲加載1.ViewStub延遲加載 ViewStub是一個不可見的,大小為0的View,最佳用途就是實現View的延遲加載,在需要的時候再加載Vie