編輯:關於Android編程
根據Android官方提供給我們的Sample例子實實在在的分析Bitmap使用時候的注意點。
在分析Bitmap的使用之前先簡單的了解下BitmapFactory 類,BitmapFactory類可以根據各種不同的數據來源(文件,流,字節數組等)來構建Bitmap位圖對象,BitmapFactory有一個內部類BitmapFactory.Options,大概看下BitmapFactory.Options裡面各個參數的作用(不一定全部對哦)
1). inBitmap: 如果設置,在加載Bitmap的時候會嘗試去重用這塊內存(內存復用),不能重用的時候會返回null,否則返回bitmap。
2). inDensity: 原始圖片的Bitmap的像素密度
3). inDiter: 是否采用抖動解碼(舉個例子來理解抖動解碼,如果一張顏色很豐富的圖,用一個位數比較低的顏色模式來解碼的話,那麼一個直觀的感覺就是顏色不夠用,那麼這張圖解出來之後,在一些顏色漸變的區域上就會有一些很明顯的斷裂色帶,如果采用抖動解碼,那麼就會在這些色帶上采用隨機噪聲色來填充,目的是讓這張圖顯示效果更好,色帶不那麼明顯)
4). inInputShareable: 與inPurgeable一起使用,如果inPurgeable為false那該設置將被忽略,如果為true,那麼它可以決定位圖是否能夠共享一個指向數據源的引用,或者是進行一份拷貝
5). inJustDecodeBounds: 當為true的時候bitmap返回null但是其他的一些option信息還是會返回的。(比如有些情況下我們只是想要獲取圖片的寬度和高度就可以把這個參數設置為true)。
6). inMutable: 如果為true,解碼方法將始終返回一個可變的位圖
7). inPreferQualityOverSpeed: 如果設置為true,解碼器將嘗試重建圖像以獲得更高質量的解碼,甚至犧牲解碼速度。現在只是對JPEG有用。
8). inPreferredConfig: 如果不為空,解碼器將嘗試解碼成這個內部配置,如果為空將嘗試挑選最好的匹配配置基於系統的屏幕。
9). inPremultiplied: 默認true,如果設置為true返回的bitmap有alpha的顏色通道。 一般不會去設置這個值直接用默認的。
10). inPurgeable: 如果設置為true,則由此產生的位圖將分配其像素,以便系統需要回收內存時可以將它們清除。
11). inSampleSize: 如果設置的值大於1,解碼器將等比縮放圖像以節約內存。
12). inScaled: 如果設置true,當inDensity和inTargetDensity不為0,加載時該位圖將被縮放,以匹配inTargetDensity,而不是依靠圖形系統縮放每次將它繪制到畫布上。
13). inScreenDensity: 當前正在使用的實際屏幕的像素密度。
14). inTargetDensity: 這個位圖將被畫到的目標的像素密度。
15). inTempStorage: 解碼的時候臨時存儲用的 建議設置16K。
16). mCancel: 用於指示已經調用了這個對象的取消方法的標志。
17). outHeight: 圖像的高度。
18). outMimeType: 如果知道,這個字符串將被設置為解碼圖像的MIME類型。
19). outWidth: 圖像的寬度。
在分析Bitmap的使用之前還得知道,在Android3.0之前,Bitmap的內存分配分為兩部分,一部分是分配在Dalvik的VM堆中,而像素數據的內存是分配在Native堆中,而到了Android3.0之後,Bitmap的內存則已經全部分配在VM堆上,這兩種分配方式的區別在於,Native堆的內存不受Dalvik虛擬機的管理,必須手動調用Recycle方法釋放Bitmap的內存,而到了Android 3.0之後,我們就可以將Bitmap的內存完全放心的交給虛擬機管理了,我們只需要保證Bitmap對象遵守虛擬機的GC Root Tracing的回收規則即可。
Bitmap使用的時候主要從下面幾個方面優化
緩存:內存緩存+文件緩存 這個應該不能算是內存方面的優化,應該算性能上面的優化。 及時釋放Bitmap的內存:正如上面說到的Android 3.0之前有部分內存是分配在native上的,必須手動去釋放。 復用內存:BitmapFactory.Options 參數inBitmap的使用。inMutable設置為true,並且配合SoftReference軟引用使用(內存空間足夠,垃圾回收器就不會回收它;如果內存空間不足了,就會回收這些軟引用對象的內存)。有一點要注意Android4.4以下的平台,需要保證inBitmap和即將要得到decode的Bitmap的尺寸規格一致,Android4.4及其以上的平台,只需要滿足inBitmap的尺寸大於要decode得到的Bitmap的尺寸規格即可。 降低采樣率,BitmapFactory.Options 參數inSampleSize的使用,從而減少內存的使用。
接下來就該進入正題了
對應上面四點Bitmap使用的優化點,下面結合Android官方提供給我們的Sample例子來簡單的看看具體是怎麼做的,對應的Sample例子在android-sdk目錄/sample/android版本/ui/DisplayingBitmaps。上面的每個優化點在這個例子裡面都有體現,在分析的時候會一一的指出來,給我們以後使用Bitmap的時候提供一個參照的作用。
在分析這個實例之前先對幾個類做大概的了解,方便後續代碼分析。
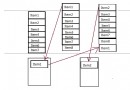
實例簡單類圖如下
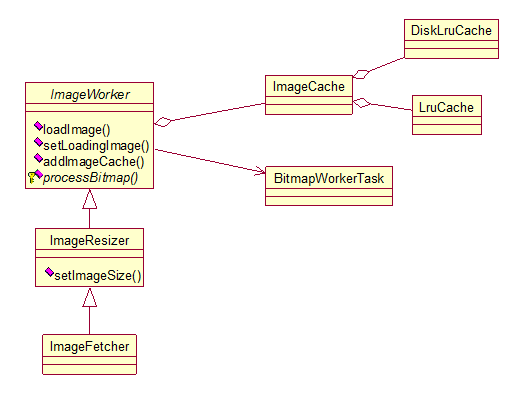
ImageWorker類:加載圖片,從內存直接加載或異步加載(從磁盤緩存或processBitmap(這個要看ImageFetcher類中processBitmap()函數的的具體實現))。
1). ImageCache類: 緩存的具體實現類。ImageCache裡面用到了兩種緩存,內存緩存LruCache,文件緩存DiskLruCache,在對圖片進行緩存的時候內存和文件都會緩存的,但是內存緩存的優先級要高於文件緩存的優先級,先讀內存緩存然後在讀文件緩存。
2). BitmapWorkerTask類: 異步加載(讀文件緩存或者調用processBitmap()函數, 因為這兩種讀取Bitmap信息都是要耗費時間)的具體實現。裡面會先去文件緩存裡面讀Bitmap,如果沒讀到就調用ImageFetcher類的processBitmap()函數去加載Bitmap,然後又根據需要又把Bitmap加入到緩存當中去。
3). ImageResizer類: 根據給定的大小對Image做調整,在降低采樣率的時候用到。會根據原圖的大小和要顯示的圖片的大小按照一定的算法計算出inSampleSize的值(關於inSampleSize的計算我們以後是可以直接搬去用的)。
4). ImageFetcher類: 從網絡下載圖片,processBitmap在ImageWorker中是一個抽象方法,並沒有實現體。為什麼這麼做呢,因為圖片的來源不確定可能是網絡也可能是本地數據庫。所以ImageWorker中processBitmap直接用了抽象的方法,讓他的子類根據需求做不同的實現。在這裡做的是去網絡上面讀取圖片。
只是分析大概的過程哦,方便以後使用Bitmap的時候更加容易入手點,還是按照具體的使用流程來直接跳到調用的地方。
ImageGridFragment類中內部類ImageAdapter的getView()函數中mImageFetcher.loadImage(Images.imageThumbUrls[position - mNumColumns], imageView)。兩個參數第一個參數url,第二個參數ImageView。 直接跟進去。
ImageWorker類的loadImage()函數
    public void loadImage(Object data, ImageView imageView) {
        if (data == null) {
            return;
        }

        BitmapDrawable value = null;

        if (mImageCache != null) {
            value = mImageCache.getBitmapFromMemCache(String.valueOf(data));
        }

        if (value != null) {
            // Bitmap found in memory cache
            imageView.setImageDrawable(value);
        } else if (cancelPotentialWork(data, imageView)) {

            final BitmapWorkerTask task = new BitmapWorkerTask(data, imageView);
            final AsyncDrawable asyncDrawable =
                    new AsyncDrawable(mResources, mLoadingBitmap, task);
            imageView.setImageDrawable(asyncDrawable);

            // NOTE: This uses a custom version of AsyncTask that has been pulled from the
            // framework and slightly modified. Refer to the docs at the top of the class
            // for more info on what was changed.
            task.executeOnExecutor(AsyncTask.DUAL_THREAD_EXECUTOR);

        }
    }
8-10行,從內存緩存中去讀圖片資源。
12-15行,內存緩存讀到了,直接設置給ImageView。
16-27行,內存緩存裡面沒有圖片資源,先調用cancelPotentialWork()判斷當前ImageView對應的BitmapWorkerTask是否還在異步請求當前url對應的圖像資源,如果是則返回true不用再重新請求了,不是則返回false。返回false的時候我們就要新建一個BitmapWorkerTask去異步請求url對應的圖像資源了(可能是文件緩存也可能從網絡上讀在接下來的分析中會體現出來)。然後通過AsyncDrawable把BitmapWorkerTask和ImageView關聯起來(注意AsyncDrawable是繼承BitmapDrawable的,所以是可以setImageDrawble的,正好在cancelPotentialWork()函數裡面會get出來去判斷)。
接下來就是BitmapWorkerTask類的具體實現了,重頭戲了(注意 通過上面內存緩存已經讀過了哦,在內存緩存裡面沒讀到才會進入BitmapWorkerTask異步類哦)。
那就該去看BitmapWorkerTask類的doInBackground()函數了。(異步,負責讀文件緩存,從網絡上讀圖片信息)。
        @Override
        protected BitmapDrawable doInBackground(Void... params) {

            if (BuildConfig.DEBUG) {
                Log.d(TAG, "doInBackground - starting work");
            }

            final String dataString = String.valueOf(mData);
            Bitmap bitmap = null;
            BitmapDrawable drawable = null;

            // Wait here if work is paused and the task is not cancelled
            synchronized (mPauseWorkLock) {
                while (mPauseWork && !isCancelled()) {
                    try {
                        mPauseWorkLock.wait();
                    } catch (InterruptedException e) {}
                }
            }

            // If the image cache is available and this task has not been cancelled by another
            // thread and the ImageView that was originally bound to this task is still bound back
            // to this task and our "exit early" flag is not set then try and fetch the bitmap from
            // the cache
            if (mImageCache != null && !isCancelled() && getAttachedImageView() != null
                    && !mExitTasksEarly) {
                bitmap = mImageCache.getBitmapFromDiskCache(dataString);
            }

            // If the bitmap was not found in the cache and this task has not been cancelled by
            // another thread and the ImageView that was originally bound to this task is still
            // bound back to this task and our "exit early" flag is not set, then call the main
            // process method (as implemented by a subclass)
            if (bitmap == null && !isCancelled() && getAttachedImageView() != null
                    && !mExitTasksEarly) {
                bitmap = processBitmap(mData);
            }

            // If the bitmap was processed and the image cache is available, then add the processed
            // bitmap to the cache for future use. Note we don't check if the task was cancelled
            // here, if it was, and the thread is still running, we may as well add the processed
            // bitmap to our cache as it might be used again in the future
            if (bitmap != null) {
                if (Utils.hasHoneycomb()) {
                    // Running on Honeycomb or newer, so wrap in a standard BitmapDrawable
                    drawable = new BitmapDrawable(mResources, bitmap);
                } else {
                    // Running on Gingerbread or older, so wrap in a RecyclingBitmapDrawable
                    // which will recycle automagically
                    drawable = new RecyclingBitmapDrawable(mResources, bitmap);
                }

                if (mImageCache != null) {
                    mImageCache.addBitmapToCache(dataString, drawable);
                }
            }

            if (BuildConfig.DEBUG) {
                Log.d(TAG, "doInBackground - finished work");
            }

            return drawable;

        }
25-28行,從文件緩存去讀圖片資源
34-37行,文件緩存沒有讀到,調用processBitmap()函數從網絡上面讀圖片資源,processBitmap()函數的具體實現在ImageFetcher類中。這個我們等下再看。
43-56行,拿到了圖片資源,44-47行,Android3.0之後的設備上面說過3.0之後的是itmap的內存則已經全部分配在VM堆上,不需要我們手動去釋放,這部分還是按照我們正常的使用流程。47-51行,Android3.0之前的設備Bitmap有一部分內存是分配在Native堆中需要手動去釋放,在這裡對應Android 3.0之前的設備用了RecyclingBitmapDrawable,RecyclingBitmapDrawable繼承BitmapDrawable並且裡面用了兩個計數器mDisplayRefCount,mCacheRefCount。mDisplayRefCount當ImageView顯示的時候加一如果顯示別的時候先把之前的減一,mCacheRefCount緩存的時候加一從緩存裡面移除的時候減一。這樣當這個RecyclingBitmapDrawable的mDisplayRefCount和mCacheRefCount都是0的時候說明這個資源不需要使用了調用getBitmap().recycle();了。
接著該看下上面說到的ImageFetcher類processBitmap()函數。
    private Bitmap processBitmap(String data) {
        if (BuildConfig.DEBUG) {
            Log.d(TAG, "processBitmap - " + data);
        }

        final String key = ImageCache.hashKeyForDisk(data);
        FileDescriptor fileDescriptor = null;
        FileInputStream fileInputStream = null;
        DiskLruCache.Snapshot snapshot;
        synchronized (mHttpDiskCacheLock) {
            // Wait for disk cache to initialize
            while (mHttpDiskCacheStarting) {
                try {
                    mHttpDiskCacheLock.wait();
                } catch (InterruptedException e) {}
            }

            if (mHttpDiskCache != null) {
                try {
                    snapshot = mHttpDiskCache.get(key);
                    if (snapshot == null) {
                        if (BuildConfig.DEBUG) {
                            Log.d(TAG, "processBitmap, not found in http cache, downloading...");
                        }
                        DiskLruCache.Editor editor = mHttpDiskCache.edit(key);
                        if (editor != null) {
                            if (downloadUrlToStream(data,
                                    editor.newOutputStream(DISK_CACHE_INDEX))) {
                                editor.commit();
                            } else {
                                editor.abort();
                            }
                        }
                        snapshot = mHttpDiskCache.get(key);
                    }
                    if (snapshot != null) {
                        fileInputStream =
                                (FileInputStream) snapshot.getInputStream(DISK_CACHE_INDEX);
                        fileDescriptor = fileInputStream.getFD();
                    }
                } catch (IOException e) {
                    Log.e(TAG, "processBitmap - " + e);
                } catch (IllegalStateException e) {
                    Log.e(TAG, "processBitmap - " + e);
                } finally {
                    if (fileDescriptor == null && fileInputStream != null) {
                        try {
                            fileInputStream.close();
                        } catch (IOException e) {}
                    }
                }
            }
        }

        Bitmap bitmap = null;
        if (fileDescriptor != null) {
            bitmap = decodeSampledBitmapFromDescriptor(fileDescriptor, mImageWidth,
                    mImageHeight, getImageCache());
        }
        if (fileInputStream != null) {
            try {
                fileInputStream.close();
            } catch (IOException e) {}
        }
        return bitmap;
    }
10-53行,通過mHttpDiskCache把從網絡上面(downloadUrlToStream)讀取到的圖片資源緩存到文件裡面去,同時拿到了緩存文件的描述符fileDescriptor。(這個時候還不會有內存問題,因為網絡上面拿到的圖片資源直接放到文件裡面去了)
56-59行,bitmap = decodeSampledBitmapFromDescriptor(fileDescriptor, mImageWidth,mImageHeight, getImageCache()); 准備從文件裡面去讀圖片信息了,這個時候就要讀到內存裡面來了,在這個函數裡面就會對內存的優化做處理了。
decodeSampledBitmapFromDescriptor()函數四個參數,文件描述符,要顯示的寬度,要顯示的高度,緩存類對象(肯定是在圖片顯示完之後要做緩存)。
    public static Bitmap decodeSampledBitmapFromDescriptor(
            FileDescriptor fileDescriptor, int reqWidth, int reqHeight, ImageCache cache) {

        // First decode with inJustDecodeBounds=true to check dimensions
        final BitmapFactory.Options options = new BitmapFactory.Options();
        options.inJustDecodeBounds = true;
        BitmapFactory.decodeFileDescriptor(fileDescriptor, null, options);

        // Calculate inSampleSize
        options.inSampleSize = calculateInSampleSize(options, reqWidth, reqHeight);

        // Decode bitmap with inSampleSize set
        options.inJustDecodeBounds = false;

        // If we're running on Honeycomb or newer, try to use inBitmap
        if (Utils.hasHoneycomb()) {
            addInBitmapOptions(options, cache);
        }

        return BitmapFactory.decodeFileDescriptor(fileDescriptor, null, options);
    }
6行,options.inJustDecodeBounds 設置只是先只是去解析圖片的寬度和高度信息,不去加載具體的圖片資源。
10行,根據calculateInSampleSize()函數計算出合適的inSampleSize值。具體是怎麼計算的可以直接看下calculateInSampleSize()函數的具體實現,反正這個函數如果以後我們要用是可以直接搬來用的。通過這個函數就降低了圖片的采樣率等下讀圖片資源的時候大大的減少了內存的消耗了。
16-18行,android 3.0以上的版本。做內存復用處理。那就的看下addInBitmapOptions()函數了
    @TargetApi(Build.VERSION_CODES.HONEYCOMB)
    private static void addInBitmapOptions(BitmapFactory.Options options, ImageCache cache) {

        // inBitmap only works with mutable bitmaps so force the decoder to
        // return mutable bitmaps.
        options.inMutable = true;

        if (cache != null) {
            // Try and find a bitmap to use for inBitmap
            Bitmap inBitmap = cache.getBitmapFromReusableSet(options);

            if (inBitmap != null) {
                options.inBitmap = inBitmap;
            }
        }

    }
6行 options.inMutable設置為true。
10行 去cache裡面找是否有適合的Bitmap給復用。如果有直接賦值給options.inBitmap。 這下就得去看下怎麼去找復用的Bitmap了。
    protected Bitmap getBitmapFromReusableSet(BitmapFactory.Options options) {

        Bitmap bitmap = null;

        if (mReusableBitmaps != null && !mReusableBitmaps.isEmpty()) {
            synchronized (mReusableBitmaps) {
                final Iterator> iterator = mReusableBitmaps.iterator();
                Bitmap item;

                while (iterator.hasNext()) {
                    item = iterator.next().get();

                    if (null != item && item.isMutable()) {
                        // Check to see it the item can be used for inBitmap
                        if (canUseForInBitmap(item, options)) {
                            bitmap = item;

                            // Remove from reusable set so it can't be used again
                            iterator.remove();
                            break;
                        }
                    } else {
                        // Remove from the set if the reference has been cleared.
                        iterator.remove();
                    }
                }
            }
        }

        return bitmap;

    }
遍歷mReusableBitmaps(Bitmap的軟引用Set),通過canUseForInBitmap()函數去判斷是否可以復用 判斷的規則是如果Android 小於4.4的要保證寬度和高度都要相同並且inSampleSize為1,高於4.4的版本只要要顯示的圖片占的內存比復用的那個Bitmap的內存小就可以。
到這裡我們清楚了復用條件的判斷,但是我們不知道mReusableBitmaps這個set是什麼時候在哪裡把可以復用的Bitmap加入進去的,直接看ImageCache的init()函數。mMemoryCache初始化部分
            mMemoryCache = new LruCache(mCacheParams.memCacheSize) {

                /**
                 * Notify the removed entry that is no longer being cached
                 */
                @Override
                protected void entryRemoved(boolean evicted, String key,
                        BitmapDrawable oldValue, BitmapDrawable newValue) {
                    if (RecyclingBitmapDrawable.class.isInstance(oldValue)) {
                        // The removed entry is a recycling drawable, so notify it
                        // that it has been removed from the memory cache
                        ((RecyclingBitmapDrawable) oldValue).setIsCached(false);
                    } else {
                        // The removed entry is a standard BitmapDrawable

                        if (Utils.hasHoneycomb()) {
                            // We're running on Honeycomb or later, so add the bitmap
                            // to a SoftReference set for possible use with inBitmap later
                            mReusableBitmaps.add(new SoftReference(oldValue.getBitmap()));
                        }
                    }
                }
看到了吧,在這裡加入進來的,看到是當一個Bitmap從內存緩存中拿掉的時候,這個Bitmap會加入到mReusableBitmaps中去,這裡我們知道某個Bitmap從內存緩存中拿掉的時候這個Bitmap對應的內存不一定會這麼快釋放掉的,我們還是可以用的所以這裡用了軟應用。
到此整個流程非常簡單的分析完了,但是感覺還是很亂。接下來做一個總結,總結下上面提到的Bitmap的優化處理的幾點載實例中是怎麼做的。
1. 緩存
實例中采用的方法,ImageCache使用了內存緩存,文件緩存雙緩存機制。
2. 及時釋放Bitmap的內存(針對Android 3.0之前的設備)
實例中借助RecyclingBitmapDrawable類和RecyclingImageView類的配合使用實現Bitmap內存的及時釋放
RecyclingBitmapDrawable繼承BitmapDrawable同時裡面有兩個計數器mDisplayRefCount,mCacheRefCount。mDisplayRefCount當RecyclingBitmapDrawable要顯示的時候加一換別的顯示的時候減一,mCacheRefCount緩存的時候加一從緩存裡面移除的時候減一,這樣當這個RecyclingBitmapDrawable的mDisplayRefCount和mCacheRefCount都是0的時候說明這個資源不需要使用了調用getBitmap().recycle()釋放掉。
RecyclingImageView繼承ImageView, 當RecyclingImageView setImageDrawable的時候先通知之前的Drawble不顯示了同時通知當前的Drawable我要顯示了這裡就要看你Drawable對應的是不是RecyclingBitmapDrawable了。
3. 復用內存
BitmapFactory.Options 參數inBitmap的使用。inMutable設置為true,並且配合SoftReference軟引用使用(內存空間足夠,垃圾回收器就不會回收它,如果內存空間不足了,就會回收這些對象的內存)。當一個Bitmap從內存緩存中移除掉的時候,把這個Bitmap加入到復用的Set集合裡面去。判斷是否有Bitmap可以復用的時候先去這個集合裡面拿到Bitmap,然後按照復用圖片的規則(Android4.4以下的平台,需要保證inBitmap和即將要得到decode的Bitmap的尺寸規格一致,Android4.4及其以上的平台,只需要滿足inBitmap的尺寸大於要decode得到的Bitmap的尺寸規格即可)判斷是否可以復用。
4. 降低采樣率
BitmapFactory.Options 參數inSampleSize的使用,先把options.inJustDecodeBounds設為true,只是去讀取圖片的大小,在拿到圖片的大小之後和要顯示的大小做比較通過calculateInSampleSize()函數計算出inSampleSize的具體值,得到值之後。options.inJustDecodeBounds設為false讀圖片資源。
 Android View繪制及實踐
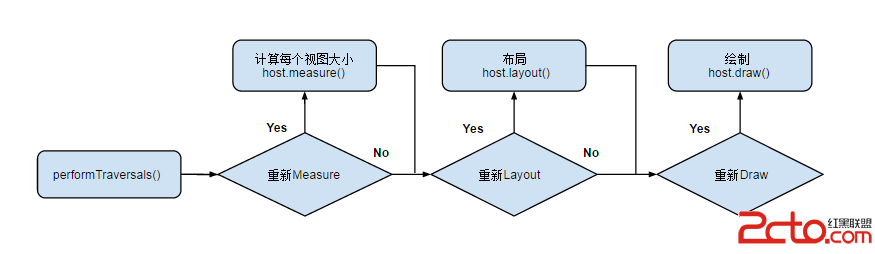
概述整個View樹的繪圖流程是在ViewRoot.java類的performTraversals()函數展開的,該函數做的執行過程可簡單概況為:- 判斷是否需要重新計算視
 Android源碼中的適配器模式
在Android開發過程中,ListView的Adapter是我們最常見的類型之一,我們需要使用Adapter加載Item View的布局,並且進行數據綁定、緩存復用等操
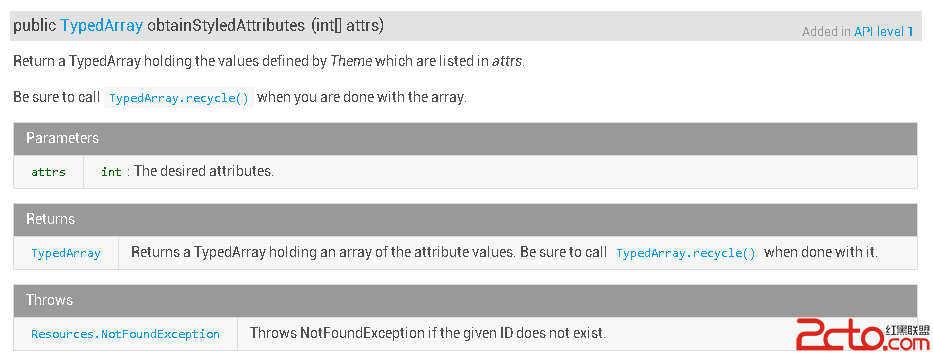 Android 自定義控件之第三講:obtainStyledAttributes 系列函數詳解
在項目中開發自定義控件時,或多或少都會用到 obtainStyledAttributes(AttributeSet, int[], int, int) 或者 obtain
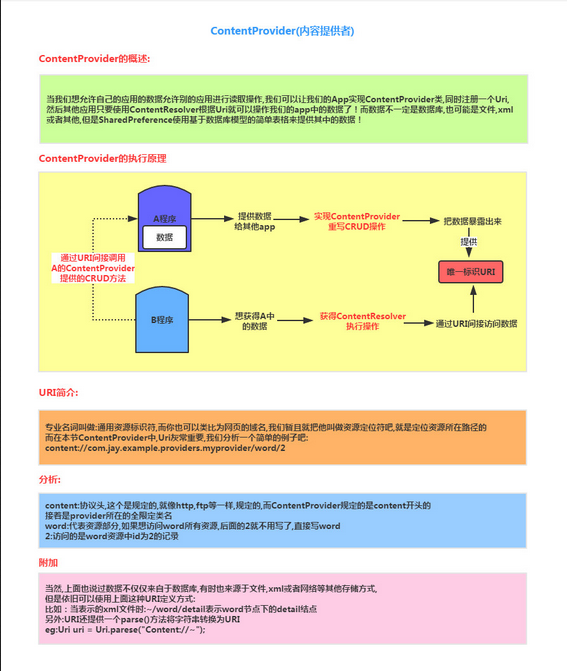 Android四大組件之ContentProvider(上)
(一)概述本節給大家帶來的是Android四大組件中的最後一個——ContentProvider(內容提供者),可能部分讀者 有疑問了,&rdqu