編輯:關於Android編程
ViewRoot目前這個類已經沒有了,是老版本中的一個類,在Android2.2以後用ViewRootImpl代替ViewRoot,對應於ViewRootImpl.java,他是鏈接WindowManager和DecorView的紐帶,另外View的繪制也是通過ViewRootImpl來完成的。
它的主要作用我的總結為如下:
A:鏈接WindowManager和DecorView的紐帶,更廣一點可以說是Window和View之間的紐帶。
B:完成View的繪制過程,包括measure、layout、draw過程。
C:向DecorView分發收到的用戶發起的event事件,如按鍵,觸屏等事件。
注:如果分析不對的地方,歡迎批評指正。
一、鏈接WindowManager和DecorView。
首先說第一個主要作用,鏈接WindowManager和DecorView,在ViewRootImpl.java中,開始的注釋如下:
/**
 * The top of a view hierarchy, implementing the needed protocol between View
 * and the WindowManager.  This is for the most part an internal implementation
 * detail of {@link WindowManagerGlobal}.
 *
 * {@hide}
 */
那麼View與WindowManager之間是怎麼建立聯系的呢,WindowManager所提供的功能很簡單,常用的只有三個方法,即添加View,更新View和刪除View,當然還有其它功能哈,比如改變Window的位置,WindowManager操作Window的過程更像是在操作Window中的View,這三個方法定義在ViewManager中,而WindowManager繼承了ViewManager。
public interface ViewManager
{
    /**
     * Assign the passed LayoutParams to the passed View and add the view to the window.
     *
Throws {@link android.view.WindowManager.BadTokenException} for certain programming * errors, such as adding a second view to a window without removing the first view. *
Throws {@link android.view.WindowManager.InvalidDisplayException} if the window is on a * secondary {@link Display} and the specified display can't be found * (see {@link android.app.Presentation}). * @param view The view to be added to this window. * @param params The LayoutParams to assign to view. */ public void addView(View view, ViewGroup.LayoutParams params); public void updateViewLayout(View view, ViewGroup.LayoutParams params); public void removeView(View view); }
Window是一個抽象的概念,每一個Window都對應著一個View和一個ViewRootImpl,Window又通過ViewRootImpl與View建立聯系,因此Window並不是實際存在的,他是以View的形式存在的。這點從WindowManager的定義也可以看出,它提供的三個接口方法addView,updateView,removeView都是針對View的,這說明View才是Window的實體,在實際使用中無法直接訪問Window,對Window的訪問必須通過WindowManager。而對Window的訪問(添加,更新,刪除)都是通過ViewRootImpl實現的。這裡以Window的添加過程為例,刪除過程,更新過程就不再贅述了。
Window的添加過程
Window的添加過程需要通過WindowManager的addView來實現,WindowManager又是一個接口,它的實現類是WindowManagerImpl,在WindowManagerImpl中的三大操作如下:
    @Override
    public void addView(View view, ViewGroup.LayoutParams params) {
        mGlobal.addView(view, params, mDisplay, mParentWindow);
    }

    @Override
    public void updateViewLayout(View view, ViewGroup.LayoutParams params) {
        mGlobal.updateViewLayout(view, params);
    }

    @Override
    public void removeView(View view) {
        mGlobal.removeView(view, false);
    }

    @Override
    public void removeViewImmediate(View view) {
        mGlobal.removeView(view, true);
    }
addView方法源碼如下:
    public void addView(View view, ViewGroup.LayoutParams params,
            Display display, Window parentWindow) {
        if (view == null) {
            throw new IllegalArgumentException("view must not be null");
        }
        if (display == null) {
            throw new IllegalArgumentException("display must not be null");
        }
        if (!(params instanceof WindowManager.LayoutParams)) {
            throw new IllegalArgumentException("Params must be WindowManager.LayoutParams");
        }

        final WindowManager.LayoutParams wparams = (WindowManager.LayoutParams)params;
        if (parentWindow != null) {
            parentWindow.adjustLayoutParamsForSubWindow(wparams);
        } else {
            // If there's no parent and we're running on L or above (or in the
            // system context), assume we want hardware acceleration.
            final Context context = view.getContext();
            if (context != null
                    && context.getApplicationInfo().targetSdkVersion >= Build.VERSION_CODES.LOLLIPOP) {
                wparams.flags |= WindowManager.LayoutParams.FLAG_HARDWARE_ACCELERATED;
            }
        }

        ViewRootImpl root;
        View panelParentView = null;

        synchronized (mLock) {
            // Start watching for system property changes.
            if (mSystemPropertyUpdater == null) {
                mSystemPropertyUpdater = new Runnable() {
                    @Override public void run() {
                        synchronized (mLock) {
                            for (int i = mRoots.size() - 1; i >= 0; --i) {
                                mRoots.get(i).loadSystemProperties();
                            }
                        }
                    }
                };
                SystemProperties.addChangeCallback(mSystemPropertyUpdater);
            }

            int index = findViewLocked(view, false);
            if (index >= 0) {
                if (mDyingViews.contains(view)) {
                    // Don't wait for MSG_DIE to make it's way through root's queue.
                    mRoots.get(index).doDie();
                } else {
                    throw new IllegalStateException("View " + view
                            + " has already been added to the window manager.");
                }
                // The previous removeView() had not completed executing. Now it has.
            }

            // If this is a panel window, then find the window it is being
            // attached to for future reference.
            if (wparams.type >= WindowManager.LayoutParams.FIRST_SUB_WINDOW &&
                    wparams.type <= WindowManager.LayoutParams.LAST_SUB_WINDOW) {
                final int count = mViews.size();
                for (int i = 0; i < count; i++) {
                    if (mRoots.get(i).mWindow.asBinder() == wparams.token) {
                        panelParentView = mViews.get(i);
                    }
                }
            }

            root = new ViewRootImpl(view.getContext(), display);

            view.setLayoutParams(wparams);

            mViews.add(view);
            mRoots.add(root);
            mParams.add(wparams);
        }

        // do this last because it fires off messages to start doing things
        try {
            root.setView(view, wparams, panelParentView);
        } catch (RuntimeException e) {
            // BadTokenException or InvalidDisplayException, clean up.
            synchronized (mLock) {
                final int index = findViewLocked(view, false);
                if (index >= 0) {
                    removeViewLocked(index, true);
                }
            }
            throw e;
        }
    }
1、檢查參數是否合法
 if (view == null) {
            throw new IllegalArgumentException("view must not be null");
        }
        if (display == null) {
            throw new IllegalArgumentException("display must not be null");
        }
        if (!(params instanceof WindowManager.LayoutParams)) {
            throw new IllegalArgumentException("Params must be WindowManager.LayoutParams");
        }

        final WindowManager.LayoutParams wparams = (WindowManager.LayoutParams)params;
        if (parentWindow != null) {
            parentWindow.adjustLayoutParamsForSubWindow(wparams);
        }
在WindowManagerGlobal內部有如下幾個列表比較重要:
    private final ArrayList mViews = new ArrayList();
    private final ArrayList mRoots = new ArrayList();
    private final ArrayList mParams =
            new ArrayList();
    private final ArraySet mDyingViews = new ArraySet();
            root = new ViewRootImpl(view.getContext(), display);

            view.setLayoutParams(wparams);

            mViews.add(view);
            mRoots.add(root);
            mParams.add(wparams);
3、通過ViewRootImpl來更新界面並完成Window的添加過程
這個步驟由ViewRootImpl的setView方法來完成,
root.setView(view, wparams, panelParentView);
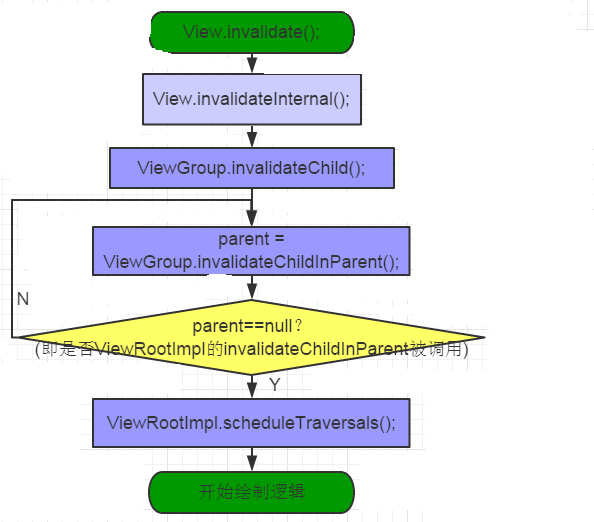
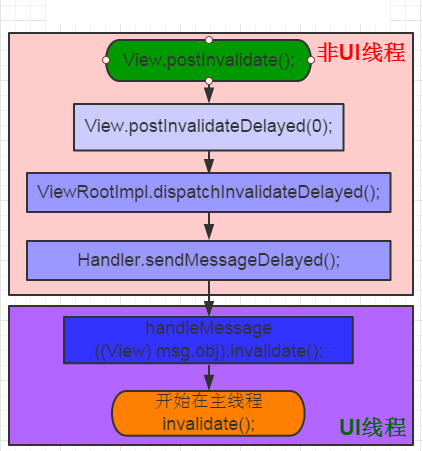
在setView內部會通過requestLayout來完成異步刷新請求,requestLayout最終會調用performTraversals方法來完成View的繪制,源碼注釋如下:差不多意思就是在添加Window之前先完成第一次layout布局過程,以確保在收到任何系統事件後面重新布局。
                // Schedule the first layout -before- adding to the window
                // manager, to make sure we do the relayout before receiving
                // any other events from the system.
                requestLayout();
接著會通過WindowSession最終來完成Window的添加過程。在下面的代碼中mWindowSession類型是IWindowSession,它是一個Binder對象,真正的實現類是Session,也就是說這其實是一次IPC過程,遠程調用了Session中的addToDisPlay方法。
try {
                    mOrigWindowType = mWindowAttributes.type;
                    mAttachInfo.mRecomputeGlobalAttributes = true;
                    collectViewAttributes();
                    res = mWindowSession.addToDisplay(mWindow, mSeq, mWindowAttributes,
                            getHostVisibility(), mDisplay.getDisplayId(),
                            mAttachInfo.mContentInsets, mInputChannel);
                } catch (RemoteException e) {
                    mAdded = false;
                    mView = null;
                    mAttachInfo.mRootView = null;
                    mInputChannel = null;
                    mFallbackEventHandler.setView(null);
                    unscheduleTraversals();
                    setAccessibilityFocus(null, null);
                    throw new RuntimeException("Adding window failed", e);
                }
    @Override
    public int addToDisplay(IWindow window, int seq, WindowManager.LayoutParams attrs,
            int viewVisibility, int displayId, Rect outContentInsets,
            InputChannel outInputChannel) {
        return mService.addWindow(this, window, seq, attrs, viewVisibility, displayId,
                outContentInsets, outInputChannel);
    }
可以看出,Window的添加請求就交給WindowManagerService去處理了。addView大概一個過程如下:
WindowManager——>WindowManagerGobal——>ViewRootImpl——>Session——>WindowManagerService
那麼WindowManager又是如何與DecorView相連的呢,最終DecorView肯定是要添加到Window上的,而Window的具體實現類是PhoneWindow,因為DecorView嵌入在Window上,如圖所示:
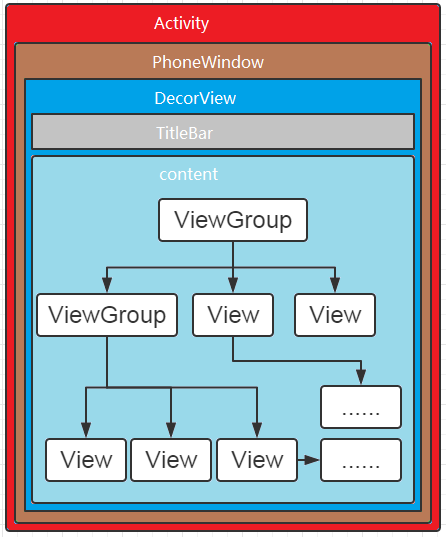
在ActivityThread中,當Activity對象被創建完畢後,會將DecorView添加到Window中,同時會創建ViewRootImpl對象,並將ViewRootImpl對象和DecorView建立關聯,可以參考一下代碼,在ActvityThread中,也就是ViewRootImpl是DecorView的父元素,但是ViewRootImpl並不是View。
		r.window = r.activity.getWindow();
                View decor = r.window.getDecorView();//獲得DecorView
                decor.setVisibility(View.INVISIBLE);
                ViewManager wm = a.getWindowManager();
                WindowManager.LayoutParams l = r.window.getAttributes();
                a.mDecor = decor;
                l.type = WindowManager.LayoutParams.TYPE_BASE_APPLICATION;
                l.softInputMode |= forwardBit;
                if (a.mVisibleFromClient) {
                    a.mWindowAdded = true;
                    wm.addView(decor, l);//通過WindowManager添加decorView
                }
我們平時在Activity調用setContentView會調用PhoneWindow的setContentView,最後會調用DecorView的addView方法,這也說明了我們添加的View是DecorView的子元素。
二、完成View的繪制過程
整個View樹的繪圖流程是在ViewRootImpl類的performTraversals()方法(這個方法巨長)開始的,該函數做的執行過程主要是根據之前設置的狀態,判斷是否重新計算視圖大小(measure)、是否重新放置視圖的位置(layout)、以及是否重繪 (draw),其核心也就是通過判斷來選擇順序執行這三個方法中的哪個,如下:
private void performTraversals() {
        ......
        //最外層的根視圖的widthMeasureSpec和heightMeasureSpec由來
        //lp.width和lp.height在創建ViewGroup實例時等於MATCH_PARENT
        int childWidthMeasureSpec = getRootMeasureSpec(mWidth, lp.width);
        int childHeightMeasureSpec = getRootMeasureSpec(mHeight, lp.height);
        ......
        mView.measure(childWidthMeasureSpec, childHeightMeasureSpec);
        ......
        mView.layout(0, 0, mView.getMeasuredWidth(), mView.getMeasuredHeight());
        ......
        mView.draw(canvas);
        ......
    }
三、向DecorView分發事件。
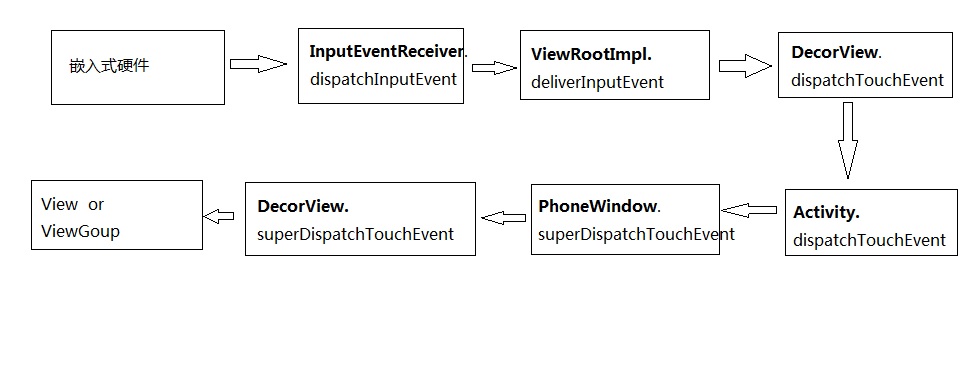
這裡的事件不僅僅包括MotionEvent,還有KeyEvent。我們知道View的時間分發順序為Activity——>Window——>View,那麼Activity的事件來源在哪裡呢?這是個需要思考的問題,答案和ViewRootImpl有很大的關系。
首先,事件的根本來源來自於Native層的嵌入式硬件,然後會經過InputEventReceiver接受事件,然後交給ViewRootImpl,將事件傳遞給DecorView,DecorView再交給PhoneWindow,PhoneWindow再交給Activity。這樣看來,整個體系的事件分發順序為:
那麼這一過程又是怎麼實現的呢?
首先看ViewRootImpl的dispatchInputEvent方法。
    public void dispatchInputEvent(InputEvent event, InputEventReceiver receiver) {
        SomeArgs args = SomeArgs.obtain();
        args.arg1 = event;
        args.arg2 = receiver;
        Message msg = mHandler.obtainMessage(MSG_DISPATCH_INPUT_EVENT, args);
        msg.setAsynchronous(true);
        mHandler.sendMessage(msg);
    }
final ViewRootHandler mHandler = new ViewRootHandler();
final class ViewRootHandler extends Handler {
@Override public void handleMessage(Message msg) { switch (msg.what) {
.........
case MSG_DISPATCH_INPUT_EVENT: { SomeArgs args = (SomeArgs)msg.obj; InputEvent event = (InputEvent)args.arg1; InputEventReceiver receiver = (InputEventReceiver)args.arg2; enqueueInputEvent(event, receiver, 0, true); args.recycle(); } break;
.................
}
在mHandler的UI線程中,最終調用了enqueueInputEvent方法,該方法就是將輸入事件打包,利用InputEvent,InputEventReceiver構造對象QueueInputEvent,然後加入到待處理的事件隊列中,代碼如下:
    void enqueueInputEvent(InputEvent event,
            InputEventReceiver receiver, int flags, boolean processImmediately) {
        QueuedInputEvent q = obtainQueuedInputEvent(event, receiver, flags);

        // Always enqueue the input event in order, regardless of its time stamp.
        // We do this because the application or the IME may inject key events
        // in response to touch events and we want to ensure that the injected keys
        // are processed in the order they were received and we cannot trust that
        // the time stamp of injected events are monotonic.
        QueuedInputEvent last = mPendingInputEventTail;
        if (last == null) {
            mPendingInputEventHead = q;
            mPendingInputEventTail = q;
        } else {
            last.mNext = q;
            mPendingInputEventTail = q;
        }
        mPendingInputEventCount += 1;
        Trace.traceCounter(Trace.TRACE_TAG_INPUT, mPendingInputEventQueueLengthCounterName,
                mPendingInputEventCount);

        if (processImmediately) {
            doProcessInputEvents();
        } else {
            scheduleProcessInputEvents();
        }
    }
    private void scheduleProcessInputEvents() {
        if (!mProcessInputEventsScheduled) {
            mProcessInputEventsScheduled = true;
            Message msg = mHandler.obtainMessage(MSG_PROCESS_INPUT_EVENTS);
            msg.setAsynchronous(true);
            mHandler.sendMessage(msg);
        }
    }
            case MSG_PROCESS_INPUT_EVENTS:
                mProcessInputEventsScheduled = false;
                doProcessInputEvents();
                brea
這下就很清楚了,即使是調用了scheduleProcessInputEvents方法,最終還是會調用doProcessInputEvents方法,只是同步與異步的區別。doProcessInputEvents的代碼如下:
    void doProcessInputEvents() {
        // Deliver all pending input events in the queue.
        while (mPendingInputEventHead != null) {
            QueuedInputEvent q = mPendingInputEventHead;
            mPendingInputEventHead = q.mNext;
            if (mPendingInputEventHead == null) {
                mPendingInputEventTail = null;
            }
            q.mNext = null;

            mPendingInputEventCount -= 1;
            Trace.traceCounter(Trace.TRACE_TAG_INPUT, mPendingInputEventQueueLengthCounterName,
                    mPendingInputEventCount);

            deliverInputEvent(q);
        }

        // We are done processing all input events that we can process right now
        // so we can clear the pending flag immediately.
        if (mProcessInputEventsScheduled) {
            mProcessInputEventsScheduled = false;
            mHandler.removeMessages(MSG_PROCESS_INPUT_EVENTS);
        }
    }
    private void deliverInputEvent(QueuedInputEvent q) {
        Trace.asyncTraceBegin(Trace.TRACE_TAG_VIEW, "deliverInputEvent",
                q.mEvent.getSequenceNumber());
        if (mInputEventConsistencyVerifier != null) {
            mInputEventConsistencyVerifier.onInputEvent(q.mEvent, 0);
        }

        InputStage stage;
        if (q.shouldSendToSynthesizer()) {
            stage = mSyntheticInputStage;
        } else {
            stage = q.shouldSkipIme() ? mFirstPostImeInputStage : mFirstInputStage;
        }

        if (stage != null) {
            stage.deliver(q);
        } else {
            finishInputEvent(q);
        }
    }
在ViewRootImpl中,有一系列類似於InputStage(輸入事件舞台)的概念,他是一個抽象類,它的deliver方法會處理一個輸入事件。處理完成之後會調用finishInputEvent方法。
它有很多子類,對應具體的InputStage,每種InputStage可以處理一定的事件類型,比如AsyncInputStage、SyntheticInputStage、NativePostImeInputStage、ViewPreImeInputStage、ViewPostImeInputStage等,它的子類實現了InputStage的一些抽象方法,比如onProcess、onDeliverToNext、processKeyEvent、processPointerEvent、processTrackballEvent、processGenericMotionEvent,從這些方法大概可以看出意思,在不同的情況下,onProcess、onDeliverToNext方法就會被回調。
當一個InputEvent到來時,ViewRootImpl會尋找合適它的InputStage來處理。對於點擊事件來說,ViewPostImeInputStage可以處理它,ViewPostImeInputStage中,ViewPostImeInputStage類中的onProcess方法如下。當onProcess被回調時,processKeyEvent、processPointerEvent、processTrackballEvent、processGenericMotionEvent至少有一個方法就會被調用,這些方法都是屬於ViewPostImeInputStage的。
        @Override
        protected int onProcess(QueuedInputEvent q) {
            if (q.mEvent instanceof KeyEvent) {
                return processKeyEvent(q);
            } else {
                // If delivering a new non-key event, make sure the window is
                // now allowed to start updating.
                handleDispatchDoneAnimating();
                final int source = q.mEvent.getSource();
                if ((source & InputDevice.SOURCE_CLASS_POINTER) != 0) {
                    return processPointerEvent(q);
                } else if ((source & InputDevice.SOURCE_CLASS_TRACKBALL) != 0) {
                    return processTrackballEvent(q);
                } else {
                    return processGenericMotionEvent(q);
                }
mView.dispatchKeyEvent(event)//按鍵事件
mView.dispatchPointerEvent(event)
mView.dispatchTrackballEvent(event)
mView.dispatchGenericMotionEvent(event)
View mView;
可以看到mView並沒有實例化,其實他的實例化在ViewRootImpl的setView方法中,
 public void setView(View view, WindowManager.LayoutParams attrs, View panelParentView) {
        synchronized (this) {
            if (mView == null) {
                mView = view;
		.............................


		}
	}
}
所以這裡的mView其實就是DecorView。
這樣一來,可以知道ViewPostImeInputStage將事件分發到了View,而這裡的mView又是DecorView,也就是多態的原理,如果DecorView沒有上述的mView.的幾個方法,就會調用View的方法,如果DecorView實現了就會調用DecorView的方法,繼續跟蹤源碼,其中在View的dispatchPointerEvent方法如下:
public final boolean dispatchPointerEvent(MotionEvent event) {
    if (event.isTouchEvent()) {
        return dispatchTouchEvent(event);
    } else {
        return dispatchGenericMotionEvent(event);
    }
}
會調用dispatchTouchEvent方法,根據多態的特性,最終點擊事件會傳給給DecorView的dispatchTouchEvent方法。下面再看DecorView的dispatchTouchEvent方法。
@Override
public boolean dispatchTouchEvent(MotionEvent ev) {
    final Callback cb = getCallback();
    return cb != null && !isDestroyed() && mFeatureId < 0 ? cb.dispatchTouchEvent(ev)
            : super.dispatchTouchEvent(ev);
}
可以看出DecorView最終會調用cb.dispatchTouchEvent方法,那麼問題問題又來了,這個Callback是什麼,其實這個Callback就是當前的Activity。
首先Activity繼承了Window.Callback
public class Activity extends ContextThemeWrapper
        implements LayoutInflater.Factory2,
        Window.Callback, KeyEvent.Callback,
        OnCreateContextMenuListener, ComponentCallbacks2,
        Window.OnWindowDismissedCallback {
然後Window.Callback的代碼如下:
public interface Callback {
    /**
     * Called when action mode is first created. The menu supplied will be used to
     * generate action buttons for the action mode.
     *
     * @param mode ActionMode being created
     * @param menu Menu used to populate action buttons
     * @return true if the action mode should be created, false if entering this
     *              mode should be aborted.
     */
    public boolean onCreateActionMode(ActionMode mode, Menu menu);

    /**
     * Called to refresh an action mode's action menu whenever it is invalidated.
     *
     * @param mode ActionMode being prepared
     * @param menu Menu used to populate action buttons
     * @return true if the menu or action mode was updated, false otherwise.
     */
    public boolean onPrepareActionMode(ActionMode mode, Menu menu);

    /**
     * Called to report a user click on an action button.
     *
     * @param mode The current ActionMode
     * @param item The item that was clicked
     * @return true if this callback handled the event, false if the standard MenuItem
     *          invocation should continue.
     */
    public boolean onActionItemClicked(ActionMode mode, MenuItem item);

    /**
     * Called when an action mode is about to be exited and destroyed.
     *
     * @param mode The current ActionMode being destroyed
     */
    public void onDestroyActionMode(ActionMode mode);
}
所以Activity必須要實現Window.Callback當中的方法,基本都是事件傳遞相關的,其中就是dispatchTouchEvent方法,在Activity的 attach方法中有如下一段代碼:
final void attach(Context context, ActivityThread aThread,
            Instrumentation instr, IBinder token, int ident,
            Application application, Intent intent, ActivityInfo info,
            CharSequence title, Activity parent, String id,
            NonConfigurationInstances lastNonConfigurationInstances,
            Configuration config, String referrer, IVoiceInteractor voiceInteractor) {
        attachBaseContext(context);

        mFragments.attachHost(null /*parent*/);

        mWindow = new PhoneWindow(this);
        mWindow.setCallback(this);
        mWindow.setOnWindowDismissedCallback(this);
        mWindow.getLayoutInflater().setPrivateFactory(this);
至此點擊事件已經到了Activity,那麼後面就和上面博客事件分發機制一樣了。
 關於Android的ListView
最近在做的一個項目需要展示一個頁面,標題和內容,我以前雖然用過。但是是從手機本地數據庫讀的。現在是從公司PHP網站的服務器讀取。原來用simpleCursorAdapte
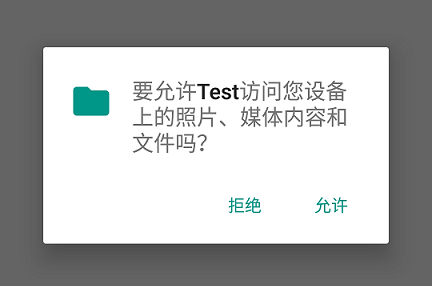 談談Android6.0運行時的權限處理
運行時權限介紹Android 6.0在我們原有的AndroidManifest.xml聲明權限的基礎上,又新增了運行時權限動態檢測,以下權限都需要在運行時判斷:
 Android開發系列(二十八):使用SubMenu創建選項菜單
大部分手機上邊都會有一個“MENU”鍵,在一個應用安裝到手機上之後,可以通過“MENU”顯示該應用關聯的菜單。 但是,從Android 3.0開始,Android不再要求
 手把手教你打造一個心電圖效果View Android自定義View
大家好,看我像不像蘑菇…因為我在學校呆的發霉了。 思而不學則殆麗麗說得對,我有奇怪的疑問,大都是思而不學造成的,在我書讀不夠的情況下想太多,大多等於白想,所