編輯:關於Android編程
上篇博客介紹了View動畫的簡單使用和基本工作原理原理,這篇來學習下屬性動畫。和View動畫不同的是,屬性動畫不再簡單的使用平移、旋轉、縮放、透明度這4種變換,代替它們的是ValueAnimator、ObjectAnimator等概念。

在真正學習屬性動畫之前,我們需要理解TimeInterpolator和TypeEvaluator這兩個概念。
中文翻譯為時間插值器。它的作用是根據當前時間流逝的百分比來計算當前某個屬性改變的百分比。查看結構,發現只有一個方法。
float getInterpolation(float input);
當然,它是一個接口,我們使用更多的是它的實現類。常用的實現類有LinearInterpolator、AccelerateInterpolator、DecelerateInterpolator等等。下面就簡單分析下LinearInterpolator、AccelerateInterpolator兩個插值器
查看LinearInterpolator源碼
    public class LinearInterpolator implements Interpolator {

    public LinearInterpolator() {
    }

    public LinearInterpolator(Context context, AttributeSet attrs) {
    }

    public float getInterpolation(float input) {
        return input;
    }
}
源碼很簡單, 核心方法是getInterpolation(),我們可以將其理解成數學中的函數。
y=x ;
查看AccelerateInterpolator源碼
    /**
     * An interpolator where the rate of change starts out slowly and
     * and then accelerates.
     *
     */
    public class AccelerateInterpolator implements Interpolator {
        private final float mFactor;
        private final double mDoubleFactor;

        public AccelerateInterpolator() {
            mFactor = 1.0f;
            mDoubleFactor = 2.0;
        }

        /**
         * Constructor
         *
         * @param factor Degree to which the animation should be eased. Seting
         *        factor to 1.0f produces a y=x^2 parabola. Increasing factor above
         *        1.0f  exaggerates the ease-in effect (i.e., it starts even
         *        slower and ends evens faster)
         */
        public AccelerateInterpolator(float factor) {
            mFactor = factor;
            mDoubleFactor = 2 * mFactor;
        }

        public AccelerateInterpolator(Context context, AttributeSet attrs) {
            TypedArray a =
                context.obtainStyledAttributes(attrs, com.android.internal.R.styleable.AccelerateInterpolator);

            mFactor = a.getFloat(com.android.internal.R.styleable.AccelerateInterpolator_factor, 1.0f);
            mDoubleFactor = 2 * mFactor;

            a.recycle();
        }

        public float getInterpolation(float input) {
            if (mFactor == 1.0f) {
                return input * input;
            } else {
                return (float)Math.pow(input, mDoubleFactor);
            }
        }
    }
同樣,我們查看getInterpolation()方法,同樣,我們可以將其視為數學中的函數y等於x的n次方法。
TypeEvaluator中文翻譯為類型估算器。和TimeInterpolator類似,它也是一個接口,而我們使用的也是它的實現類。它一共有4個實現類,ArgbEvaluator、FloatEvaluator、IntEvaluator、RectEvaluator。下面就其中一種分析–RectEvaluator。查看源碼:
    public class IntEvaluator implements TypeEvaluator {

    public Integer evaluate(float fraction, Integer startValue, Integer endValue) {
        int startInt = startValue;
        return (int)(startInt + fraction * (endValue - startInt));
    }
}
由其源碼可以知道它主要的作用是根據當前屬性改變的百分比來獲取改變後的屬性值。
TimeInterpolator和TypeEvaluator的配合使用可以幫助我們實現好多復雜的效果
簡單做一個屬性動畫的入門例子,這裡我們采用java代碼來實現,當然xml也可以實現,比較簡單,就不演示了。
    //創建集合對象
    AnimatorSet animatorSet = new AnimatorSet() ;

    animatorSet.playTogether(ObjectAnimator.ofFloat(btn_attr, "translationX",0, 50)
            ,ObjectAnimator.ofFloat(btn_attr, "translationY",0, 50)
            );
    animatorSet.setDuration(3000);
    animatorSet.start();
使用animatorset來實現平移的效果。注意,這裡的平移可是實現了真正位置上的平移,不像View動畫。
首先從Animator的start()方法作為入口來分析,
    @Override
    public void start() {
        // See if any of the current active/pending animators need to be canceled
        AnimationHandler handler = sAnimationHandler.get();
        if (handler != null) {
            int numAnims = handler.mAnimations.size();
            for (int i = numAnims - 1; i >= 0; i--) {
                if (handler.mAnimations.get(i) instanceof ObjectAnimator) {
                    ObjectAnimator anim = (ObjectAnimator) handler.mAnimations.get(i);
                    if (anim.mAutoCancel && hasSameTargetAndProperties(anim)) {
                        anim.cancel();
                    }
                }
            }
            numAnims = handler.mPendingAnimations.size();
            for (int i = numAnims - 1; i >= 0; i--) {
                if (handler.mPendingAnimations.get(i) instanceof ObjectAnimator) {
                    ObjectAnimator anim = (ObjectAnimator) handler.mPendingAnimations.get(i);
                    if (anim.mAutoCancel && hasSameTargetAndProperties(anim)) {
                        anim.cancel();
                    }
                }
            }
            numAnims = handler.mDelayedAnims.size();
            for (int i = numAnims - 1; i >= 0; i--) {
                if (handler.mDelayedAnims.get(i) instanceof ObjectAnimator) {
                    ObjectAnimator anim = (ObjectAnimator) handler.mDelayedAnims.get(i);
                    if (anim.mAutoCancel && hasSameTargetAndProperties(anim)) {
                        anim.cancel();
                    }
                }
            }
        }
        if (DBG) {
            Log.d("ObjectAnimator", "Anim target, duration: " + mTarget + ", " + getDuration());
            for (int i = 0; i < mValues.length; ++i) {
                PropertyValuesHolder pvh = mValues[i];
                ArrayList keyframes = pvh.mKeyframeSet.mKeyframes;
                Log.d("ObjectAnimator", "   Values[" + i + "]: " +
                    pvh.getPropertyName() + ", " + keyframes.get(0).getValue() + ", " +
                    keyframes.get(pvh.mKeyframeSet.mNumKeyframes - 1).getValue());
            }
        }
        super.start();
    }
首先,第一行代碼,我們需要知道sAnimationHandler是什麼,由於ObjectAnimator是ValueAnimator的子類,從ValueAnimator的源碼可以知道它是一個本地線程,主要的作用是不同的線程有不同的AnimatorHandler。如果還是不理解ThreadLocal的概念,請看ThreadLocal的源碼分析
    protected static ThreadLocal sAnimationHandler =
            new ThreadLocal();
通過sAnimationHandler獲取AnimationHandler對象,我們再來看下AnimationHandler又是什麼
    protected static class AnimationHandler implements Runnable {
        // The per-thread list of all active animations
        /** @hide */
        protected final ArrayList mAnimations = new ArrayList();

        // Used in doAnimationFrame() to avoid concurrent modifications of mAnimations
        private final ArrayList mTmpAnimations = new ArrayList();

        // The per-thread set of animations to be started on the next animation frame
        /** @hide */
        protected final ArrayList mPendingAnimations = new ArrayList();

        /**
         * Internal per-thread collections used to avoid set collisions as animations start and end
         * while being processed.
         * @hide
         */
        protected final ArrayList mDelayedAnims = new ArrayList();
        private final ArrayList mEndingAnims = new ArrayList();
        private final ArrayList mReadyAnims = new ArrayList();

        private final Choreographer mChoreographer;
        private boolean mAnimationScheduled;

        private AnimationHandler() {
            mChoreographer = Choreographer.getInstance();
        }

        /**
         * Start animating on the next frame.
         */
        public void start() {
            scheduleAnimation();
        }

        private void doAnimationFrame(long frameTime) {
            // mPendingAnimations holds any animations that have requested to be started
            // We're going to clear mPendingAnimations, but starting animation may
            // cause more to be added to the pending list (for example, if one animation
            // starting triggers another starting). So we loop until mPendingAnimations
            // is empty.
            while (mPendingAnimations.size() > 0) {
                ArrayList pendingCopy =
                        (ArrayList) mPendingAnimations.clone();
                mPendingAnimations.clear();
                int count = pendingCopy.size();
                for (int i = 0; i < count; ++i) {
                    ValueAnimator anim = pendingCopy.get(i);
                    // If the animation has a startDelay, place it on the delayed list
                    if (anim.mStartDelay == 0) {
                        anim.startAnimation(this);
                    } else {
                        mDelayedAnims.add(anim);
                    }
                }
            }
            // Next, process animations currently sitting on the delayed queue, adding
            // them to the active animations if they are ready
            int numDelayedAnims = mDelayedAnims.size();
            for (int i = 0; i < numDelayedAnims; ++i) {
                ValueAnimator anim = mDelayedAnims.get(i);
                if (anim.delayedAnimationFrame(frameTime)) {
                    mReadyAnims.add(anim);
                }
            }
            int numReadyAnims = mReadyAnims.size();
            if (numReadyAnims > 0) {
                for (int i = 0; i < numReadyAnims; ++i) {
                    ValueAnimator anim = mReadyAnims.get(i);
                    anim.startAnimation(this);
                    anim.mRunning = true;
                    mDelayedAnims.remove(anim);
                }
                mReadyAnims.clear();
            }

            // Now process all active animations. The return value from animationFrame()
            // tells the handler whether it should now be ended
            int numAnims = mAnimations.size();
            for (int i = 0; i < numAnims; ++i) {
                mTmpAnimations.add(mAnimations.get(i));
            }
            for (int i = 0; i < numAnims; ++i) {
                ValueAnimator anim = mTmpAnimations.get(i);
                if (mAnimations.contains(anim) && anim.doAnimationFrame(frameTime)) {
                    mEndingAnims.add(anim);
                }
            }
            mTmpAnimations.clear();
            if (mEndingAnims.size() > 0) {
                for (int i = 0; i < mEndingAnims.size(); ++i) {
                    mEndingAnims.get(i).endAnimation(this);
                }
                mEndingAnims.clear();
            }

            // If there are still active or delayed animations, schedule a future call to
            // onAnimate to process the next frame of the animations.
            if (!mAnimations.isEmpty() || !mDelayedAnims.isEmpty()) {
                scheduleAnimation();
            }
        }

        // Called by the Choreographer.
        @Override
        public void run() {
            mAnimationScheduled = false;
            doAnimationFrame(mChoreographer.getFrameTime());
        }

        private void scheduleAnimation() {
            if (!mAnimationScheduled) {
                mChoreographer.postCallback(Choreographer.CALLBACK_ANIMATION, this, null);
                mAnimationScheduled = true;
            }
        }
    }
從源碼我們可以知道它是一個Runnable對象,裡面封裝了好多集合,用來存放當前動畫、演示動畫、等待動畫等。再回到star()方法,如果handler不為null,則依次獲取這些動畫將其取消,最後調用父類的start方法。
    @Override
    public void start() {
        start(false);
    }
然後又調用start(false)
    private void start(boolean playBackwards) {
        if (Looper.myLooper() == null) {
            throw new AndroidRuntimeException("Animators may only be run on Looper threads");
        }
        mPlayingBackwards = playBackwards;
        mCurrentIteration = 0;
        mPlayingState = STOPPED;
        mStarted = true;
        mStartedDelay = false;
        AnimationHandler animationHandler = getOrCreateAnimationHandler();
        animationHandler.mPendingAnimations.add(this);
        if (mStartDelay == 0) {
            // This sets the initial value of the animation, prior to actually starting it running
            setCurrentPlayTime(0);
            mPlayingState = STOPPED;
            mRunning = true;
            notifyStartListeners();
        }
        animationHandler.start();
    }
從源碼可以知道,它是運行在有Looper的線程當中的,首先,根據通過getOrCreateAnimationHandler()方法獲取AnimationHandler對象,有則創建並且將其賦值,否則直接獲取。然後通過AnimationHandler將動畫加到mPendingAnimations延時動畫裡去。最後調用AnimationHandler的start()方法,即執行AnimationHandler的run()方法
    private static AnimationHandler getOrCreateAnimationHandler() {
        AnimationHandler handler = sAnimationHandler.get();
        if (handler == null) {
            handler = new AnimationHandler();
            sAnimationHandler.set(handler);
        }
        return handler;
    }
     @Override
    public void run() {
        mAnimationScheduled = false;
        doAnimationFrame(mChoreographer.getFrameTime());
    }
接著,我們看下doAnimationFrame()方法
    final boolean doAnimationFrame(long frameTime) {
        if (mPlayingState == STOPPED) {
            mPlayingState = RUNNING;
            if (mSeekTime < 0) {
                mStartTime = frameTime;
            } else {
                mStartTime = frameTime - mSeekTime;
                // Now that we're playing, reset the seek time
                mSeekTime = -1;
            }
        }
        // The frame time might be before the start time during the first frame of
        // an animation.  The "current time" must always be on or after the start
        // time to avoid animating frames at negative time intervals.  In practice, this
        // is very rare and only happens when seeking backwards.
        final long currentTime = Math.max(frameTime, mStartTime);
        return animationFrame(currentTime);
    }
前面都是時間的設置,最後調用animationFrame()方法,
    boolean animationFrame(long currentTime) {
        boolean done = false;
        switch (mPlayingState) {
        case RUNNING:
        case SEEKED:
            float fraction = mDuration > 0 ? (float)(currentTime - mStartTime) / mDuration : 1f;
            if (fraction >= 1f) {
                if (mCurrentIteration < mRepeatCount || mRepeatCount == INFINITE) {
                    // Time to repeat
                    if (mListeners != null) {
                        int numListeners = mListeners.size();
                        for (int i = 0; i < numListeners; ++i) {
                            mListeners.get(i).onAnimationRepeat(this);
                        }
                    }
                    if (mRepeatMode == REVERSE) {
                        mPlayingBackwards = !mPlayingBackwards;
                    }
                    mCurrentIteration += (int)fraction;
                    fraction = fraction % 1f;
                    mStartTime += mDuration;
                } else {
                    done = true;
                    fraction = Math.min(fraction, 1.0f);
                }
            }
            if (mPlayingBackwards) {
                fraction = 1f - fraction;
            }
            animateValue(fraction);
            break;
        }

        return done;
    }
前面還是一些計算,當動畫應該結束時返回true,否則返回false,方法內部計算出時間比率fraction,然後調用animateValue()方法,
     void animateValue(float fraction) {
        fraction = mInterpolator.getInterpolation(fraction);
        mCurrentFraction = fraction;
        int numValues = mValues.length;
        for (int i = 0; i < numValues; ++i) {
            mValues[i].calculateValue(fraction);
        }
        if (mUpdateListeners != null) {
            int numListeners = mUpdateListeners.size();
            for (int i = 0; i < numListeners; ++i) {
                mUpdateListeners.get(i).onAnimationUpdate(this);
            }
        }
    }
首先通過插值器獲取一個按照一定規律的fraction,默認為AccelerateDecelerateInterpolator
private TimeInterpolator mInterpolator = sDefaultInterpolator;
     // The time interpolator to be used if none is set on the animation
    private static final TimeInterpolator sDefaultInterpolator =
            new AccelerateDecelerateInterpolator();
接著,依次遍歷mValues,那麼mValues又是什麼呢?
    /**
     * The property/value sets being animated.
     */
    PropertyValuesHolder[] mValues;
那麼mValues是什麼時候設置的呢?還記得我們在使用屬性動畫的時候調用的ofXxx方法嗎?
    public static ValueAnimator ofInt(int... values) {
        ValueAnimator anim = new ValueAnimator();
        anim.setIntValues(values);
        return anim;
    }
首先創建了ValueAnimator對象,然後調用setIntValues()方法
    public void setIntValues(int... values) {
        if (values == null || values.length == 0) {
            return;
        }
        if (mValues == null || mValues.length == 0) {
            setValues(PropertyValuesHolder.ofInt("", values));
        } else {
            PropertyValuesHolder valuesHolder = mValues[0];
            valuesHolder.setIntValues(values);
        }
        // New property/values/target should cause re-initialization prior to starting
        mInitialized = false;
    }
接著又調用了setIntValues方法
    public void setIntValues(int... values) {
        mValueType = int.class;
        mKeyframeSet = KeyframeSet.ofInt(values);
    }
    public static KeyframeSet ofInt(int... values) {
        int numKeyframes = values.length;
        IntKeyframe keyframes[] = new IntKeyframe[Math.max(numKeyframes,2)];
        if (numKeyframes == 1) {
            keyframes[0] = (IntKeyframe) Keyframe.ofInt(0f);
            keyframes[1] = (IntKeyframe) Keyframe.ofInt(1f, values[0]);
        } else {
            keyframes[0] = (IntKeyframe) Keyframe.ofInt(0f, values[0]);
            for (int i = 1; i < numKeyframes; ++i) {
                keyframes[i] =
                        (IntKeyframe) Keyframe.ofInt((float) i / (numKeyframes - 1), values[i]);
            }
        }
        return new IntKeyframeSet(keyframes);
    }
KeyframeSet的ofInt主要是創建一個IntKeyframe數組,最後將其返回。表示一組Keyframe,而Keyframe從字面可以理解為關鍵幀。再回到animateValue方法,依次遍歷,並調用。該方法主要完成的事為:
A:通過Interpolator計算出動畫運行時間的分數。 B:變量ValueAnimator中的mValues[i].calculateValue(fraction)(也就是 PropertyValuesHolder對象數組)計算當前動畫的值。 C:調用animation的onAnimationUpdate(…)通知animation更新的消息
     void calculateValue(float fraction) {
        mAnimatedValue = mKeyframeSet.getValue(fraction);
    }
根據evaluator獲取每一幀所對應的屬性值。這裡主要的是這個PropertyValuesHolder對象,我們可以從這個類的注釋中可以看出。PropertyValuesHolder內部維持了一個KeyFrameSet和TypeEvaluator
    /**
     * This class holds information about a property and the values that that property
     * should take on during an animation. PropertyValuesHolder objects can be used to create
     * animations with ValueAnimator or ObjectAnimator that operate on several different properties
     * in parallel.
     */
    public class PropertyValuesHolder implements Cloneable {
主要在動畫執行過程中hold屬性和值的信息。主要是用來被ObjectAnimator和ValueAnimator來操作不同的屬性。那麼PropertyValuesHolder又是如何調用set和get方法來操作屬性的呢?
     private void setupValue(Object target, Keyframe kf) {
        if (mProperty != null) {
            kf.setValue(mProperty.get(target));
        }
        try {
            if (mGetter == null) {
                Class targetClass = target.getClass();
                setupGetter(targetClass);
                if (mGetter == null) {
                    // Already logged the error - just return to avoid NPE
                    return;
                }
            }
            kf.setValue(mGetter.invoke(target));
        } catch (InvocationTargetException e) {
            Log.e("PropertyValuesHolder", e.toString());
        } catch (IllegalAccessException e) {
            Log.e("PropertyValuesHolder", e.toString());
        }
    }
    /**
     * Utility function to get the getter from targetClass
     */
    private void setupGetter(Class targetClass) {
        mGetter = setupSetterOrGetter(targetClass, sGetterPropertyMap, "get", null);
    }
接著,當動畫的下一幀來臨的時候,又會調用setAnimatedValue()方法,當然主要還是通過反射。
    void setAnimatedValue(Object target) {
        if (mProperty != null) {
            mProperty.set(target, getAnimatedValue());
        }
        if (mSetter != null) {
            try {
                mTmpValueArray[0] = getAnimatedValue();
                mSetter.invoke(target, mTmpValueArray);
            } catch (InvocationTargetException e) {
                Log.e("PropertyValuesHolder", e.toString());
            } catch (IllegalAccessException e) {
                Log.e("PropertyValuesHolder", e.toString());
            }
        }
    }
這裡對屬性動畫工作流程的幾個重要類進行總結
ObjectValue:ObjectAnimator我們可以將其理解為外界API接口,ObjectAnimator持有PropertyValuesHolder作為存儲關於將要進行動畫的具體對象(通常是View類型的控件)的屬性和動畫期間需要的值。 PropertyValueHolder:PropertyValueHolder又使用KeyframeSet來保存animator從開始到結束期間關鍵幀的值。 KeyframeSet:保存每一幀的值。OK,這篇關於屬性動畫就介紹到這裡了。
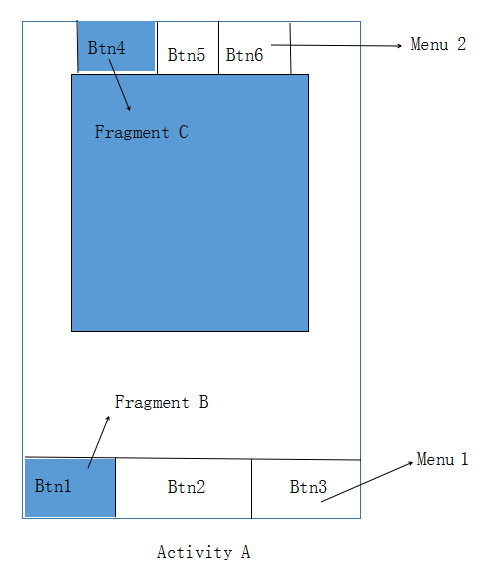 Android中關於FragmentA嵌套FragmentB的問題
問題描述:在項目中Activity A中嵌套Fragment B,Fragment B中再嵌套Fragment C,如圖:問題1:在點擊Activity A中主菜單1進行
 Android錄制視頻
我們一般直接從攝像頭和麥克風取數據,經過編碼,保存為文件。android的視頻錄制需要使用到MediaRecorder,MediaRecorder除了可以用於錄制音頻,還
 Android Studio應用開發集成百度語音合成使用方法實例講解
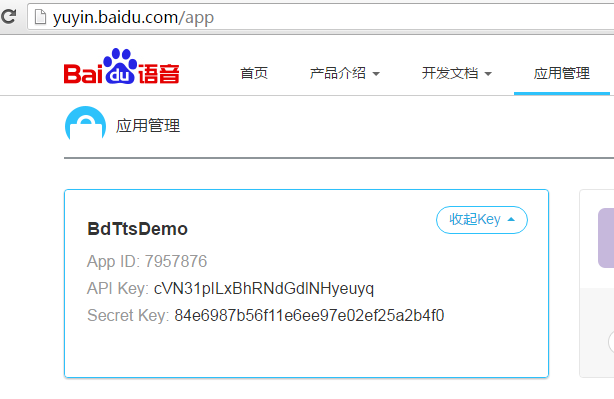
首先,語音合成是指將文本信息轉換成聲音。意思就是將文本轉化為聲音,讓你的應用開口說話。國內在業內比較有名的第三方語音合成平台有百度語音和科大訊飛。本文集成的是百度語音合成
 Android編程實現TCP客戶端的方法
本文實例講述了Android編程實現TCP客戶端的方法。分享給大家供大家參考,具體如下:因為項目上需要實現一個TCP Client 端;在網上找好多例子基本上都是阻塞方式