編輯:關於Android編程
說起Android 自定義View,網上的博客、視頻很多。鴻洋的博客和視頻還是很值得推薦的。本文打算結合Sdk源碼,來講解如何自定義一個View。
本文結合TextView的源碼,看看怎麼實現一個簡單的自定義View。有源碼後,可以使用Source Insight這個工具打開。如果沒有Android源碼,但是有SDK的jar包源碼,那麼使用IDE工具中就可以查看SDK的源碼!
自定義View的步驟一般有以下4步:
(1). 自定義View的屬性;
(2). 在View的構造方法中獲取自定義的屬性以及屬性值;
(3). 重寫onMeasure();
(4). 重寫onDraw() 。
接下來,我們就結合TextView的源碼來實現一個簡單的自定義View。
1. 自定義View的屬性。
首先看看Android framework源碼attrs.xml中有關TextView的屬性的代碼中是如何實現的,代碼示例:
可以看出,自定義屬性,需要用到... ...
以上就是自定義屬性,是不是很簡單呢!
2. 在View的構造方法中獲取自定義的屬性以及屬性值。
老規矩,還是先看Textview是如何實現的,上代碼:
public class TextView extends View implements ViewTreeObserver.OnPreDrawListener {
    ...

    public TextView(Context context) {
        this(context, null);
    }

    public TextView(Context context,
                    AttributeSet attrs) {
        this(context, attrs, com.android.internal.R.attr.textViewStyle);
    }

    @SuppressWarnings("deprecation")
    public TextView(Context context,
                    AttributeSet attrs,
                    int defStyle) {
        super(context, attrs, defStyle);
     ...
   TypedArray a = theme.obtainStyledAttributes(attrs,
                com.android.internal.R.styleable.TextViewAppearance, defStyleAttr, defStyleRes);
   ...
   a = theme.obtainStyledAttributes( attrs, com.android.internal.R.styleable.TextView, defStyleAttr, defStyleRes);
     int n = a.getIndexCount();
   for (int i = 0; i < n; i++) {
   int attr = a.getIndex(i);
     switch (attr) {
     case com.android.internal.R.styleable.TextView_editable:
        editable = a.getBoolean(attr, editable);
        break;

     case com.android.internal.R.styleable.TextView_inputMethod:
        inputMethod = a.getText(attr);
        break;
            ...
            }
        }
     a.recycle();
     ...
     }
     ...
}
只羅列了重要的代碼,但是這些就足夠說明問題了。
回到代碼,有三個構造方法,分別是一個參數、兩個參數、三個參數,並且一個參數的構造方法調用兩個參數的構造方法,兩個參數的構造方法調用三個參數的構造方法,三個參數的構造方法調用父類的構造方法。那麼我們重點看看三個參數的構造方法。其中,
(1). 通過TypedArray獲取自定義的屬性集合。
TypedArray a = theme.obtainStyledAttributes(attrs,
                com.android.internal.R.styleable.TextViewAppearance, defStyleAttr, defStyleRes);
(2). 分別獲取自定義屬性。循環從屬性集合中獲取屬性值。
(3). 記得最後要釋放TypedArray,調用a.recycle()。
PS:
1. 好多文章在講解自定義View時,獲取屬性值這一步的實現可能是底下這一種方式,具體代碼如下:
        String text = array.getString(R.styleable.BottomWidget_tv_text);
        float  textSize = array.getDimension(R.styleable.BottomWidget_tv_textSize, 0);
        int textColor = array.getColor(R.styleable.BottomWidget_tv_textColor, 0);
        int background = array.getDrawable(R.styleable.BottomWidget_iv_background);
        array.recycle();
首先這種寫法並沒有錯,但是這種寫法有一個坑,就是當某一個屬性,沒有設置值時,它也會給該屬性一個默認值,這樣的話,就可能會出問題。所以在此建議,在獲取自定義View屬性值時,使用循環從屬性集合中獲取屬性值,具體代碼如下所示:
for (int i = 0; i < n; i++) {
    int attr = a.getIndex(i);
     switch (attr) {
        case com.android.internal.R.styleable.TextView_editable:
            editable = a.getBoolean(attr, editable);
            break;
    ...
}
}
2. 有關構造方法到底是調用自己的方法還是調用父類的。
源碼中,我們看到了的現象是,一個參數的構造方法調用兩個參數的構造方法,兩個參數的構造方法調用三個參數的構造方法,三個參數的構造方法調用父類的構造方法;但是如果我們自定義的View是繼承自某一個控件,例如Button,那麼建議,構造方法調用的規則是,構造方法調用相應的父類構造方法。因為只有這樣,該自定義View才能繼承父View的一些樣式。
總結:如果我們自定義的View是繼承至某一個控件,需要使用到該控件的樣式,那麼構造方法要調用相應的父類構造方法,代碼是‘super(...)’;如果我們是集成自View,那麼就可以成‘this(...)’。
下面,我們就根據上面的描述,獲取自定義屬性值,代碼如下,
    private int firstColor;//第一種顏色
    private int secondeColor;//第二種顏色
    private int progress = 1;//當前音量

    private int firstColorDefault = Color.BLUE;//默認顏色
    private int secondColorDefault = Color.RED;//默認顏色
    private int progressDefault = 0;//默認值

    private int splitSize = 5;//間隔高度
    private int mWidth = 100;//每個小塊的寬度
    private int mHeight =30;//每個小塊的高度
    private final int maxProgress = 10;//最大音量

    private Paint mPaint;//畫筆
    private float stockWidth = 5;//描邊的寬度
    private int stockColor = Color.BLACK;//描邊的顏色


    private float left = 0;
    private float top = 0;

    private float right = 0;
    private float bottom = 0;
    public AduioView(Context context) {
        this(context,null);
    }

    public AduioView(Context context, AttributeSet attrs) {
        this(context, attrs,0);
    }

    public AduioView(Context context, AttributeSet attrs, int defStyleAttr) {
        super(context, attrs, defStyleAttr);
        final Resources.Theme theme = context.getTheme();
        TypedArray ta = theme.obtainStyledAttributes(attrs, R.styleable.AduioView, defStyleAttr, 0);
        int n = ta.getIndexCount();
        for (int i = 0; i < n; i++) {
            int attr = ta.getIndex(i);
            switch (attr) {
                case R.styleable.AduioView_firstColor:
                    firstColor = ta.getColor(attr, firstColorDefault);
                    break;
                case R.styleable.AduioView_secondColor:
                    secondeColor = ta.getColor(attr, secondColorDefault);
                    break;
                case R.styleable.AduioView_progress:
                    progress = ta.getInteger(attr, progressDefault);
                    break;
            }
        }
        ta.recycle();
        mPaint = new Paint();

    }
獲取到自定義屬性值後,就可能需要測量以及繪制。那麼第三步,我們先繪制,檢驗一下不測量先繪制的影響。
3. 重寫onDraw() 方法。
首頁,還是看看Textview的onDraw()是如何實現的,上代碼:
 @Override
    protected void onDraw(Canvas canvas) {
        restartMarqueeIfNeeded();

        // Draw the background for this view
        super.onDraw(canvas);

        ...
        final int scrollX = mScrollX;
        final int scrollY = mScrollY;
        final int right = mRight;
        final int left = mLeft;
        final int bottom = mBottom;
        final int top = mTop;
        final boolean isLayoutRtl = isLayoutRtl();
        final int offset = getHorizontalOffsetForDrawables();
        final int leftOffset = isLayoutRtl ? 0 : offset;
        final int rightOffset = isLayoutRtl ? offset : 0 ;

        final Drawables dr = mDrawables;
        if (dr != null) {
            /*
             * Compound, not extended, because the icon is not clipped
             * if the text height is smaller.
             */

            int vspace = bottom - top - compoundPaddingBottom - compoundPaddingTop;
            int hspace = right - left - compoundPaddingRight - compoundPaddingLeft;

            // IMPORTANT: The coordinates computed are also used in invalidateDrawable()
            // Make sure to update invalidateDrawable() when changing this code.
            if (dr.mShowing[Drawables.LEFT] != null) {
                canvas.save();
                canvas.translate(scrollX + mPaddingLeft + leftOffset,
                                 scrollY + compoundPaddingTop +
                                 (vspace - dr.mDrawableHeightLeft) / 2);
                dr.mShowing[Drawables.LEFT].draw(canvas);
                canvas.restore();
            }
			...
        }
		...
	}
	...
onDraw()方法,無非是在畫布(Canvas)上使用畫筆(Paint)繪制View。
   @Override
    protected void onDraw(Canvas canvas) {
        mPaint.setAntiAlias(true);//設置抗鋸齒
        mPaint.setColor(stockColor);//設置描邊顏色
        mPaint.setStrokeWidth(stockWidth);//設置描邊寬度
        drawOval(canvas);//繪制矩形
    }

    /*
     * 繪制圖形
     * */
    private void drawOval(Canvas canvas) {
        left = 0;// 左坐標
        right = 100;// 右坐標
        bottom = mHeight;// 下坐標
        mPaint.setColor(firstColor);//設置畫筆的顏色
        //循環計算矩形的坐標點,繪制底部矩形
        for (int i = 0; i < maxProgress; i++) {
            top = i * (mHeight + splitSize);//上坐標(每個矩形的高度+間隔高度)*i
            bottom = i * (mHeight + splitSize) + mHeight;// 下坐標(每個矩形的高度+間隔高度)*i+矩形的高度
            canvas.drawRect(left, top, right, bottom, mPaint);//繪制矩形 (左上角坐標,右下角坐標,畫筆)
        }
        mPaint.setColor(secondeColor);//設置畫筆的顏色
        //循環計算矩形的坐標點,繪制第二層矩形
        for (int i = 0; i < progress; i++) {
            top = mHeight * (maxProgress - i) + (maxProgress - i - 1) * splitSize - mHeight;//上坐標
            bottom = mHeight * (maxProgress - i) + (maxProgress - i - 1) * splitSize;// 下坐標
            canvas.drawRect(left, top, right, bottom, mPaint);//繪制矩形 (左上角坐標,右下角坐標,畫筆)
        }
    }
代碼都有注釋,不難理解!如果對畫筆(Paint)和畫布(Canvas)還不了解,請看這篇文章Android 繪圖(一) Paint 和 Android 繪圖(二) Canvas 。
打開布局xm文件,首先需要在最外層的ViewGroup中加入命名空間,Android Studio中命名空間的寫法是這樣,‘ xmlns:aduio="http://schemas.android.com/apk/res-auto"’,其中‘aduio’ 是命名空間。如果是在Eclipse中,命名空間的寫法,‘xmlns:aduio="http://schemas.android.com/apk/res/cn.xinxing.customeview"’,其中‘aduio’ 是命名空間,‘cn.xinxing.customeview’是應用的包名。下面是xml的代碼,
如果你使用Android Studio,還可以看到設置的顏色,截圖如下,所以,推薦使用Android Studio。

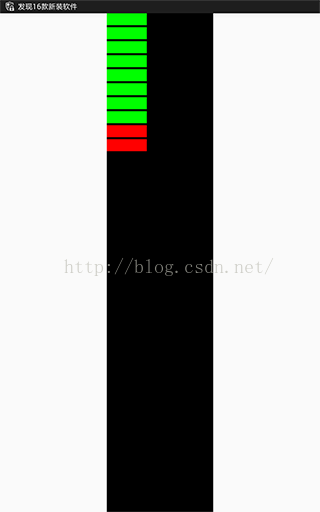
現在我們就可以運行該項目了!運行後的效果,截圖如下,
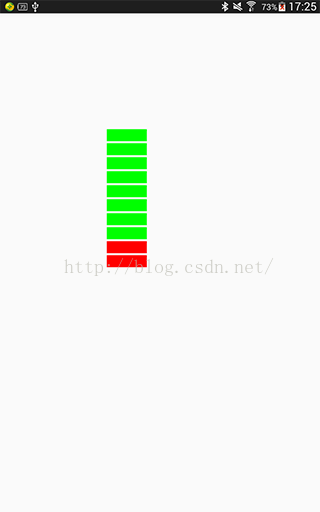
到這兒,是不是自定義View就完了呢?非也非也!因為,我們知道onMeasure()方法還未重寫!但是重寫沒有onMeasure()方法,好像也沒發現有什麼問題!此時,我們修改一下布局文件中引入自定義View的屬性,例如修改android:layout_height="wrap_content",並且給該View加入了一個黑色背景。再次運行,看效果,截圖如下所示,
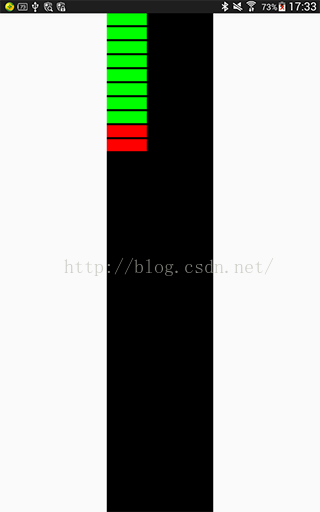
是不是很奇怪呢?為何設置‘android:layout_height="wrap_content"’後,高度怎麼充滿父控件了呢?感覺它的值和‘android:layout_height="match_parent"’是一樣的?確實是這樣的。通過閱讀View的源碼可以得出,View中的屬性‘android:layout_height=" "’’,當設置為‘wrap_content’或者‘match_parent’,其效果都和‘match_parent’一樣的,充滿父控件;當設置為一個具體的數值,那麼效果基本和設置的值保持一致。所以,在自定義View的時候,我們最好重寫onMeasure()方法。
(4). 重寫onMeasure()方法。
還是先看看Textview的onMeasure()是如何實現的,上代碼:
    @Override
    protected void onMeasure(int widthMeasureSpec, int heightMeasureSpec) {
        int widthMode = MeasureSpec.getMode(widthMeasureSpec);
        int heightMode = MeasureSpec.getMode(heightMeasureSpec);
        int widthSize = MeasureSpec.getSize(widthMeasureSpec);
        int heightSize = MeasureSpec.getSize(heightMeasureSpec);

        int width;
        int height;

        BoringLayout.Metrics boring = UNKNOWN_BORING;
        BoringLayout.Metrics hintBoring = UNKNOWN_BORING;

        int des = -1;
        boolean fromexisting = false;

        if (widthMode == MeasureSpec.EXACTLY) {
            // Parent has told us how big to be. So be it.
            width = widthSize;
        } else {
            if (mLayout != null && mEllipsize == null) {
                des = desired(mLayout);
            }
		}
       ...
 }
通過MeasureSpec這個類,獲取到建議的測量模式和測量值,然後根據View自身的特性,最後計算出適合自己的測量值。有關MeasureSpec這個類,可以查看這篇文章, Android View(三)-MeasureSpec詳解。
    @Override
    protected void onMeasure(int widthMeasureSpec, int heightMeasureSpec) {

        int widthMode = MeasureSpec.getMode(widthMeasureSpec);//獲取寬度的測試模式
        int widthSize = MeasureSpec.getSize(widthMeasureSpec);//獲取寬度的測試值
        int width;
		//如果寬度的測試模式等於EXACTLY,就直接賦值
        if (widthMode == MeasureSpec.EXACTLY) {
            width = widthSize;
        } else {
            width = mWidth;//使用我們自己在代碼中定義的寬度
		    //如果寬度的測試模式等於AT_MOST,取測量值和計算值的最小值
	        if (widthMode == MeasureSpec.AT_MOST) {
            width = Math.min(width, widthSize);
            }
        }
        int heightMode = MeasureSpec.getMode(heightMeasureSpec);//獲取高度的測試模式
        int heightSize = MeasureSpec.getSize(heightMeasureSpec);//獲取高度的測試值
        int height;
		//如果高度的測試模式等於EXACTLY,就直接賦值
        if (heightMode == MeasureSpec.EXACTLY) {
            height = heightSize;
        } else {
		    //計算出整個View的高度
            height = mHeight * maxProgress + (maxProgress - 1) * splitSize;
		    //如果高度的測試模式等於AT_MOST,取測量值和計算值的最小值
            if (heightMode == MeasureSpec.AT_MOST) {
            height = Math.min(height, heightSize);
            }
        }
        setMeasuredDimension(width, height);//來存儲測量的寬,高值
    }
重寫onMeasure()方法後,我們再次修改android:layout_height=" "的值,上截圖,
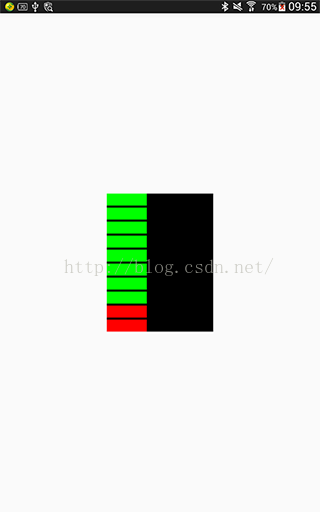
(android:layout_height="match_parent") (android:layout_height="wrap_content")

效果很明顯,分別設置三種不同的值,效果都基本一致!
至此,自定義View就完成了!
總結:
自定義View的一般步驟就是以上4步,平時按照這幾步去實現,就可以了!
 Android ViewGroup 觸摸事件傳遞機制
引言上一篇博客我們學習了Android View 觸摸事件傳遞機制,不了解的同學可以查看Android View 觸摸事件傳遞機制。今天繼續學習Android觸摸事件傳遞
 Android開發中ListView自定義adapter的封裝
【引入】 我們一般編寫listView的時候順序是這樣的: •需要展示的數據集List<T> •為這個數
 微信號怎麼注銷?手機注冊的微信號怎麼注銷
我們用手機注冊了微信,但是由於要換手機號那怎麼注銷這個微信手機號呢?微信號怎麼注銷呢?手機注冊的微信號怎麼注銷?今天下載吧小編就和大家分享一下手機號注冊的微
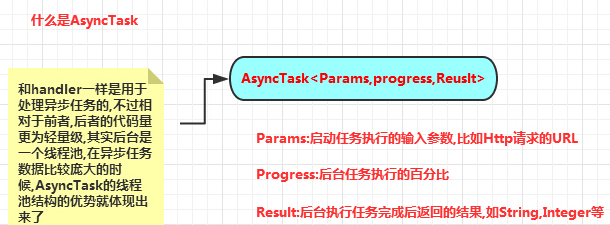 事件處理機制之AnsyncTask異步任務
(一)概述本節給大家帶來的是Android給我們提供的一個輕量級的用於處理異步任務的類:AsyncTask,我們一般是 繼承AsyncTask,然後在類中實現異步操作,然