編輯:關於Android編程
上一篇我們通過實例學習了MINA框架的用法,發現用起來還是挺方便的,就那麼幾步就可以了,本著學東西必知其原理的觀念,決定看看MINA的源碼實現,好了,我們開始吧!
MINA源碼對於客戶端和服務端來說基本上差別不是很大的,所以我計劃主要還是分析服務端的源碼,在正式分析之前,我們需要對MINA有一個整體的了解;
MINA中涉及到了這麼幾個對象:
IoService:用於提供連接,他是IoAcceptor和IoConnector的父接口;
IoBuffer:消息緩存區;
IoSession:在每一次連接建立成功之後都會創建一個IoSession對象出來,並且在創建該對象的時候創建一個IoFilter對象出來,通過IoSession的session id來為當前IoSession設置處理他的IoProcessor;
IoProcessor:用於檢查是否有數據在通道上面進行讀寫,在我們創建Acceptor或者Connector的時候,默認會創建一個線程池,裡面存儲的就是IoProcessor線程,該線程裡面是擁有自己的Selector的,這個是MINA為我們做的一點優化,我們通常使用NIO的話是只有一個Selector的,而MINA中的
IoFilter:用於定義攔截器,這些攔截器可以包括日志輸出、數據編解碼等等,只要用於二進制數據和對象之間的轉換;
IoHandler:處於IoFilter的尾部,用於真正的業務邏輯處理,所以我們在使用MINA的時候是必須要提供IoHandler對象的,因為是靠他來進行真正業務處理的;
接下來我們看看上篇博客中我們用到的MINA中涉及到的這幾個對象的類結構圖:
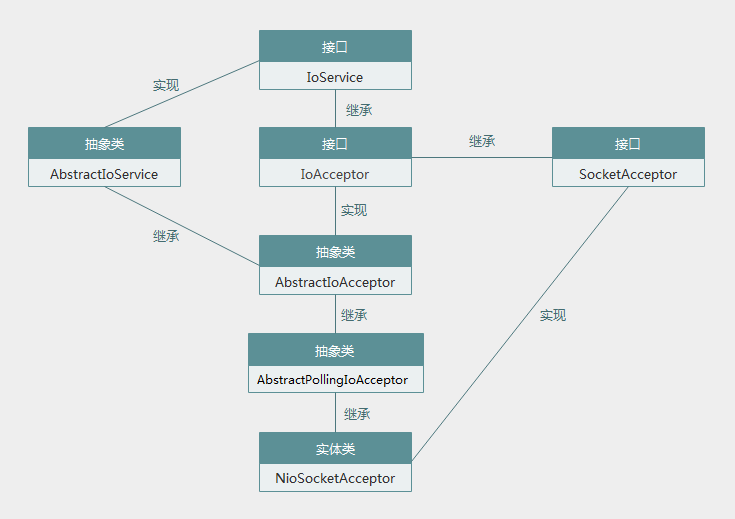
NioSocketAcceptor類結構圖:
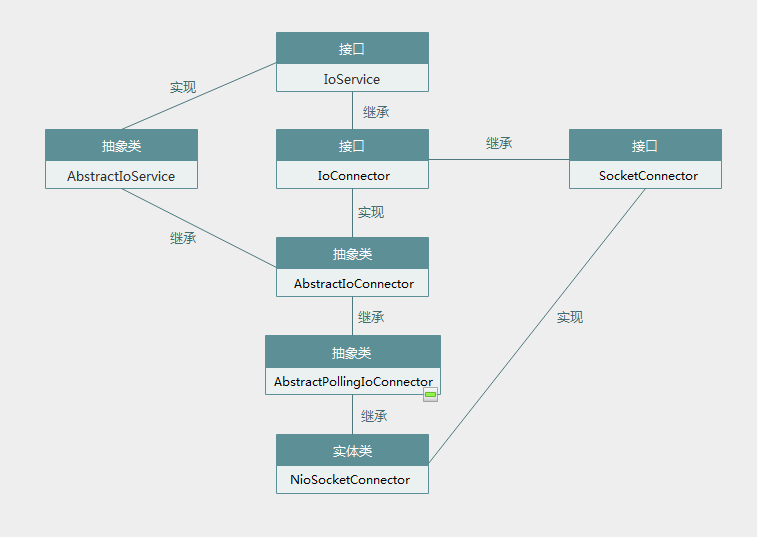
NioSocketConnector類結構圖:
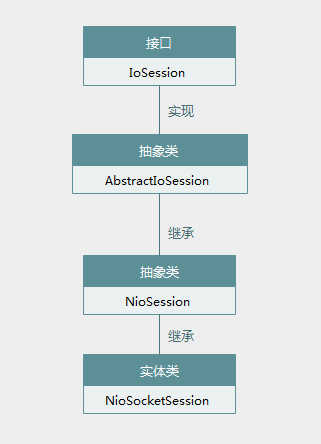
NioSocketSession類結構圖:
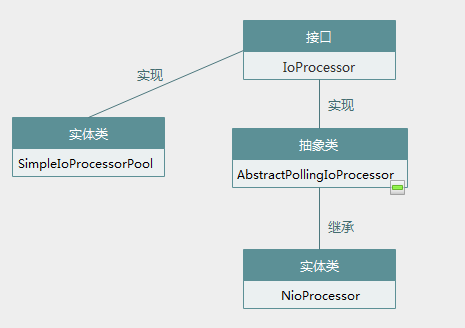
NioProcessor類結構圖:
好了,開始我們真正的源碼分析了(服務端);
首先我們通過NioSocketAcceptor acceptor = new NioSocketAcceptor();創建了一個NioSocketAcceptor對象出來,那我們就得看看NioSocketAcceptor的構造函數裡面做了些什麼事了;
NioSocketAcceptor$NioSocketAcceptor()
public NioSocketAcceptor() {
        super(new DefaultSocketSessionConfig(), NioProcessor.class);
        ((DefaultSocketSessionConfig) getSessionConfig()).init(this);
    }
可以看到首先調用了父類的構造函數,也就是AbstractPollingIoAcceptor的構造函數,並且傳入了NioProcessor的Class對象,這裡我們可以想象一下後面肯定會用這個NioProcessor的Class對象進行一些與反射有關的操作;
AbstractPollingIoAcceptor$AbstractPollingIoAcceptor()
protected AbstractPollingIoAcceptor(IoSessionConfig sessionConfig, Class> processorClass) {
        this(sessionConfig, null, new SimpleIoProcessorPool(processorClass), true, null);
    }
可以看到實際上調用的是5個參數的構造函數,在看這個構造函數之前,我們看到第三個參數利用我們從NioSocketAcceptor構造函數中傳進來的NioProcessor對象,創建了一個SimpleIoProcessorPool對象,我們來看看SimpleIoProcessorPool的構造函數;
   public SimpleIoProcessorPool(Class> processorType) {
        this(processorType, null, DEFAULT_SIZE, null);
    }
發現他接著調用的是SimpleIoProcessorPool四個參數的構造函數,並且添加了一個DEFAULT_SIZE參數,這個值的大小等於我們CPU的核數+1,這也是我們在創建NioSocketAcceptor的時候默認創建的NioProcessor的線程個數,來看看SimpleIoProcessorPool四個參數的構造函數:
public SimpleIoProcessorPool(Class> processorType, Executor executor, int size,
            SelectorProvider selectorProvider) {
        if (processorType == null) {
            throw new IllegalArgumentException("processorType");
        }

        if (size <= 0) {
            throw new IllegalArgumentException("size: " + size + " (expected: positive integer)");
        }

        // Create the executor if none is provided
        createdExecutor = (executor == null);

        if (createdExecutor) {
            this.executor = Executors.newCachedThreadPool();
            // Set a default reject handler
            ((ThreadPoolExecutor) this.executor).setRejectedExecutionHandler(new ThreadPoolExecutor.CallerRunsPolicy());
        } else {
            this.executor = executor;
        }

        pool = new IoProcessor[size];

        boolean success = false;
        Constructor> processorConstructor = null;
        boolean usesExecutorArg = true;

        try {
            // We create at least one processor
            try {
                try {
                    processorConstructor = processorType.getConstructor(ExecutorService.class);
                    pool[0] = processorConstructor.newInstance(this.executor);
                } catch (NoSuchMethodException e1) {
                    // To the next step...
                    try {
                        if(selectorProvider==null) {
                            processorConstructor = processorType.getConstructor(Executor.class);
                            pool[0] = processorConstructor.newInstance(this.executor);
                        } else {
                            processorConstructor = processorType.getConstructor(Executor.class, SelectorProvider.class);
                            pool[0] = processorConstructor.newInstance(this.executor,selectorProvider);
                        }
                    } catch (NoSuchMethodException e2) {
                        // To the next step...
                        try {
                            processorConstructor = processorType.getConstructor();
                            usesExecutorArg = false;
                            pool[0] = processorConstructor.newInstance();
                        } catch (NoSuchMethodException e3) {
                            // To the next step...
                        }
                    }
                }
            } catch (RuntimeException re) {
                LOGGER.error("Cannot create an IoProcessor :{}", re.getMessage());
                throw re;
            } catch (Exception e) {
                String msg = "Failed to create a new instance of " + processorType.getName() + ":" + e.getMessage();
                LOGGER.error(msg, e);
                throw new RuntimeIoException(msg, e);
            }

            if (processorConstructor == null) {
                // Raise an exception if no proper constructor is found.
                String msg = String.valueOf(processorType) + " must have a public constructor with one "
                        + ExecutorService.class.getSimpleName() + " parameter, a public constructor with one "
                        + Executor.class.getSimpleName() + " parameter or a public default constructor.";
                LOGGER.error(msg);
                throw new IllegalArgumentException(msg);
            }

            // Constructor found now use it for all subsequent instantiations
            for (int i = 1; i < pool.length; i++) {
                try {
                    if (usesExecutorArg) {
                        if(selectorProvider==null) {
                            pool[i] = processorConstructor.newInstance(this.executor);
                        } else {
                            pool[i] = processorConstructor.newInstance(this.executor, selectorProvider);
                        }
                    } else {
                        pool[i] = processorConstructor.newInstance();
                    }
                } catch (Exception e) {
                    // Won't happen because it has been done previously
                }
            }

            success = true;
        } finally {
            if (!success) {
                dispose();
            }
        }
    }
這段代碼相對來說比較長,可以看到在第14行判斷傳入SimpleIoProcessorPool的executor是否為null,為null的話執行第15行,創建一個CachedThreadPool類型的線程池,隨後在第32行通過反射獲取到processorType參數為ExecutorService的構造函數,我們這裡的processType實際上就是NioProcessor,隨後33行通過反射創建一個NioProcessor對象出來,調用的是他的下面這個構造函數:
 public NioProcessor(Executor executor) {
        super(executor);

        try {
            // Open a new selector
            selector = Selector.open();
        } catch (IOException e) {
            throw new RuntimeIoException("Failed to open a selector.", e);
        }
    }
可以注意到的是在SimpleIoProcessorPool裡面有兩種通過反射創建NioProcessor對象的方式,就是我們上面代碼的第78和80這兩種方式,兩者的區別在於如果我們在創建SimpleIoProcessorPool的時候傳入了SelectorProvider對象,那麼NioProcessor裡面的Selector將直接調用SelectorProvider的openSelector來獲得,而如果沒有傳入SelectorProvider對象的話,NioProcessor裡面的Selector將通過Selector.open方法獲得;
到此,我們創建出來了CPU個數+1個NioProcessor,每個NioProcessor裡面都會有一個Selector對象;
我們回到AbstractPollingIoAcceptor的構造函數
private AbstractPollingIoAcceptor(IoSessionConfig sessionConfig, Executor executor, IoProcessor processor,
            boolean createdProcessor, SelectorProvider selectorProvider) {
        super(sessionConfig, executor);

        if (processor == null) {
            throw new IllegalArgumentException("processor");
        }

        this.processor = processor;
        this.createdProcessor = createdProcessor;

        try {
            // Initialize the selector
            init(selectorProvider);

            // The selector is now ready, we can switch the
            // flag to true so that incoming connection can be accepted
            selectable = true;
        } catch (RuntimeException e) {
            throw e;
        } catch (Exception e) {
            throw new RuntimeIoException("Failed to initialize.", e);
        } finally {
            if (!selectable) {
                try {
                    destroy();
                } catch (Exception e) {
                    ExceptionMonitor.getInstance().exceptionCaught(e);
                }
            }
        }
    }
首先執行了super構造函數,這個構造函數實際上執行的是AbstractIoService的構造函數;
protected AbstractIoService(IoSessionConfig sessionConfig, Executor executor) {
        if (sessionConfig == null) {
            throw new IllegalArgumentException("sessionConfig");
        }

        if (getTransportMetadata() == null) {
            throw new IllegalArgumentException("TransportMetadata");
        }

        if (!getTransportMetadata().getSessionConfigType().isAssignableFrom(sessionConfig.getClass())) {
            throw new IllegalArgumentException("sessionConfig type: " + sessionConfig.getClass() + " (expected: "
                    + getTransportMetadata().getSessionConfigType() + ")");
        }

        // Create the listeners, and add a first listener : a activation listener
        // for this service, which will give information on the service state.
        listeners = new IoServiceListenerSupport(this);
        listeners.add(serviceActivationListener);

        // Stores the given session configuration
        this.sessionConfig = sessionConfig;

        // Make JVM load the exception monitor before some transports
        // change the thread context class loader.
        ExceptionMonitor.getInstance();

        if (executor == null) {
            this.executor = Executors.newCachedThreadPool();
            createdExecutor = true;
        } else {
            this.executor = executor;
            createdExecutor = false;
        }

        threadName = getClass().getSimpleName() + '-' + id.incrementAndGet();
    }
這個構造函數會判斷我們的executor是否為null,為null的話會創建一個CachedThreadPool出來,這裡我們傳入給AbstractPollingIoAcceptor的參數值為null,因此會創建一個Executor出來;
可以看到第14行執行了init方法,傳入的參數是SelectorProvider類型對象,這個方法在AbstractPollingIoAcceptor裡面並沒有實現,因此查看AbstractPollingIoAcceptor的子類NioSocketAcceptor的init(SelectorProvider)方法
protected void init(SelectorProvider selectorProvider) throws Exception {
        this.selectorProvider = selectorProvider;

        if (selectorProvider == null) {
            selector = Selector.open();
        } else {
            selector = selectorProvider.openSelector();
        }
    }
這個方法所做的事還是比較簡單的,就是創建根據SelectorProvider是否為空創建Selector對象而已,注意這個Selector對象是屬於NioSocketAcceptor的;
在init執行結束之後,AbstractPollingIoAcceptor構造函數第18行會將selectable設置為true,表示我們NioSocketAcceptor裡面的Selector對象已經創建結束了,我們可以處理隨後客戶端到來的連接請求了;
至此,NioSocketAcceptor的構造方法執行結束了,在這個構造方法中為我們創建出了CPU個數+1個NioProcess對象,每個對象裡面都包含一個Selector對象,同時也為NioSocketAcceptor創建了一個Selector對象,同時從上面可以發現我們的NioSocketAcceptor和SimpleIoProcessorPool裡的線程池可以是同一個也可以不是同一個,具體就在你創建NioSocketAcceptor和SimpleIoProcessorPool是否傳入同一個Executor就可以啦;
有了NioSocketAcceptor對象之後,我們通過有了NioSocketAcceptor的bind方法將他和某一個端口綁定起來,因此查看NioSocketAcceptor的bind方法,你會發現根本不存在,那麼根據前面NioSocketAcceptor的類結構圖,去他的父類AbstractPollingIoAcceptor查找,還是沒有,那只能繼續向上找,找到AbstractIoAcceptor裡面,終於找到了;
AbstractIoAcceptor$bind()
public final void bind(Iterable localAddresses) throws IOException {
        if (isDisposing()) {
            throw new IllegalStateException("The Accpetor disposed is being disposed.");
        }

        if (localAddresses == null) {
            throw new IllegalArgumentException("localAddresses");
        }

        List localAddressesCopy = new ArrayList();

        for (SocketAddress a : localAddresses) {
            checkAddressType(a);
            localAddressesCopy.add(a);
        }

        if (localAddressesCopy.isEmpty()) {
            throw new IllegalArgumentException("localAddresses is empty.");
        }

        boolean activate = false;
        synchronized (bindLock) {
            synchronized (boundAddresses) {
                if (boundAddresses.isEmpty()) {
                    activate = true;
                }
            }

            if (getHandler() == null) {
                throw new IllegalStateException("handler is not set.");
            }

            try {
                Set addresses = bindInternal(localAddressesCopy);

                synchronized (boundAddresses) {
                    boundAddresses.addAll(addresses);
                }
            } catch (IOException e) {
                throw e;
            } catch (RuntimeException e) {
                throw e;
            } catch (Exception e) {
                throw new RuntimeIoException("Failed to bind to: " + getLocalAddresses(), e);
            }
        }

        if (activate) {
            getListeners().fireServiceActivated();
        }
    }
不管你調用的是哪個bind方法,最後執行的都是這個bind方法,在這個方法中首先會進行迭代,將所有需要綁定的地址存儲到localAddressesCopy裡面,隨後在第34行調用bindInternal方法進行綁定,這個方法在AbstractIoAcceptor裡面是沒有實現的,需要到他的子類AbstractPollingIoAcceptor查看,這個類中實現了該方法:
AbstractPollingIoAcceptor$bindInternal
protected final SetbindInternal(List localAddresses) throws Exception { // Create a bind request as a Future operation. When the selector // have handled the registration, it will signal this future. AcceptorOperationFuture request = new AcceptorOperationFuture(localAddresses); // adds the Registration request to the queue for the Workers // to handle registerQueue.add(request); // creates the Acceptor instance and has the local // executor kick it off. startupAcceptor(); // As we just started the acceptor, we have to unblock the select() // in order to process the bind request we just have added to the // registerQueue. try { lock.acquire(); // Wait a bit to give a chance to the Acceptor thread to do the select() Thread.sleep(10); wakeup(); } finally { lock.release(); } // Now, we wait until this request is completed. request.awaitUninterruptibly(); if (request.getException() != null) { throw request.getException(); } // Update the local addresses. // setLocalAddresses() shouldn't be called from the worker thread // because of deadlock. Set newLocalAddresses = new HashSet (); for (H handle : boundHandles.values()) { newLocalAddresses.add(localAddress(handle)); } return newLocalAddresses; }
首先創建了一個AcceptorOperationFuture類型的對象,當NioSocketAcceptor裡面的Selector已經處理了該注冊請求後,就會給AcceptorOperationFuture對象發送一個信號,至於什麼地方會發送信號後面會講到,接著會將創建的AcceptorOperationFuture對象添加到registerQueue中,他是一個AcceptorOperationFuture類型的隊列,保存著我們所有注冊到NioSocketAcceptor上面的服務端address組成的AcceptorOperationFuture,也就是說上面的requestQueue實際上存儲的是服務端需要注冊到NioSocketAcceptor裡面的Selector的集合;接著第12行執行了startupAcceptor方法,我們來看看這個方法做了些什麼;
private void startupAcceptor() throws InterruptedException {
        // If the acceptor is not ready, clear the queues
        // TODO : they should already be clean : do we have to do that ?
        if (!selectable) {
            registerQueue.clear();
            cancelQueue.clear();
        }

        // start the acceptor if not already started
        Acceptor acceptor = acceptorRef.get();

        if (acceptor == null) {
            lock.acquire();
            acceptor = new Acceptor();

            if (acceptorRef.compareAndSet(null, acceptor)) {
                executeWorker(acceptor);
            } else {
                lock.release();
            }
        }
    }
這個方法關鍵是第10行或者14行,創建一個Acceptor類型的對象,Acceptor實現了Runnable接口,並且在第17行執行executeWorker方法,這個方法在AbstractPollingIoAcceptor中並沒有實現,具體實現是在他的間接父類AbstractIoService中的,我們查看AbstractIoService中的executeWorker方法:
AbstractIoService$executeWorker
protected final void executeWorker(Runnable worker) {
        executeWorker(worker, null);
    }

    protected final void executeWorker(Runnable worker, String suffix) {
        String actualThreadName = threadName;
        if (suffix != null) {
            actualThreadName = actualThreadName + '-' + suffix;
        }
        executor.execute(new NamePreservingRunnable(worker, actualThreadName));
    }
可以看到實際上是首先將我們上面創建的Acceptor對象放到線程池executor裡面,這裡的executor線程池是我們在創建NioSocketAcceptor的時候創建的,他是CachedThreadPool類型的,隨後執行exexcute方法,將該線程池運行起來,那麼緊接著執行的就該是Acceptor的run方法了;
AbstractPollingIoAcceptor$Acceptor$run()
public void run() {
            assert (acceptorRef.get() == this);

            int nHandles = 0;

            // Release the lock
            lock.release();

            while (selectable) {
                try {
                    // Detect if we have some keys ready to be processed
                    // The select() will be woke up if some new connection
                    // have occurred, or if the selector has been explicitly
                    // woke up
                    int selected = select();

                    // this actually sets the selector to OP_ACCEPT,
                    // and binds to the port on which this class will
                    // listen on
                    nHandles += registerHandles();

                    // Now, if the number of registred handles is 0, we can
                    // quit the loop: we don't have any socket listening
                    // for incoming connection.
                    if (nHandles == 0) {
                        acceptorRef.set(null);

                        if (registerQueue.isEmpty() && cancelQueue.isEmpty()) {
                            assert (acceptorRef.get() != this);
                            break;
                        }

                        if (!acceptorRef.compareAndSet(null, this)) {
                            assert (acceptorRef.get() != this);
                            break;
                        }

                        assert (acceptorRef.get() == this);
                    }

                    if (selected > 0) {
                        // We have some connection request, let's process
                        // them here.
                        processHandles(selectedHandles());
                    }

                    // check to see if any cancellation request has been made.
                    nHandles -= unregisterHandles();
                } catch (ClosedSelectorException cse) {
                    // If the selector has been closed, we can exit the loop
                    ExceptionMonitor.getInstance().exceptionCaught(cse);
                    break;
                } catch (Exception e) {
                    ExceptionMonitor.getInstance().exceptionCaught(e);

                    try {
                        Thread.sleep(1000);
                    } catch (InterruptedException e1) {
                        ExceptionMonitor.getInstance().exceptionCaught(e1);
                    }
                }
            }

            // Cleanup all the processors, and shutdown the acceptor.
            if (selectable && isDisposing()) {
                selectable = false;
                try {
                    if (createdProcessor) {
                        processor.dispose();
                    }
                } finally {
                    try {
                        synchronized (disposalLock) {
                            if (isDisposing()) {
                                destroy();
                            }
                        }
                    } catch (Exception e) {
                        ExceptionMonitor.getInstance().exceptionCaught(e);
                    } finally {
                        disposalFuture.setDone();
                    }
                }
            }
        }
可以看到第9行首先判斷selectable的值是true還是false,這個值是在什麼時候賦值的呢?就是在AbstractPollingIoAcceptor的構造函數裡面了,只要我們在NioSocketAcceptor裡面創建了Selector對象之後就會將selectable的值設置為true,那麼我們這裡run方法裡面的while循環將是死循環了,一直等待客戶端的連接請求;第15行的select方法將處於阻塞狀態,它實際上調用的就是我們Selector的select方法,一直等待著客戶端的接入,在有客戶端連接或者Selector被明確喚醒的情況下就會返回,返回結果大於0表示有客戶端連接接入;接著執行第20行的registerHandles方法
AbstractPollingIoAcceptor$registerHandles
private int registerHandles() {
        for (;;) {
            // The register queue contains the list of services to manage
            // in this acceptor.
            AcceptorOperationFuture future = registerQueue.poll();

            if (future == null) {
                return 0;
            }

            // We create a temporary map to store the bound handles,
            // as we may have to remove them all if there is an exception
            // during the sockets opening.
            Map newHandles = new ConcurrentHashMap();
            List localAddresses = future.getLocalAddresses();

            try {
                // Process all the addresses
                for (SocketAddress a : localAddresses) {
                    H handle = open(a);
                    newHandles.put(localAddress(handle), handle);
                }

                // Everything went ok, we can now update the map storing
                // all the bound sockets.
                boundHandles.putAll(newHandles);

                // and notify.
                future.setDone();
                return newHandles.size();
            } catch (Exception e) {
                // We store the exception in the future
                future.setException(e);
            } finally {
                // Roll back if failed to bind all addresses.
                if (future.getException() != null) {
                    for (H handle : newHandles.values()) {
                        try {
                            close(handle);
                        } catch (Exception e) {
                            ExceptionMonitor.getInstance().exceptionCaught(e);
                        }
                    }

                    // TODO : add some comment : what is the wakeup() waking up ?
                    wakeup();
                }
            }
        }
    }
registerHandles方法主要用於創建ServerSocketChannel,為通道創建ServerSocket並且為其綁定端口號,創建接收緩存區,並且為Selector注冊OP_ACCEPT事件;
首先第5行從我們的registerQueue服務端請求注冊隊隊列中取出隊首元素,第14行創建了一個臨時的Map來存儲我們已經綁定的請求地址對應的SocketAddress,為什麼要這個臨時的Map呢?原因就在於如果我們在Socket開啟的狀態下發生異常的話,我們需要移出掉這些已經綁定的請求地址,有點類似於數據庫中的事務操作,如果有一個失敗,那麼就需要全部回滾,具體我們可以看到發生異常之後執行的是第33行代碼,為future設置了異常,隨後finally中進行了回滾操作;緊接著第15行獲得可該AcceptorOperationFuture裡面對應的SocketAddress列表,接著執行了第20行的open方法,為我們的每個SocketAddress創建一個ServerSocketChannel及其對應的ServerSocket,同時將通道注冊到Selector上面,並且為當前通道注冊OP_ACCEPT事件;我們來看看open方法,這個方法是在AbstractPollingIoAcceptor的子類NioSocketAcceptor中實現的;
NioSocketAcceptor$open()
 protected ServerSocketChannel open(SocketAddress localAddress) throws Exception {
        // Creates the listening ServerSocket

        ServerSocketChannel channel = null;

        if (selectorProvider != null) {
            channel = selectorProvider.openServerSocketChannel();
        } else {
            channel = ServerSocketChannel.open();
        }

        boolean success = false;

        try {
            // This is a non blocking socket channel
            channel.configureBlocking(false);

            // Configure the server socket,
            ServerSocket socket = channel.socket();

            // Set the reuseAddress flag accordingly with the setting
            socket.setReuseAddress(isReuseAddress());

            // and bind.
            try {
                socket.bind(localAddress, getBacklog());
            } catch (IOException ioe) {
                // Add some info regarding the address we try to bind to the
                // message
                String newMessage = "Error while binding on " + localAddress + "\n" + "original message : "
                        + ioe.getMessage();
                Exception e = new IOException(newMessage);
                e.initCause(ioe.getCause());

                // And close the channel
                channel.close();

                throw e;
            }

            // Register the channel within the selector for ACCEPT event
            channel.register(selector, SelectionKey.OP_ACCEPT);
            success = true;
        } finally {
            if (!success) {
                close(channel);
            }
        }
        return channel;
    }
可以看到這個open方法裡面其實就是我們使用NIO的經典步驟了,首先創建一個ServerSocketChannel對象,接著將ServerSocketChannel通道設置為非阻塞式,根據當前通道創建一個ServerSocket對象,並且為當前ServerSocket綁定我們傳入的參數SocketAddress,最後第42行把我們創建的通道注冊到Selector選擇器上面,同時注冊OP_ACCEPT事件;
open方法執行結束之後,registerHandles也算結束了,registerHandles中其他部分代碼可以略過,至此,我們將服務端需要創建的ServerSocketChannel及其對應綁定了指定SocketAddress的ServerSocket注冊到了Selector選擇器中,同時注冊了OP_ACCEPT事件;
回到我們Acceptor裡面的run方法,注意registerHandles方法的返回值實際上就是我們已經創建ServerSocketChannel的個數,接著就是執行第25行,如果我們創建的ServerSocketChannel個數為0的話,就會退出這個while死循環,因為我們沒有任何ServerSocket來監聽客戶端連接的到來,避免資源的浪費;隨後就是第41行,當有通道被選擇的時候,selected的值將會是大於0的,那麼就會執行第44行的processHandles方法,這個方法的參數是由selectedHandles獲得的,他的實現是在NioSocketAcceptor裡面的
NioSocketAcceptor$selectedHandles
protected Iterator可以看到實際上selectedHandles就是返回我們已經選中通道的集合而已了selectedHandles() { return new ServerSocketChannelIterator(selector.selectedKeys()); }
接下來我們看看processHandles做了些什麼
AbstractPollingIoAcceptor$processHandles
private void processHandles(Iterator這段代碼相對來說比較短,我們仔細看看裡面做了些什麼,首先迭代我們的ServerSocketChannel集合,從中取出一個ServerSocketChannel對象,我這裡把H的類型全部說成是ServerSocketChannel的原因在於我們主要分析的是MINA框架中關於Socket的這部分,因為MINA不僅僅支持Socket通信,同時支持UDP數據包通信,因而這裡使用的是泛型實現的,在獲得一個ServerSocketChannel對象之後,要注意將其從迭代器中刪除,避免進行重復多次處理,接著執行第8行,創建一個IoSession對象出來,具體來講我們這裡創建的是NioSocketSession對象,調用的方法是accept,這個方法的第一個參數就是我們之前在創建NioSocketAcceptor的時候創建的SimpleIoProcessorPool對象,默認情況下在他裡面是會創建CPU個數+1個NioProcessor的,這個方法在AbstractPollingIoAcceptor中是沒有實現的,因此我們查看他的子類NioSocketAcceptor裡面handles) throws Exception { while (handles.hasNext()) { H handle = handles.next(); handles.remove(); // Associates a new created connection to a processor, // and get back a session S session = accept(processor, handle); if (session == null) { continue; } initSession(session, null, null); // add the session to the SocketIoProcessor session.getProcessor().add(session); } } }
NioSocketAcceptor$accept()
protected NioSession accept(IoProcessorprocessor, ServerSocketChannel handle) throws Exception { SelectionKey key = null; if (handle != null) { key = handle.keyFor(selector); } if ((key == null) || (!key.isValid()) || (!key.isAcceptable())) { return null; } // accept the connection from the client SocketChannel ch = handle.accept(); if (ch == null) { return null; } return new NioSocketSession(this, processor, ch); }
這個方法裡首先獲得被選中ServerSocketChannel的key,接著對該key進行一系列的判斷,接著第14行獲取到和當前ServerSocketChannel有關聯的SocketChannel,這裡需要補充一點的就是ServerSocketChannel和Selector是通過SelectionKey來發生關聯的,SelectionKey標志了我們當前ServerSocketChannel的狀態,而如果說某一客戶端想要和服務器某一端口服務發生關聯的話,那麼它實際上是和與該端口綁定的ServerSocketChannel發生聯系的,因此我們就可以通過ServerSocketChannel獲取與他有關聯了客戶端SocketChannel啦;最後執行第20行創建一個NioSocketSession對象,我們來看看他的構造函數;
NioSocketSession$NioSocketSession()
public NioSocketSession(IoService service, IoProcessor首先執行的是super的構造函數,其實就是NioSession的構造函數了,我們來看看processor, SocketChannel channel) { super(processor, service, channel); config = new SessionConfigImpl(); this.config.setAll(service.getSessionConfig()); }
protected NioSession(IoProcessor首先執行super的構造函數,實際上執行的是AbstractIoSession的構造函數,裡面沒有做多少事,我們不再展開講,接著第5行創建了一個DefaultIoFilterChain對象出來,這個還是比較重要的,我們來看下裡面做了什麼事;processor, IoService service, Channel channel) { super(service); this.channel = channel; this.processor = processor; filterChain = new DefaultIoFilterChain(this); }
DefaultIoFilterChain$DefaultIoFilterChain()
public DefaultIoFilterChain(AbstractIoSession session) {
        if (session == null) {
            throw new IllegalArgumentException("session");
        }

        this.session = session;
        head = new EntryImpl(null, null, "head", new HeadFilter());
        tail = new EntryImpl(head, null, "tail", new TailFilter());
        head.nextEntry = tail;
    }
這個構造函數中為我們創建了兩個EntryImpl類型的對象,分別封裝的是HeadFilter和TailFilter對象,這裡有必要說下DefaultIoFilterChain的作用了,在我們創建Session的時候,會為Session創建一個Filter責任鏈出來,那麼責任鏈主要是干什麼的呢?主要進行進行我們二進制與真正對象之間的轉換啦,因為我們都知道在網絡中傳輸的只能是字節,並不能傳遞對象,那麼我們就需要字節和對象之間的轉換,Filter鏈就是用來干這個的,當然你可以在客戶端將要發送的數據通過Filter鏈來進行加密,在服務端再通過Filter鏈來進行解密,這個是完全可以的,既然是鏈嘛,就需要鏈頭和鏈尾了;他們都會被封裝到EntryImpl中,至於EntryImpl裡面有什麼我們就不貼出來了,主要就是prevEntry,nextEntry,nextFilter從名字上就能明顯看出來主要是用於EntryImpl鏈拼接的實體罷了,有點類似於鏈表;
到此呢,我們的NioSocketSession就創建成功啦,創建NioSocketSession其實主要就是在它裡面創建一個IoFilter責任鏈出來,用於處理當前Session的一些編解碼工作,這樣我們的NioSocketAcceptor的accept方法就執行結束了,返回了一個NioSocketSession對象,繼續回到AbstractPollingIoAcceptor裡面的processHandles方法,在第8行創建完NioSocketSession之後,執行第17行,將我們的NioSocketSession對象放到NioProcessor中,具體實現過程見下:
首先執行的是session的getProcessor方法,這裡的session類型是NioSocketSession,所以我們去NioSocketSession裡面查看getProcessor,你會發現它裡面不存在這個方法,那就要去他的父類NioSession裡面找了,果然我們找到了:
public IoProcessorgetProcessor() { return processor; }
getProcessor裡面的方法體非常簡單,就是返回processor而已了,那麼這個processor是在哪裡賦值的呢?就是在創建NioSession的構造函數裡面,我們在創建NioSocketSession的時候是會調用super來調用NioSession的構造函數的,也就是我們這裡的processor就是我們在創建NioSocketAcceptor的時候創建的SimpleIoProcessorPool對象,接下來調用的就是它裡面的add方法啦:
 public final void add(S session) {
        getProcessor(session).add(session);
    }
可以看到在SimpleIoProcessor裡面的add方法裡,首先執行的是getProcessor,從SimpleIoProcessor裡面獲得一個Processor對象出來,具體來講這裡獲得到的Processor類型將是NioProcessor類型,我們看看getProcessor方法
private IoProcessor getProcessor(S session) {
        IoProcessor processor = (IoProcessor) session.getAttribute(PROCESSOR);

        if (processor == null) {
            if (disposed || disposing) {
                throw new IllegalStateException("A disposed processor cannot be accessed.");
            }

            processor = pool[Math.abs((int) session.getId()) % pool.length];

            if (processor == null) {
                throw new IllegalStateException("A disposed processor cannot be accessed.");
            }

            session.setAttributeIfAbsent(PROCESSOR, processor);
        }

        return processor;
    }
這個方法最關鍵的就是第9行,獲取到當前session的id,對其取絕對值,並且對我們創建SimpleIoProcessor的時候創建的NioProcessor數組進行取余運算,獲得數組中的一個NioProcessor對象,默認情況下這個數組的大小是CPU個數+1;最後第15行將當前Session的PROCESSOR屬性設置為獲取到的NioProcessor;
那麼到這裡,實際上add操作執行的就是NioProcessor的add操作啦,我們查看NioProcessor裡面會發現不存在這個方法,那麼需要去他的父類AbstractPollingIoProcessor查看,代碼見下:
AbstractPollingIoProcessor$add()
public final void add(S session) {
        if (disposed || disposing) {
            throw new IllegalStateException("Already disposed.");
        }

        // Adds the session to the newSession queue and starts the worker
        newSessions.add(session);
        startupProcessor();
    }
將當前NioSocketSession添加到newSession裡面,這裡的newSessions實際上就是NioSocketSession隊列,就是我們當前NioProcessor需要處理的NioSocketSession所組成的集合了,為什麼還要這個集合呢?道理很簡單嘛,剛剛你在通過getProcessor方法為NioSocketSession設置處理他的NioPrrocessor的時候,采用的方法是通過session的id對包含NioProcessor對象的數組進行取模運算的,這肯定就不能避免多個NioSocketSession同時都需要一個NioProcessor來處理的情況了,那麼為了保存這些需要NioProcessor處理的NioSocketSession,自然需要一個隊列來存儲了;
緊接著執行了startupProcessor方法,如果你還記得上面的源碼分析過程的話,會發現上面有調用過startupAcceptor方法,這兩個方法不同之處在於一個是用於開啟Processor線程執行它裡面NioSocketSession請求的,一個是用於開啟Acceptor來進行ServerSocketChannel的事件注冊的,並且startupAcceptor只會執行一次,而startupProcessor會執行多次,默認情況下最多執行CPU個數+1次;
我們來看看startupProcessor方法:
AbstractPollingIoProcessor$startupProcessor
private void startupProcessor() {
        Processor processor = processorRef.get();

        if (processor == null) {
            processor = new Processor();

            if (processorRef.compareAndSet(null, processor)) {
                executor.execute(new NamePreservingRunnable(processor, threadName));
            }
        }

        // Just stop the select() and start it again, so that the processor
        // can be activated immediately.
        wakeup();
    }
這個方法首先就是創建了一個Processor對象他實現了Runnable接口,隨後調用executor的execute方法,將封裝成NamePreservingRunnable的Processor放入線程池中,executor是CachedThreadPool類型的線程池,那麼接下來就是執行Processor線程的run方法了:
public void run() {
            assert (processorRef.get() == this);

            int nSessions = 0;
            lastIdleCheckTime = System.currentTimeMillis();

            for (;;) {
                try {
                    // This select has a timeout so that we can manage
                    // idle session when we get out of the select every
                    // second. (note : this is a hack to avoid creating
                    // a dedicated thread).
                    long t0 = System.currentTimeMillis();
                    int selected = select(SELECT_TIMEOUT);
                    long t1 = System.currentTimeMillis();
                    long delta = (t1 - t0);

                    if (!wakeupCalled.getAndSet(false) && (selected == 0) && (delta < 100)) {
                        // Last chance : the select() may have been
                        // interrupted because we have had an closed channel.
                        if (isBrokenConnection()) {
                            LOG.warn("Broken connection");
                        } else {
                            LOG.warn("Create a new selector. Selected is 0, delta = " + (t1 - t0));
                            // Ok, we are hit by the nasty epoll
                            // spinning.
                            // Basically, there is a race condition
                            // which causes a closing file descriptor not to be
                            // considered as available as a selected channel,
                            // but
                            // it stopped the select. The next time we will
                            // call select(), it will exit immediately for the
                            // same
                            // reason, and do so forever, consuming 100%
                            // CPU.
                            // We have to destroy the selector, and
                            // register all the socket on a new one.
                            registerNewSelector();
                        }
                    }

                    // Manage newly created session first
                    nSessions += handleNewSessions();

                    updateTrafficMask();

                    // Now, if we have had some incoming or outgoing events,
                    // deal with them
                    if (selected > 0) {
                        // LOG.debug("Processing ..."); // This log hurts one of
                        // the MDCFilter test...
                        process();
                    }

                    // Write the pending requests
                    long currentTime = System.currentTimeMillis();
                    flush(currentTime);

                    // And manage removed sessions
                    nSessions -= removeSessions();

                    // Last, not least, send Idle events to the idle sessions
                    notifyIdleSessions(currentTime);

                    // Get a chance to exit the infinite loop if there are no
                    // more sessions on this Processor
                    if (nSessions == 0) {
                        processorRef.set(null);

                        if (newSessions.isEmpty() && isSelectorEmpty()) {
                            // newSessions.add() precedes startupProcessor
                            assert (processorRef.get() != this);
                            break;
                        }

                        assert (processorRef.get() != this);

                        if (!processorRef.compareAndSet(null, this)) {
                            // startupProcessor won race, so must exit processor
                            assert (processorRef.get() != this);
                            break;
                        }

                        assert (processorRef.get() == this);
                    }

                    // Disconnect all sessions immediately if disposal has been
                    // requested so that we exit this loop eventually.
                    if (isDisposing()) {
                        boolean hasKeys = false;

                        for (Iterator i = allSessions(); i.hasNext();) {
                            IoSession session = i.next();

                            if (session.isActive()) {
                                scheduleRemove((S)session);
                                hasKeys = true;
                            }
                        }

                        if (hasKeys) {
                            wakeup();
                        }
                    }
                } catch (ClosedSelectorException cse) {
                    // If the selector has been closed, we can exit the loop
                    // But first, dump a stack trace
                    ExceptionMonitor.getInstance().exceptionCaught(cse);
                    break;
                } catch (Exception e) {
                    ExceptionMonitor.getInstance().exceptionCaught(e);

                    try {
                        Thread.sleep(1000);
                    } catch (InterruptedException e1) {
                        ExceptionMonitor.getInstance().exceptionCaught(e1);
                    }
                }
            }

            try {
                synchronized (disposalLock) {
                    if (disposing) {
                        doDispose();
                    }
                }
            } catch (Exception e) {
                ExceptionMonitor.getInstance().exceptionCaught(e);
            } finally {
                disposalFuture.setValue(true);
            }
        }
    }
和Acceptor的run方法類似,同樣存在一個死循環,第14行調用了Selector的select方法,但是和之前Acceptor中調用的select方法不同,我們這裡調用的是有參數的select方法,這種方式會讓我們的選擇器每隔SELECT_TIMEOUT被喚醒一次,讓他進行重新選擇,目的就是為了管理空閒的NioSocketSession,而使用無參的select的話會一直阻塞下去,直到出現需要的事件為止;接著第43行執行了handleNewSessions方法
  private int handleNewSessions() {
        int addedSessions = 0;

        for (S session = newSessions.poll(); session != null; session = newSessions.poll()) {
            if (addNow(session)) {
                // A new session has been created
                addedSessions++;
            }
        }

        return addedSessions;
    }
可以看到通過for循環不停的poll出隊列中存在的NioSocketSession對象,同時調用addNow方法對當前NioSocketSession中對應的SocketChannel進行OP_READ操作的注冊,具體我們可以看看addNow方法:
AbstractPollingIoProcessor$addNow()
 private boolean addNow(S session) {
        boolean registered = false;

        try {
            init(session);
            registered = true;

            // Build the filter chain of this session.
            IoFilterChainBuilder chainBuilder = session.getService().getFilterChainBuilder();
            chainBuilder.buildFilterChain(session.getFilterChain());

            // DefaultIoFilterChain.CONNECT_FUTURE is cleared inside here
            // in AbstractIoFilterChain.fireSessionOpened().
            // Propagate the SESSION_CREATED event up to the chain
            IoServiceListenerSupport listeners = ((AbstractIoService) session.getService()).getListeners();
            listeners.fireSessionCreated(session);
        } catch (Exception e) {
            ExceptionMonitor.getInstance().exceptionCaught(e);

            try {
                destroy(session);
            } catch (Exception e1) {
                ExceptionMonitor.getInstance().exceptionCaught(e1);
            } finally {
                registered = false;
            }
        }

        return registered;
    }
這個方法首先第5行執行了init方法,這個方法就是用來為當前NioSocketSession對應的SocketChannel注冊OP_READ事件的,具體實現是在NioProcessor裡面的:
NioProcessor$init()
@Override
    protected void init(NioSession session) throws Exception {
        SelectableChannel ch = (SelectableChannel) session.getChannel();
        ch.configureBlocking(false);
        session.setSelectionKey(ch.register(selector, SelectionKey.OP_READ, session));
    }
可以看到首先是獲得當前NioSocketSession對應的SocketChannel對應,他是SelectableChannel的子類,接著將當前獲得到的通道設置為非阻塞式,隨後為其注冊OP_READ事件;
這樣的話,addNow方法執行結束了,由於這篇篇幅已經比較長了,所以決定在下一篇繼續分析,未完,請繼續查看下一篇;
 千裡之外,你也能用手機遠程控制PC!
我們總是出門後才發現忘了關電腦,或是忘了從電腦中拷貝重要數據,難道還得跑回家一趟?嘿嘿,想在外網環境下遠程控制PC,其實沒有那麼復雜。如果某位童鞋擔心遇到上
 玩轉Android Camera開發(五):基於Google自帶算法實時檢測人臉並繪制人臉框(網絡首發,附完整demo)
本文主要介紹使用Google自帶的FaceDetectionListener進行人臉檢測,並將檢測到的人臉用矩形框繪制出來。本文代碼基於PlayCameraV1.0.0,
 Android開發---Fragment學習總結(一)
下面正式開始Fragment使用講解:一.准備工作1.引入類庫(導包)步驟:復制jar包--->project視圖下--->工程--->app---&g
 android 計算所在周所在月的前後日期
效果圖:使用了 一個時間相關的工具類 package com.yqy.yqy_date;import android.util.Log;import java.