編輯:關於Android編程
1. 桌面widget小部件(http://blog.csdn.net/qq_28261343/article/details/51043971)
2. 通知欄通知信息
if (android.os.Build.VERSION.SDK_INT >= android.os.Build.VERSION_CODES.JELLY_BEAN) {
            remoteViews = new RemoteViews(getPackageName(), R.layout.remoteviews_item_dl);
            remoteViews.setTextViewText(R.id.tv_filename, getPackageName());   // 設置標題
//            remoteViews.setTextViewText(R.id.tv_content, "this is notification");   // 設置內容
            Intent btIntent = new Intent();
            btIntent.setAction("com.yu.sendnotification.action_dl");
            PendingIntent btPendingIntent = PendingIntent.getBroadcast(this, 1, btIntent, PendingIntent.FLAG_CANCEL_CURRENT);  // 發送廣播意圖
            remoteViews.setOnClickPendingIntent(R.id.bt_stop, btPendingIntent);   // 設置點擊事件
            Intent intent = new Intent(this, NewActivity.class);
            PendingIntent pi = PendingIntent.getActivity(context, 0, intent, PendingIntent.FLAG_CANCEL_CURRENT);
            noti = new Notification.Builder(context).setSmallIcon(R.mipmap.ic_launcher)
            .setTicker("Hellonotification")
            .setWhen(System.currentTimeMillis())
            .setAutoCancel(true)
            .setContentIntent(pi).build();
            manager = (NotificationManager) getSystemService(Context.NOTIFICATION_SERVICE);
            manager.notify(0, noti);
               }
 1. 通過Notification.Builder創建一個builder對象
     Notification.Builder builder = new Notification.Builder(context);
 2. 給builder設置相關選項
            ?   setContent(remoteViews)  // 設置RemoteViews
            ?   setContentIntent(intent)   // 設置view的intent事件
            ?   setContentText()        // 設置內容文字
            ?   setContentTitle()       //設置標題文字
            ?   setAutoCancel(bool) //設置自動取消
            ?   setSmallIcon().         //設置小圖標
            ?   setTicker(CharSequence tickerText)  // 設置新消息狀態欄滾動文字
            ?   setDeleteIntent(PendingIntent intent) // 設置用戶滑動刪除通知intent
            ?   setProgress(int max,int progress,boolean indeterminate) //設置進度
            ?   setWhen(long when)   // 設置發送時間
            ?   setSound(Uri sound):設定一個鈴聲,用於在通知的時候響應。傳遞一個Uri的參數,格式為“file:///mnt/sdcard/Xxx.mp3”。
            ?   setLights(int argb, int onMs, int offMs):設定前置LED燈的閃爍速率,持續毫秒數,停頓毫秒數。
            ?   setVibrate(long[] pattern):設定震動的模式,以一個long數組保存毫秒級間隔的震動。
            ?   setDefaults(int)方法設定默認響應參數,在Notification中,對它的參數使用常量定義了,我們只需使用即可:
                            --DEFAULT_ALL:鈴聲、閃光、震動均系統默認。
                            --DEFAULT_SOUND:系統默認鈴聲。
                            --DEFAULT_VIBRATE:系統默認震動。
                            --DEFAULT_LIGHTS:系統默認閃光。


                需要權限


 3.  builder.build() 創建一個Notification對象
 4.  獲取NotificationManger並發送通知
    manager=(NotificationManager)=getSystemService(Context.NOTIFICATION_SERVICE);
    manager.notify(0, noti);
1)  intent是即時發生的意圖,PendingIntent不確定發生時間的意圖
2)  用於給RemoteViews添加點擊事件
3)  PendingIntent支持啟動Activity、啟動Service,發送廣播三種意圖,對應如下方法

(Context context, int requestCode, Intent intent, int flags)
requestCode表示請求碼Private request code for the sender
flags標志,有4種
intent 意圖
    1.  FLAG_CANCEL_CURRENT:如果當前系統中已經存在一個相同的PendingIntent對象,
                    那麼就將先將已有的PendingIntent取消,然後重新生成一個PendingIntent對象。
    2.  FLAG_NO_CREATE:如果當前系統中不存在相同的PendingIntent對象,
                    系統將不會創建該PendingIntent對象而是直接返回null。
    3.  FLAG_ONE_SHOT:該PendingIntent只作用一次。在該PendingIntent對象通過send()方法觸發過
                    後,PendingIntent將自動調用cancel()進行銷毀,那麼如果你再調用send()方法的話,系統將會返回一個SendIntentException。
    4.  FLAG_UPDATE_CURRENT:如果系統中有一個和你描述的PendingIntent對等的PendingInent,
                    那麼系統將使用該PendingIntent對象,但是會使用新的Intent來更新之前PendingIntent中的Intent對象數據,
                    例如更新Intent中的Extras。
    兩個PendingInent相同條件:requestCode與Intent都相同
    Intent相同指Component與intent-filter相同(與Extras無關)
manager.notify(id, notification)發通知
    1、當id相同時,後面的通知覆蓋原來
    2、當id不同時
        --當PendingIntent不匹配時, 通知間不互相干擾,不受flags影響
        --當PendingIntent匹配時,按flags分析
            *使用FLAG_ONE_SHOT:後續的PendingIntent會和第一條保持一致,包括Extras,單擊任意一條後,其他無法打開
            *使用FLAG_CANCEL_CURRENT:只有最新的通知可以打開
            *使用FLAG_UPDATE_CURRENT:之前彈出的通知中的PendingIntent都會被更新,包括Extras,並且通知都可以打開
public RemoteViews(String packageName, int layoutId)
   layout:
FrameLayout  LinearLayout  RelativeLayout  GridLayout
  View:
AnalogClock button Chronometer ImageButton ImageView ProgressBar TextView ViewFlipper ListView GridView
         setTextViewText(int viewId,CharSequence text) 設置TextView的文本內容 第一個參數是TextView的id 第二個參數是設置的內容
        setTextViewTextSize(int viewId,int units,float size)    設置TextView的字體大小 第二個參數是字體的單位
        setTextColor(int viewId,int color)  設置TextView字體顏色
        setImageViewResource(int viewId,int srcId)  設置ImageView的圖片
        setInt(int viewId,String methodName,int value)  反射調用View對象的參數類型為Int的方法 比如上述的setImageViewResource的方法內部就是這個方法實現 因為srcId為int型參數
        setLong setBoolean  類似於setInt
        setOnClickPendingIntent(int viewId,PendingIntent pendingIntent) 添加點擊事件的方法,事件類型只能為PendingIntent
        還有很多方法,大部分是通過反射調用View的方法
        NotificationManger與AppWidgetManger通過Binder分別和運行於SystemServer的NotificationMangerService與AppWidgetMangerService進行通信
        通知欄和桌面小部件的布局分別在NotificationMangerService與AppWidgetMangerService被加載(兩者運行於SystemServer)

        1.  RemoteViews通過Binder傳遞至SystemServer進程(因為RemoteViews實現了Parcelable接口,因此它可以跨進程傳輸)
        2.  系統根據RemoteViews中的packageName, layoutId去得到該應用的資源,之後通過LayoutInflater去加載RemoteViews中的布局文件 (在SystemServer中加載的是一個普通的View,只不過相對於我們的進程他是一個RemoteView而已)
        3.  系統對View界面執行一系列的更新操作,即通過set方法提交的,但更新操作不是立即執行(在RemoteViews內部會記錄所有的更新操作),而是到RemoteViews被加載後執行
        4.  RemoteViews顯示後,再次更新時,則調用set方法並通過NotificationManger與AppWidgetManger來提交更新任務,具體更新操作在SystemServer中完成
        5.  每一次的set操作對應著一個action (對應著一個view操作,實現了Parcelable接口),RemoteViews會添加一個對應的action對象 ,當這些更新操作被提交時,這些action會被跨進程傳輸到遠程進程中並在遠程進程執行。遠程進程通過RemoteViews的apply方法進行view的更新操作(apply內部回去遍歷所有的action並執行action的apply方法),通知欄和桌面小插件在初始化界面時調用apply,後續更新界面會調用reapply。如圖示

    - RemoteViews中只支持發起PendingIntent,不支持onClickListener模式
    例:
        Intent btIntent = new Intent();
        btIntent.setAction("com.yu.sendnotification.action_dl");
        PendingIntent btPendingIntent = PendingIntent.getBroadcast(this, 1, btIntent, PendingIntent.FLAG_CANCEL_CURRENT);
        remoteViews.setOnClickPendingIntent(R.id.bt_stop, btPendingIntent);//給id為stop的view設置點擊事件

    - setPendingIntentTemplatey與setOnClickFillInIntent須結合,給ListView和StackView中的item添加點擊事件
    -不需要定義大量的Binder接口
    -通過在遠程進程中批量執行RemoteViews的修改操作從而避免了大量的IPC操作這就提高了程序性能
    -只需要操作RemoteViews即可實現效果,操作簡單
1一個應用簡單的更新另一個應用的界面,可以選擇AIDL去實現。但對界面的更新比較頻繁,這個時候就會有效率問題,同時AIDL接口就有可能使問題復雜化,此時不宜使用aidl

2. 對於界面更新比較頻繁,適宜采用RemoteView來實現就,當然remoteView也有點缺點,remoteView僅支持一些常見的View,不支持自定View
 android實現簡單的乘法計算代碼
開發環境:android4.1.實驗功能:在第一個界面中的2個乘數輸入處分別輸入2個數字,按下結果button,會自動跳到第二個界面並顯示輸入2個數字相乘的結果。如果在第
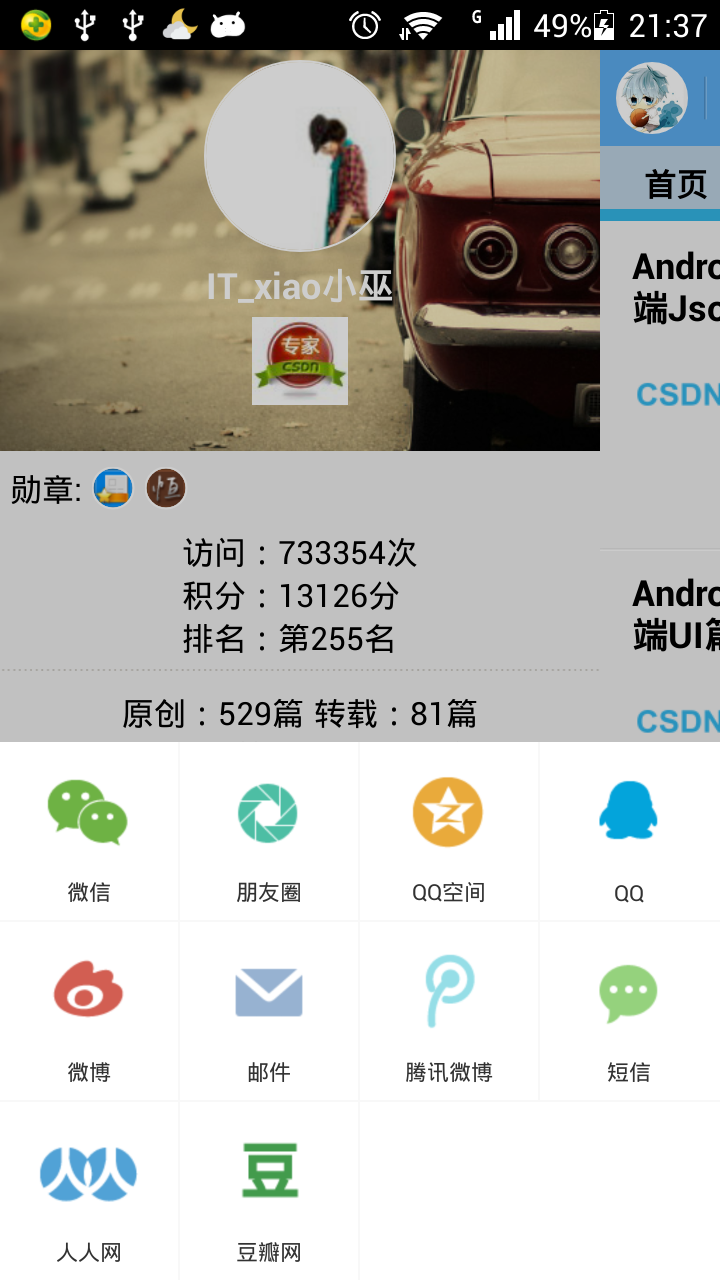 Android應用開發-小巫CSDN博客客戶端之集成友盟社會化分享組件
Android應用開發-小巫CSDN博客客戶端之集成友盟社會化分享組件 上一篇博客給大家介紹了如何分析網頁並且使用jsoup這個庫對html代碼進行解析,本篇博客繼續給大
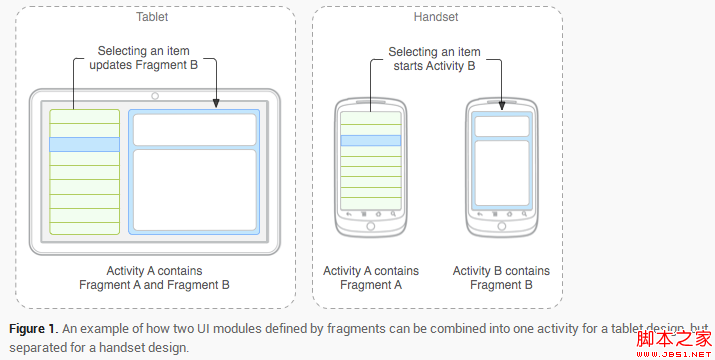 Android Fragment 基本了解(圖文介紹)
Fragment Android是在Android 3.0 (API level 11)開始引入Fragment的。 可以把Fragment想成Activity中的模塊,
 微信朋友圈怎麼轉發?微信朋友圈分享資源要轉發到我的朋友圈怎麼
微信朋友圈現在比較亂,一堆微商把裡面弄得烏煙瘴氣亂七八糟,但是有時候有些內容還是值得認可的,我們最好的支持方式就是轉發了,那麼微信朋友圈怎麼轉發?微信朋友圈
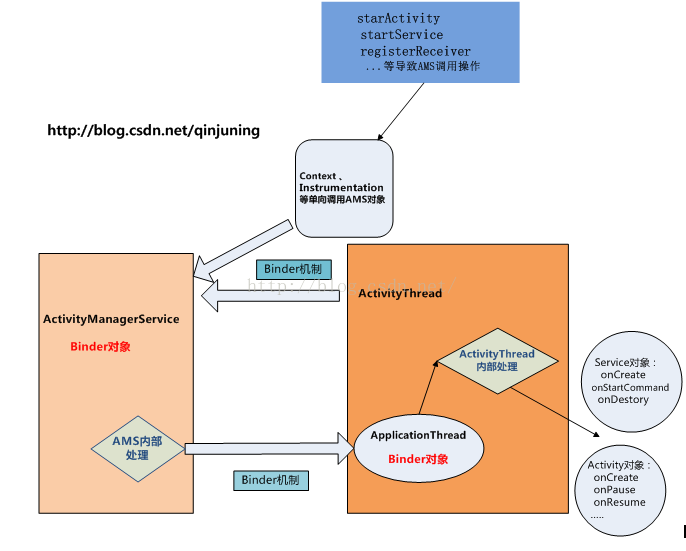 Android插件化開發之AMS與應用程序(客戶端ActivityThread、Instrumentation、Activity)通信模型分析
今天主要分析下ActivityManagerService(服務端) 與