編輯:關於Android編程
animator = ValueAnimator.ofFloat(0f, 300);
animator.setDuration(4000);
animator.start();
這段代碼僅僅是計算了動畫變化過程值,並沒有把值應用到任何對象上,如何要顯示出效果,還要注冊一個監聽器——AnimatorUpdateListener,通過getAnimatedValue()方法獲取當前幀的值,並將該值應用到指定對象上:
animator.addUpdateListener(new AnimatorUpdateListener() {
@Override
public void onAnimationUpdate(ValueAnimator animation) {
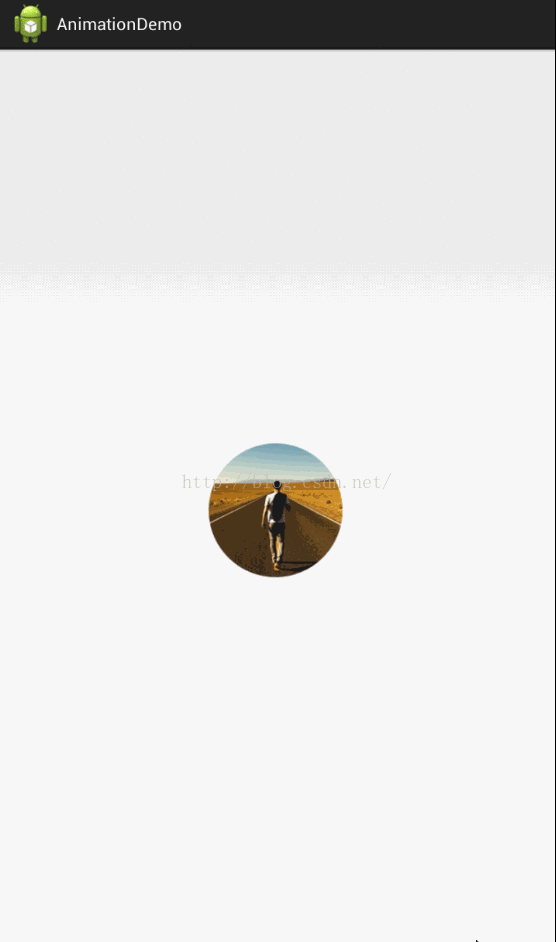
mImageView.setTranslationX( (Float)animation.getAnimatedValue());
}
});
效果如下:
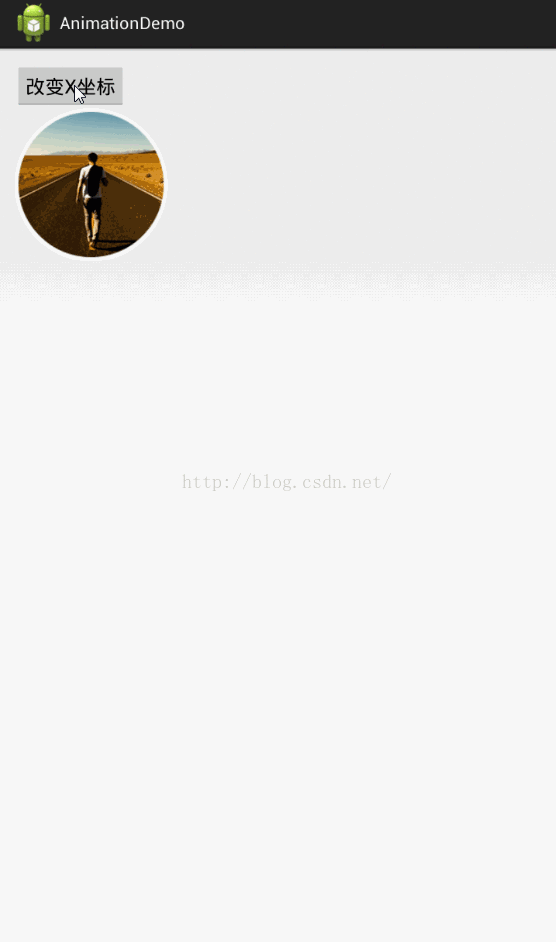 當然,我們也可以自定義一個Evaluator計算器,例如:
animator=ValueAnimator.ofObject(new CustomEvaluatour(), startVal,endVal);
animator.setDuration(1000);
animator.start();
4、使用ObjectAnimator創建動畫 ObjectAnimator繼承ValueAnimator,因此可以它能夠直接將ValueAnimator在動畫過程中計算出來的值應用到指定屬性上,所以使用ObjectAnimator就不需要注冊AnimatorUpdateListener監聽器了,下面我就以鴻洋大神的例子作為說明了 布局文件如下:
xmlns:tools="http://schemas.android.com/tools"
android:layout_width="match_parent"
android:layout_height="match_parent" >

android:onClick="changeAlpha"
android:layout_width="wrap_content"
android:layout_height="wrap_content"
android:layout_centerInParent="true"
android:src="@drawable/circle_photo" />
public class ObjectAnimatorActivity extends Activity {
@Override
protected void onCreate(Bundle savedInstanceState) {
super.onCreate(savedInstanceState);
setContentView(R.layout.activity_object_animator);
}

public void changeAlpha(final View view) {
ObjectAnimator anim = ObjectAnimator.ofFloat(view, "alpha", 1.0F, 0.2F)
.setDuration(500);//
anim.start();
}
}
效果如下: 與ValueAnimator不同的是,我們在使用ObjectAnimator還要注意以下幾點:
anim.addUpdateListener(newAnimatorUpdateListener()
{
@Override
publicvoidonAnimationUpdate(ValueAnimatoranimation)
{
//view.postInvalidate();
//view.invalidate();
}
});
上面的例子,設置的操作的屬性只有一個,如果希望一個動畫能夠讓一個View支持多個動畫怎麼辦?可能會說使用AnimatorSet就行了,但是只使用ObjectAnimator能否實現呢?下面實現下:
public void changeAlpha(final View view) {
ObjectAnimator anim = ObjectAnimator.ofFloat(view, "xmr", 1.0F, 0.2F)
.setDuration(5000);
anim.start();

anim.addUpdateListener(new AnimatorUpdateListener()
{
@Override
public void onAnimationUpdate(ValueAnimator animation)
{
float value = (Float) animation.getAnimatedValue();
view.setAlpha(value);
view.setScaleX(value);
view.setScaleY(value);
}
});
}
因為我們要在下面設置透明度,所以把設置屬性的那個字符串“alpha"隨便改一個該對象沒有的屬性,只需要它按照時間插值和持續時間計算的那個值,自己手動調用即可:
 實際上使用propertyValuesHolder也可以實現一個動畫更改多個效果:
public void changeAlpha(View view)
{
PropertyValuesHolder pvhX = PropertyValuesHolder.ofFloat("alpha", 1f,
0f, 1f);
PropertyValuesHolder pvhY = PropertyValuesHolder.ofFloat("scaleX", 1f,
0, 1f);
PropertyValuesHolder pvhZ = PropertyValuesHolder.ofFloat("scaleY", 1f,
0, 1f);
ObjectAnimator.ofPropertyValuesHolder(view, pvhX, pvhY,pvhZ).setDuration(5000).start();
}
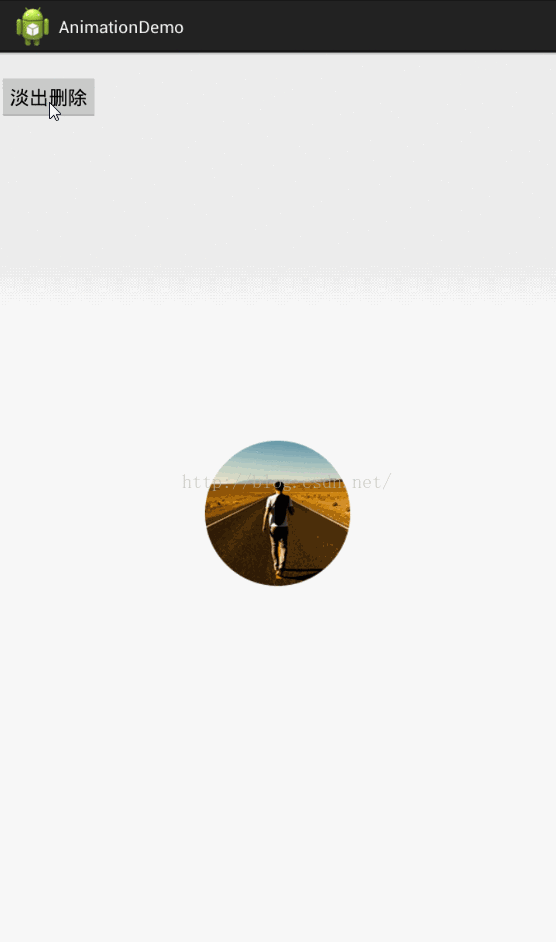
5、監聽動畫的事件 動畫一般都是做一些輔助效果,比如我要刪除個元素,我可能希望是個淡出的效果,但是最終還是要刪處,並不是你透明度沒有了,還占著位置,所以我們需要知道動畫如何結束。 所以我們可以添加一個動畫的監聽:
ublic void fadeOut(View view) {
ObjectAnimator anim = ObjectAnimator.ofFloat(mImageView, "alpha", 0.5f)
.setDuration(5000);
anim.start();

anim.addListener(new AnimatorListener() {

@Override
public void onAnimationStart(Animator animation) {
}

@Override
public void onAnimationRepeat(Animator animation) {
}

@Override
public void onAnimationEnd(Animator animation) {
ViewGroup parent = (ViewGroup) mImageView.getParent();
if (parent != null)
parent.removeView(mImageView);
}

@Override
public void onAnimationCancel(Animator animation) {
}
});
}
這個監聽器可以監聽動畫的開始、結束、被取消、重復等事件,但是有時候只要知道結束就行了,那你可以使用AnimatorListenerAdapter,AnimatorListenerAdapter繼承了AnimatorListener接口,然後空實現了所有的方法:
anim.addListener(new AnimatorListenerAdapter() {
@Override
public void onAnimationEnd(Animator animation) {
ViewGroup parent = (ViewGroup) mImageView.getParent();
if (parent != null)
parent.removeView(mImageView);
}
});
 6、AnimatorSet的使用
布局文件:
6、AnimatorSet的使用
布局文件:
xmlns:tools="http://schemas.android.com/tools"
android:layout_width="match_parent"
android:layout_height="match_parent" >

android:layout_width="match_parent"
android:layout_height="wrap_content"
android:orientation="horizontal" >

android:layout_width="wrap_content"
android:layout_height="wrap_content"
android:onClick="togetherRun"
android:text="多動畫同時執行" />

android:layout_width="wrap_content"
android:layout_height="wrap_content"
android:onClick="playWithAfter"
android:text="多動畫按次序執行" />


android:id="@+id/iv_anim"
android:layout_width="wrap_content"
android:layout_height="wrap_content"
android:layout_centerInParent="true"
android:src="@drawable/circle_photo" />
public class AnimatorSetActivity extends Activity {
private ImageView mImageView;

@Override
protected void onCreate(Bundle savedInstanceState)
{
super.onCreate(savedInstanceState);
setContentView(R.layout.activity_animator_set);

mImageView = (ImageView) findViewById(R.id.iv_anim);

}

public void togetherRun(View view)
{
ObjectAnimator anim1 = ObjectAnimator.ofFloat(mImageView, "scaleX",
1.0f, 2.0f);
ObjectAnimator anim2 = ObjectAnimator.ofFloat(mImageView, "scaleY",
1.0f, 2.0f);

AnimatorSet animSet = new AnimatorSet();
animSet.setDuration(5000);
animSet.setInterpolator(new LinearInterpolator());
//兩個動畫同時執行
animSet.playTogether(anim1, anim2);
// animSet.playSequentially(items)
animSet.start();
}

public void playWithAfter(View view)
{
float cx = mImageView.getX();

ObjectAnimator anim1 = ObjectAnimator.ofFloat(mImageView, "scaleX",
1.0f, 2.0f);
ObjectAnimator anim2 = ObjectAnimator.ofFloat(mImageView, "scaleY",
1.0f, 2.0f);
ObjectAnimator anim3 = ObjectAnimator.ofFloat(mImageView,
"x", cx , 0.0f);
ObjectAnimator anim4 = ObjectAnimator.ofFloat(mImageView,
"x", cx);

/**
* anim1,anim2,anim3同時執行
* anim4接著執行
*/
AnimatorSet animSet = new AnimatorSet();
animSet.play(anim1).with(anim2);
animSet.play(anim2).with(anim3);
animSet.play(anim4).after(anim3);
animSet.setDuration(2000);
animSet.start();
}
}
效果如下:
 有一點注意:animSet.play().with();也是支持鏈式編程的,但是不要想著狂點,比如 animSet.play(anim1).with(anim2).before(anim3).before(anim5); 這樣是不行的,系統不會根據你寫的這一長串來決定先後的順序,所以麻煩你按照上面例子的寫法,多寫幾行
好了,先說這麼多吧
有一點注意:animSet.play().with();也是支持鏈式編程的,但是不要想著狂點,比如 animSet.play(anim1).with(anim2).before(anim3).before(anim5); 這樣是不行的,系統不會根據你寫的這一長串來決定先後的順序,所以麻煩你按照上面例子的寫法,多寫幾行
好了,先說這麼多吧
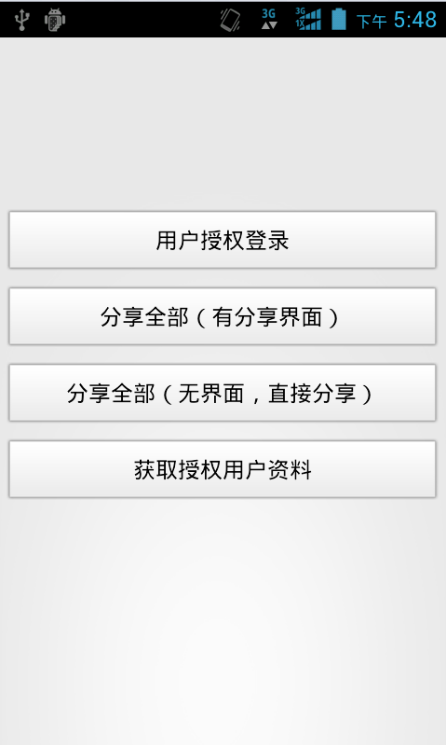 Android實現第三方授權登錄、分享以及獲取用戶資料
由於公司項目的需要,要實現在項目中使用第三方授權登錄以及分享文字和圖片等這樣的效果,幾經波折,查閱了一番資料,做了一個Demo。實現起來的效果還是不錯的,不敢獨享,決定寫
 Android自學筆記-6-簡單短信發送器
簡單實現的短信發送器,效果截圖如下: 其中的java代碼如下:package com.mxy.smssend; import java.util.ArrayList;
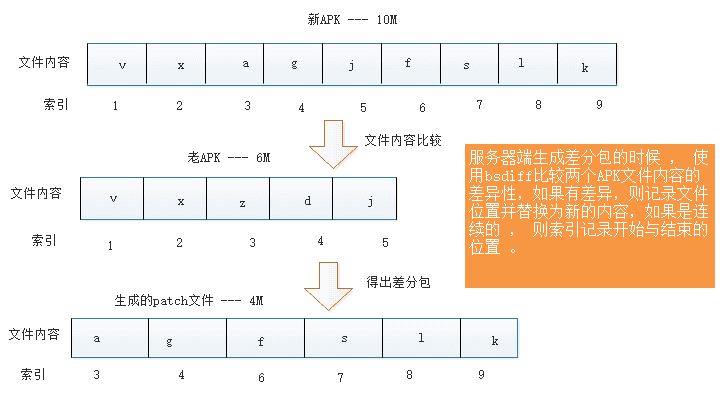 Android增量更新實現
Android增量更新技術在很多公司都在使用,網上也有一些相關的文章,但大家可能未必完全理解實現的方式,本篇博客,我將一步步的帶大家實現增量更新。為什麼需要增量更新?當我
 Android-自定義PopupWindow
Android-自定義PopupWindow2014年5月12日 PopupWindow在應用中應該是隨處可見的,很常用到,比如在舊版本的微信當中就用到下拉的Popup