編輯:關於Android編程
在上一篇Android網絡編程(九)Retrofit2前篇[基本使用]中我們了解了Retrofit的最基本的GET方式訪問網絡的寫法以及請求參數的簡單介紹。這一篇我們來詳細的了解Retrofit的請求參數。
Retrofit提供了很多的請求參數注解,使得請求網路時更加便捷。在這裡我們仍舊訪問淘寶ip庫。其中,@Path用來動態的配置URL地址。請求網絡接口代碼如下所示。
public interface IpServiceForPath {
    @GET("{path}/getIpInfo.php?ip=59.108.54.37")
    Call getIpMsg(@Path("path") String path);
}
在GET注解中包含了{path},它對應著@Path注解中的”path”,而用來替換{path}的正是需要傳入的 “String path”的值。接下來請求網絡的代碼如下所示。
String url = "http://ip.taobao.com/";
        Retrofit retrofit = new Retrofit.Builder()
                .baseUrl(url)
                .addConverterFactory(GsonConverterFactory.create())
                .build();
        IpServiceForPath ipService = retrofit.create(IpServiceForPath.class);
        Callcall=ipService.getIpMsg("service");//1
        call.enqueue(new Callback() {
            @Override
            public void onResponse(Call call, Response response) {
                String country= response.body().getData().getCountry();
                Toast.makeText(getApplicationContext(),country,Toast.LENGTH_SHORT).show();
            }
            @Override
            public void onFailure(Call call, Throwable t) {
            }
        });
在注釋1處,傳入”service”來替換 @GET注解中的{path}的值。
在上一篇中我們用@Query來動態的替換ip地址為了能更方便的得到該ip所對應的地理信息:
public interface IpServiceForQuery{
    @GET("getIpInfo.php")
    Call getIpMsg(@Query("ip")String ip);
}
但是在網絡請求中一般為了更精確的查找到我們所需要的數據,需要傳入很多的查詢參數,如果用@Query會比較麻煩,這時我們可以采用@QueryMap,將所有的參數集成在一個Map統一傳遞:
public interface IpServiceForQueryMap {
    @GET("getIpInfo.php")
    Call getIpMsg(@QueryMap Map options);
}
傳輸數據類型為鍵值對,這是我們最常用的POST請求數據類型,淘寶ip庫支持數據類型為鍵值對的POST請求:
public interface IpServiceForPost {
    @FormUrlEncoded
    @POST("getIpInfo.php")
    Call getIpMsg(@Field("ip") String first);
}
首先用到@FormUrlEncoded注解來標明這是一個表單請求,然後在getIpMsg方法中使用@Field注解來標示所對應的String類型數據的鍵,從而組成一組鍵值對進行傳遞。接下來請求網絡的代碼如下所示。
 String url = "http://ip.taobao.com/service/";
        Retrofit retrofit = new Retrofit.Builder()
                .baseUrl(url)
                .addConverterFactory(GsonConverterFactory.create())
                .build();
        IpServiceForPost ipService = retrofit.create(IpServiceForPost.class);
        Callcall=ipService.getIpMsg("59.108.54.37");
        call.enqueue(new Callback() {
            @Override
            public void onResponse(Call call, Response response) {
                String country= response.body().getData().getCountry();
                Toast.makeText(getApplicationContext(),country,Toast.LENGTH_SHORT).show();
            }

            @Override
            public void onFailure(Call call, Throwable t) {
            }
        });
我們也可以用POST方式將Gson字符串作為請求體發送到服務器,請求網絡接口代碼為:
public interface IpServiceForPostBody {
    @POST("getIpInfo.php")
    Call getIpMsg(@Body Ip ip);
}
用@Body這個注解標識參數對象即可,retrofit會將Ip對象轉換為字符串。
public class Ip {
    private String ip;
    public Ip(String ip) {
        this.ip = ip;
    }
}
請求網絡的代碼基本上都是一致的:
 String url = "http://ip.taobao.com/service/";
        Retrofit retrofit = new Retrofit.Builder()
                .baseUrl(url)
                .addConverterFactory(GsonConverterFactory.create())
                .build();
        IpServiceForPostBody ipService = retrofit.create(IpServiceForPostBody.class);
        Callcall=ipService.getIpMsg(new Ip(ip));
        call.enqueue(new Callback() {
            @Override
            public void onResponse(Call call, Response response) {
                String country= response.body().getData().getCountry();
                Log.i("wangshu","country"+country);
                Toast.makeText(getApplicationContext(),country,Toast.LENGTH_SHORT).show();
            }

            @Override
            public void onFailure(Call call, Throwable t) {

            }
        });
    }
運行程序用Fiddler抓包,如下圖所示。
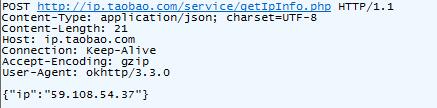
可以看到請求數據是一個Json字符串,因為淘寶ip庫並不支持此類型所以不會返回我們需要的地理信息數據。
public interface UploadFileForPart {
    @Multipart
    @POST("user/photo")
    Call updateUser(@Part MultipartBody.Part photo, @Part("description") RequestBody description);
}
Multipart注解表示允許多個@Part,updateUser方法第一個參數是准備上傳的圖片文件,使用了MultipartBody.Part類型,另一個參數是RequestBody類型,它用來傳遞簡單的鍵值對。請求網絡代碼如下所示。
...
File file = new File(Environment.getExternalStorageDirectory(), "wangshu.png");
RequestBody photoRequestBody = RequestBody.create(MediaType.parse("image/png"), file);
MultipartBody.Part photo = MultipartBody.Part.createFormData("photos", "wangshu.png", photoRequestBody);
UploadFileForPart uploadFile = retrofit.create(UploadFileForPart.class);
Call call = uploadFile.updateUser(photo, RequestBody.create(null, "wangshu"));
...
@Multipart
@POST("user/photo")
Call updateUser(@PartMap Map photos, @Part("description") RequestBody description);
和單文件上傳是類似的,只是使用Map封裝了上傳的文件,並用@PartMap注解來標示起來。其他的都一樣,這裡就不贅述了。
Http請求中,為了防止攻擊或是過濾掉不安全的訪問或是添加特殊加密的訪問等等,用來減輕服務器的壓力和保證請求的安全,通常都會在消息報頭中攜帶一些特殊的消息頭處理。Retrofit也提供了@Header來添加消息報頭。添加消息報頭有兩種方式,一種是靜態的,另一種是動態的,先來看靜態的方式,如下所示。
interface SomeService {
 @GET("some/endpoint")
 @Headers("Accept-Encoding: application/json")
 Call getCarType();
}
使用@Headers注解添加消息報頭,如果想要添加多個消息報頭,則可以使用{}包含起來:
interface SomeService {
 @GET("some/endpoint")
 @Headers({
            "Accept-Encoding: application/json",
            "User-Agent: MoonRetrofit"
    })
 Call getCarType();
}
動態的方式添加消息報頭如下所示。
interface SomeService {
 @GET("some/endpoint")
 Call getCarType(
 @Header("Location") String location);
}
使用@Header注解,可以通過調用getCarType方法來動態的添加消息報頭。
github源碼下載
 簡單的側滑菜單實現
實現思路利用自定義的HorizontalScrollView實現。 HorizontalScrollView中管理兩個視圖,一個視圖為“菜單”,另
 Android自定義Animation實現View搖擺效果
使用自定義Animation,實現View的左右搖擺效果,如圖所示:代碼很簡單,直接上源碼activity_maini.xml布局文件:<?xml vers
 java/android 使用swig編譯c/c++ 代碼類型轉換
今天被同時問到java/android 使用swig編譯c/c++ 代碼類型轉換。想起找個中文版swig看一下,雖然找到了,但也是基本是英文。中文版首頁的:http://
 Openssl CA證書生成以及雙向認證,及windows系統證書批量導出,android cer轉bks
只是途中有些問題折騰了一下,比如openssl.cnf如何來的,這個文件在編譯完openssl後,應該openssl根目錄下/apps/demoCA有個,可以把他拷貝到o