編輯:關於Android編程
??在Android開發過程中,我們幾乎每天都在跟Activity打交道。我們循規蹈矩的調用startActivity()方法便可以打開一個新的界面,但是這個界面是怎樣從無到有我們卻不是很清楚,也有很多人根本就沒有想過。我們寫的layout布局通過setContentView()方法是怎樣加載到activity中,然後又是怎樣顯示到界面上的?這一系列的問題相信大多數人都不清楚。
??也許是因為我們平時的開發過程根本不需要了解這些,但是如果深入了解後,對我們還是很有幫助的。接下來我們用3篇文章去分析一下Activity從無到顯示布局這一過程,第一篇我們就深入研究一下Activity的創建過程。
step 1. Activity.startActivtiy()??在Android系統中,我們比較熟悉的打開Activity通常有兩種方式,第一種是點擊應用程序圖標,Launcher會啟動應用程序的主Activity,我們知道Launcher其實也是一個應用程序,他是怎樣打開我們的主Activity的呢?在應用程序被安裝的時候,系統會找到AndroidManifest.xml中activity的配置信息,並將action=android.intent.action.MAIN&category=android.intent.category.LAUNCHER的activity記錄下來,形成應用程序與主Activity 的映射關系,當點擊啟動圖標時,Launcher就會找到應用程序對應的主activity並將它啟動。第二種是當主Activity啟動之後,在應用程序內部可以調用startActivity()開啟新的Activity,這種方式又可分為顯示啟動和隱式啟動。不管使用哪種方式啟動Activity,其實最終調用的都是startActivity()方法。所以如果要分析Activity的啟動過程,我們就從startActivity()方法分析。跟蹤發現Activity中重載的startActivity()方法最終都是調用startActivityForResult(intent, requestCode , bundle):
public void startActivityForResult(Intent intent, int requestCode, Bundle options) {
    //一般Activity的mParent都為null,mParent常用在ActivityGroup中,ActivityGroup已廢棄
    if (mParent == null) {
        //啟動新的Activity
        Instrumentation.ActivityResult ar =
                mInstrumentation.execStartActivity(
                        this, mMainThread.getApplicationThread(), mToken, this,
                        intent, requestCode, options);
        if (ar != null) {
            //跟蹤execStartActivity(),發現開啟activity失敗ar才可能為null,這時會調用onActivityResult
            mMainThread.sendActivityResult(
                    mToken, mEmbeddedID, requestCode, ar.getResultCode(),
                    ar.getResultData());
        }
        ...
    } else {
        //在ActivityGroup內部的Activity調用startActivity的時候會走到這裡,處理邏輯和上面是類似的
        if (options != null) {
            mParent.startActivityFromChild(this, intent, requestCode, options);
        } else {
            // Note we want to go through this method for compatibility with
            // existing applications that may have overridden it.
            mParent.startActivityFromChild(this, intent, requestCode);
        }
    }
}
??從上面的代碼可以發現,開啟activity的關鍵代碼是mInstrumentation.execStartActivity(),mInstrumentation是Activity的成員變量,用於監視系統與應用的互交。
step2. Instrumentation.execStartActivity()
public ActivityResult execStartActivity(
        Context who, IBinder contextThread, IBinder token, String target,
        Intent intent, int requestCode, Bundle options) {
    IApplicationThread whoThread = (IApplicationThread) contextThread;
    //mActivityMonitors是所有ActivityMonitor的集合,用於監視應用的Activity(記錄狀態)
    if (mActivityMonitors != null) {
        synchronized (mSync) {
            //先查找一遍看是否存在這個activity
            final int N = mActivityMonitors.size();
            for (int i=0; i= 0 ? am.getResult() : null;
                    }
                    break;
                }
            }
        }
    }
    try {
        intent.migrateExtraStreamToClipData();
        intent.prepareToLeaveProcess();
        //這裡才是真正開啟activity的地方,ActivityManagerNative中實際上調用的是ActivityManagerProxy的方法
        int result = ActivityManagerNative.getDefault()
                .startActivity(whoThread, who.getBasePackageName(), intent,
                        intent.resolveTypeIfNeeded(who.getContentResolver()),
                        token, target, requestCode, 0, null, options);
        //checkStartActivityResult方法是拋異常專業戶,它對上面開啟activity的結果進行檢查,如果無法打開activity,
        //則拋出諸如ActivityNotFoundException類似的各種異常
        checkStartActivityResult(result, intent);
    } catch (RemoteException e) {
        throw new RuntimeException("Failure from system", e);
    }
    return null;
}
??mInstrumentation的execStartActivity()方法中首先檢查activity是否能打開,如果不能打開直接返回,否則繼續調用ActivityManagerNative.getDefault().startActivity()開啟activity,然後檢查開啟結果,如果開啟失敗,會拋出異常(比如未在AndroidManifest.xml注冊)。接著我們轉入ActivityManagerNative中:
step3. ActivityManagerNative??在講解此步驟之前,先大致介紹一下ActivityManagerNative這個抽象類。ActivityManagerNative繼承自Binder(實現了IBinder),實現了IActivityManager接口,但是沒有實現他的抽象方法。
??ActivityManagerNative中有一個內部類ActivityManagerProxy,ActivityManagerProxy也實現了IActivityManager接口,並實現了IActivityManager中所有的方法。IActivityManager裡面有很多像startActivity()、startService()、bindService()、registerReveicer()等方法,它為Activity管理器提供了統一的API。
??ActivityManagerNative通過getDefault()獲取到一個ActivityManagerProxy的示例,並將遠程代理對象IBinder傳遞給他,然後調用他的starXxx方法開啟Service、Activity或者registReceiver,可以看出ActivityManagerNative只是一個裝飾類,真正工作的是其內部類ActivityManagerProxy。
①.ActivtiyManagerNative.getDefault().startActivity()
static public IActivityManager getDefault() {
    //此處返回的IActivityManager示例是ActivityManagerProxy的對象
    return gDefault.get();
}
private static final Singleton gDefault = new Singleton() {
    protected IActivityManager create() {
        //android.os.ServiceManager中維護了HashMap sCache,他是系統Service對應的IBinder代理對象的集合
        //通過名稱獲取到ActivityManagerService對應的IBinder遠程代理對象
        IBinder b = ServiceManager.getService("activity");
        if (false) {
            Log.v("ActivityManager", "default service binder = " + b);
        }
        //返回一個IActivityManager對象,這個對象實際上是ActivityManagerProxy的對象
        IActivityManager am = asInterface(b);
        if (false) {
            Log.v("ActivityManager", "default service = " + am);
        }
        return am;
    }
};
static public IActivityManager asInterface(IBinder obj) {
    if (obj == null) {
        return null;
    }
    IActivityManager in =
            (IActivityManager)obj.queryLocalInterface(descriptor);
    if (in != null) {
        return in;
    }
    //返回ActivityManagerProxy對象
    return new ActivityManagerProxy(obj);
}
??ActivityManagerNative中的方法只是獲取到ActivityManagerProxy的實例,然後調用其startActivity方法:
②.ActivtiyManagerProxy.startActivity()
public int startActivity(IApplicationThread caller, String callingPackage, Intent intent,
                         String resolvedType, IBinder resultTo, String resultWho, int requestCode,
                         int startFlags, ProfilerInfo profilerInfo, Bundle options) throws RemoteException {
    Parcel data = Parcel.obtain();
    Parcel reply = Parcel.obtain();
    //下面的代碼將參數持久化,便於ActivityManagerService中獲取
    data.writeInterfaceToken(IActivityManager.descriptor);
    data.writeStrongBinder(caller != null ? caller.asBinder() : null);
    data.writeString(callingPackage);
    intent.writeToParcel(data, 0);
    data.writeString(resolvedType);
    data.writeStrongBinder(resultTo);
    data.writeString(resultWho);
    data.writeInt(requestCode);
    data.writeInt(startFlags);
    if (profilerInfo != null) {
        data.writeInt(1);
        profilerInfo.writeToParcel(data, Parcelable.PARCELABLE_WRITE_RETURN_VALUE);
    } else {
        data.writeInt(0);
    }
    if (options != null) {
        data.writeInt(1);
        options.writeToParcel(data, 0);
    } else {
        data.writeInt(0);
    }
    //mRemote就是ActivityManagerService的遠程代理對象,這句代碼之後就進入到ActivityManagerService中了
    mRemote.transact(START_ACTIVITY_TRANSACTION, data, reply, 0);
    reply.readException();
    int result = reply.readInt();
    reply.recycle();
    data.recycle();
    return result;
}
??上面說到ActivityManagerNative才是真正干活的,他維護了ActivityManagerService的遠程代理對象mRemote ,最終會通過mRemote將開啟Activity的消息傳送給ActivityManagerService,這樣就來到了ActivityManagerService的startActivity方法中:
step4. ActivityManagerService
public final class ActivityManagerService extends ActivityManagerNative
        implements Watchdog.Monitor, BatteryStatsImpl.BatteryCallback {
    ...

    @Override
    public final int startActivity(IApplicationThread caller, String callingPackage,
                                   Intent intent, String resolvedType, IBinder resultTo, String resultWho, int requestCode,
                                   int startFlags, ProfilerInfo profilerInfo, Bundle options) {
        return startActivityAsUser(caller, callingPackage, intent, resolvedType, resultTo,
                resultWho, requestCode, startFlags, profilerInfo, options,
                UserHandle.getCallingUserId());
    }

    @Override
    public final int startActivityAsUser(IApplicationThread caller, String callingPackage,
                                         Intent intent, String resolvedType, IBinder resultTo, String resultWho, int requestCode,
                                         int startFlags, ProfilerInfo profilerInfo, Bundle options, int userId) {
        enforceNotIsolatedCaller("startActivity");
        userId = handleIncomingUser(Binder.getCallingPid(), Binder.getCallingUid(), userId,
                false, ALLOW_FULL_ONLY, "startActivity", null);
        //mStackSupervisor的類型是ActivityStackSupervisor
        return mStackSupervisor.startActivityMayWait(caller, -1, callingPackage, intent,
                resolvedType, null, null, resultTo, resultWho, requestCode, startFlags,
                profilerInfo, null, null, options, userId, null, null);
    }

    ...
}
??ActivityManagerService中startActivity()直接調用了startActivityAsUser()方法,這個方法中又調用了ActivitySupervisor的startActivityMayWait()方法:
step5. ActivityStackSupervisor.startActivityMayWait()
final int startActivityMayWait(IApplicationThread caller, int callingUid,
                               String callingPackage, Intent intent, String resolvedType,
                               IVoiceInteractionSession voiceSession, IVoiceInteractor voiceInteractor,
                               IBinder resultTo, String resultWho, int requestCode, int startFlags,
                               ProfilerInfo profilerInfo, WaitResult outResult, Configuration config,
                               Bundle options, int userId, IActivityContainer iContainer, TaskRecord inTask) {
    ...

    // Don't modify the client's object!
    intent = new Intent(intent);

    // 調用resolveActivity()根據意圖intent參數,解析目標Activity的一些信息保存到aInfo中,
    // 這些信息包括activity的name、applicationInfo、processName、theme、launchMode、permission、flags等等
    // 這都是在AndroidManifest.xml中為activity配置的
    ActivityInfo aInfo = resolveActivity(intent, resolvedType, startFlags,
            profilerInfo, userId);

    ...
    synchronized (mService) {
        //下面省略的代碼用於重新組織startActivityLocked()方法需要的參數
        ...
        //調用startActivityLocked開啟目標activity
        int res = startActivityLocked(caller, intent, resolvedType, aInfo,
                voiceSession, voiceInteractor, resultTo, resultWho,
                requestCode, callingPid, callingUid, callingPackage,
                realCallingPid, realCallingUid, startFlags, options,
                componentSpecified, null, container, inTask);
        ...

        if (outResult != null) {
            //如果outResult不為null,則設置開啟activity的結果
            outResult.result = res;
            ...

        return res;
    }
}
??根據上面傳遞的參數和應用信息重新封裝一些參數,然後調用startActivityLocked()方法:
step6. ActivityStackSupervisor.startActivityLocked()
final int startActivityLocked(IApplicationThread caller,
                              Intent intent, String resolvedType, ActivityInfo aInfo,
                              IVoiceInteractionSession voiceSession, IVoiceInteractor voiceInteractor,
                              IBinder resultTo, String resultWho, int requestCode,
                              int callingPid, int callingUid, String callingPackage,
                              int realCallingPid, int realCallingUid, int startFlags, Bundle options,
                              boolean componentSpecified, ActivityRecord[] outActivity, ActivityContainer container,
                              TaskRecord inTask) {
    int err = ActivityManager.START_SUCCESS;
    //調用者的進程信息,也就是哪個進程要開啟此Activity的
    ProcessRecord callerApp = null;
    //下面有很多if語句,用於判斷一些錯誤信息,並給err賦值相應的錯誤碼
    if (caller != null) {
        callerApp = mService.getRecordForAppLocked(caller);
        if (callerApp != null) {
            callingPid = callerApp.pid;
            callingUid = callerApp.info.uid;
        } else {
            err = ActivityManager.START_PERMISSION_DENIED;
        }
    }
    ...
    if (err == ActivityManager.START_SUCCESS && intent.getComponent() == null) {
        err = ActivityManager.START_INTENT_NOT_RESOLVED;
    }
    if (err == ActivityManager.START_SUCCESS && aInfo == null) {
        // 未找到需要打開的activity的class文件
        err = ActivityManager.START_CLASS_NOT_FOUND;
    }
    ...
    //上面判斷完成之後,接著判斷如果err不為START_SUCCESS,則說明開啟activity失敗,直接返回錯誤碼
    if (err != ActivityManager.START_SUCCESS) {
        if (resultRecord != null) {
            resultStack.sendActivityResultLocked(-1,
                    resultRecord, resultWho, requestCode,
                    Activity.RESULT_CANCELED, null);
        }
        ActivityOptions.abort(options);
        return err;
    }

    //檢查權限,有些activity在清單文件中注冊了權限,比如要開啟系統相機,就需要注冊相機權限,否則此處就會跑出異常
    final int startAnyPerm = mService.checkPermission(
            START_ANY_ACTIVITY, callingPid, callingUid);
    final int componentPerm = mService.checkComponentPermission(aInfo.permission, callingPid,
            callingUid, aInfo.applicationInfo.uid, aInfo.exported);
    if (startAnyPerm != PERMISSION_GRANTED && componentPerm != PERMISSION_GRANTED) {
        if (resultRecord != null) {
            resultStack.sendActivityResultLocked(-1,
                    resultRecord, resultWho, requestCode,
                    Activity.RESULT_CANCELED, null);
        }
        String msg;
        //權限被拒絕,拋出異常
        if (!aInfo.exported) {
            msg = "Permission Denial: starting " + intent.toString()
                    + " from " + callerApp + " (pid=" + callingPid
                    + ", uid=" + callingUid + ")"
                    + " not exported from uid " + aInfo.applicationInfo.uid;
        } else {
            msg = "Permission Denial: starting " + intent.toString()
                    + " from " + callerApp + " (pid=" + callingPid
                    + ", uid=" + callingUid + ")"
                    + " requires " + aInfo.permission;
        }
        throw new SecurityException(msg);
    }

    //★★★經過上面的判斷後,創建一個新的Activity記錄,
    // 這個ActivityRecord就是被創建的activity在歷史堆棧中的一個條目,表示一個活動
    ActivityRecord r = new ActivityRecord(mService, callerApp, callingUid, callingPackage,
            intent, resolvedType, aInfo, mService.mConfiguration, resultRecord, resultWho,
            requestCode, componentSpecified, this, container, options);
    ...
    //繼續調用startActivityUncheckedLocked()
    err = startActivityUncheckedLocked(r, sourceRecord, voiceSession, voiceInteractor,
            startFlags, true, options, inTask);
    ...
    return err;
}
??這個方法主要是判斷一些錯誤信息和檢查權限,如果沒有發現錯誤(err==START_SUCCESS)就繼續開啟activity, 否則直接返回錯誤碼。繼續查看startActivityUnChechedLocked()方法:
step7 : ActivityStackSupervisor.startActivityUncheckedLocked()
final int startActivityUncheckedLocked(ActivityRecord r, ActivityRecord sourceRecord,
                                       IVoiceInteractionSession voiceSession, IVoiceInteractor voiceInteractor, int startFlags,
                                       boolean doResume, Bundle options, TaskRecord inTask) {
    ...
    //① 獲取並配置activity配置的啟動模式
    int launchFlags = intent.getFlags();
    if ((launchFlags & Intent.FLAG_ACTIVITY_NEW_DOCUMENT) != 0 &&
            (launchSingleInstance || launchSingleTask)) {
        launchFlags &=
                ~(Intent.FLAG_ACTIVITY_NEW_DOCUMENT | Intent.FLAG_ACTIVITY_MULTIPLE_TASK);
    } else {
       ...
    }
    ...
    /*
     * 如果調用者不是來自另一個activity(不是在activity中調用startActivity),
     * 但是給了我們用於放入心activity的一個明確的task,將執行下面代碼
     *
     * 我們往上追溯,發現inTask是step4 中 ActivityManagerService.startActivityAsUser()方法傳遞的null,
     * 所以if裡面的不會執行
     */
    if (sourceRecord == null && inTask != null && inTask.stack != null) {
        ...
    } else {
        inTask = null;
    }
    //根據activity的設置,如果滿足下列條件,將launchFlags置為FLAG_ACTIVITY_NEW_TASK(創建新進程)
    if (inTask == null) {
        if (sourceRecord == null) {
            // This activity is not being started from another...  in this
            // case we -always- start a new task.
            //如果調用者為null,將launchFlags置為 創建一個新進程
            if ((launchFlags & Intent.FLAG_ACTIVITY_NEW_TASK) == 0 && inTask == null) {
                launchFlags |= Intent.FLAG_ACTIVITY_NEW_TASK;
            }
        } else if (sourceRecord.launchMode == ActivityInfo.LAUNCH_SINGLE_INSTANCE) {
            // 如果調用者的模式是SINGLE_INSTANCE,需要開啟新進程
            launchFlags |= Intent.FLAG_ACTIVITY_NEW_TASK;
        } else if (launchSingleInstance || launchSingleTask) {
            // 如果需要開啟的activity的模式是SingleInstance或者SingleTask,也需要開新進程
            launchFlags |= Intent.FLAG_ACTIVITY_NEW_TASK;
        }
    }

    ActivityInfo newTaskInfo = null;   //新進程
    Intent newTaskIntent = null;
    ActivityStack sourceStack;    //調用者所在的進程
    //下面省略的代碼是為上面三個變量賦值
    ...

    /*
     * ② 我們嘗試將新的activity放在一個現有的任務中。但是如果activity被要求是singleTask或者singleInstance,
     * 我們會將activity放入一個新的task中.下面的if中主要處理將目標進程置於棧頂,然後將目標activity顯示
     */
    if (((launchFlags & Intent.FLAG_ACTIVITY_NEW_TASK) != 0 &&
            (launchFlags & Intent.FLAG_ACTIVITY_MULTIPLE_TASK) == 0)
            || launchSingleInstance || launchSingleTask) {
        //如果被開啟的activity不是需要開啟新的進程,而是single instance或者singleTask,
        if (inTask == null && r.resultTo == null) {
            //檢查此activity是否已經開啟了,findTaskLocked()方法用於查找目標activity所在的進程
            ActivityRecord intentActivity = !launchSingleInstance ?
                    findTaskLocked(r) : findActivityLocked(intent, r.info);
            if (intentActivity != null) {
                ...
                targetStack = intentActivity.task.stack;
                ...
                //如果目標activity已經開啟,目標進程不在堆棧頂端,我們需要將它置頂
                final ActivityStack lastStack = getLastStack();
                ActivityRecord curTop = lastStack == null? null : lastStack.topRunningNonDelayedActivityLocked(notTop);
                boolean movedToFront = false;
                if (curTop != null && (curTop.task != intentActivity.task ||
                        curTop.task != lastStack.topTask())) {
                    r.intent.addFlags(Intent.FLAG_ACTIVITY_BROUGHT_TO_FRONT);
                    if (sourceRecord == null || (sourceStack.topActivity() != null &&
                            sourceStack.topActivity().task == sourceRecord.task)) {
                        ...
                        //置頂進程
                        targetStack.moveTaskToFrontLocked(intentActivity.task, r, options,
                                "bringingFoundTaskToFront");
                        ...
                        movedToFront = true;
                    }
                }
                ...
                if ((launchFlags &
                        (Intent.FLAG_ACTIVITY_NEW_TASK|Intent.FLAG_ACTIVITY_CLEAR_TASK))
                        == (Intent.FLAG_ACTIVITY_NEW_TASK|Intent.FLAG_ACTIVITY_CLEAR_TASK)) {
                    //如果調用者要求完全替代已經存在的進程
                    reuseTask = intentActivity.task;
                    reuseTask.performClearTaskLocked();
                    reuseTask.setIntent(r);
                } else if ((launchFlags&Intent.FLAG_ACTIVITY_CLEAR_TOP) != 0
                        || launchSingleInstance || launchSingleTask) {
                    //將進程堆棧中位於目標activity上面的其他activitys清理掉
                    ActivityRecord top = intentActivity.task.performClearTaskLocked(r, launchFlags);
                } else if (r.realActivity.equals(intentActivity.task.realActivity)) {
                    //如果進程最上面的activity就是目標activity,進行一些設置操作
                    ...
                } else if ((launchFlags&Intent.FLAG_ACTIVITY_RESET_TASK_IF_NEEDED) == 0) {
                    ...
                } else if (!intentActivity.task.rootWasReset) {
                    ...
                }
                if (!addingToTask && reuseTask == null) {
                    //讓目標activity顯示,會調用onResume
                    if (doResume) {
                        targetStack.resumeTopActivityLocked(null, options);
                    } else {
                        ActivityOptions.abort(options);
                    }
                    //直接返回
                    return ActivityManager.START_TASK_TO_FRONT;
                }
            }
        }
    }

    // ③ 判斷包名是否解析成功,如果包名解析不成功無法開啟activity
    if (r.packageName != null) {
        //當前處於堆棧頂端的進程和activity
        ActivityStack topStack = getFocusedStack();
        ActivityRecord top = topStack.topRunningNonDelayedActivityLocked(notTop);
        if (top != null && r.resultTo == null) {
            if (top.realActivity.equals(r.realActivity) && top.userId == r.userId) {
                if (top.app != null && top.app.thread != null) {
                    if ((launchFlags & Intent.FLAG_ACTIVITY_SINGLE_TOP) != 0
                            || launchSingleTop || launchSingleTask) {
                        ActivityStack.logStartActivity(EventLogTags.AM_NEW_INTENT, top,
                                top.task);
                        ...
                        return ActivityManager.START_DELIVERED_TO_TOP;
                    }
                }
            }
        }

    } else {
        // 包名為空,直接返回,沒有找到要打開的activity
        ...
        return ActivityManager.START_CLASS_NOT_FOUND;
    }

    // ④ 判斷activiy應該在那個進程中啟動,如果該進程中已經存在目標activity,根據啟動模式做相應處理
    ...
    // 判斷是否需要開啟新進程?
    boolean newTask = false;
    if (r.resultTo == null && inTask == null && !addingToTask
            && (launchFlags & Intent.FLAG_ACTIVITY_NEW_TASK) != 0) {
        ...
        newTask = true;   //如果有FLAG_ACTIVITY_NEW_TASK標志,將為目標activity開啟新的進程
        targetStack = adjustStackFocus(r, newTask);
        if (!launchTaskBehind) {
            targetStack.moveToFront("startingNewTask");
        }
        if (reuseTask == null) {
            r.setTask(targetStack.createTaskRecord(getNextTaskId(),
                    newTaskInfo != null ? newTaskInfo : r.info,
                    newTaskIntent != null ? newTaskIntent : intent,
                    voiceSession, voiceInteractor, !launchTaskBehind /* toTop */),
                    taskToAffiliate);
            if (DEBUG_TASKS) Slog.v(TAG, "Starting new activity " + r + " in new task " +
                    r.task);
        } else {
            r.setTask(reuseTask, taskToAffiliate);
        }
        ...
    } else if (sourceRecord != null) {
        //調用者不為空
        final TaskRecord sourceTask = sourceRecord.task;
        //默認在調用者所在進程啟動,需要將進程置前
        targetStack = sourceTask.stack;
        targetStack.moveToFront("sourceStackToFront");
        final TaskRecord topTask = targetStack.topTask();
        if (topTask != sourceTask) {
            targetStack.moveTaskToFrontLocked(sourceTask, r, options, "sourceTaskToFront");
        }
        if (!addingToTask && (launchFlags&Intent.FLAG_ACTIVITY_CLEAR_TOP) != 0) {
            //沒有FLAG_ACTIVITY_CLEAR_TOP標志時,開啟activity
            ActivityRecord top = sourceTask.performClearTaskLocked(r, launchFlags);
            if (top != null) {
                ActivityStack.logStartActivity(EventLogTags.AM_NEW_INTENT, r, top.task);
                top.deliverNewIntentLocked(callingUid, r.intent, r.launchedFromPackage);
                ...
                targetStack.resumeTopActivityLocked(null);
                return ActivityManager.START_DELIVERED_TO_TOP;
            }
        } else if (!addingToTask &&
                (launchFlags&Intent.FLAG_ACTIVITY_REORDER_TO_FRONT) != 0) {
            //如果activity在當前進程中已經開啟,清除位於他之上的activity
            final ActivityRecord top = sourceTask.findActivityInHistoryLocked(r);
            if (top != null) {
                final TaskRecord task = top.task;
                task.moveActivityToFrontLocked(top);
                ActivityStack.logStartActivity(EventLogTags.AM_NEW_INTENT, r, task);
                ...
                return ActivityManager.START_DELIVERED_TO_TOP;
            }
        }
        r.setTask(sourceTask, null);
        if (DEBUG_TASKS) Slog.v(TAG, "Starting new activity " + r + " in existing task " + r.task + " from source " + sourceRecord);

    } else if (inTask != null) {
        //在調用者指定的確定的進程中開啟目標activity
        ...
        if (DEBUG_TASKS) Slog.v(TAG, "Starting new activity " + r  + " in explicit task " + r.task);
    } else {
        ...
    }

    ...
    ActivityStack.logStartActivity(EventLogTags.AM_CREATE_ACTIVITY, r, r.task);
    targetStack.mLastPausedActivity = null;
    //⑤ 繼續調用目標堆棧ActivityStack的startActivityLocked()方法,這個方法沒有返回值,執行完畢之後直接返回START_SUCCESS
    targetStack.startActivityLocked(r, newTask, doResume, keepCurTransition, options);
    if (!launchTaskBehind) {
        // Don't set focus on an activity that's going to the back.
        mService.setFocusedActivityLocked(r, "startedActivity");
    }
    return ActivityManager.START_SUCCESS;
}
??通過第6步,新的activity記錄已經創建了,接下來就是將這個activity放入到某個進程堆棧中;

??startActivityLocked()中首先獲取activity的啟動模式(AndroidManifest.xml中為activity配置的launchMode屬性值),
啟動模式一共有四種:

	ActivityInfo.LAUNCH_MULTIPLE(standard標准)、

	ActivityInfo.LAUNCH_SINGLE_INSTANCE(全局單例)、

	ActivityInfo.LAUNCH_SINGLE_TASK(進程中單例)、

	ActivityInfo.LAUNCH_SINGLE_TOP(棧頂單例)

	不清楚的可以參考官方網站:

	http://developer.android.com/reference/android/content/pm/ActivityInfo.html
??如果目標activity已經在某個歷史進程中存在,需要根據啟動模式分別判斷並做相應處理。舉個例子:如果啟動模式為LAUNCH_SINGLE_INSTANCE,發現目標activity在某個進程中已經被啟動過,這時候就將此進程置於進程堆棧棧頂,然後清除位於目標activity之上的activity,這樣目標activity就位於棧頂了,這種情況就算是activity啟動成功,直接返回。

??通過上面的判斷處理,發現必須創建新的activity,並將其放入到某個進程中,就會進一步獲取需要棲息的進程堆棧targetStack(創建新進程or已有的進程),最後調用(ActivityStack)targetStack.startActivityLocked()方法:
step8 : ActivityStack.startActivityLocked()??ActivityStack用於管理activity的堆棧狀態,startActivityLocked()方法就是將某個activity記錄放入堆棧中,下面看看源碼:
final void startActivityLocked(ActivityRecord r, boolean newTask,
                               boolean doResume, boolean keepCurTransition, Bundle options) {
    TaskRecord rTask = r.task;
    final int taskId = rTask.taskId;
    // mLaunchTaskBehind tasks get placed at the back of the task stack.
    if (!r.mLaunchTaskBehind && (taskForIdLocked(taskId) == null || newTask)) {
        // Last activity in task had been removed or ActivityManagerService is reusing task.
        // Insert or replace.
        // Might not even be in.
        insertTaskAtTop(rTask);
        mWindowManager.moveTaskToTop(taskId);
    }
    TaskRecord task = null;
    //①.不用創建新進程的情況,需要做一些任務切換操作
    if (!newTask) {
        boolean startIt = true;
        //遍歷所有的任務,找到目標activity所在的堆棧,taskNdx為所有的task的數量,肯定是大於0
        for (int taskNdx = mTaskHistory.size() - 1; taskNdx >= 0; --taskNdx) {
            task = mTaskHistory.get(taskNdx);
            if (task.getTopActivity() == null) {
                // 如果進程中activity為空,繼續遍歷
                continue;
            }
            if (task == r.task) {
                //如果當前task==需要開啟的activity的進程
                if (!startIt) {
                    if (DEBUG_ADD_REMOVE) Slog.i(TAG, "Adding activity " + r + " to task "
                            + task, new RuntimeException("here").fillInStackTrace());
                    // 將需要啟動的activity的記錄放入task堆棧的頂層
                    task.addActivityToTop(r);
                    r.putInHistory();
                    mWindowManager.addAppToken(task.mActivities.indexOf(r), r.appToken,
                            r.task.taskId, mStackId, r.info.screenOrientation, r.fullscreen,
                            (r.info.flags & ActivityInfo.FLAG_SHOW_ON_LOCK_SCREEN) != 0,
                            r.userId, r.info.configChanges, task.voiceSession != null,
                            r.mLaunchTaskBehind);
                    ...
                    return;
                }
                break;
            } else if (task.numFullscreen > 0) {
                startIt = false;
            }
        }
    }

    //②. 在處於棧頂的進程中放置新的activity,這個activity將是即將和用戶交互的界面
    task = r.task;
    //將activity插入歷史堆棧頂層
    task.addActivityToTop(r);
    task.setFrontOfTask();
    r.putInHistory();
    if (!isHomeStack() || numActivities() > 0) {
        /*
         * 如果我們需要切換到一個新的任務,或者下一個activity不是當前正在運行的,
         * 我們需要顯示啟動預覽窗口,在這裡可能執行一切窗口切換的動畫效果
         */
        boolean showStartingIcon = newTask;
        ProcessRecord proc = r.app;
        ...
        if ((r.intent.getFlags()&Intent.FLAG_ACTIVITY_NO_ANIMATION) != 0) {
            mWindowManager.prepareAppTransition(AppTransition.TRANSIT_NONE, keepCurTransition);
            mNoAnimActivities.add(r);
        } else {
            //執行切換動畫
            mWindowManager.prepareAppTransition(...);
            mNoAnimActivities.remove(r);
        }
        mWindowManager.addAppToken(task.mActivities.indexOf(r),
                r.appToken, r.task.taskId, mStackId, r.info.screenOrientation, r.fullscreen,
                (r.info.flags & ActivityInfo.FLAG_SHOW_ON_LOCK_SCREEN) != 0, r.userId,
                r.info.configChanges, task.voiceSession != null, r.mLaunchTaskBehind);
        ...
    } else {
        /*
         * 如果需要啟動的activity的信息已經是堆棧中第一個,不需要執行動畫
         */
        mWindowManager.addAppToken(task.mActivities.indexOf(r), r.appToken,
                r.task.taskId, mStackId, r.info.screenOrientation, r.fullscreen,
                (r.info.flags & ActivityInfo.FLAG_SHOW_ON_LOCK_SCREEN) != 0, r.userId,
                r.info.configChanges, task.voiceSession != null, r.mLaunchTaskBehind);
        ...
    }
    ...
    if (doResume) {
        //此處的doResume參數為true,繼續調用ActivityStackSupervisor.resumeTopActivitiesLocked()
        mStackSupervisor.resumeTopActivitiesLocked(this, r, options);
    }
}
??這個方法中主要進行一些堆棧切換工作,將目標activity所在的堆棧置頂, 然後再棧頂放入新的activtiy記錄,最後調用mStackSupervisor.resumeTopActivitiesLocked(this, r, options)方法 將位於棧頂的activity顯示出來:
step9 : ActivityStackSupervisor.resumeTopActivitiesLocked()
boolean resumeTopActivitiesLocked(ActivityStack targetStack, ActivityRecord target,
                                  Bundle targetOptions) {
    if (targetStack == null) {
        targetStack = getFocusedStack();
    }
    // Do targetStack first.
    boolean result = false;
    //是否是棧頂的任務
    if (isFrontStack(targetStack)) {
        result = targetStack.resumeTopActivityLocked(target, targetOptions);
    }
    for (int displayNdx = mActivityDisplays.size() - 1; displayNdx >= 0; --displayNdx) {
        final ArrayList stacks = mActivityDisplays.valueAt(displayNdx).mStacks;
        for (int stackNdx = stacks.size() - 1; stackNdx >= 0; --stackNdx) {
            final ActivityStack stack = stacks.get(stackNdx);
            if (stack == targetStack) {
                // Already started above.
                continue;
            }
            if (isFrontStack(stack)) {
                //會調用resumeTopActivityLocked(ActivityRecord prev, Bundle options)
                stack.resumeTopActivityLocked(null);
            }
        }
    }
    return result;
}
??這一步緊接著調用ActivityStack.resumeTopActivityLocked():
step10 : ActivityStack.resumeTopActivityLocked()
final boolean resumeTopActivityLocked(ActivityRecord prev, Bundle options) {
    if (mStackSupervisor.inResumeTopActivity) {
        // Don't even start recursing.
        return false;
    }

    boolean result = false;
    try {
        // Protect against recursion.
        mStackSupervisor.inResumeTopActivity = true;
        if (mService.mLockScreenShown == ActivityManagerService.LOCK_SCREEN_LEAVING) {
            mService.mLockScreenShown = ActivityManagerService.LOCK_SCREEN_HIDDEN;
            mService.updateSleepIfNeededLocked();
        }
        //繼續調用resumeTopActivityInnerLocked()
        result = resumeTopActivityInnerLocked(prev, options);
    } finally {
        mStackSupervisor.inResumeTopActivity = false;
    }
    return result;
}

resumeTopActivityLocked()方法繼續調用resumeTopActivityInnerLocked()方法:

final boolean resumeTopActivityInnerLocked(ActivityRecord prev, Bundle options) {
    ...

    // We need to start pausing the current activity so the top one
    // can be resumed...
    //① 需要將現在的activity置於pausing狀態,然後才能將棧頂的activity處於resume狀態
    boolean dontWaitForPause = (next.info.flags&ActivityInfo.FLAG_RESUME_WHILE_PAUSING) != 0;
    boolean pausing = mStackSupervisor.pauseBackStacks(userLeaving, true, dontWaitForPause);
    if (mResumedActivity != null) {
        if (DEBUG_STATES) Slog.d(TAG, "resumeTopActivityLocked: Pausing " + mResumedActivity);
        pausing |= startPausingLocked(userLeaving, false, true, dontWaitForPause);
    }
    ...

    // Launching this app's activity, make sure the app is no longer
    // considered stopped.
    //② 啟動棧頂的activity
    try {
        AppGlobals.getPackageManager().setPackageStoppedState(
                next.packageName, false, next.userId); /* TODO: Verify if correct userid */
    } catch (RemoteException e1) {
    } catch (IllegalArgumentException e) {
        Slog.w(TAG, "Failed trying to unstop package "
                + next.packageName + ": " + e);
    }
    ...

    //③ 判斷棧頂activity是否啟動,如果已經啟動將其置為resume狀態,如果沒有啟動將重新啟動activity
    if (next.app != null && next.app.thread != null) {
        //如果棧頂的activity不為空,並且其thread成員(ApplicationThread)不為空,說明activity已經啟動(執行了attach())
        if (DEBUG_SWITCH) Slog.v(TAG, "Resume running: " + next);
        // This activity is now becoming visible.
        mWindowManager.setAppVisibility(next.appToken, true);
        ...
        try {
            ...
            next.sleeping = false;
            mService.showAskCompatModeDialogLocked(next);
            next.app.pendingUiClean = true;
            next.app.forceProcessStateUpTo(ActivityManager.PROCESS_STATE_TOP);
            next.clearOptionsLocked();
            //回調activity的onResume()方法
            next.app.thread.scheduleResumeActivity(next.appToken, next.app.repProcState,
                    mService.isNextTransitionForward(), resumeAnimOptions);
            ...
        } catch (Exception e) {

            //拋異常後,需要啟動activity
            mStackSupervisor.startSpecificActivityLocked(next, true, false);
            if (DEBUG_STACK) mStackSupervisor.validateTopActivitiesLocked();
            return true;
        }
        ...
    } else {
        // 否則需要重新啟動activity
        ...
        mStackSupervisor.startSpecificActivityLocked(next, true, true);
    }
    return true;
}
??在resumeTopActivityInnerLocked ()中,主要會經歷三個步驟,第一步需要將當前正在顯示的activity置於pausing狀態; 然後啟動棧頂的activity(也就是目標activity),如果目標activity已經被啟動過,會將其置於resume狀態; 否則將重新啟動activity,由於現在我們研究的acivity的啟動,所以繼續跟蹤ActivityStackSupervisor.startSpecificActivityLocked():
step11:ActivityStackSupervisor.startSpecificActivityLocked()
void startSpecificActivityLocked(ActivityRecord r,
                                 boolean andResume, boolean checkConfig) {
    //判斷activity所屬的應用程序的進程(process + uid)是否已經啟動
    ProcessRecord app = mService.getProcessRecordLocked(r.processName,
            r.info.applicationInfo.uid, true);
    r.task.stack.setLaunchTime(r);
    if (app != null && app.thread != null) {
        try {
            ...
            /*
             * ① 如果應用已經啟動,並且進程中的thread對象不為空,
             *   調用realStartActivityLocked()方法創建activity對象
             *
             *   繼續跟下去,會發現調用activity的onCreate方法
             */
            realStartActivityLocked(r, app, andResume, checkConfig);
            return;
        } catch (RemoteException e) {
            Slog.w(TAG, "Exception when starting activity "
                    + r.intent.getComponent().flattenToShortString(), e);
        }
        // If a dead object exception was thrown -- fall through to
        // restart the application.
    }
    //② 如果拋出了異常或者獲取的應用進程為空,需用重新啟動應用程序,點擊Launcher桌面上圖表時走這裡
    mService.startProcessLocked(r.processName, r.info.applicationInfo, true, 0,
            "activity", r.intent.getComponent(), false, false, true);
}
??這個方法用於判斷需要開啟的activity所在的進程是否已經啟動, 如果已經啟動,會執行第①中情況開啟activity, 如果沒有啟動,將會走第②中情況,先去啟動進程,然後在開啟activity。 由於第②種情況是一個比較完整的過程,並且後面也會調用realStartActivityLocked()方法開啟activity, 所以,我們繼續分析第②種情況:
step12: ActivityManagerService.startProcessLocked()
final ProcessRecord startProcessLocked(String processName,
                                       ApplicationInfo info, boolean knownToBeDead, int intentFlags,
                                       String hostingType, ComponentName hostingName, boolean allowWhileBooting,
                                       boolean isolated, boolean keepIfLarge) {
    return startProcessLocked(processName, info, knownToBeDead, intentFlags, hostingType,
            hostingName, allowWhileBooting, isolated, 0 /* isolatedUid */, keepIfLarge,
            null /* ABI override */, null /* entryPoint */, null /* entryPointArgs */,
            null /* crashHandler */);
}
final ProcessRecord startProcessLocked(String processName, ApplicationInfo info,
                                       boolean knownToBeDead, int intentFlags, String hostingType, ComponentName hostingName,
                                       boolean allowWhileBooting, boolean isolated, int isolatedUid, boolean keepIfLarge,
                                       String abiOverride, String entryPoint, String[] entryPointArgs, Runnable crashHandler) {
    long startTime = SystemClock.elapsedRealtime();
    ProcessRecord app;
    //isolated==false
    if (!isolated) {
        //再次檢查是否已經有以process + uid命名的進程存在
        app = getProcessRecordLocked(processName, info.uid, keepIfLarge);
        checkTime(startTime, "startProcess: after getProcessRecord");
    } else {
        app = null;
    }
    //接下來有一些if語句,用於判斷是否需要創建新進程,如果滿足下面三種情況,就不會創建新進程
    // We don't have to do anything more if:
    // (1) There is an existing application record; and
    // (2) The caller doesn't think it is dead, OR there is no thread
    //     object attached to it so we know it couldn't have crashed; and
    // (3) There is a pid assigned to it, so it is either starting or
    //     already running.
    ...

    //繼續調用startProcessLocked()真正創建新進程
    startProcessLocked(app, hostingType, hostingNameStr, abiOverride, entryPoint, entryPointArgs);
    return (app.pid != 0) ? app : null;
}

private final void startProcessLocked(ProcessRecord app, String hostingType,
                                      String hostingNameStr, String abiOverride, String entryPoint, String[] entryPointArgs) {
    ...
    try {
        //下面代碼主要是初始化新進程需要的參數
        int uid = app.uid;
        int[] gids = null;
        int mountExternal = Zygote.MOUNT_EXTERNAL_NONE;
        if (!app.isolated) {
            int[] permGids = null;
            try {
                final PackageManager pm = mContext.getPackageManager();
                permGids = pm.getPackageGids(app.info.packageName);

                ...
            } catch (PackageManager.NameNotFoundException e) {
            }
            if (permGids == null) {
                gids = new int[2];
            } else {
                gids = new int[permGids.length + 2];
                System.arraycopy(permGids, 0, gids, 2, permGids.length);
            }
            gids[0] = UserHandle.getSharedAppGid(UserHandle.getAppId(uid));
            gids[1] = UserHandle.getUserGid(UserHandle.getUserId(uid));
        }
        ...

        app.gids = gids;
        app.requiredAbi = requiredAbi;
        app.instructionSet = instructionSet;

        //是否是Activity所在的進程,此處entryPoint為null所以isActivityProcess為true
        boolean isActivityProcess = (entryPoint == null);
        if (entryPoint == null)
            entryPoint = "android.app.ActivityThread";
        /*
         * 調用Process.start接口來創建一個新的進程,並會創建一個android.app.ActivityThread類的對象,
         * 並且執行它的main函數,ActivityThread是應用程序的主線程
         */
        Process.ProcessStartResult startResult =
                Process.start(entryPoint,
                app.processName, uid, uid, gids, debugFlags, mountExternal,
                app.info.targetSdkVersion, app.info.seinfo, requiredAbi, instructionSet,
                app.info.dataDir, entryPointArgs);
        ...
    } catch (RuntimeException e) {
        //創建進程失敗
        Slog.e(TAG, "Failure starting process " + app.processName, e);
    }
}
??在第二個startProcessLocked()方法中主要進行一些判斷,判斷是否需要創建新進程;緊接著調用無返回值的startProcessLocked()方法,在這個方法中通過Process.start接口創建出新的進程。我們知道線程是程序執行的最小單元,線程棲息於進程中,每個進程在創建完畢後都會有一個主線程被開啟,在大多數變成語言中線程的入口都是通過main函數, 這裡也不例外,當進程創建完畢後,進程的主線程就被創建了,並會調用其main方法,Android中ActivityThread就代表著主線程,接著我們來到ActivityThread:
step13: ActivityThread
public final class ActivityThread {
    final ApplicationThread mAppThread = new ApplicationThread();
    //新的進程創建後就會執行這個main方法
    public static void main(String[] args) {
        ...

        Looper.prepareMainLooper();

        //創建一個ActivityThread實例,並調用他的attach方法
        ActivityThread thread = new ActivityThread();
        thread.attach(false);
        ...

        if (false) {
            Looper.myLooper().setMessageLogging(new
                    LogPrinter(Log.DEBUG, "ActivityThread"));
        }
        ...
        //進入消息循環
        Looper.loop();

        throw new RuntimeException("Main thread loop unexpectedly exited");
    }

    private void attach(boolean system) {
        sCurrentActivityThread = this;
        mSystemThread = system;
        if (!system) {
            ...
            /*
             * ActivityManagerNative.getDefault()方法返回的是一個ActivityManagerProxy對象,
             * ActivityManagerProxy實現了IActivityManager接口,並維護了一個mRemote,
             * 這個mRemote就是ActivityManagerService的遠程代理對象
             */
            final IActivityManager mgr = ActivityManagerNative.getDefault();
            try {
                //調用attachApplication(),並將mAppThread傳入,mAppThread是ApplicationThread類的示例,他的作用是用來進程間通信的
                mgr.attachApplication(mAppThread);
            } catch (RemoteException ex) {
                // Ignore
            }
            ...
        } else {
           ...
        }
     ...
    }
}
??ActivityThread是應用程序進程中的主線程,他的作用是調度和執行activities、廣播和其他操作。 main方法開啟了消息循環機制,並調用attach()方法,attach()方法會調用ActivityManagerNative.getDefault()獲取到一個ActivityManagerProxy示例,上面step3中我們講解了ActivityManagerNative這個類,ActivityManagerProxy中維護了ActivityManagerService的遠程代理對象mRemote; 然後會調用attachApplication()方法通過mRemote調用到ActivityManagerService的attachApplication()中, 傳入的mAppThread是ApplicationThread類型,mAppThread實際上通過Handler實現ActivityManagerService與ActivityThread的消息通信。
step14: ActivityManagerProxy.attachApplication() (ActivityManagerNative內部類)
public void attachApplication(IApplicationThread app) throws RemoteException
{
    Parcel data = Parcel.obtain();
    Parcel reply = Parcel.obtain();
    data.writeInterfaceToken(IActivityManager.descriptor);
    data.writeStrongBinder(app.asBinder());
    mRemote.transact(ATTACH_APPLICATION_TRANSACTION, data, reply, 0);
    reply.readException();
    data.recycle();
    reply.recycle();
}
??attachApplication()接受IApplicationThread實例,step13中attach()方法傳入的ApplicationThread實現了IApplicationThread,然後通過ActivityManagerService的遠程代理對象mRemote,進入ActivityManagerService的attachApplication():
step15: ActivityManagerService.attachApplication()
@Override
public final void attachApplication(IApplicationThread thread) {
    synchronized (this) {
        int callingPid = Binder.getCallingPid();
        final long origId = Binder.clearCallingIdentity();
        //接著調用attachApplicationLocked()
        attachApplicationLocked(thread, callingPid);
        Binder.restoreCallingIdentity(origId);
    }
}

private final boolean attachApplicationLocked(IApplicationThread thread,
                                              int pid) {
    //① 獲取到進程
    ProcessRecord app;
    if (pid != MY_PID && pid >= 0) {
        synchronized (mPidsSelfLocked) {
            app = mPidsSelfLocked.get(pid);
        }
    } else {
        app = null;
    }
    if (app == null) {
        if (pid > 0 && pid != MY_PID) {
            ...
            Process.killProcessQuiet(pid);
        } else {
            thread.scheduleExit();
            ...
        }
        return false;
    }
    ...
    //② 對app的一些成員變量進行初始化
    app.makeActive(thread, mProcessStats);
    app.curAdj = app.setAdj = -100;
    app.curSchedGroup = app.setSchedGroup = Process.THREAD_GROUP_DEFAULT;
    app.forcingToForeground = null;
    updateProcessForegroundLocked(app, false, false);
    app.hasShownUi = false;
    app.debugging = false;
    app.cached = false;
    app.killedByAm = false;

    ...
    boolean normalMode = mProcessesReady || isAllowedWhileBooting(app.info);
    ...
    boolean badApp = false;
    boolean didSomething = false;

    // See if the top visible activity is waiting to run in this process...
    /*
     * ③ 檢查當前進程中頂端的activity是否等著被運行,這個頂端的activity就是我們要啟動的activity;
     *
     *    此處適用於需要為activity創建新進程的情況(比如點擊Launcher桌面上的圖標啟動應用,或者打開配置了process的activity)
     *
     *    如果應用程序已經啟動,在應用程序內部啟動activity(未配置process)不會創建進程,這種情況回到step11中的第①步直接開啟activity
     */
    if (normalMode) {
        try {
            if (mStackSupervisor.attachApplicationLocked(app)) {
                didSomething = true;
            }
        } catch (Exception e) {
            Slog.wtf(TAG, "Exception thrown launching activities in " + app, e);
            badApp = true;
        }
    }

    // Find any services that should be running in this process...
    //④ 查找當前進程中應該啟動的服務,並將其啟動
    if (!badApp) {
        try {
            didSomething |= mServices.attachApplicationLocked(app, processName);
        } catch (Exception e) {
            Slog.wtf(TAG, "Exception thrown starting services in " + app, e);
            badApp = true;
        }
    }

    // Check if a next-broadcast receiver is in this process...
    //⑤ 查找當前進程中應該注冊的廣播
    if (!badApp && isPendingBroadcastProcessLocked(pid)) {
        try {
            didSomething |= sendPendingBroadcastsLocked(app);
        } catch (Exception e) {
            // If the app died trying to launch the receiver we declare it 'bad'
            Slog.wtf(TAG, "Exception thrown dispatching broadcasts in " + app, e);
            badApp = true;
        }
    }
    // Check whether the next backup agent is in this process...
    ...

    return true;
}
??attachApplication()方法調用了attachApplicationLocked()方法, 在step12中,我們創建了一個ProcessRecord,這裡通過進程的pid將他取出來,賦值給app, 並初始化app的一些成員變量,然後為當前進程啟動頂層activity、一些服務和廣播; 這裡我們就不深入研究到底啟動的是那些,我們主要研究activity的啟動,所以重點看第③步,_ step6_中最後創建了一個ActivityRecord實例r,這個r只是進程堆棧中的一個活動記錄, 然後再step8中將這個r插入到堆棧最頂端,所以這個r相當於一個占位,並不是真正啟動的Activity, 真正啟動Activity需要判斷進程是否存在,如果存在就直接啟動,如果不存在需要啟動進程後再執行此處第③步調用ActivityStackSupervisor.attachApplicationLocked(ProcessRecord)方法:
step16: ActivityStackSupervisor.attachApplicationLocked(ProcessRecord)
boolean attachApplicationLocked(ProcessRecord app) throws RemoteException {
    final String processName = app.processName;
    boolean didSomething = false;
    for (int displayNdx = mActivityDisplays.size() - 1; displayNdx >= 0; --displayNdx) {
        ArrayList stacks = mActivityDisplays.valueAt(displayNdx).mStacks;
        for (int stackNdx = stacks.size() - 1; stackNdx >= 0; --stackNdx) {
            //遍歷進程中的堆棧,找到最頂層的堆棧
            final ActivityStack stack = stacks.get(stackNdx);
            if (!isFrontStack(stack)) {
                continue;
            }
            //
            /*
             * 獲取位於頂層堆棧中棧頂的activity,這個activity就是目標activity(需要被啟動的);
             * 這個hr就是step6中創建的ActivityRecord實例r
             */
            ActivityRecord hr = stack.topRunningActivityLocked(null);
            if (hr != null) {
                if (hr.app == null && app.uid == hr.info.applicationInfo.uid
                        && processName.equals(hr.processName)) {
                    try {
                        //調用realStartActivityLocked()方法啟動activity,同step11中的第①步
                        if (realStartActivityLocked(hr, app, true, true)) {
                            didSomething = true;
                        }
                    } catch (RemoteException e) {
                        Slog.w(TAG, "Exception in new application when starting activity "
                                + hr.intent.getComponent().flattenToShortString(), e);
                        throw e;
                    }
                }
            }
        }
    }
    if (!didSomething) {
        ensureActivitiesVisibleLocked(null, 0);
    }
    return didSomething;
}
??這個方法中首先遍歷進程中的堆棧,找到位於頂層的堆棧,然後調用topRunningActivityLocked() 獲取位於棧頂的ActivityRecord記錄,最後調用realStartActivityLocked()方法啟動activity:
★★★step17: ActivityStackSupervisor.realStartActivityLocked()
final boolean realStartActivityLocked(ActivityRecord r,
                                      ProcessRecord app, boolean andResume, boolean checkConfig)
        throws RemoteException {
    ...

    r.app = app;
    ...

    int idx = app.activities.indexOf(r);
    if (idx < 0) {
        app.activities.add(r);
    }
    final ActivityStack stack = r.task.stack;

    try {
        ...
        List results = null;
        List newIntents = null;
        if (andResume) {
            results = r.results;
            newIntents = r.newIntents;
        }
        ...
        //
        app.thread.scheduleLaunchActivity(new Intent(r.intent), r.appToken,
                System.identityHashCode(r), r.info, new Configuration(mService.mConfiguration),
                r.compat, r.launchedFromPackage, r.task.voiceInteractor, app.repProcState,
                r.icicle, r.persistentState, results, newIntents, !andResume,
                mService.isNextTransitionForward(), profilerInfo);
       ...
    } catch (RemoteException e) {
        if (r.launchFailed) {
            //This is the second time we failed -- finish activity and give up.
            ...
            return false;
        }
        // This is the first time we failed -- restart process and retry.
        app.activities.remove(r);
        throw e;
    }
    ...

    return true;
}
??這個方法調用app.thread.scheduleLaunchActivity()真正的啟動一個activity, 這裡thread是IApplicationThread的實例,也就是ActivityThread中的成員變量ApplicationThread mAppThread; 在step15的第②步初始化app時調用app.makeActive(thread, mProcessStats)為其賦值的。 我們接著看看ApplicationThread.scheduleLaunchActivity():
step18: ApplicationThread.scheduleLaunchActivity()
@Override
public final void scheduleLaunchActivity(Intent intent, IBinder token, int ident,
                                         ActivityInfo info, Configuration curConfig, Configuration overrideConfig,
                                         CompatibilityInfo compatInfo, String referrer, IVoiceInteractor voiceInteractor,
                                         int procState, Bundle state, PersistableBundle persistentState,
                                         List pendingResults, List pendingNewIntents,
                                         boolean notResumed, boolean isForward, ProfilerInfo profilerInfo) {
    updateProcessState(procState, false);

    ActivityClientRecord r = new ActivityClientRecord();

    r.token = token;
    r.ident = ident;
    r.intent = intent;
    r.referrer = referrer;
    r.voiceInteractor = voiceInteractor;
    r.activityInfo = info;
    r.compatInfo = compatInfo;
    r.state = state;
    r.persistentState = persistentState;

    r.pendingResults = pendingResults;
    r.pendingIntents = pendingNewIntents;

    r.startsNotResumed = notResumed;
    r.isForward = isForward;

    r.profilerInfo = profilerInfo;

    r.overrideConfig = overrideConfig;
    updatePendingConfiguration(curConfig);

    sendMessage(H.LAUNCH_ACTIVITY, r);
}
??ActivityThread中有一個H的成員變量,它是一個Handler, 專門接受ApplicationThread發送的消息,然後調用ActivityThread中的方法, 我們看看H是怎樣處理消息的:
step19:ActivityThread.H
public final class ActivityThread {
    ...
    final ApplicationThread mAppThread = new ApplicationThread();
    final H mH = new H();

    private void sendMessage(int what, Object obj) {
        sendMessage(what, obj, 0, 0, false);
    }
    ...
    private void sendMessage(int what, Object obj, int arg1, int arg2, boolean async) {
        if (DEBUG_MESSAGES) Slog.v(
                TAG, "SCHEDULE " + what + " " + mH.codeToString(what)
                        + ": " + arg1 + " / " + obj);
        Message msg = Message.obtain();
        msg.what = what;
        msg.obj = obj;
        msg.arg1 = arg1;
        msg.arg2 = arg2;
        if (async) {
            msg.setAsynchronous(true);
        }
        mH.sendMessage(msg);
    }

    private class H extends Handler {
        public void handleMessage(Message msg) {
            if (DEBUG_MESSAGES) Slog.v(TAG, ">>> handling: " + codeToString(msg.what));
            switch (msg.what) {
                case LAUNCH_ACTIVITY: {     //啟動activity
                    ...
                    handleLaunchActivity(r, null);
                    ...
                }
                break;
                case RELAUNCH_ACTIVITY: {   //重新啟動activity
                    ...
                    handleRelaunchActivity(r);
                    ...
                }
                break;
                case PAUSE_ACTIVITY:        //activity失去焦點
                    ...
                    handlePauseActivity((IBinder) msg.obj, false, (msg.arg1 & 1) != 0, msg.arg2,
                            (msg.arg1 & 2) != 0);
                    ...
                    break;
                ...
                case RESUME_ACTIVITY:       //activity獲取焦點
                    Trace.traceBegin(Trace.TRACE_TAG_ACTIVITY_MANAGER, "activityResume");
                    handleResumeActivity((IBinder) msg.obj, true, msg.arg1 != 0, true);
                    Trace.traceEnd(Trace.TRACE_TAG_ACTIVITY_MANAGER);
                    break;
                ...
            }
        }
    }
}
??step18中調用sendMessage(H.LAUNCH_ACTIVITY, r)之後,mH會收到一個LAUNCH_ACTIVITY消息, 然後調用了ActivityThread.handleLaunchActivity(r, null):
step20:ActivityThread.handleLaunchActivity(r, null)
private void handleLaunchActivity(ActivityClientRecord r, Intent customIntent) {
    ...
    //創建Activity對象,並初始化,然後調用activity.attach()和onCreate()
    Activity a = performLaunchActivity(r, customIntent);
    if (a != null) {
        r.createdConfig = new Configuration(mConfiguration);
        Bundle oldState = r.state;
        //調用activity.onResume()
        handleResumeActivity(r.token, false, r.isForward,
                !r.activity.mFinished && !r.startsNotResumed);

        ...
    } else {
        ...
    }
}
??這裡首先調用performLaunchActivity()方法創建Activity對象(調用它的attach()和onCreate()方法), 然後調用handleResumeActivity函數來使這個Activity進入Resumed狀態,並回調這個Activity的onResume函數。我們接著看看performLaunchActivity()方法中做了什麼:
step21: ActivityThread.performLaunchActivity()
 private Activity performLaunchActivity(ActivityClientRecord r, Intent customIntent) {
    //① 收集要啟動的Activity的相關信息,主要package和component
    ActivityInfo aInfo = r.activityInfo;
    ...
    ComponentName component = r.intent.getComponent();
    ...

    Activity activity = null;
    try {
        //② 通過類加載器將activity的類加載進來,然後創建activity對象
        java.lang.ClassLoader cl = r.packageInfo.getClassLoader();
        activity = mInstrumentation.newActivity(
                cl, component.getClassName(), r.intent);
        StrictMode.incrementExpectedActivityCount(activity.getClass());
        r.intent.setExtrasClassLoader(cl);
        r.intent.prepareToEnterProcess();
        if (r.state != null) {
            r.state.setClassLoader(cl);
        }
    } catch (Exception e) {
        ...
    }

    try {
        //③ 創建Application,也就是AndroidManifest.xml配置的
        Application app = r.packageInfo.makeApplication(false, mInstrumentation);
        ...
        if (activity != null) {
            //④ 創建Activity的上下文Content,並通過attach方法將這些信息設置到Activity中去
            Context appContext = createBaseContextForActivity(r, activity);
            CharSequence title = r.activityInfo.loadLabel(appContext.getPackageManager());
            Configuration config = new Configuration(mCompatConfiguration);

            //⑤ 調用activity的attach()方法,這個方法的作用主要是為activity初始化一些成員變量
            activity.attach(appContext, this, getInstrumentation(), r.token,
                    r.ident, app, r.intent, r.activityInfo, title, r.parent,
                    r.embeddedID, r.lastNonConfigurationInstances, config,
                    r.referrer, r.voiceInteractor);

            if (customIntent != null) {
                activity.mIntent = customIntent;
            }
            r.lastNonConfigurationInstances = null;
            activity.mStartedActivity = false;
            int theme = r.activityInfo.getThemeResource();
            if (theme != 0) {
                activity.setTheme(theme);
            }

            activity.mCalled = false;
            /*
             * ⑥ 通過mInstrumentation調用activity的onCreate()方法,
             *    mInstrumentation的作用是監控Activity與系統的交互操做。
             *    這時候activity的生命周期就開始了
             */
            if (r.isPersistable()) {
                mInstrumentation.callActivityOnCreate(activity, r.state, r.persistentState);
            } else {
                mInstrumentation.callActivityOnCreate(activity, r.state);
            }
            //下面主要為堆棧中的ActivityClientRecord設置一些數據
            ...
            r.activity = activity;
            r.stopped = true;
            if (!r.activity.mFinished) {
                activity.performStart();
                r.stopped = false;
            }
            ...
        }
        r.paused = true;
        ...
    } catch (SuperNotCalledException e) {
        throw e;

    } catch (Exception e) {
        if (!mInstrumentation.onException(activity, e)) {
            throw new RuntimeException(
                    "Unable to start activity " + component
                            + ": " + e.toString(), e);
        }
    }

    return activity;
}
??performLaunchActivity ()中首先根據activity的className加載類文件,並創建activity實例,然後初始化上下文Context,並調用attach()方法初始化activity,最後通過mInstrumentation回調activity的onCreate()方法,這樣Activity算是創建完成了。
??這篇博客涉及到的內容還是比較多,每個過程中主要的代碼注釋已經標示的比較清楚了,還有些細節問題有興趣的可以更加深入的去研究,相信如果弄懂這個流程後,再去深入也不是什麼難事了。項目中framwork層的源碼都是參照android5.0版本,如果下載源碼有問題的同學可以在本篇博客末尾下載博客研究的工程(主要的源碼已經摘錄放入到工程中),也可以參考http://grepcode.com/project/repository.grepcode.com/java/ext/com.google.android/android/。
接下來對本篇博客稍作總結:
step1-step3:通過Binder機制將創建activity的消息傳給ActivityManagerService
step4-step8:根據activity的啟動模式判斷activity是否應該重新創建,還是只需要置於棧頂,並將目標activity記錄放在棧頂
step9-step10:判斷activity是否已經創建,如果已經創建將直接置於resume狀態,如果沒有創建便重新開啟
step11-step12:判斷activity所屬的進程是否創建,如果沒有創建將啟動新的進程,如果創建了就直接啟動activity
step13-step15:進程的主線程執行ActivityThread的main方法,然後初始化進程相關的東西
step16-step21:實例化棧頂的activity對象,並調用Activity.attach()初始化,回調onCreate()生命周期方法;然後調用ActivityThread.handleResumeActivity()使activity處於resume狀態
下一篇博客我們將一起探討Activity加載Layout的過程
源碼工程:https://github.com/openXu/AndroidActivityLaunchProgress
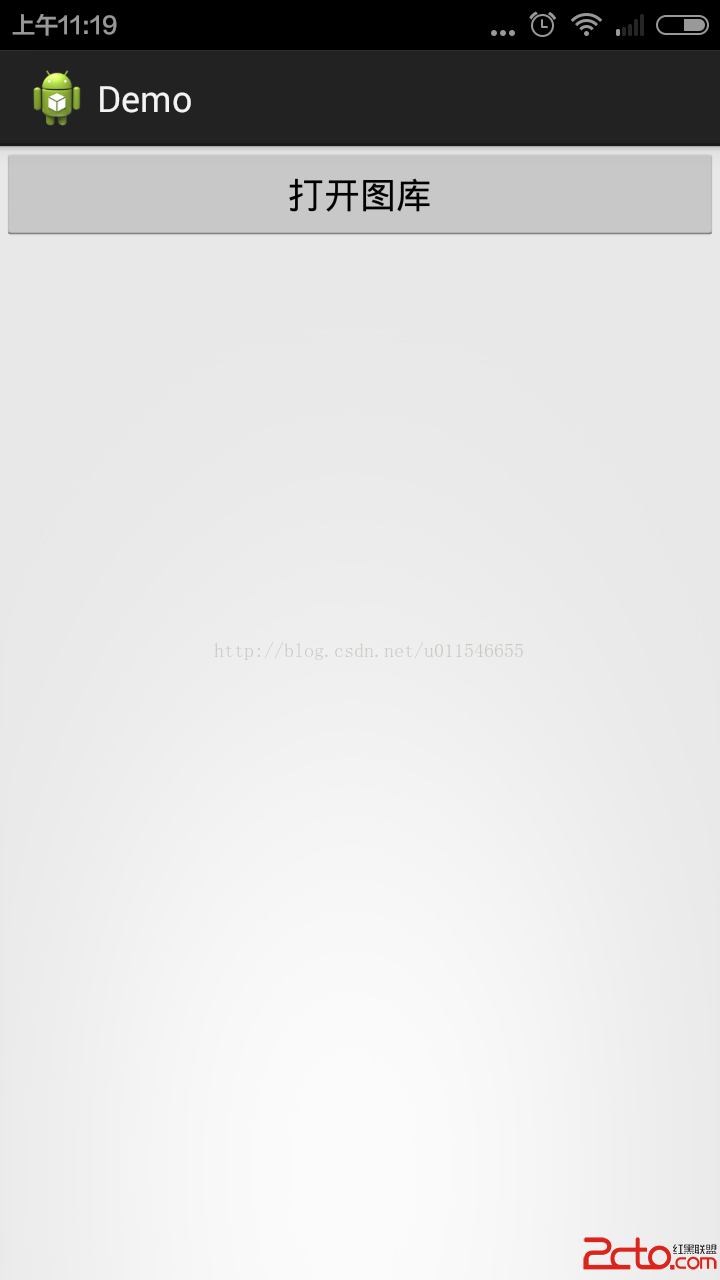 Android 打開Gallery
小demo一個,今天用到了,那麼就分享給大家,希望對大家有所收獲 先上效果圖: 示例源碼: 1.添加訪問sd卡權限 2.源碼 package com
 基於海思媒體庫視頻H264打包成RTP包
1.首先我們先引用網上介紹RTP數據包RTP數據包格式: 0 1 2 3 4 5 6 7 8 9 0 1 2 3 4 5 6 7 8 9 0 1 2 3 4 5
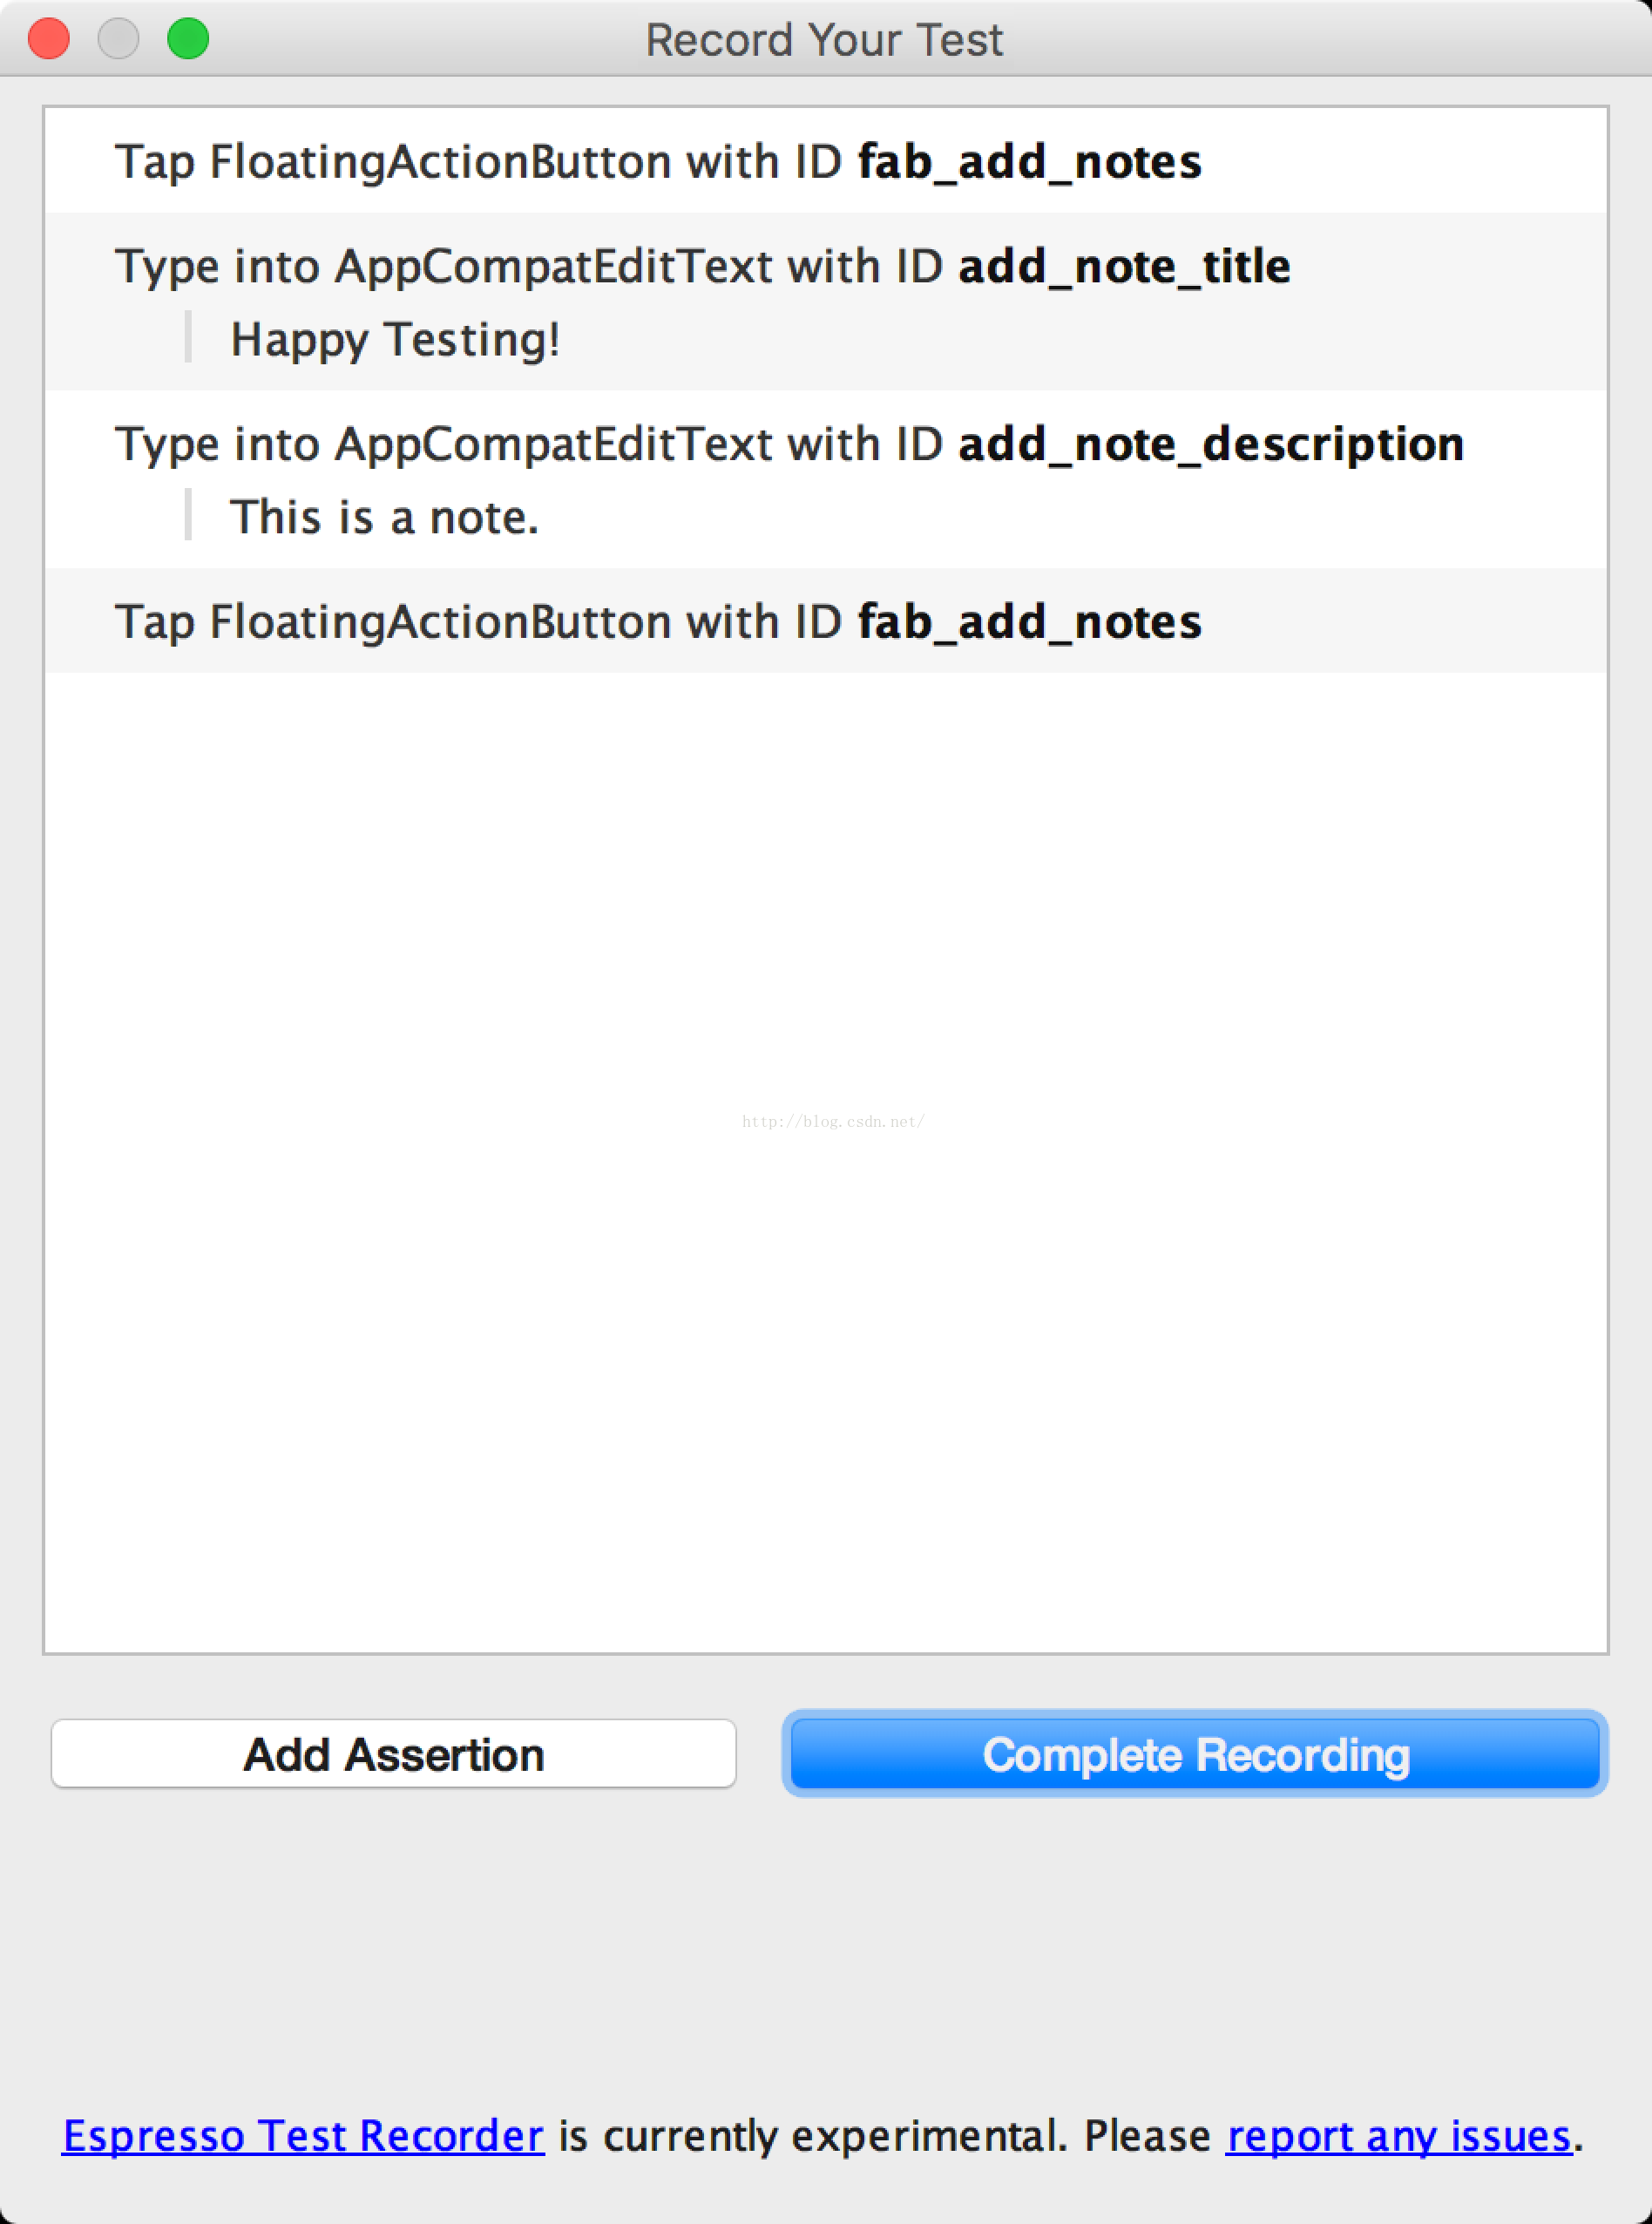 Android Studio 2.2 Espresso Test Recorder 通過錄制測試過程實現測試
通過Espresso測試錄制器來創建UI注意:Espresso測試記錄器在Android Stuido 2.2中只是一個測試版。工具Espresso測試錄制器可以讓你不寫
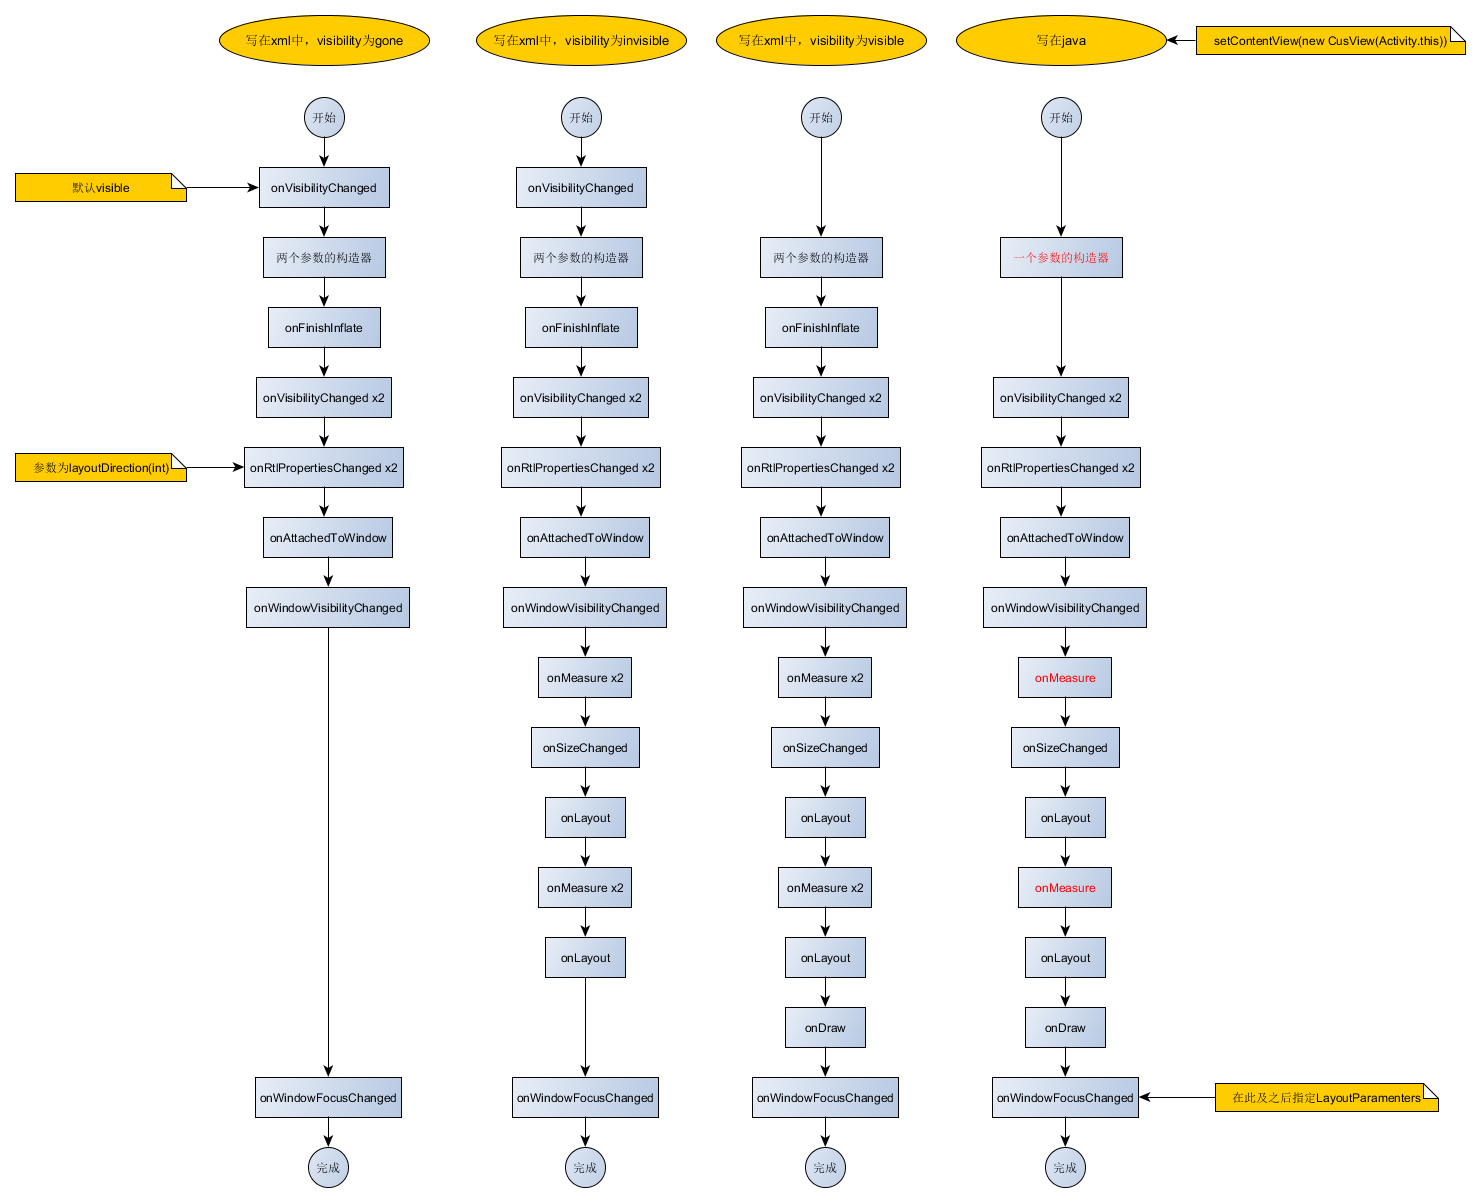 Android自助餐之View生命周期
直接給圖,一目了然!