編輯:關於Android編程
前言:開發中接觸了不少網絡請求的框架,包括Volley,HttpCliet AsyncHttpClient,Okhttp,OkhttpUtils,HttpUrlConnection,Retrofit。雖說一個項目頂多使用一種框架,但是 我們難免接觸基於不同框架下開發的app,所以認識和了解它們就顯得很有必要,而且,我很確定在你手中項目的基礎上你可以很熟練的使用項目依賴的框架進行網絡的訪問請求,但是拋開你的項目,我感覺你會和我一樣變得像一個idiot,只記得他們大概的使用情形,但是具體寫每一行的代碼,會讓你無從下手,所以在此總結各種網絡請求框架的使用方法就很有必要啦。
1、Volley
Volley是Goole在2013年Google I/O大會上推出了一個新的網絡通信框架,它是開源的。Volley 的特點:特別適合數據量小,通信頻繁的網絡操作。
優點
1. 創建一個RequestQueue對象。
2. 創建一個StringRequest對象。
3. 將StringRequest對象添加到RequestQueue裡面。
GET:
RequestQueue mQueue = Volley.newRequestQueue(context);
	StringRequest stringRequest = new StringRequest("http://www.baidu.com",
                        new Response.Listener() {
                            @Override
                            public void onResponse(String response) {
                                Log.d("TAG", response);
                            }
                        }, new Response.ErrorListener() {
                            @Override
                            public void onErrorResponse(VolleyError error) {
                                Log.e("TAG", error.getMessage(), error);
                            }
                        });
mQueue.add(stringRequest);POST:
StringRequest stringRequest = new StringRequest(Method.POST, url, listener, errorListener) { @Override protected Map getParams() throws AuthFailureError { Map map = new HashMap(); map.put("params1", "value1"); map.put("params2", "value2"); return map; } };
有關Volley的用法可以參考郭神文章:點擊打開鏈接
2、HttpClient
在Android開發中,Android SDK附帶了Apache的HttpClient,它是一個完善的客戶端。它提供了對HTTP協議的全面支持,可以使用HttpClient的對象來執行HTTP GET和HTTP POST調用。
使用步驟:
1.使用DefaultHttpClient類實例化HttpClient對象
2.創建HttpGet或HttpPost對象,將要請求的URL通過構造方法傳入HttpGet或HttpPost對象。
3.調用execute方法發送HTTP GET或HTTP POST請求,並返回HttpResponse對象。
4.通過HttpResponse接口的getEntity方法返回響應信息,並進行相應的處理。
GET:
	try {
            //得到HttpClient對象
            HttpClient getClient = new DefaultHttpClient();
            //得到HttpGet對象
            HttpGet request = new HttpGet(uri);
            //客戶端使用GET方式執行請教,獲得服務器端的回應response
            HttpResponse response = getClient.execute(request);
            //判斷請求是否成功
            if(response.getStatusLine().getStatusCode()==HttpStatus.SC_OK){
                Log.i(TAG_STRING, "請求服務器端成功");
                //獲得輸入流
                InputStream  inStrem = response.getEntity().getContent();
                int result = inStrem.read();
                while (result != -1){
                    System.out.print((char)result);
                    result = inStrem.read();
                }
                //關閉輸入流
                inStrem.close();
            }else {
                Log.i(TAG_STRING, "請求服務器端失敗");
            }
        } catch (Exception e) {
            // TODO Auto-generated catch block
            e.printStackTrace();
        }
POST:
 	BufferedReader in = null;
        try {
            HttpClient client = new DefaultHttpClient();
            HttpPost request = new HttpPost("http://code.google.com/android/");
            //使用NameValuePair來保存要傳遞的Post參數
            List postParameters = new ArrayList();
            //添加要傳遞的參數
            postParameters.add(new BasicNameValuePair("id", "12345"));
            postParameters.add(new BasicNameValuePair("username", "dave"));
            //實例化UrlEncodedFormEntity對象
            UrlEncodedFormEntity formEntity = new UrlEncodedFormEntity(
                    postParameters);

            //使用HttpPost對象來設置UrlEncodedFormEntity的Entity
            request.setEntity(formEntity);
            HttpResponse response = client.execute(request);
            in = new BufferedReader(
                    new InputStreamReader(
                            response.getEntity().getContent()));

            StringBuffer string = new StringBuffer("");
            String lineStr = "";
            while ((lineStr = in.readLine()) != null) {
                string.append(lineStr + "\n");
            }
            in.close();

            String resultStr = string.toString();
            System.out.println(resultStr);
        } catch(Exception e) {
            // Do something about exceptions
        } finally {
            if (in != null) {
                try {
                    in.close();
                } catch (IOException e) {
                    e.printStackTrace();
                }
            }
        }
3、AsyncHttpClient
1. 創建一個AsyncHttpClient;
2. (可選的)通過RequestParams對象設置請求參數; 3. 調用AsyncHttpClient的某個get方法,傳遞你需要的(成功和失敗時)callback接口實現,一般都是匿名內部類 代碼實例:GET:
	// 初始化網絡請求
        AsyncHttpClient client = new AsyncHttpClient();
	RequestParams params = new RequestParams();
	params.put("key", "value");
	params.put("more", "data");
	client.get("http://www.google.com", params, new
    	AsyncHttpResponseHandler() {
       	 @Override
       	 public void onSuccess(int statusCode, Header[] headers, byte[] response) {
           	 System.out.println(response);
      	  }

       	 @Override
       	 public void onFailure(int statusCode, Header[] headers, byte[] responseBody, Throwable error) {
         	   Log.d("ERROR", error);
       	 }
   	 }
	);
POST:
調用post方法即可,其他部分不變
4、HttpUrlConnection
HttpURLConnection繼承自URLConnection類,用它可以發送和接收任何類型和長度的數據,
且預先不用知道數據流的長度,可以設置請求方式get或post、超時時間。
代碼實例:
 /**
     * 獲取指定URL的響應字符串
     * @param urlString
     * @return
     */
    private String getURLResponse(String urlString){
        HttpURLConnection conn = null; //連接對象
        InputStream is = null;
        String resultData = "";
        try {
            URL url = new URL(urlString); //URL對象
            conn = (HttpURLConnection)url.openConnection(); //使用URL打開一個鏈接
            conn.setDoInput(true); //允許輸入流,即允許下載
            conn.setDoOutput(true); //允許輸出流,即允許上傳
            conn.setUseCaches(false); //不使用緩沖
            conn.setRequestMethod("GET"); //使用get請求
            is = conn.getInputStream();   //獲取輸入流,此時才真正建立鏈接
            InputStreamReader isr = new InputStreamReader(is);
            BufferedReader bufferReader = new BufferedReader(isr);
            String inputLine  = "";
            while((inputLine = bufferReader.readLine()) != null){
                resultData += inputLine + "\n";
            }

        } catch (MalformedURLException e) {
            // TODO Auto-generated catch block
            e.printStackTrace();
        }catch (IOException e) {
            // TODO Auto-generated catch block
            e.printStackTrace();
        }finally{
            if(is != null){
                try {
                    is.close();
                } catch (IOException e) {
                    // TODO Auto-generated catch block
                    e.printStackTrace();
                }
            }
            if(conn != null){
                conn.disconnect();
            }
        }

        return resultData;
    }
5,okHttp,okHttpUtils,Retrofit
Square 公司開源的 OkHttp 是一個專注於連接效率的 HTTP 客戶端。OkHttp 提供了對 HTTP/2 和 SPDY 的支持,並提供了連接池,GZIP 壓縮和 HTTP 響應緩存功能。
優點
這三個放在一起說是因為他們三個都是基於okhttp實現的,okHttpUtils是鴻洋大神對okhttp的封裝,網上查了很多資料,okHttp本身功能是很強大,也是現在很流行的網絡請求框架,但是需要對其有一定的了解,並進行良好的封裝以後才能方便的使用,鴻洋大神在gitHub上就有封裝以後的開源庫okHttpUtils,
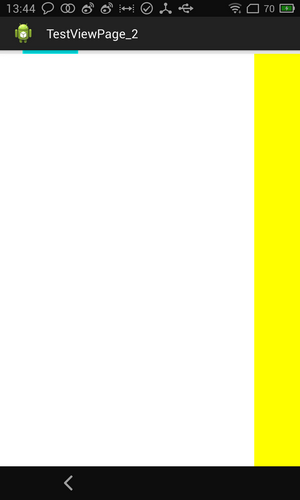 Android中ViewPager實現滑動條及與Fragment結合的實例教程
自主實現滑動指示條先上一個基本效果圖:1.XML布局布局代碼如下:<LinearLayout xmlns:android=http://schemas.androi
 Android中的普通對話框、單選對話框、多選對話框、帶Icon的對話框、以及自定義Adapter和自定義View對話框詳解
對話框就是一個AlertDialog,但是一個簡單的AlertDialog,我們卻可以將它玩出許多花樣來,下面我們就來一起總結一下AlertDialog的用法。看看各位童
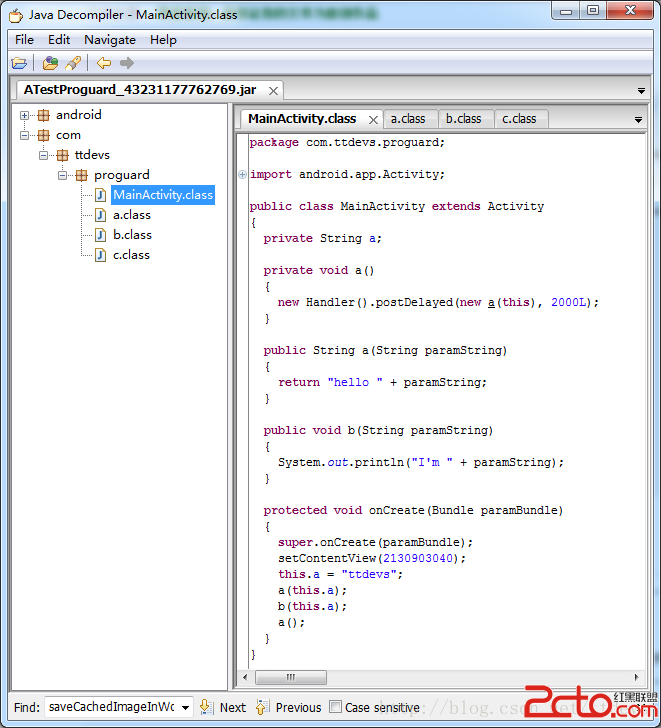 android app進行代碼混淆實例詳解
接到一個新的任務,對現有項目進行代碼混淆。之前對混淆有過一些了解,但是不夠詳細和完整,知道有些東西混淆起來還是比較棘手的。不過幸好目前的項目不是太復雜(針對混淆這塊來說)
 管理Android通信錄
Android提供了Contacts應用程序來管理聯系人,而且Android系統還為聯系人管理提供了ContentProvider,這就允許其它應用