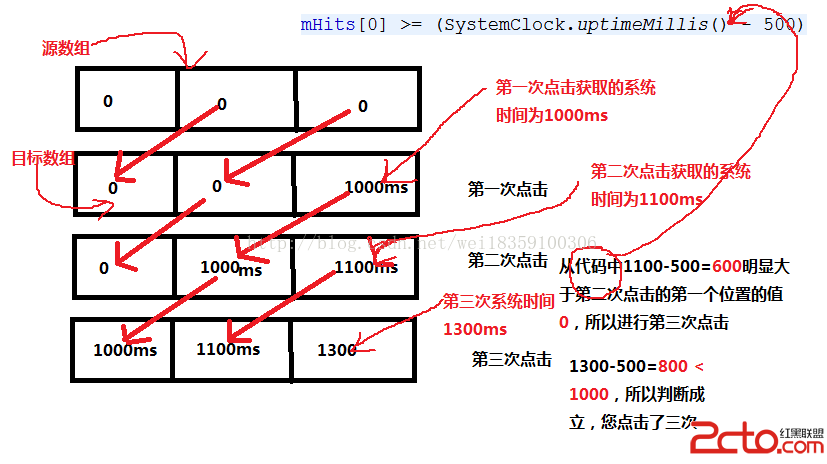
編輯:關於Android編程
今天和大家分享下組合控件的使用。很多時候android自定義控件並不能滿足需求,如何做呢?很多方法,可以自己繪制一個,可以通過繼承基礎控件來重寫某些環節,當然也可以將控件組合成一個新控件,這也是最方便的一個方法。今天就來介紹下如何使用組合控件,將通過兩個實例來介紹。
第一個實現一個帶圖片和文字的按鈕,如圖所示:

<?xml version="1.0" encoding="utf-8"?>
<LinearLayout xmlns:android=http://schemas.android.com/apk/res/android"
    android:orientation="horizontal"
    android:layout_width="fill_parent"
    android:layout_height="fill_parent"
    >
 <ImageView
  android:id="@+id/iv"
     android:layout_width="wrap_content"
     android:layout_height="wrap_content"
     android:layout_gravity="center_vertical"
     android:paddingLeft="10.0dip"
     android:paddingTop="10.0dip"
     android:paddingBottom="10.0dip"
     />
 <TextView
  android:id="@+id/tv"
     android:layout_width="wrap_content"
     android:layout_height="wrap_content"
     android:textColor="#ffffff"
     android:layout_marginLeft="8dip"
     android:layout_gravity="center_vertical"
     android:paddingLeft="5.0dip"
     android:paddingTop="10.0dip"
     android:paddingBottom="10.0dip"
     android:paddingRight="10.0dip"
     android:textSize="18.0sp"
     />
</LinearLayout>
這個xml實現一個左圖右字的布局,接下來寫一個類繼承LinearLayout,導入剛剛的布局,並且設置需要的方法,從而使的能在代碼中控制這個自定義控件內容的顯示。代碼如下:
CustomButton.java
package com.szy.customview;

import android.content.Context;
import android.util.AttributeSet;
import android.view.LayoutInflater;
import android.widget.ImageView;
import android.widget.LinearLayout;
import android.widget.TextView;

/**
 *@author coolszy
 *@date 2011-12-20
 *@blog http://blog.92coding.com/
 */
public class CustomButton extends LinearLayout
{

 private ImageView iv;
 private TextView tv;

 public CustomButton(Context context)
 {
  this(context, null);
 }

 public CustomButton(Context context, AttributeSet attrs)
 {
  super(context, attrs);
  // 導入布局
  LayoutInflater.from(context).inflate(R.layout.custom_button, this, true);
  iv = (ImageView) findViewById(R.id.iv);
  tv = (TextView) findViewById(R.id.tv);
 }

 /**
  * 設置圖片資源
  */
 public void setImageResource(int resId)
 {
  iv.setImageResource(resId);
 }

 /**
  * 設置顯示的文字
  */
 public void setTextViewText(String text)
 {
  tv.setText(text);
 }
}
第三步,在需要使用這個自定義控件的layout中加入這控件,只需要在xml中加入即可。方法如下:
main.xml
<LinearLayout xmlns:android="http://schemas.android.com/apk/res/android"
 android:layout_width="fill_parent"
 android:layout_height="fill_parent"
 android:orientation="vertical"
 >
 <com.szy.customview.CustomButton
     android:id="@+id/bt_confirm"
     android:layout_width="wrap_content"
     android:layout_height="wrap_content"
     android:background="@drawable/button_bg"
     />
 <com.szy.customview.CustomButton
     android:id="@+id/bt_cancel"
     android:layout_width="wrap_content"
     android:layout_height="wrap_content"
     android:background="@drawable/button_bg"
    />
</LinearLayout>
注意的是,控件標簽使用完整的類名即可。為了給按鈕一個點擊效果,你需要給他一個selector背景,這裡就不說了。
最後一步,即在activity中設置該控件的內容。當然,在xml中也可以設置,但是只能設置一個,當我們需要兩次使用這樣的控件,並且顯示內容不同時就不行了。在activity中設置也非常簡單,我們在CustomButton這個類中已經寫好了相應的方法,簡單調用即可。代碼如下:
package com.szy.customview;

import android.app.Activity;
import android.os.Bundle;
import android.view.View;
import android.view.View.OnClickListener;

public class MainActivity extends Activity
{
 private CustomButton btnConfirm;
 private CustomButton btnCancel;

 @Override
 public void onCreate(Bundle savedInstanceState)
 {
  super.onCreate(savedInstanceState);
  setContentView(R.layout.main);
  btnConfirm = (CustomButton) findViewById(R.id.bt_confirm);
  btnCancel = (CustomButton) findViewById(R.id.bt_cancel);

  btnConfirm.setTextViewText("確定");
  btnConfirm.setImageResource(R.drawable.confirm);
  btnCancel.setTextViewText("取消");
  btnCancel.setImageResource(R.drawable.cancel);

  btnConfirm.setOnClickListener(new OnClickListener()
  {
   @Override
   public void onClick(View v)
   {
    // 在這裡可以實現點擊事件
   }
  });
 }
}
 Android 快速開發系列 打造萬能的ListView GridView 適配器
1、概述 相信做Android開發的寫得最多的就是ListView,GridView的適配器吧,記得以前開發一同事開發項目,一個項目下來基本就一直在寫Lis
 Android Data Binding數據綁定詳解
去年谷歌 I/O大會上介紹了一個非常厲害的新框架DataBinding, 數據綁定框架給我們帶來了很大的方便,以前我們可能需要在每個Activity裡寫很多的findVi
 Android開發之使用sqlite3工具操作數據庫的兩種方式
使用 sqlite3 工具操作數據庫的兩種方式 請尊重他人的勞動成果,轉載請注明出處:Android開發之使用sqlite3工具操作數據庫的兩種方式 http://bl
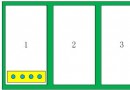 Android組件banner實現左右滑屏效果
什麼是banner組件?在許多Android應用上,比如愛奇藝客戶端、百度美拍、應用寶等上面,都有一個可以手動滑動的小廣告條,這就是banner,實際應用中的banner