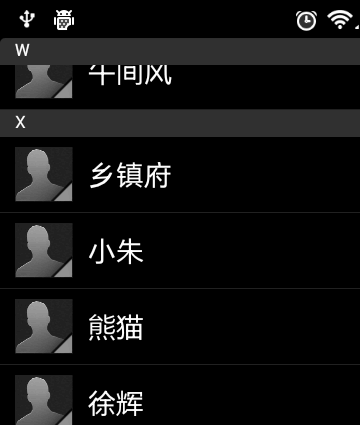
記得在我剛接觸Android的時候對系統聯系人中的特效很感興趣,它會根據手機中聯系人姓氏的首字母進行分組,並在界面的最頂端始終顯示一個當前的分組。如下圖所示:
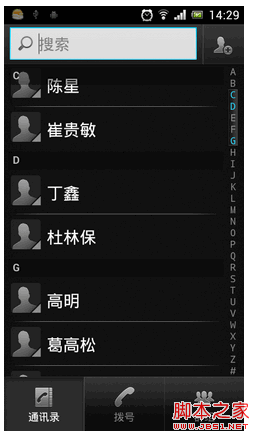
最讓我感興趣的是,當後一個分組和前一個分組相碰時,會產生一個上頂的擠壓動畫。那個時候我思考了各種方法想去實現這種特效,可是限於功夫不到家,都未能成功。如今兩年多過去了,自己也成長了很多,再回頭去想想這個功能,突然發現已經有了思路,於是立刻記錄下來與大家分享。
首先講一下需要提前了解的知識點,這裡我們最需要用到的就是SectionIndexer,它能夠有效地幫助我們對分組進行控制。由於SectionIndexer是一個接口,你可以自定義一個子類來實現SectionIndexer,不過自己再寫一個SectionIndexer的實現太麻煩了,這裡我們直接使用Android提供好的實現AlphabetIndexer,用它來實現聯系人分組功能已經足夠了。
AlphabetIndexer的構造函數需要傳入三個參數,第一個參數是cursor,第二個參數是sortedColumnIndex整型,第三個參數是alphabet字符串。其中cursor就是把我們從數據庫中查出的游標傳進去,sortedColumnIndex就是指明我們是使用哪一列進行排序的,而alphabet則是指定字母表排序規則,比如:"ABCDEFGHIJKLMNOPQRSTUVWXYZ"。有了AlphabetIndexer,我們就可以通過它的getPositionForSection和getSectionForPosition方法,找出當前位置所在的分組,和當前分組所在的位置,從而實現類似於系統聯系人的分組導航和擠壓動畫效果,關於AlphabetIndexer更詳細的詳解,請參考官方文檔。
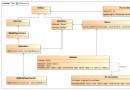
那麼我們應該怎樣對聯系人進行排序呢?前面也提到過,有一個sortedColumnIndex參數,這個sortedColumn到底在哪裡呢?我們來看一下系統聯系人的raw_contacts這張表(/data/data/com.android.providers.contacts/databases/contacts2.db),這個表結構比較復雜,裡面有二十多個列,其中有一列名叫sort_key,這就是我們要找的了!如下圖所示:
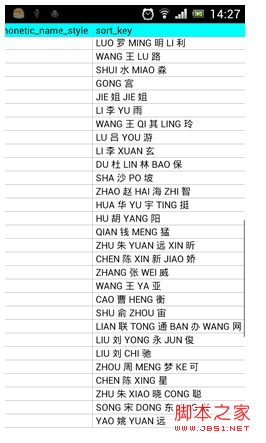
可以看到,這一列非常人性化地幫我們記錄了漢字所對應的拼音,這樣我們就可以通過這一列的值輕松為聯系人進行排序了。
下面我們就來開始實現,新建一個Android項目,命名為ContactsDemo。首先我們還是先來完成布局文件,打開或新建activity_main.xml作為程序的主布局文件,在裡面加入如下代碼:
復制代碼 代碼如下:
<RelativeLayout xmlns:android="http://schemas.android.com/apk/res/android"
xmlns:tools="http://schemas.android.com/tools"
android:layout_width="match_parent"
android:layout_height="match_parent"
android:orientation="vertical" >
<ListView
android:id="@+id/contacts_list_view"
android:layout_width="fill_parent"
android:layout_height="wrap_content"
android:layout_alignParentTop="true"
android:fadingEdge="none" >
</ListView>
<LinearLayout
android:id="@+id/title_layout"
android:layout_width="fill_parent"
android:layout_height="18dip"
android:layout_alignParentTop="true"
android:background="#303030" >
<TextView
android:id="@+id/title"
android:layout_width="wrap_content"
android:layout_height="wrap_content"
android:layout_gravity="center_horizontal"
android:layout_marginLeft="10dip"
android:textColor="#ffffff"
android:textSize="13sp" />
</LinearLayout>
</RelativeLayout>
布局文件很簡單,裡面放入了一個ListView,用於展示聯系人信息。另外還在頭部放了一個LinearLayout,裡面包含了一個TextView,它的作用是在界面頭部始終顯示一個當前分組。
然後新建一個contact_item.xml的布局,這個布局用於在ListView中的每一行進行填充,代碼如下:
復制代碼 代碼如下:
<LinearLayout xmlns:android="http://schemas.android.com/apk/res/android"
android:layout_width="match_parent"
android:layout_height="match_parent"
android:orientation="vertical" >
<LinearLayout
android:id="@+id/sort_key_layout"
android:layout_width="fill_parent"
android:layout_height="18dip"
android:background="#303030" >
<TextView
android:id="@+id/sort_key"
android:layout_width="wrap_content"
android:layout_height="wrap_content"
android:layout_gravity="center_horizontal"
android:layout_marginLeft="10dip"
android:textColor="#ffffff"
android:textSize="13sp" />
</LinearLayout>
<LinearLayout
android:id="@+id/name_layout"
android:layout_width="fill_parent"
android:layout_height="50dip" >
<ImageView
android:layout_width="wrap_content"
android:layout_height="wrap_content"
android:layout_gravity="center_vertical"
android:layout_marginLeft="10dip"
android:layout_marginRight="10dip"
android:src="@drawable/icon" />
<TextView
android:id="@+id/name"
android:layout_width="wrap_content"
android:layout_height="wrap_content"
android:layout_gravity="center_vertical"
android:textColor="#ffffff"
android:textSize="22sp" />
</LinearLayout>
</LinearLayout>
在這個布局文件中,首先是放入了一個和前面完成一樣的分組布局,因為不僅界面頭部需要展示分組,在每個分組內的第一個無素之前都需要展示分組布局。然後是加入一個簡單的LinearLayout,裡面包含了一個ImageView用於顯示聯系人頭像,還包含一個TextView用於顯示聯系人姓名。
這樣我們的布局文件就全部寫完了,下面開始來真正地實現功能。
先從簡單的開始,新建一個Contact實體類:
復制代碼 代碼如下:
public class Contact {
/**
* 聯系人姓名
*/
private String name;
/**
* 排序字母
*/
private String sortKey;
public String getName() {
return name;
}
public void setName(String name) {
this.name = name;
}
public String getSortKey() {
return sortKey;
}
public void setSortKey(String sortKey) {
this.sortKey = sortKey;
}
}
這個實體類很簡單,只包含了聯系人姓名和排序鍵。
接下來完成聯系人列表適配器的編寫,新建一個ContactAdapter類繼承自ArrayAdapter,加入如下代碼:
復制代碼 代碼如下:
public class ContactAdapter extends ArrayAdapter<Contact> {
/**
* 需要渲染的item布局文件
*/
private int resource;
/**
* 字母表分組工具
*/
private SectionIndexer mIndexer;
public ContactAdapter(Context context, int textViewResourceId, List<Contact> objects) {
super(context, textViewResourceId, objects);
resource = textViewResourceId;
}
@Override
public View getView(int position, View convertView, ViewGroup parent) {
Contact contact = getItem(position);
LinearLayout layout = null;
if (convertView == null) {
layout = (LinearLayout) LayoutInflater.from(getContext()).inflate(resource, null);
} else {
layout = (LinearLayout) convertView;
}
TextView name = (TextView) layout.findViewById(R.id.name);
LinearLayout sortKeyLayout = (LinearLayout) layout.findViewById(R.id.sort_key_layout);
TextView sortKey = (TextView) layout.findViewById(R.id.sort_key);
name.setText(contact.getName());
int section = mIndexer.getSectionForPosition(position);
if (position == mIndexer.getPositionForSection(section)) {
sortKey.setText(contact.getSortKey());
sortKeyLayout.setVisibility(View.VISIBLE);
} else {
sortKeyLayout.setVisibility(View.GONE);
}
return layout;
}
/**
* 給當前適配器傳入一個分組工具。
*
* @param indexer
*/
public void setIndexer(SectionIndexer indexer) {
mIndexer = indexer;
}
}
上面的代碼中,最重要的就是getView方法,在這個方法中,我們使用SectionIndexer的getSectionForPosition方法,通過當前的position值拿到了對應的section值,然後再反向通過剛剛拿到的section值,調用getPositionForSection方法,取回新的position值。如果當前的position值和新的position值是相等的,那麼我們就可以認為當前position的項是某個分組下的第一個元素,我們應該將分組布局顯示出來,而其它的情況就應該將分組布局隱藏。
最後我們來編寫程序的主界面,打開或新建MainActivity作為程序的主界面,代碼如下所示:
復制代碼 代碼如下:
public class MainActivity extends Activity {
/**
* 分組的布局
*/
private LinearLayout titleLayout;
/**
* 分組上顯示的字母
*/
private TextView title;
/**
* 聯系人ListView
*/
private ListView contactsListView;
/**
* 聯系人列表適配器
*/
private ContactAdapter adapter;
/**
* 用於進行字母表分組
*/
private AlphabetIndexer indexer;
/**
* 存儲所有手機中的聯系人
*/
private List<Contact> contacts = new ArrayList<Contact>();
/**
* 定義字母表的排序規則
*/
private String alphabet = "#ABCDEFGHIJKLMNOPQRSTUVWXYZ";
/**
* 上次第一個可見元素,用於滾動時記錄標識。
*/
private int lastFirstVisibleItem = -1;
@Override
protected void onCreate(Bundle savedInstanceState) {
super.onCreate(savedInstanceState);
setContentView(R.layout.activity_main);
adapter = new ContactAdapter(this, R.layout.contact_item, contacts);
titleLayout = (LinearLayout) findViewById(R.id.title_layout);
title = (TextView) findViewById(R.id.title);
contactsListView = (ListView) findViewById(R.id.contacts_list_view);
Uri uri = ContactsContract.CommonDataKinds.Phone.CONTENT_URI;
Cursor cursor = getContentResolver().query(uri,
new String[] { "display_name", "sort_key" }, null, null, "sort_key");
if (cursor.moveToFirst()) {
do {
String name = cursor.getString(0);
String sortKey = getSortKey(cursor.getString(1));
Contact contact = new Contact();
contact.setName(name);
contact.setSortKey(sortKey);
contacts.add(contact);
} while (cursor.moveToNext());
}
startManagingCursor(cursor);
indexer = new AlphabetIndexer(cursor, 1, alphabet);
adapter.setIndexer(indexer);
if (contacts.size() > 0) {
setupContactsListView();
}
}
/**
* 為聯系人ListView設置監聽事件,根據當前的滑動狀態來改變分組的顯示位置,從而實現擠壓動畫的效果。
*/
private void setupContactsListView() {
contactsListView.setAdapter(adapter);
contactsListView.setOnScrollListener(new OnScrollListener() {
@Override
public void onScrollStateChanged(AbsListView view, int scrollState) {
}
@Override
public void onScroll(AbsListView view, int firstVisibleItem, int visibleItemCount,
int totalItemCount) {
int section = indexer.getSectionForPosition(firstVisibleItem);
int nextSecPosition = indexer.getPositionForSection(section + 1);
if (firstVisibleItem != lastFirstVisibleItem) {
MarginLayoutParams params = (MarginLayoutParams) titleLayout.getLayoutParams();
params.topMargin = 0;
titleLayout.setLayoutParams(params);
title.setText(String.valueOf(alphabet.charAt(section)));
}
if (nextSecPosition == firstVisibleItem + 1) {
View childView = view.getChildAt(0);
if (childView != null) {
int titleHeight = titleLayout.getHeight();
int bottom = childView.getBottom();
MarginLayoutParams params = (MarginLayoutParams) titleLayout
.getLayoutParams();
if (bottom < titleHeight) {
float pushedDistance = bottom - titleHeight;
params.topMargin = (int) pushedDistance;
titleLayout.setLayoutParams(params);
} else {
if (params.topMargin != 0) {
params.topMargin = 0;
titleLayout.setLayoutParams(params);
}
}
}
}
lastFirstVisibleItem = firstVisibleItem;
}
});
}
/**
* 獲取sort key的首個字符,如果是英文字母就直接返回,否則返回#。
*
* @param sortKeyString
* 數據庫中讀取出的sort key
* @return 英文字母或者#
*/
private String getSortKey(String sortKeyString) {
String key = sortKeyString.substring(0, 1).toUpperCase();
if (key.matches("[A-Z]")) {
return key;
}
return "#";
}
}
可以看到,在onCreate方法中,我們從系統聯系人數據庫中去查詢聯系人的姓名和排序鍵,之後將查詢返回的cursor直接傳入AlphabetIndexer作為第一個參數。由於我們一共就查了兩列,排序鍵在第二列,所以我們第二個sortedColumnIndex參數傳入1。第三個alphabet參數這裡傳入了"#ABCDEFGHIJKLMNOPQRSTUVWXYZ"字符串,因為可能有些聯系人的姓名不在字母表范圍內,我們統一用#來表示這部分聯系人。
然後我們在setupContactsListView方法中監聽了ListView的滾動,在onScroll方法中通過getSectionForPosition方法獲取第一個可見元素的分組值,然後給該分組值加1,再通過getPositionForSection方法或者到下一個分組中的第一個元素,如果下個分組的第一個元素值等於第一個可見元素的值加1,那就說明下個分組的布局要和界面頂部分組布局相碰了。之後再通過ListView的getChildAt(0)方法,獲取到界面上顯示的第一個子View,再用view.getBottom獲取底部距離父窗口的位置,對比分組布局的高度來對頂部分組布局進行縱向偏移,就可以實現擠壓動畫的效果了。
最後給出AndroidManifest.xml的代碼,由於要讀取手機聯系人,因此需要加上android.permission.READ_CONTACTS的聲明:
復制代碼 代碼如下:
<manifest xmlns:android="http://schemas.android.com/apk/res/android"
package="com.example.contactsdemo"
android:versionCode="1"
android:versionName="1.0" >
<uses-sdk
android:minSdkVersion="8"
android:targetSdkVersion="8" />
<uses-permission android:name="android.permission.READ_CONTACTS"></uses-permission>
<application
android:allowBackup="true"
android:icon="@drawable/ic_launcher"
android:label="@string/app_name"
android:theme="@android:style/Theme.NoTitleBar"
>
<activity
android:name="com.example.contactsdemo.MainActivity"
android:label="@string/app_name" >
<intent-filter>
<action android:name="android.intent.action.MAIN" />
<category android:name="android.intent.category.LAUNCHER" />
</intent-filter>
</activity>
</application>
</manifest>
現在我們來運行一下程序,效果如下圖所示:
目前的話,分組導航和擠壓動畫效果都已經完成了,看起來感覺還是挺不錯的,下一篇文章我會帶領大家繼續完善這個程序,加入字母表快速滾動功能。
好了,今天的講解到此結束,有疑問的朋友請在下面留言。
源碼下載,請點擊這裡
 Android系統進程間通信(IPC)機制Binder中的Client獲得Server遠程接口過程源代碼分析
 Android ViewDragHelper解析
 Android Touch事件分發過程
 Android DrawerLayout帶有側滑功能的布局類(2)